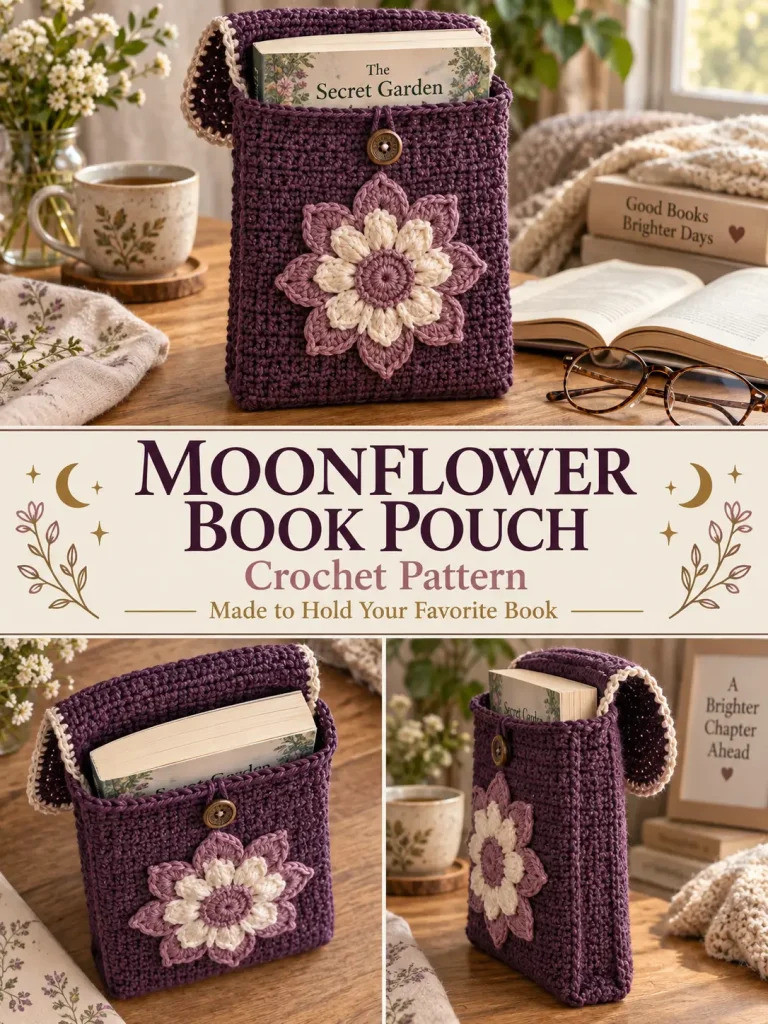
This crochet book pouch is designed to give us the same “I need to make that” visual appeal of an ornate book cover, but with a completely original and much easier construction.
The pouch is built from:
- one long textured body panel
- two narrow side gussets
- one large layered moonflower motif
- a built-in closing flap
- one button
There is no complicated chart, no dozens of specialty stitches, and no need to crochet the decorative design directly into every round.
The finished pouch fits most trade paperbacks, journals, planners, and smaller hardcover books.
The Evenfall Pouch that inspired the broad idea is a newly released paid pattern by Julia Hart. It is a challenging size-10-thread design measuring 9 × 6 × 1.5 inches, and the designer explicitly prohibits reproduction and derivative charts/instructions. (Ravelry)
So the pattern below uses our own dimensions, yarn weight, construction, texture, gussets, layered flower, flap, and closure system.
Pattern at a Glance
Skill level: Confident beginner / intermediate
Terminology: US crochet terms
Construction: One long main panel + 2 side gussets
Finished size: Approximately 9¼ × 6½ × 1¼ inches
Suggested yarn: Sport / Category 2 cotton
Hook: 3.25 mm
Main panel width: 32 stitches
Front height: 50 rows
Back height: 50 rows
Bottom depth: 7 rows
Flap: 20 rows
Decorative motif: 8-petal layered moonflower
Closure: Button + crocheted loop
Color Palette
For this version use:
Color A — Midnight Plum
Main pouch, gussets, and flap.
Color B — Dusty Mauve
Inner flower.
Color C — Warm Cream
Outer flower layer and optional edging details.
Button
One ¾–1 inch wooden, coconut, or antiqued-brass button.
This darker color palette gives the pouch an elegant bookish look while keeping the decorative motif highly visible.
Materials
You will need:
- approximately 450–550 yards sport-weight cotton in midnight plum
- approximately 30 yards dusty mauve
- approximately 40 yards warm cream
- 3.25 mm crochet hook
- one ¾–1 inch button
- yarn needle
- scissors
- locking stitch markers
- measuring tape
- blocking mats, optional
Cotton is recommended because it produces a stable pouch that will not stretch excessively around a heavy book.
Gauge
In the main texture:
20 stitches = approximately 4 inches
22 rows = approximately 4 inches
Take time to check your gauge if you want the pouch to fit a particular book.
Abbreviations
- ch = chain
- sc = single crochet
- dc = double crochet
- hdc = half double crochet
- tr = treble crochet
- sl st = slip stitch
- st = stitch
- sts = stitches
- sp = space
- rep = repeat
Main Texture
The body uses a simple alternating texture.
Texture Repeat
Sc in next st, dc in next st
Repeat across.
Because the panel contains 32 stitches, every row can begin with sc and finish with dc.
This creates a firm textured fabric without making the pouch excessively thick.
Important Turning Rule
At the end of every body row:
Ch 1 and turn.
The turning chain does not count as a stitch.
Work directly into the first actual stitch.
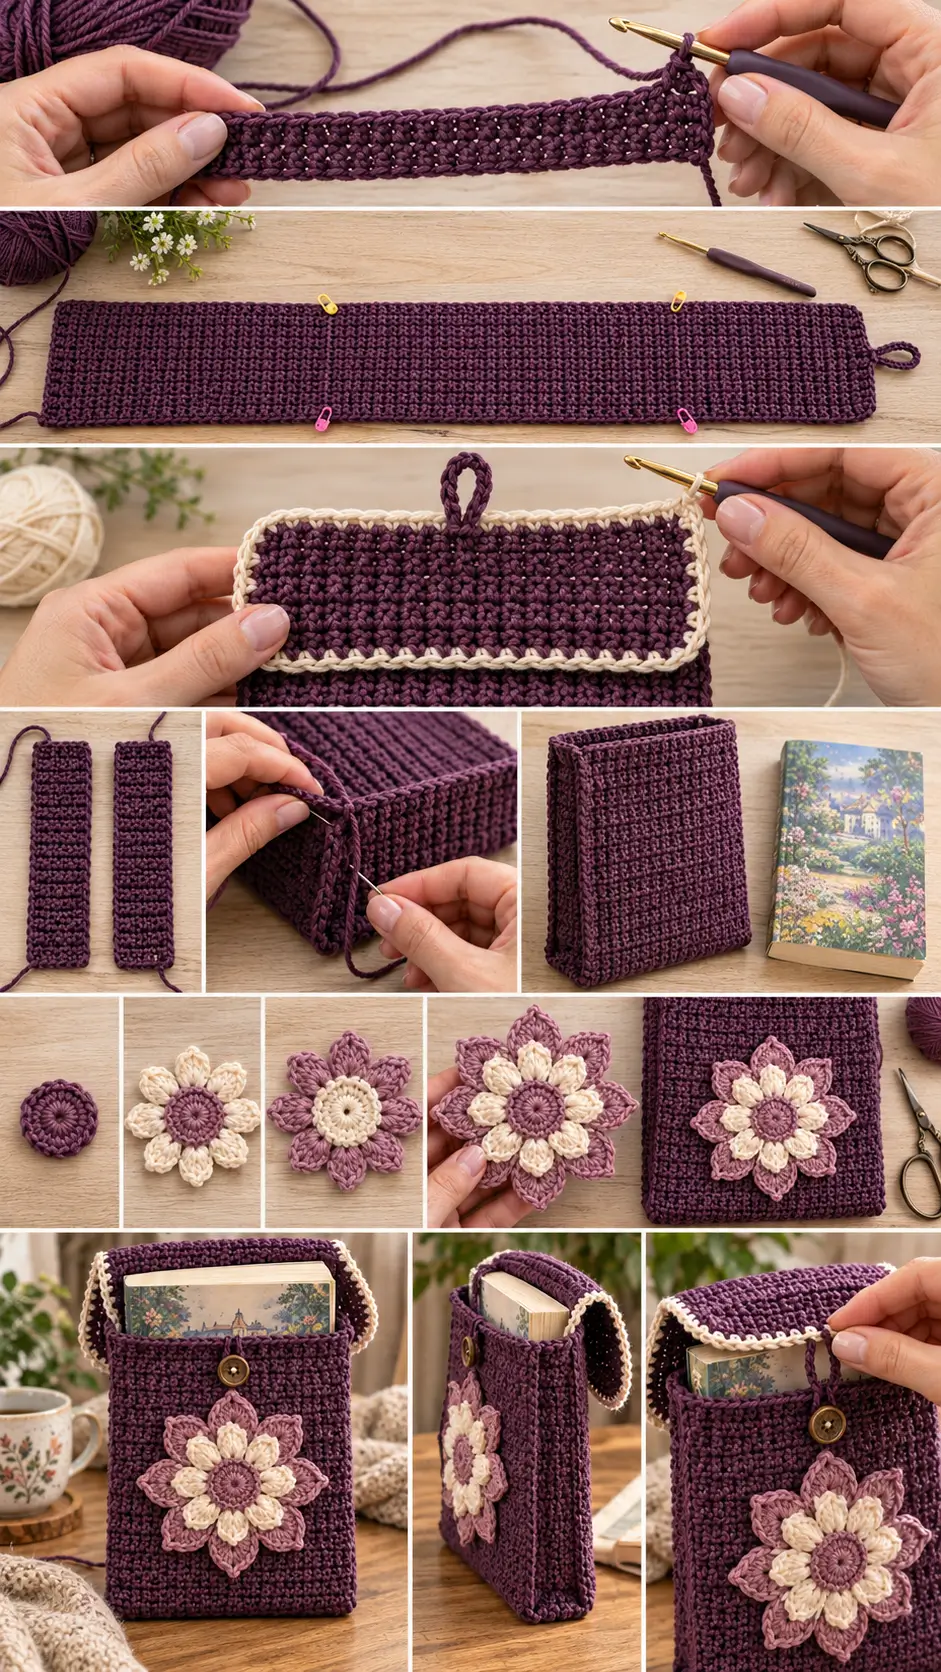
PART 1 — MAIN BODY PANEL
Using midnight plum:
Ch 33.
Row 1
Starting in the second chain from the hook:
Sc in first chain.
Dc in next chain.
Repeat:
sc, dc
across.
You should have:
32 sts
Ch 1.
Turn.
Row 2
Sc in first stitch.
Dc in next.
Repeat:
sc, dc
across.
32 sts
Ch 1.
Turn.
Rows 3–50 — Front Panel
Repeat Row 2.
Keep:
32 stitches
throughout.
At the end of Row 50, the front should measure approximately:
9–9¼ inches long
and approximately:
6¼–6½ inches wide
depending on gauge.
Do not fasten off.
PART 2 — BOTTOM SECTION
Continue with the same stitch repeat.
Rows 51–57
Repeat:
sc, dc
across.
Ch 1 and turn after each row.
These:
7 rows
form the bottom depth of the pouch.
At gauge, the bottom measures approximately:
1¼ inches
front to back.
PART 3 — BACK PANEL
Rows 58–107
Continue the same:
sc, dc
texture.
Keep:
32 sts
The back contains:
50 rows
matching the front.
Check the Main Shape
Lay the strip flat.
You should now have:
50 front rows
7 bottom rows
50 back rows
The piece will eventually fold into a U shape.
The remaining rows create the flap.
PART 4 — CLOSING FLAP
Continue without fastening off.
Rows 108–126
Repeat:
sc, dc
across.
These are:
19 full-width flap rows
Row 127 — Button Loop
Sc in first stitch.
Dc in next.
Continue the texture pattern across the first:
14 sts
Now:
Ch 8
Skip:
4 sts
Continue the established sc/dc pattern across the final:
14 sts
You have created one centered button loop.
Fasten off.
Check the Button Loop
Do not sew the button yet.
The exact button position is easier to determine after the pouch has been assembled.
If using a very large button, you may need:
ch 9 or ch 10
instead.
If using a smaller button:
ch 6 or ch 7
may be enough.
Test before final assembly if possible.
PART 5 — SIDE GUSSETS
Make:
2 identical gussets
Using midnight plum:
Ch 7.
Gusset Row 1
Starting in the second chain:
Sc across.
6 sc
Ch 1.
Turn.
Rows 2–50
Sc in every stitch across.
6 sts
Ch 1.
Turn.
After Row 50, fasten off leaving a long sewing tail.
The strip should measure approximately:
1¼ inches wide × 9 inches long
Why the Gussets Are Plain SC
The body already has plenty of texture.
Dense single crochet gives the sides:
- structure
- strength
- cleaner seams
- less stretching around the book
PART 6 — BLOCK BEFORE ASSEMBLY
Lightly block:
- main panel
- both gussets
Do not stretch them larger.
Your goal is simply to straighten the edges.
PART 7 — MARK THE FOLDS
On the main panel, place stitch markers between:
Front and Bottom
Rows:
50 and 51
Bottom and Back
Rows:
57 and 58
Fold along these lines.
You now have:
- front
- bottom
- back
- flap extending from the back
PART 8 — ATTACH THE FIRST GUSSET
Place the pouch with the wrong side facing outward.
Position one gusset along one side.
The gusset has:
- one 50-row long edge
- another 50-row long edge
- two short 6-stitch ends
Attach to the Front
Align one long gusset edge with:
Rows 1–50 of the front
Using mattress stitch or whip stitch, sew the two edges together.
Work approximately one joining stitch through each corresponding row end.
Do not pull too tightly.
Attach the Bottom
At the bottom, align the gusset’s short 6-stitch edge with the side of the:
7-row bottom section
Distribute the sewing stitches evenly.
One extra row end can be eased into the seam without creating a visible problem.
Attach to the Back
Continue sewing the opposite long edge of the gusset to:
Rows 58–107
of the back panel.
Fasten securely.
PART 9 — SECOND GUSSET
Repeat exactly on the opposite side.
The pouch should now have:
- flat front
- flat back
- approximately 1¼-inch depth
- enclosed bottom
- open top
- long flap extending from the back
Turn right side out.
Check the Fit
Insert the book or journal you plan to use.
The pouch should fit snugly but not distort.
There should be enough room for the book to slide in and out comfortably.
PART 10 — FRONT TOP EDGE
Join midnight-plum yarn at one top front corner.
Work:
1 sc evenly across the entire top front edge
Aim for approximately:
32 sc
Fasten off.
This strengthens the opening.
PART 11 — FLAP EDGING
Join warm cream at the base of one flap side.
Sc evenly up the first side of the flap.
Across the final flap edge, work sc in every stitch.
When you reach the ch-8 button loop:
Work approximately:
10 sc around the entire chain loop
rather than working into individual chains.
Continue across.
Sc evenly down the opposite flap side.
Fasten off.
This gives the flap a thin contrasting frame.
PART 12 — CROCHET THE MOONFLOWER
The decorative flower is made separately and sewn to the front.
It is intentionally different from the lacework on the linked paid design.
Use dusty mauve.
Moonflower Round 1
Make a magic ring.
Ch 1.
Work:
8 sc into the ring
Join with sl st.
8 sts
Round 2
Ch 3.
Work another dc into the same stitch.
Ch 1.
In each remaining stitch work:
2 dc, ch 1
Join.
You should have:
- 8 groups of 2 dc
- 8 ch-1 spaces
Fasten off dusty mauve.
Round 3 — Inner Petals
Join warm cream in any ch-1 space.
In the same space work:
sc, hdc, 3 dc, hdc, sc
One petal complete.
Repeat the same sequence in every ch-1 space.
You should have:
8 rounded petals
Join.
Fasten off.
PART 13 — OUTER MOONFLOWER HALO
Join dusty mauve into the center dc of any petal.
Ch:
5
Sc into the center dc of the next petal.
Repeat:
ch 5, sc in center of next petal
around.
You should have:
8 ch-5 loops
Join.
Outer Petal Round
In each ch-5 loop work:
sc, hdc, dc, 3 tr, dc, hdc, sc
Repeat around.
You should now have:
8 large outer petals
surrounding the smaller cream flower.
Fasten off.
Finished Moonflower
The motif should have:
- small open center
- dusty-mauve center ring
- 8 cream inner petals
- 8 larger dusty-mauve outer petals
- approximately 3½–4 inches diameter
Lightly block before attaching.
PART 14 — POSITION THE FLOWER
Lay the pouch front flat.
Center the moonflower:
approximately 2½–3 inches above the bottom
and horizontally centered.
Pin in position.
Insert a book temporarily to give the pouch its natural shape and make sure the flower still appears centered.
Remove the book before sewing.
PART 15 — SEW THE MOONFLOWER
Using matching yarn:
Sew around the inner portions of the outer petals.
Do not stitch every petal edge completely flat.
Leaving the tips slightly free gives the flower more dimension.
Secure all yarn ends inside the pouch.
PART 16 — ADD SIMPLE CORNER DETAILS
To make the front feel more elaborate without copying the original lace design, add four small surface-crochet corner accents.
Using warm cream:
Insert the hook approximately:
¾ inch inward from one lower corner
Pull up a loop.
Surface slip stitch diagonally for approximately:
1½ inches
toward the flower.
Fasten off.
Repeat in all four visual corners surrounding the moonflower.
This creates a simple geometric frame.
This step is optional.
PART 17 — POSITION THE BUTTON
Put a book inside.
Fold the flap over the front.
Allow the flap to sit naturally without stretching.
Pass the crochet loop over the front.
Mark the point where the center of the loop lands.
That is where the button should be placed.
This is more accurate than relying on a fixed measurement because yarn and book thickness vary.
PART 18 — SEW ON THE BUTTON
Use strong matching yarn or sewing thread.
Sew through the button holes several times.
For a shank-style button, secure firmly through the crocheted fabric.
Do not pull so tightly that the front panel puckers.
Tie securely on the inside.
Weave in or knot the tail safely.
PART 19 — OPTIONAL BUTTON BACKING
If your button is heavy, cut a tiny piece of felt or sturdy fabric approximately:
¾ inch square
Place it behind the button on the inside of the pouch.
Sew through:
button → crochet → backing
This spreads the pressure over a larger area and prevents the crochet from stretching.
Finished Size
At the written gauge, the finished pouch measures approximately:
9¼ inches tall
6½ inches wide
1¼ inches deep
The flap adds additional coverage over the opening.
What Fits Inside?
This size works well for many:
- trade paperback books
- journals
- planners
- notebooks
- smaller hardcover books
- e-readers with thin protective cases
Always compare the actual item measurements with the finished pouch.
Maximum Recommended Book Size
For a comfortable fit, aim for a book no larger than approximately:
9 × 6 × 1 inch
A slightly thicker paperback may still fit because the crochet has some stretch.
How to Make It Wider
At gauge:
5 stitches ≈ 1 inch
To add approximately 1 inch of width:
Add:
4 stitches
so the stitch count stays even.
Examples:
Standard
32 sts
Slightly wider
36 sts
Larger
40 sts
Because the texture repeat requires an even number, always keep the total stitch count even.
How to Make It Taller
Simply add rows equally to:
- front
- back
For example, adding:
5 rows to the front
means also adding:
5 rows to the back
The gussets must also receive:
5 additional rows
How to Increase the Depth
The standard bottom contains:
7 rows
and each gusset is:
6 stitches wide
For a deeper pouch:
Increase both dimensions proportionally.
For example:
Approximately 1¾-inch depth
Make the bottom about:
9–10 rows
and the gussets about:
8–9 stitches wide
Check against your gauge.
E-Reader Version
For a smaller e-reader pouch:
Measure the device.
Create a main panel approximately:
½ inch wider than the device
and:
½ inch taller
before the flap.
A lightly snug fit provides better protection.
Journal Version
For a thick journal, increase the gusset depth rather than making the entire pouch excessively wide.
That creates a cleaner fit.
Can I Skip the Flower?
Yes.
The base pouch works perfectly without decoration.
You can replace the moonflower with:
- embroidery
- surface crochet
- a granny motif
- initials
- a simple contrasting stripe
Can I Make the Entire Pouch One Color?
Absolutely.
A monochrome version in:
- midnight navy
- charcoal
- burgundy
- forest green
- oatmeal
would emphasize the crochet texture instead of the color contrast.
Alternative Color Palette — Dark Academia
Body
Deep espresso
Flower
Camel + antique gold
Edging
Warm cream
Button
Dark wood
Alternative Palette — Woodland
Body
Deep moss
Inner Flower
Dusty rust
Outer Flower
Oatmeal
Button
Natural wood
Alternative Palette — Soft Romantic
Body
Dusty lavender
Inner Flower
Muted rose
Outer Flower
Warm ivory
Button
Mother-of-pearl style
Why Use a Gusset?
A simple flat envelope pouch can protect a very thin book.
But once you put a:
1-inch-thick paperback
inside, a completely flat pouch stretches significantly.
The side gussets create real depth.
That means:
- cleaner corners
- less fabric distortion
- easier book removal
- more professional finished shape
Why Use Sport Cotton?
Very fine crochet thread can produce breathtaking detail, but it also makes a book-size project significantly slower.
Sport cotton keeps:
- enough stitch definition for decoration
- a refined appearance
- good strength
- reasonable construction time
It also makes this design more approachable for ordinary crocheters.
What If My Pouch Stretches?
Cotton will stretch slightly under weight.
If your fabric feels loose:
- move down to a 3 mm hook
- crochet with firmer tension
- add a simple cotton fabric lining
Optional Fabric Lining
A lining is not required, but it gives the pouch extra protection.
Cut fabric pieces slightly smaller than the inside dimensions.
Create a simple fabric pouch matching:
- front
- back
- bottom
- side depth
Insert it inside the crochet shell.
Fold the fabric edge inward approximately:
¼ inch
Hand sew around the inside top opening.
Do not stitch the lining to the decorative flap unless you specifically want the flap lined too.
What If the Sides Look Uneven?
Make sure both gussets contain exactly:
50 rows
Also distribute your sewing stitches consistently along the main-panel row ends.
Do not pull one side seam tighter than the other.
What If the Flap Pulls Sideways?
Check:
- whether the two gussets are the same size
- whether the back panel is centered
- whether the flap edging has been worked evenly
Light blocking can correct minor asymmetry.
What If the Button Loop Is Too Loose?
Undo the loop row if possible and use fewer chains.
If the pouch is already finished, you can reinforce the loop with:
surface slip stitches
around the existing chain arch.
This makes it shorter and firmer.
What If the Flower Curls?
Lightly wet-block the motif before sewing it onto the pouch.
Do not aggressively flatten the outer petal tips.
A little dimension makes the motif more attractive.
Can Beginners Make This?
A confident beginner can make the actual pouch.
You should know:
- chain
- single crochet
- double crochet
- half double crochet
- treble crochet
- slip stitch
- working in the round
- simple sewing
The flower is slightly more involved than the pouch body, but it uses only basic stitches.
Frequently Asked Questions
Is the pouch worked in the round?
No.
The main front, bottom, back, and flap are one long flat strip.
How many separate structural pieces are there?
Three:
- 1 main panel
- 2 gussets
The moonflower is decorative.
Is the flap separate?
No.
The flap continues directly from the back panel.
Is the flower part of the original pouch fabric?
No.
It is an original layered motif made separately and securely attached to the front.
Does it fit a standard paperback?
It is designed for many books up to approximately:
6 × 9 inches
with moderate thickness.
Do I need a chart?
No.
The entire pattern is written row by row.
Is a lining necessary?
No.
It is optional.
Can I sell finished pouches made from this pattern?
The instructions above are our newly constructed pouch pattern rather than a transcription of the linked paid design. The linked Evenfall design itself has separate usage terms specified by its designer. (Ravelry)
Final Thoughts
The visual payoff here comes from combining two very simple ideas.
First, make a practical book sleeve with real side depth instead of a completely flat envelope.
Then give that otherwise simple pouch one oversized crochet detail.
The body itself is almost mindless:
single crochet, double crochet, repeat.
The flower uses only eight repeating sections.
The flap already belongs to the main panel.
And the gussets are just two narrow strips.
Once the flower, contrasting flap edge, and button are added, the finished pouch suddenly looks much more intricate than the construction actually is.
That gives us the part of this idea I like most for the site:
a highly visual finished object that looks advanced, while the article can genuinely give readers a manageable pattern they can build.



