No-Sew Christmas Rubber Duck Amigurumi — 5 Interchangeable Christmas Hats (Free Crochet Pattern)
Introduction
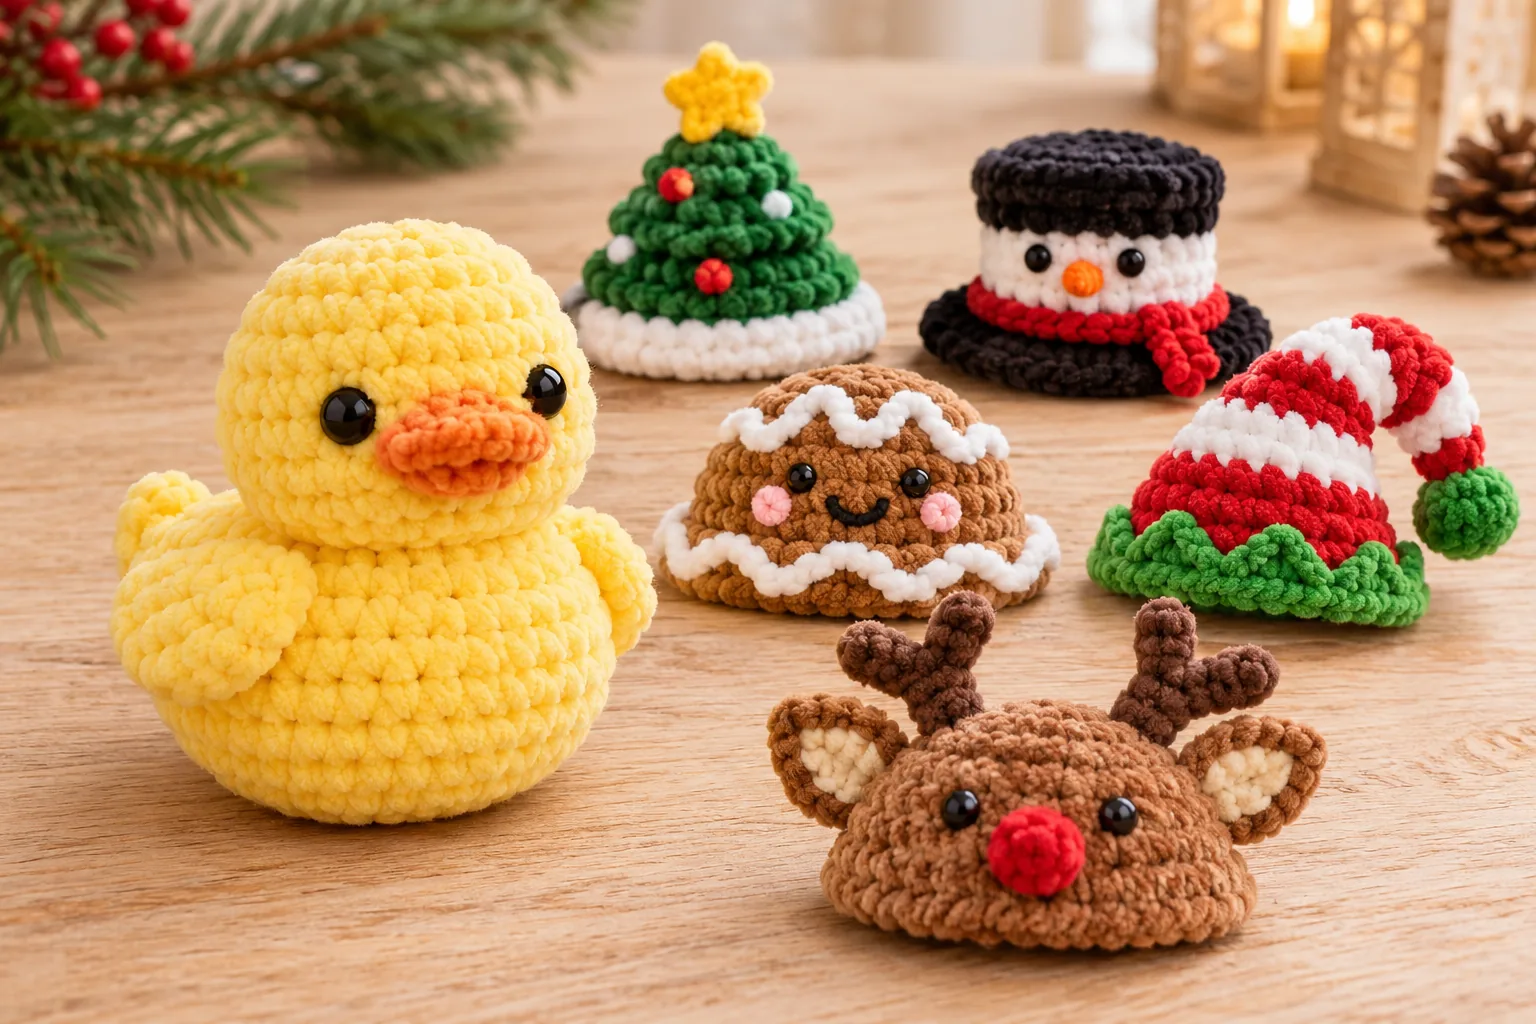
If you love cute holiday makes, this no-sew Christmas rubber duck amigurumi is a fun project to keep on your hook. The duck is worked as one main piece, so it comes together quickly and keeps finishing simple. Once the body is done, you can dress it up with five tiny interchangeable hats for a playful Christmas twist.
This is an original Yarnimals-style pattern concept, created fresh for your site and not copied from any paid PDF. The idea is a cheerful duck with a soft, rounded body and a set of mini seasonal hats: a Christmas tree hat, a snowman hat, a gingerbread man hat, a candy-cane elf hat, and a Rudolph hat.
Because the duck is small and the hats are quick to make, this pattern is great for gift-making, market prep, stocking stuffers, and festive desk decor. It is beginner-friendly, easy to customize, and especially cute in plush chenille yarn.
Description
This small no-sew duck amigurumi is made in one main body piece with a simple rounded shape and a tiny tail detail added directly to the body. The wings and beak are also attached without sewing. The five mini hats are designed to sit on top of the duck’s head so you can swap the look anytime you like.
Materials
- Super-bulky chenille yarn in yellow for the duck
- Small amounts of super-bulky chenille yarn in red, green, white, brown, and black for the hats
- Small amount of orange yarn for the beak
- 4 mm crochet hook
- 6–8 mm safety eyes or black yarn for embroidered eyes
- Polyester fiberfill
- Yarn needle
- Scissors
- Stitch marker
Finished Size
The finished duck is approximately 4.5 inches / 11.5 cm tall and about 4 inches / 10 cm wide, not including hats. Each hat is approximately 2 to 2.5 inches / 5 to 6.5 cm tall, depending on the style. Size will vary depending on your yarn, hook, stuffing, and personal tension.
Gauge
Gauge is not critical for this small plush. The most important thing is to keep your stitches tight enough that the stuffing does not show through. If stuffing is visible, go down to a smaller hook.
Abbreviations
MR: magic ring; ch: chain; sc: single crochet; hdc: half double crochet; dc: double crochet; inc: increase, 2 sc in the same stitch; dec: invisible decrease; sl st: slip stitch; st: stitch; sts: stitches; FO: fasten off.
Pattern Notes
- This is a beginner-friendly pattern.
- The duck body is worked in one piece from the bottom up.
- Stuff the duck firmly before closing.
- For a baby-safe or pet-safe version, use embroidered eyes instead of safety eyes.
- Use a stitch marker to keep track of the first stitch of each round.
- The hats are designed to sit on top of the head and be easily swapped.
Step-by-Step Instructions
Duck Body (Rounds 1–12) — With yellow yarn:
Round 1: Work 6 sc into the MR. (6)
Round 2: Inc in each st around. (12)
Round 3: 1 sc, inc repeat 6 times. (18)
Round 4: 2 sc, inc repeat 6 times. (24)
Round 5: 3 sc, inc repeat 6 times. (30)
Round 6: 4 sc, inc repeat 6 times. (36)
Round 7: Sc in each st around. (36)
Round 8: Sc in each st around. (36)
Round 9: 4 sc, dec repeat 6 times. (30)
Round 10: 3 sc, dec repeat 6 times. (24)
Round 11: 2 sc, dec repeat 6 times. (18)
Round 12: 1 sc, dec repeat 6 times. (12)
Stuff firmly. Cut yarn, leaving a tail. Thread the tail through the front loops of the remaining 12 stitches and pull tight to close. Secure and weave in the end.
Tail — With yellow yarn, locate the center back of the duck, slightly above the midpoint. Join yarn to one stitch on the back.
Step 1: Ch 2, work 2 hdc in the same joining point, ch 2, sl st in the same point to make a small tail bump. (1 tail detail) FO and weave in the end.
Beak — With orange yarn, locate the center front between the eyes area. Join yarn to a front stitch between Rounds 7 and 8.
Step 1: Ch 1, work 3 hdc into the same point, sl st into the next stitch. (1 beak) FO and shape the beak gently with your fingers.
Wings — Make 2. With yellow yarn:
Round 1: Work 6 sc into MR. (6)
Round 2: 1 sc, inc repeat 3 times. (9)
FO, leaving a short tail for attaching if needed. Flatten lightly and attach one wing to each side of the duck around the widest part of the body.
Face and Eye Placement
Insert 6–8 mm safety eyes between Rounds 7 and 8. Space the eyes about 5 stitches apart. If embroidering eyes, use black yarn and make two small horizontal or satin-stitched eyes in the same position. If desired, add a tiny embroidered smile under the beak with black yarn.
Hat 1: Christmas Tree Hat — With green yarn:
Round 1: Work 4 sc into MR. (4)
Round 2: Inc in each st around. (8)
Round 3: 1 sc, inc repeat 4 times. (12)
Round 4: Sc in each st around. (12)
Round 5: 2 sc, inc repeat 4 times. (16)
Round 6: Sc in each st around. (16)
Round 7: 3 sc, inc repeat 4 times. (20)
Round 8: In BLO, sc in each st around. (20)
FO green. Join white yarn. Round 9: Sl st loosely in each st around for the snowy brim. (20) Add tiny embroidered dots in red or white if desired to look like ornaments.
Hat 2: Snowman Hat — With black yarn:
Round 1: Work 6 sc into MR. (6)
Round 2: Inc in each st around. (12)
Round 3: In BLO, sc in each st around. (12)
Round 4: Sc in each st around. (12)
Round 5: Sc in each st around. (12)
Round 6: 1 sc, inc repeat 6 times. (18)
Round 7: Sl st in each st around. (18)
FO black. With white yarn, embroider a small band or tiny snow dots. This creates a mini top-hat style inspired by a snowman.
Hat 3: Gingerbread Man Hat — With brown yarn:
Round 1: Work 6 sc into MR. (6)
Round 2: Inc in each st around. (12)
Round 3: 1 sc, inc repeat 6 times. (18)
Round 4: Sc in each st around. (18)
Round 5: In BLO, sc in each st around. (18)
Round 6: Sl st in each st around. (18)
FO. Use white yarn to embroider simple icing squiggles. Add tiny black stitched eyes and a small smile to suggest a gingerbread face.
Hat 4: Candy-Cane Elf Hat — Start with red yarn:
Round 1: Work 4 sc into MR. (4)
Round 2: Inc in each st around. (8)
Change to white. Round 3: 1 sc, inc repeat 4 times. (12)
Round 4: Sc in each st around. (12)
Change to red. Round 5: 2 sc, inc repeat 4 times. (16)
Round 6: Sc in each st around. (16)
Change to green. Round 7: 3 sc, inc repeat 4 times. (20)
Round 8: Sc in each st around. (20)
FO. Let the tip bend naturally for an elf-hat shape. The color changes create a candy-cane feel.
Hat 5: Rudolph Hat — With brown yarn:
Round 1: Work 6 sc into MR. (6)
Round 2: Inc in each st around. (12)
Round 3: 1 sc, inc repeat 6 times. (18)
Round 4: Sc in each st around. (18)
Round 5: Sc in each st around. (18)
FO. Rudolph Ears (make 2): Round 1: Work 4 sc into MR. (4) Round 2: Sc in each st around. (4) FO. Flatten slightly. Rudolph Antlers (make 2): Step 1: Ch 4. Step 2: Starting in the 2nd ch from hook, sl st in next 3 ch. (3) Step 3: Return to the base, ch 3, starting in the 2nd ch from hook, sl st in next 2 ch. (2 branches) FO. Attach the ears and antlers to the hat. Add a tiny red stitched dot at the center front for Rudolph’s nose.
Finishing / Assembly
Shape the stuffed duck with your hands so it sits evenly. Check that the eyes and beak are centered. Place each hat on top of the duck’s head and adjust as needed. If you want the hats to sit more securely for display, you can lightly tack them in place with a removable stitch, but they are designed to stay interchangeable.
Color Ideas
Use a classic yellow duck with bright holiday hats for a cheerful Christmas look. Make the duck in soft pastel yellow for a sweeter nursery style. Try a white duck with colorful hats for a winter theme. Add a tiny bit of orange yarn for the beak if you want a more classic rubber-duck finish.
Tips & Variations
If your duck feels too soft, add a little more stuffing before closing. If the hats feel snug, go up half a hook size or add one plain round before the brim. For a simpler version, make only one or two hats and turn the duck into a quick stocking stuffer. You can embroider tiny cheeks, eyelashes, or a small blush effect for extra personality. Turn it into an ornament by adding a hanging loop at the top of one hat.
FAQ
- Is this pattern good for beginners? Yes. The main duck is made with simple amigurumi shaping, and the hats are small, quick projects.
- Is it really no-sew? The duck body is worked in one piece, and the tail and beak are added directly to the body. The wings and some hat details can be attached with minimal finishing, but the overall design keeps sewing to a minimum.
- Can I use a different yarn weight? Yes, but the finished size and hat fit will change. If you switch yarn, make sure the hats still sit properly on the head.
- Can I make it baby-safe? Yes. Replace safety eyes with embroidered eyes, and avoid any loose decorative parts.
- How do I keep the hats interchangeable? Do not permanently attach them. Make the hats just slightly roomy so they sit on the head without being tight.
Conclusion
This no-sew Christmas rubber duck amigurumi is a cheerful little holiday make with lots of personality. The one-piece duck keeps construction simple, and the five mini hats make it extra fun to customize for gifts, decor, or seasonal market prep. Save this pattern for your Christmas crochet list, and enjoy mixing and matching the hats to create your favorite festive duck look.