
Introduction
There’s something incredibly satisfying about crocheting a cute turtle that comes together quickly and requires almost no finishing work. This no-sew plush turtle amigurumi is soft, squishy, beginner-friendly, and perfect for anyone who loves fast crochet projects with adorable results.
With its round shell, tiny flippers, sweet little face, and cuddly plush texture, this turtle is a wonderful addition to any handmade collection. Whether you’re creating gifts, selling at craft fairs, decorating a nursery, or simply enjoying a relaxing crochet session, this easy crochet turtle pattern is sure to become a favorite.
The best part? The entire turtle is worked as a no-sew project, meaning the head, flippers, and tail are crocheted directly into the body, eliminating the need for complicated assembly.
Description
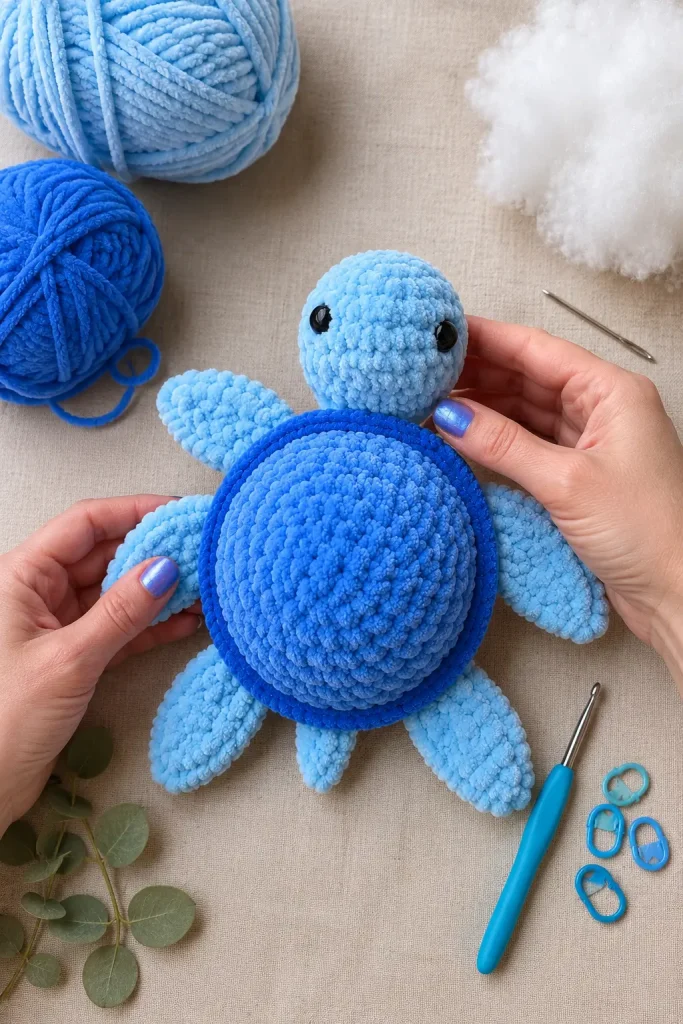
This plush crochet turtle features a large rounded shell, short flippers, a cute rounded head, and a tiny tail. The oversized shell gives the turtle a charming chubby appearance while the plush chenille yarn creates an incredibly soft and huggable finish.
Using two shades of blue creates a beautiful ocean-inspired look. The darker shell contrasts perfectly with the lighter head and flippers, giving the finished turtle depth and personality. The simple design makes it ideal for beginners while still producing a professional-looking plush toy.
This amigurumi turtle works wonderfully as:
- Nursery decor
- Ocean-themed room decorations
- Handmade gifts
- Market and craft fair products
- Children’s plush toys
- Desk companions
- Stress-relief pocket plushies
Materials
- Super bulky chenille yarn in dark blue (shell)
- Super bulky chenille yarn in light blue (head, flippers, tail)
- 5.0 mm crochet hook
- 12 mm safety eyes
- Polyester fiberfill stuffing
- Stitch marker
- Yarn needle
- Scissors
Finished Size
Using super bulky chenille yarn and a 5 mm crochet hook:
- Approximately 6–8 inches wide
- Approximately 3–4 inches tall
Size may vary depending on yarn choice and crochet tension.
Skill Level
Beginner
This beginner crochet project uses:
- Magic Ring
- Single Crochet
- Increases
- Decreases
- Slip Stitches
- Color Changes
Abbreviations
- MR = Magic Ring
- SC = Single Crochet
- INC = Increase (2 SC in one stitch)
- DEC = Invisible Decrease
- SL ST = Slip Stitch
- ST = Stitch
- CH = Chain
- FO = Fasten Off
Step-by-Step Instructions

Head
Using light blue yarn:
Round 1
6 SC in MR (6)
Round 2
INC around (12)
Round 3
(SC, INC) × 6 (18)
Round 4
(SC 2, INC) × 6 (24)
Round 5-8
SC around (24)
Insert safety eyes between Rounds 6 and 7.
Round 9
(SC 2, DEC) × 6 (18)
Begin stuffing.
Round 10
(SC, DEC) × 6 (12)
Round 11
DEC around (6)
Do not fasten off.
Front Flippers
Using the remaining working yarn:
Flipper 1
CH 6
Starting in second chain from hook:
5 SC
SL ST into next body stitch.
Flipper 2
Repeat on opposite side.
These flippers should remain soft and slightly flexible.
Tail
At the back of the body:
CH 4
Starting in second chain from hook:
3 SC
SL ST to body.
Shell Bottom
Continue using light blue yarn.
Round 12
SC around body and attachment points (24)
Round 13
(SC 2, INC) × 6 (30)
Round 14
SC around (30)
Fasten off.
Shell Top
Using dark blue yarn:
Round 1
6 SC in MR (6)
Round 2
INC around (12)
Round 3
(SC, INC) × 6 (18)
Round 4
(SC 2, INC) × 6 (24)
Round 5
(SC 3, INC) × 6 (30)
Round 6
(SC 4, INC) × 6 (36)
Round 7
(SC 5, INC) × 6 (42)
Round 8
(SC 6, INC) × 6 (48)
Round 9-11
SC around (48)
Fasten off leaving a long tail.
Shell Border
Using dark blue yarn:
Join around outer edge of shell.
Round 12
Work SC evenly around.
Round 13
SL ST around entire shell edge.
Fasten off.
This creates the raised shell rim that gives the turtle its realistic shape.
Assembly
Attach Shell
Place shell on top of turtle body.
Pin into position.
Sew around the edge using matching dark blue yarn.
Leave a small opening.
Stuff the turtle firmly but gently.
Finish sewing closed.
Shape
Massage stuffing evenly throughout shell.
Shape flippers outward.
Adjust head position slightly upward.
The turtle should have a rounded plush appearance.
Tips & Variations
Ocean Turtle
Use:
- Navy shell
- Aqua body
Seafoam Turtle
Use:
- Mint shell
- Pale turquoise body
Pastel Turtle
Use:
- Lavender shell
- Baby blue body
Rainbow Turtle
Create shells in multiple colors for a playful collection.
Keychain Version
Use:
- Worsted weight yarn
- 3.5 mm hook
Finished turtle becomes a cute bag charm.
Extra Plush Version
Use jumbo chenille yarn and a 6–7 mm hook for a giant cuddly turtle.
FAQ
Is this turtle pattern beginner-friendly?
Yes. It uses basic stitches and simple shaping, making it ideal for beginners.
Why is it called a no-sew turtle?
The head, flippers, and tail are crocheted directly into the body, greatly reducing assembly.
What yarn works best?
Super bulky chenille yarn creates the softest plush turtle.
Can I sell turtles made from this pattern?
Generally yes, if using your own finished handmade products. Always check the original designer’s terms if following a specific adaptation.
How long does it take to make?
Most crocheters can finish one turtle in about an hour, making it an excellent quick crochet project.
Conclusion
This no-sew plush turtle amigurumi is the perfect combination of simplicity, speed, and cuteness. With its oversized shell, soft flippers, and adorable expression, it’s a crochet project that delivers impressive results without complicated construction.
Whether you’re making one for yourself, creating gifts, stocking your craft fair table, or building an entire ocean-themed collection, this beginner-friendly crochet turtle is guaranteed to bring smiles. Save this easy crochet pattern for your next cozy crochet session and enjoy creating your own adorable plush turtle.




I was so excited when this Turtle appeared in my feed today. I got out my yarn and before I started the project, I read through the directions. I am so sorry if I haven’t read thoroughly, but I am having difficulty with the directions. first the directions for the flippers don’t seem to be complete. And where are the directions for the body? I see the head, incomplete flippers and tail , Shell top and border. It just seems like something is missing. Please advise.
The shell bottom plus the shell top form the body.
Thanks for the explanation.
Turtle please send pattern. It is so darn cute!!
Where is the rest of the pattern. So disappointed.
Hi. I must admit i am very lost.
I have done the head. Flippers and tail pattern seem very incomplete and where do i suddenly get 24 stitches from for the body…?
Seems a very incomplete pattern.
Please help i am making it for a turtle loving little girl
Isn’t it in wrong order. Why does picture show 5 flippers. Out of order and incomplete. I crochet intermediate but please help so confusing
Pattern Difficult to understand
I’m very disappointed! I started on the turtle, but the pattern is incomplete. The tail and fin instructions are not there and maybe more, I’m not sure. I bought the yarn for this and now I can’t make it.
I’m in the same boat as everyone else. Don’t understand the pattern. It said after the head, work the working yarn I made an incomplete fin. It said opposite side, make the other fin. So, how many stitches in between the fins. Frustrated.
Dang it! I should have read the reviews before I started. I now have a head and shell top, but can’t figure out how to move on using this pattern. Boo…