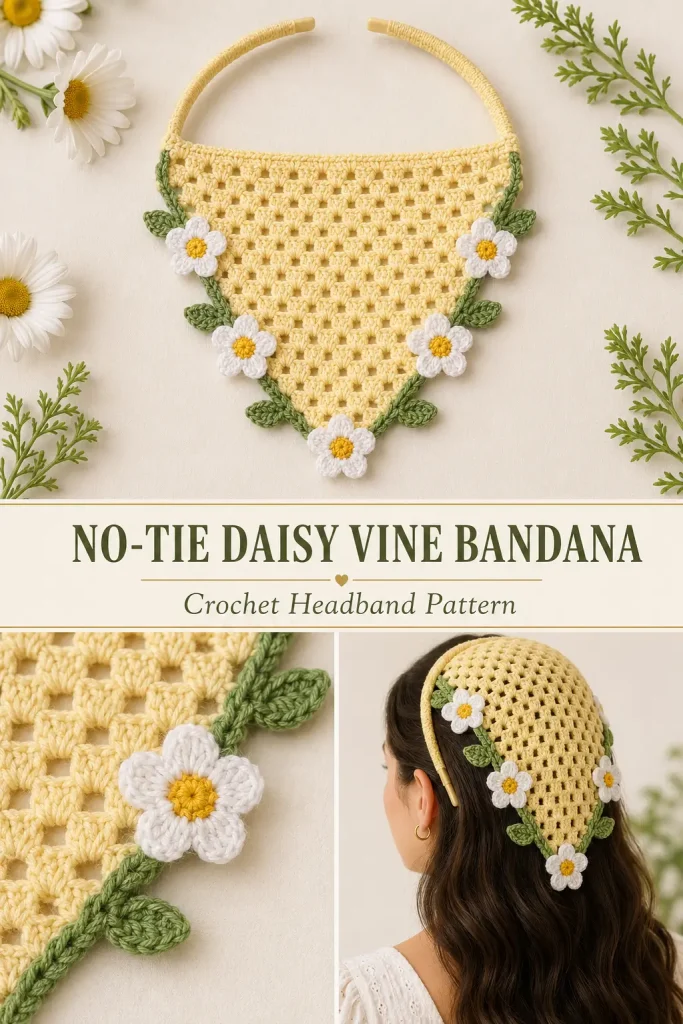
This no-tie crochet bandana gives you the soft look of a triangular headscarf without needing to knot long ties behind your head. A standard open U-shaped hair headband is enclosed inside the upper crochet casing, allowing the bandana to slide on like an ordinary headband.
The pale buttery-yellow granny mesh creates a light summer fabric, while a trailing green vine, five white daisies, and six small leaves decorate the sloping edges. The finished crochet accessory stays secure behind the ears and drapes gently over the back of the hair.
Description
The finished crochet bandana has a triangular granny-stitch body with a curved upper edge fitted around an open rigid headband. The headband has two separate tips that remain uncovered and rest behind the ears.
The triangle is made in pale yellow cotton yarn. A muted green crochet vine follows the two lower edges and supports six leaves and five small white daisies with golden-yellow centers. One daisy hangs at the bottom point, with two flowers arranged along each side.
This pattern does not create a closed oval or circular handle. The headband must always remain an open U shape.
Finished Measurements
Using DK cotton yarn and a 3.5 mm hook:
- Triangle width across the top: approximately 36–40 cm
- Triangle depth: approximately 19–22 cm
- Headband width: approximately 8–10 mm
- Exposed headband tips: approximately 3–5 cm on each side
- Daisy diameter: approximately 3–3.5 cm
- Leaf length: approximately 3 cm
Measure the headband before completing the triangle because headband sizes vary.
Materials
- DK or light worsted-weight cotton yarn in pale buttery yellow
- Small amount of muted leaf-green yarn
- Small amount of white yarn
- Small amount of golden-yellow yarn
- 3.5 mm crochet hook
- One flexible open U-shaped hair headband, approximately 8–10 mm wide
- Yarn needle
- Scissors
- Stitch markers
- Blocking mat
- Rustproof blocking pins
Abbreviations
- ch – chain
- dc – double crochet
- hdc – half double crochet
- MR – magic ring
- sc – single crochet
- sl st – slip stitch
- sp – space
- st – stitch
- sts – stitches
- tr – treble crochet
Pattern Notes
- This pattern uses US crochet terminology.
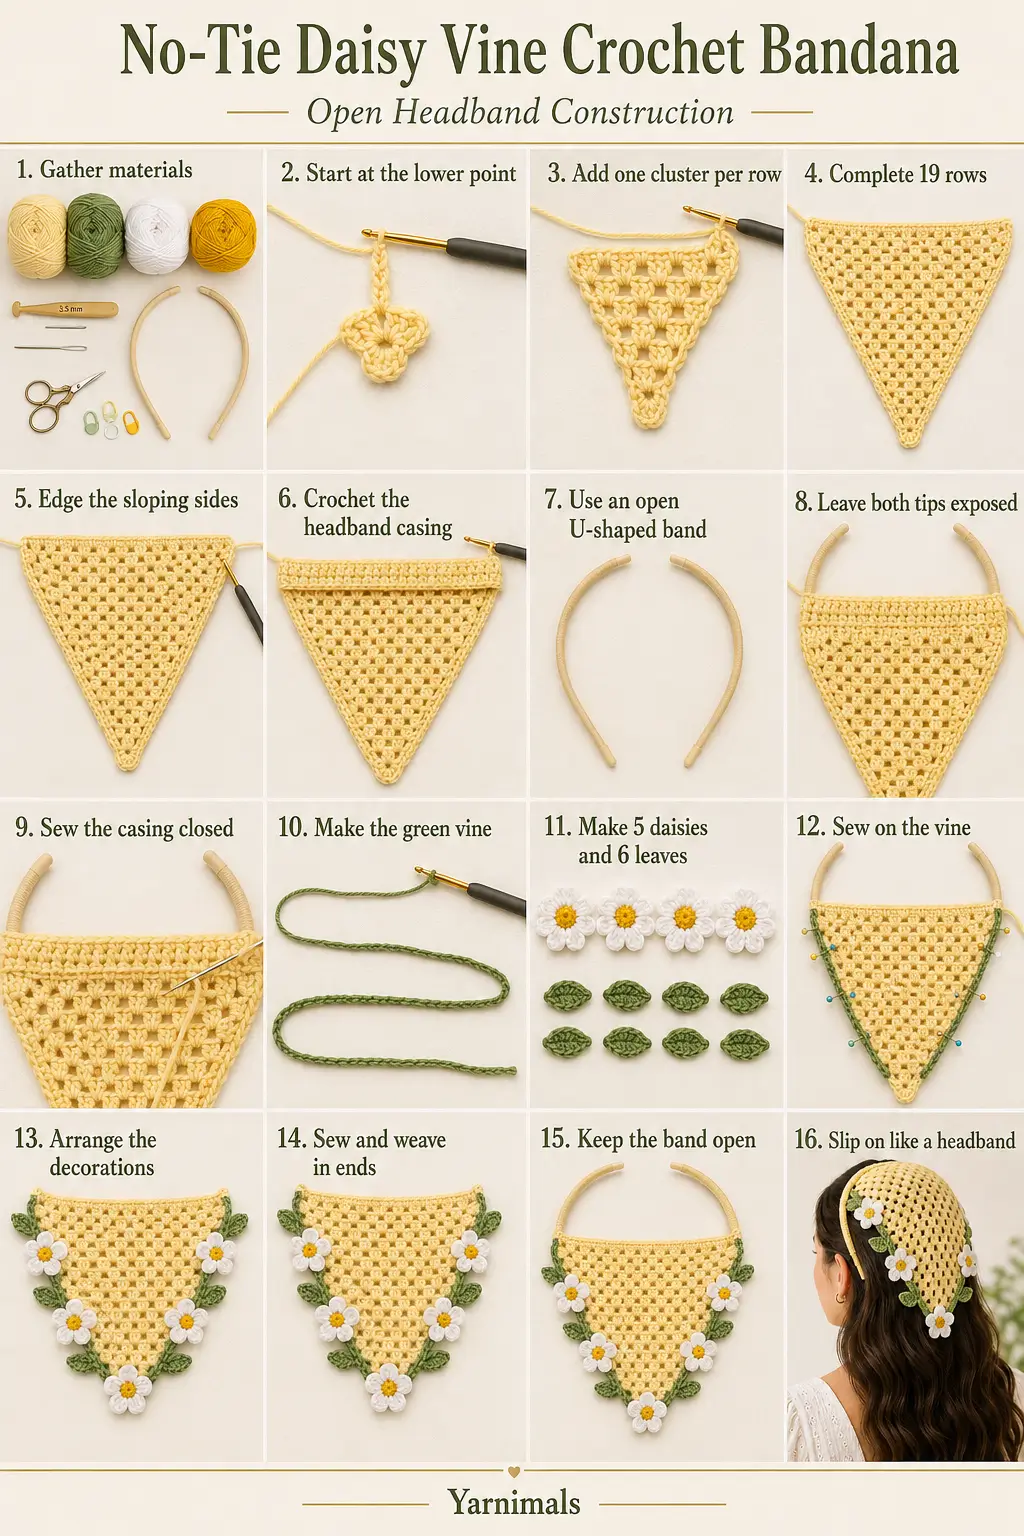
- The triangle is worked from the lower point upward.
- Each new granny row adds one additional cluster.
- The sample uses 19 granny rows.
- Add or remove rows until the top edge matches the section of the headband that will be covered.
- The headband remains permanently open.
- Never connect the two headband tips.
- The crochet casing covers only the curved upper section.
- Leave 3–5 cm of each rigid headband tip uncovered.
- The vine, leaves, and daisies are made separately and sewn to the triangle.
- Make exactly five daisies and six leaves.
- Block the triangle before inserting the headband.
Step-by-Step Instructions
Part One: Crochet the Triangle
Using pale yellow yarn, ch 4.
Row 1
Work 2 dc in the fourth ch from the hook.
The skipped chains count as the first dc.
You should have one 3-dc granny cluster.
Turn.
Row 2
Ch 3. This counts as the first dc.
Work 2 dc in the same first st.
Ch 1.
Work 3 dc in the top of the beginning ch from Row 1.
You should have two granny clusters.
Turn.
Row 3
Ch 3.
Work 2 dc in the same first st.
Ch 1.
Work 3 dc in the next ch-1 sp.
Ch 1.
Work 3 dc in the top of the beginning ch from the previous row.
You should have three granny clusters.
Turn.
Row 4
Ch 3.
Work 2 dc in the same first st.
Ch 1.
Work 3 dc in each ch-1 sp across, placing ch 1 between the clusters.
Ch 1.
Work 3 dc in the top of the previous beginning ch.
Turn.
Rows 5–19
Repeat Row 4.
Each completed row adds one granny cluster.
After Row 19, you should have:
- 19 granny clusters
- 18 ch-1 spaces
- A straight top edge
- Two evenly sloping sides
- One centered lower point
Do not fasten off.
Check the Triangle Width
Lay the open U-shaped headband above the final row.
Measure the curved section between points approximately 3–5 cm above each rigid tip.
The triangle’s top edge should be close to this measurement.
Add more granny rows when the triangle is too narrow.
Remove the final row or remake with fewer rows when it is significantly wider than the headband section that will be covered.
Do not measure around the complete headband, because the two open tips must remain exposed.
Part Two: Crochet the Headband Casing
The casing is worked across the final straight row of the triangle.
Casing Row 1
Ch 1 and turn.
Work:
- 1 sc in every dc
- 1 sc in every ch-1 sp
For the 19-row sample, you should have approximately 75 sc.
The exact count matters less than creating a smooth, flat edge.
Casing Rows 2–6
Ch 1 and turn.
Sc in every st across.
Maintain the same stitch count.
After Row 6, fasten off, leaving a long tail for sewing.
The casing strip should be wide enough to fold around the headband.
For a headband wider than 10 mm, add one or two additional single crochet rows.
Part Three: Add the Yellow Side Border
Join pale yellow yarn at the upper corner of one sloping edge.
Work approximately 2 sc around the end of each granny row.
Continue toward the lower point.
Work 3 sc in the lower point.
Continue up the second sloping edge, again working approximately 2 sc around every row end.
Fasten off at the opposite upper corner.
Keep the border relaxed. A tight border will cause the triangle to curl.
Part Four: Block the Triangle
Lightly dampen the crochet piece.
Place it on a blocking mat with the right side facing upward.
Pin the top edge straight.
Pin the lower point in the center.
Arrange both sloping edges symmetrically.
Open the granny spaces gently.
Do not stretch the casing strip excessively.
Allow the piece to dry completely.
Part Five: Insert the Open U-Shaped Headband
Place the dry bandana wrong side up.
Position the open U-shaped headband along the casing.
The headband must have:
- One curved upper arc
- One separate left tip
- One separate right tip
- An open gap between the tips
Center the triangle along the upper curved section.
Leave approximately 3–5 cm of each headband tip outside the crochet casing.
These uncovered tips sit behind the ears and keep the bandana in place.
Ease the casing gently along the curved headband. Do not force the crochet into a closed circle.
Fold the casing over the headband toward the wrong side.
Thread the long yellow tail through a yarn needle.
Whipstitch the final casing row to the base of Casing Row 1.
Sew through the crochet only. Do not sew through the plastic or metal headband.
Continue across the entire casing.
At the left casing end, make several firm stitches around the crochet fabric to prevent the headband from sliding.
Repeat at the right casing end.
Do not stitch the two tips together.
Weave in the yellow yarn tail.
The finished top should look like an open horseshoe or U shape, never a closed oval.
Part Six: Crochet the Green Vine
Measure from the upper left corner down one sloping edge, around the lower point, and up the opposite side.
Using green yarn, make a chain approximately 5 cm longer than this measurement.
Starting in the second ch from the hook, sl st in every ch across.
Fasten off, leaving a long sewing tail at both ends.
The finished vine should be narrow and flexible.
Attach the Vine
Pin the center of the vine to the lower point.
Arrange the remaining vine along both sloping edges.
Allow it to form gentle curves rather than pulling it completely straight.
Using green yarn, sew the vine to the yellow border every 2–3 cm.
Leave short curved sections between the anchor stitches.
Secure and weave in the ends.
Part Seven: Crochet the Leaves
Make six using green yarn.
Leaf
Ch 8.
Starting in the second ch from the hook, work:
- 1 sc in the next ch
- 1 hdc in the next ch
- 1 dc in the next ch
- 1 tr in the next ch
- 1 dc in the next ch
- 1 hdc in the next ch
- 3 sc in the final ch
Continue along the unused loops on the opposite side:
- 1 hdc
- 1 dc
- 1 tr
- 1 dc
- 1 hdc
- 1 sc
Join with a sl st at the base.
Fasten off, leaving a long tail for sewing.
Gently shape the leaf into a pointed oval.
Make five more identical leaves.
Part Eight: Crochet the Five-Petal Daisies
Make five identical flowers.
Golden Center
Using golden-yellow yarn, make an MR.
Ch 1.
Work 10 sc into the ring.
Pull the ring closed.
Join with a sl st in the first sc.
Fasten off the yellow yarn.
White Petals
Join white yarn in any center stitch.
Repeat the following five times:
- Sl st in the next st
- In the next st, work ch 2, 3 dc, ch 2, sl st
After the fifth petal, join neatly at the base of the first petal.
Fasten off.
Each daisy should have:
- One golden-yellow center
- Five rounded white petals
Add Green Stems
Join green yarn to the back of each flower center.
For four side flowers, ch 5.
For the flower at the lower point, ch 4.
Fasten off, leaving a sewing tail.
Part Nine: Arrange the Vine Decorations
Place the bandana right side up.
Arrange the flowers and leaves before sewing.
Left Side
Starting at the upper left corner and moving downward:
- Leaf 1 near the upper corner
- Daisy 1 below it
- Leaf 2 around the middle
- Daisy 2 on the lower side
- Leaf 3 just above the lower point
Center
- Daisy 3 at the lower point
Right Side
Mirror the left arrangement:
- Leaf 4 just above the lower point
- Daisy 4 on the lower side
- Leaf 5 around the middle
- Daisy 5 near the upper section
- Leaf 6 near the upper right corner
The completed trim should have:
- Five daisies
- Six leaves
- One centered lower flower
- Two flowers along each side
Part Ten: Sew the Leaves and Flowers
Using each leaf tail, sew only the base of the leaf to the vine.
Leave the pointed outer section free so the leaf remains dimensional.
Position the leaves so they angle away from the triangle.
Using the green flower stems, sew each daisy to the vine.
Allow the flowers to hang slightly below the yellow edge.
Stitch through the vine several times so each attachment remains secure.
Hide all green tails behind the vine.
Arrange every flower so the white petals face forward.
Final Finishing
Check the complete headband carefully.
The finished project must have:
- One open U-shaped headband
- Two separate uncovered tips
- No crochet connection between the tips
- A pale yellow triangular granny-mesh panel
- A secure folded headband casing
- One green vine around the two sloping edges
- Exactly five white daisies
- Exactly six green leaves
- One flower centered at the lower point
Place the band over the head like a normal hair headband.
The curved section rests over the crown.
The two separate tips sit behind the ears.
The triangle drapes over the back of the hair.
Tips and Variations
Use mercerized cotton for crisp mesh stitches, firm leaves, and well-defined flowers.
For a deeper bandana, add two or three granny rows before beginning the casing.
For a smaller version, stop after approximately 16–17 granny rows and use a child-sized open headband.
A wider rigid headband requires a wider casing. Add enough single crochet rows to wrap fully around it.
Use a headband with smooth rounded tips. Sharp or broken plastic should not be covered and used.
For a different color palette, try:
- Cream with sage vines
- Dusty rose with olive leaves
- Pale blue with white flowers
- Lavender with cream daisies
Hand-wash gently. Avoid soaking a metal headband unless it is rust-resistant.
Reshape the flowers and leaves while damp and allow the bandana to dry flat.
FAQ
Is the headband supposed to form a complete oval?
No. It must remain an open U-shaped hair headband with two separate tips. A closed oval would not fit or function correctly.
How does the bandana stay on without ties?
The rigid open headband sits over the crown and grips gently behind the ears. The crochet triangle is attached to the curved upper section.
How much of the headband should remain uncovered?
Leave approximately 3–5 cm of each tip uncovered. The exact amount depends on the headband and the wearer’s comfort.
Can I replace the rigid headband with elastic?
Elastic would create a different construction and could turn the top into a closed loop. Use an open U-shaped headband for the correct no-tie design.
Can I add more flowers?
Yes, but keep the decoration balanced on both sides. The sample uses five daisies and six leaves.
Conclusion
This no-tie daisy vine crochet bandana combines the light texture of a granny-stitch headscarf with the secure fit of a standard open hair headband. The separate tips sit comfortably behind the ears, while the yellow triangle, green vine, leaves, and white daisies drape softly over the hair. Make it in the sunny original colors or choose a gentle palette that matches your favorite spring and summer outfits.



