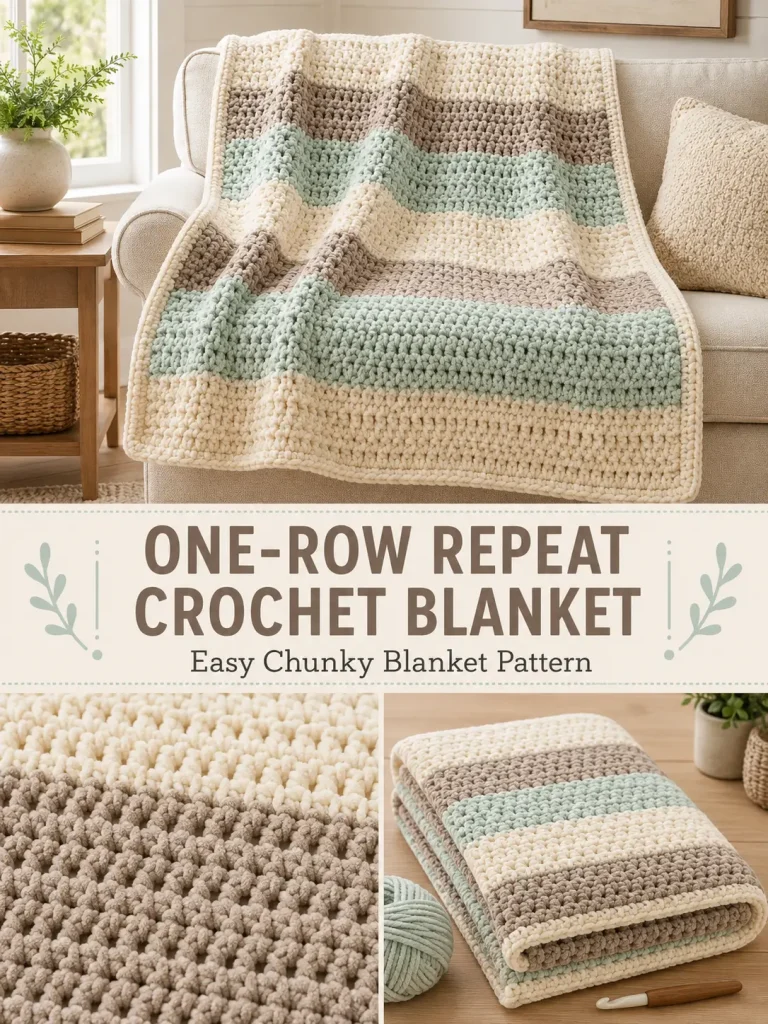
This soft chunky crochet blanket uses one easy stitch sequence for almost the entire project.
The blanket is worked in wide horizontal stripes using warm ivory, mushroom taupe, and pale seafoam, with a simple alternating single-crochet and double-crochet texture. Because the same row is repeated again and again, it is easy to memorize while the different stitch heights create a softly pebbled surface.
The linked blanket uses super-bulky chenille yarn and a one-row-repeat textured construction. (Crochet Dreamz) This version uses a different stitch repeat, foundation count, stripe arrangement, edging, and sizing so we have our own complete pattern rather than reproducing the original instructions.
Pattern at a Glance
Skill level: Beginner
Terminology: US crochet terms
Construction: Worked flat in rows
Main stitch: Alternating sc and dc
Row repeat: 1 row
Suggested yarn: Category 6 super bulky chenille
Hook: 10 mm / N-P
Finished size: Approximately 37 × 48 inches
Foundation: 69 chains
Body stitch count: 68 stitches
Colors: Warm ivory, mushroom taupe, pale seafoam
Materials
You will need:
- Category 6 super-bulky chenille yarn in warm ivory
- Category 6 super-bulky chenille yarn in mushroom taupe
- Category 6 super-bulky chenille yarn in pale seafoam
- 10 mm crochet hook
- Large-eye yarn needle
- Scissors
- Stitch markers, optional
- Measuring tape
Have approximately 1,000–1,150 yards total available for the sample size.
Because chenille yarn varies considerably between brands, buy a little extra if you want to guarantee matching dye lots.
Approximate Color Amounts
Warm Ivory
400–450 yards
Mushroom Taupe
300–350 yards
Pale Seafoam
300–350 yards
Exact usage depends on tension and finished dimensions.
Abbreviations
- ch = chain
- sc = single crochet
- dc = double crochet
- sl st = slip stitch
- st = stitch
- sts = stitches
- rep = repeat
Special Stitch Pattern
The texture is created by alternating:
sc, dc
across every row.
Because there are an even number of stitches, the next row starts with a sc worked into the dc from the row below.
That means:
- short stitches sit over tall stitches
- tall stitches sit over short stitches
This produces the pebbled texture.
Gauge
Approximate gauge with super-bulky chenille and a 10 mm hook:
7–7½ stitches = 4 inches
Gauge is not critical, but it affects the finished blanket size and yarn usage.
Make a small swatch before starting if exact dimensions matter.
FOUNDATION
Using warm ivory:
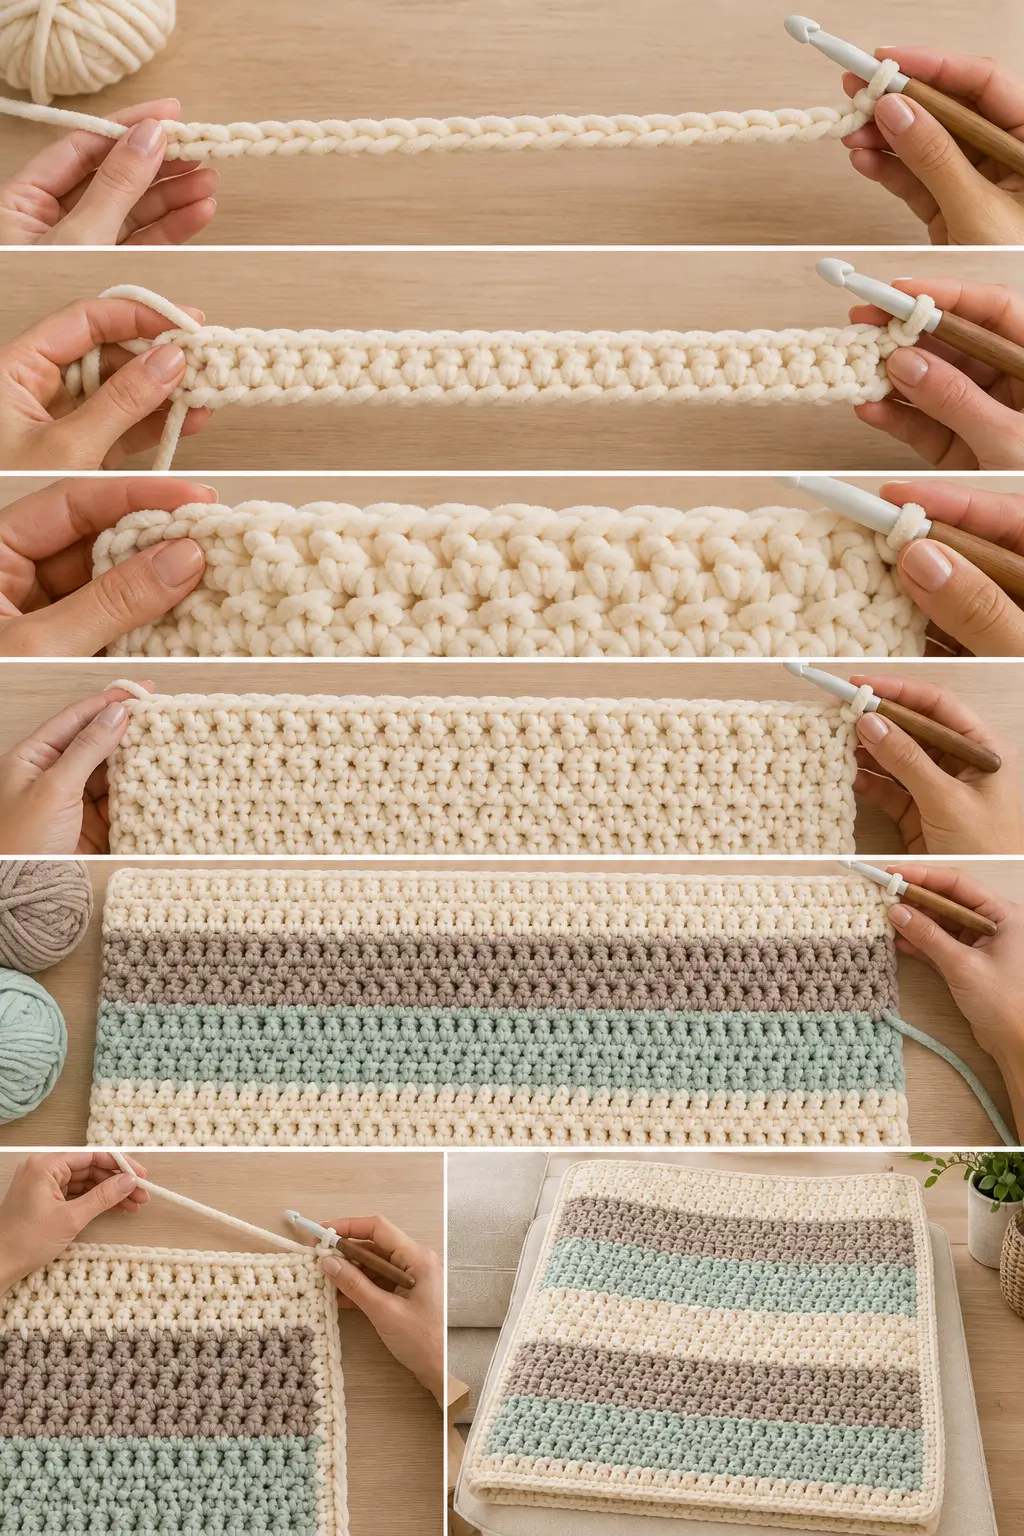
Ch 69.
Do not make the foundation chain tight.
If necessary, make the chain with an 11 mm hook and switch back to the 10 mm hook for the blanket.
ROW 1 — FOUNDATION ROW
Starting in the second chain from the hook:
Sc in every chain across.
You should have:
68 sc
Ch 1.
Turn.
The turning chain does not count as a stitch.
ROW 2 — TEXTURE ROW
Sc in the first stitch.
Dc in the next stitch.
Repeat:
sc in next st, dc in next st
across.
You should finish with:
1 dc in the final stitch
Ch 1.
Turn.
ROW 3 AND ALL FOLLOWING BODY ROWS
Repeat Row 2:
sc in first st, dc in next st
then:
sc, dc
across.
Ch 1.
Turn.
That is the entire one-row repeat.
Important Stitch Placement
Do not crochet according to how the stitch below looks.
Simply repeat:
sc, dc, sc, dc
from the first stitch to the last stitch of every row.
Because the blanket always has 68 stitches, the pattern automatically alternates correctly.
STRIPE 1 — WARM IVORY
Continue the texture row until the ivory section measures approximately:
7½–8 inches
For many crocheters using this yarn weight, this will be around:
10 body rows after the foundation row
but measure the actual fabric.
Do not rely only on row count.
Changing Color
When working the final dc of the stripe:
- Yarn over.
- Insert hook.
- Pull up a loop.
- Yarn over and pull through 2 loops.
- Stop with 2 loops remaining.
- Drop the old color.
- Pull the new color through the final 2 loops.
Turn and continue normally.
Cut the previous yarn leaving a tail approximately 6 inches long.
STRIPE 2 — MUSHROOM TAUPE
Using mushroom taupe, continue the exact same repeat:
sc, dc
across every row.
Continue until this stripe measures approximately:
7½–8 inches
STRIPE 3 — PALE SEAFOAM
Change to pale seafoam.
Continue the one-row repeat until the stripe measures:
7½–8 inches
STRIPE 4 — WARM IVORY
Change back to warm ivory.
Work another:
7½–8-inch stripe
using the same stitch repeat.
STRIPE 5 — MUSHROOM TAUPE
Change to mushroom taupe.
Work another:
7½–8-inch stripe
STRIPE 6 — PALE SEAFOAM
Finish with pale seafoam.
Continue until the main blanket measures approximately:
46–47 inches long
before the border.
Do not fasten off yet if you want the border to begin in seafoam.
Finished Stripe Sequence
Your blanket should read:
Warm Ivory
↓
Mushroom Taupe
↓
Pale Seafoam
↓
Warm Ivory
↓
Mushroom Taupe
↓
Pale Seafoam
This creates six broad color blocks.
Why Measure Instead of Counting Rows?
Chenille yarn compresses differently depending on:
- yarn brand
- hook style
- crochet tension
- how strongly you pull your stitches
Two crocheters can work the exact same number of rows and get noticeably different lengths.
For wide stripes, measuring each section is more reliable.
Check Your Stitch Count
At the end of every few rows, count:
68 stitches
A missing edge stitch can gradually make the blanket narrower.
Finding the Last Stitch
Chenille yarn can hide the final stitch.
Place a stitch marker in:
- first stitch of each row
- last stitch of each row
if necessary.
This is especially helpful for beginners.
PART 2 — SIMPLE BORDER
The textured body is already thick, so the blanket only needs a clean border.
Use warm ivory for the border.
Fasten off the final seafoam stripe.
Join ivory in any corner.
Border Round 1
Ch 1.
Work sc evenly around the entire blanket.
Across the Top and Bottom
Work:
1 sc in each stitch
Along the Side Edges
Work approximately:
1 sc into each row end
Because the stitches are very thick, avoid packing too many stitches into the side edge.
At each corner work:
3 sc
Continue around.
Join with a sl st to the first sc.
Check the Border Before Continuing
Lay the blanket flat.
If the border ruffles
You have too many stitches along the sides.
Remove some.
If the border pulls inward
You need a few more side stitches.
Fix Round 1 before adding another round.
Border Round 2
Ch 1.
Sc in every stitch around.
At each corner:
3 sc in the center corner stitch
Join with sl st.
Fasten off.
Optional Textured Final Border
If you want a slightly more decorative finish, add one additional round.
Using mushroom taupe:
Join in any corner.
Repeat:
sl st in next st, ch 1
around.
Keep the slip stitches loose.
At each corner, work:
sl st, ch 1, sl st
in the corner stitch.
Fasten off.
This creates a subtle corded edge without competing with the striped body.
Weave In the Ends
Chenille yarn can be slippery, so don’t simply cut the yarn close to the fabric.
Thread each tail onto a large yarn needle.
Weave through several stitches.
Change direction.
Weave through another section.
Trim only after the tail feels secure.
Finished Size
The sample is designed to finish approximately:
37 inches wide × 48 inches long
including the border.
A variation of an inch or two is completely normal.
How to Make the Blanket Wider
The stitch pattern requires an:
even number of body stitches
Because the first foundation chain is skipped, begin with an:
odd number of chains
Examples:
Narrower
Ch 59 → 58 stitches
Sample
Ch 69 → 68 stitches
Wider
Ch 79 → 78 stitches
Larger Throw
Ch 89 → 88 stitches
The important rule is:
Odd foundation chain → even stitch count
How to Make It Longer
Simply continue repeating the texture rows.
You can:
- make each stripe deeper
- add more stripes
- repeat the 3-color sequence
Then add the border when the blanket reaches your desired length.
Baby Blanket Size
For a smaller baby blanket, aim for approximately:
30 × 36 inches
Start with fewer chains and make shorter stripe sections.
Keep an even number of body stitches.
Lap Blanket Size
For a comfortable lap throw, aim for approximately:
38 × 48 inches
The written sample is already close to this size.
Larger Throw
For a sofa throw, aim for approximately:
45 × 55 inches
Increase the foundation chain and continue the stripe sequence until you reach the desired length.
Remember that super-bulky yarn will require significantly more yardage.
One-Color Version
This blanket does not need stripes.
Work the entire body in:
warm ivory
and let the alternating stitch texture provide all the interest.
This creates a very clean, plush neutral blanket.
Two-Color Version
Try:
Warm ivory + muted sage
Alternate wide color blocks.
This works especially well for a nursery.
Modern Neutral Version
Use:
- warm ivory
- mushroom
- soft camel
This creates a cozy neutral throw without losing the striped look.
Soft Nursery Palette
Try:
- warm cream
- dusty lavender
- pale sage
Keep the stripe widths identical.
Why the Texture Works
Single crochet is short.
Double crochet is tall.
When the two stitches alternate and each new row places a short stitch over a tall one, the surface naturally develops small raised areas.
With chenille yarn, those little height differences become especially soft and plush.
The blanket looks more complicated than:
sc, dc, sc, dc
really is.
What If My Blanket Is Getting Wider?
The most common cause is accidentally working two stitches into an edge stitch.
Count periodically.
You should always have:
68 stitches
for the sample.
What If It Is Getting Narrower?
You may be missing the final stitch.
Chenille makes edge stitches difficult to see.
Using stitch markers at both ends prevents most problems.
What If My Edges Look Wavy?
Check:
- stitch count
- foundation-chain tension
- whether the first and last stitches are being worked consistently
Small unevenness can usually be corrected with the border.
What If My Texture Looks Flat?
Make sure you alternate:
sc and dc
rather than accidentally working all sc or all dc.
Also avoid extremely loose tension.
A slightly firm stitch makes the pebble texture more visible.
What If the Blanket Feels Too Stiff?
Try:
- moving to an 11 mm hook
- relaxing your tension
Super-bulky chenille should remain soft and drapey.
What If the Blanket Has Large Holes?
Your hook may be too large for your specific chenille yarn.
Try moving down to:
9 mm
and make another swatch.
Can I Use Regular Super-Bulky Yarn?
Yes.
The pattern does not require chenille.
A traditional super-bulky acrylic or wool-blend yarn will create:
- sharper stitch definition
- less plushness
- slightly more visible texture
Can I Use Worsted Yarn?
Yes, but the finished blanket will become dramatically smaller using the same stitch count.
For worsted yarn, make a gauge swatch and calculate a new foundation width.
Keep the body stitch count even.
Can Beginners Make This?
Yes.
You only need to know:
- chain
- single crochet
- double crochet
- slip stitch
After the foundation row, the entire body uses the same repeat.
Is There a Right and Wrong Side?
Both sides are attractive.
Because the stitch alternation is repeated on every row, the blanket has a similar textured appearance on both sides.
Do I Need to Block Chenille?
Usually very little blocking is necessary.
Many polyester chenille yarns do not respond to blocking the way wool does.
Follow the manufacturer’s care instructions.
Never apply excessive direct heat to synthetic chenille.
Can I Wash the Blanket?
Follow the yarn-label instructions.
A washable chenille is especially practical for:
- baby blankets
- family-room throws
- pet-friendly homes
Make sure all yarn ends are securely woven before washing.
Frequently Asked Questions
What is the row repeat?
One row:
sc, dc, sc, dc across
How many stitches are in the sample?
68 stitches
How many starting chains?
69 chains
Does the turning chain count as a stitch?
No.
The ch 1 is only for turning.
How many colors are used?
Three:
- warm ivory
- mushroom taupe
- pale seafoam
Do I need complicated post stitches?
No.
This original version uses only basic sc and dc stitches for the body.
Is the border required?
No.
The blanket can be used without a border, but two simple sc rounds make the edges look more finished.
Can I change colors every few rows instead?
Yes.
The stitch pattern works with:
- wide stripes
- narrow stripes
- random scrap stripes
- one solid color
The construction never changes.
Final Thoughts
The appeal of this blanket is how little there is to remember.
Once the foundation row is finished, every row is simply:
single crochet
then:
double crochet
and repeat.
The thick chenille yarn does the rest.
Wide blocks of ivory, mushroom, and seafoam make the blanket visually strong, while the alternating stitch heights add enough texture that the finished piece looks much more detailed than the actual pattern.
It is exactly the kind of blanket you can keep beside the sofa, memorize after a few minutes, and continue crocheting without constantly checking instructions.



