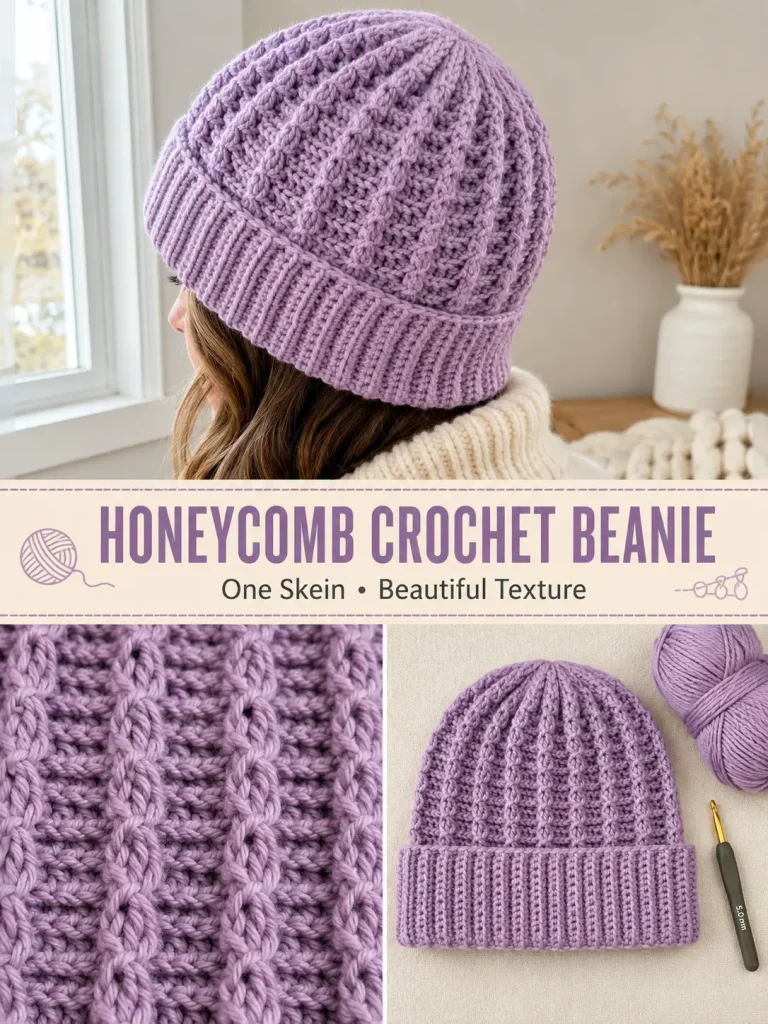
This cozy crochet beanie uses a beautiful raised honeycomb texture, a deep fold-up ribbed brim, and clever short-row shaping at the crown.
The hat is worked sideways in rows, not from the top down.
One section of every row creates the stretchy ribbed brim, while alternating back-loop slip stitches and half double crochet create the textured honeycomb body. Short rows remove bulk from the crown so the top closes neatly instead of forming a thick bunch.
The adult sample uses just one 100 g skein.
Pattern at a Glance
Skill level: Confident beginner / intermediate
Terminology: US crochet terms
Construction: Sideways rows, then seamed
Sample size: Adult, approximately 55–57 cm / 21¾–22½ in head circumference
Yarn: Worsted / light aran yarn, approximately 240 m / 262 yd per 100 g
Hook: 5 mm
Sample row count: 72 rows
Main repeat: 4 rows
Folded brim section: 26 stitches
Honeycomb/crown section: 30 stitches at full depth
Foundation: 56 chains
The source construction provided gives a tested adult 55–57 cm size. It mentions shortening the brim for smaller hats, but does not provide a fully tested child’s crown size, so the exact instructions below stay with the supported adult sizing.
Materials
You will need:
- 1 skein worsted/light aran yarn, approximately 100 g / 240 m
- 5 mm crochet hook
- Large-eye yarn needle
- Scissors
- Stitch marker
- Measuring tape
A wool/acrylic blend works especially well because it gives the honeycomb texture good definition while keeping the hat stretchy.
Abbreviations
- ch = chain
- sc = single crochet
- hdc = half double crochet
- sl st = slip stitch
- BLO = back loop only
- st = stitch
- sts = stitches
- rep = repeat
Important Construction Notes
The hat is crocheted sideways.
Each row contains two sections.
Brim Section
The first:
26 stitches
are single crochet.
These become the deep fold-up ribbed brim.
Honeycomb Section
The remaining section uses groups of:
6 hdc and 6 sl sts
worked in the back loops.
The different stitch heights create the raised honeycomb texture.
Crown Shaping
Every 4-row repeat contains two short rows.
Those rows stop 6 stitches before the crown edge.
The following row reconnects those 6 stitches.
This produces a narrower crown edge without complicated decreases.
Back Loop Only
From Row 2 onward, nearly all stitches are worked through the:
back loop only
of the stitch below.
Looking at the top of a crochet stitch, you will see a small V.
The loop farthest away from you is the back loop.
Working only into this loop creates the strong horizontal ribbing visible in the finished hat.
Special Edge Rule
At the very outer edge of the brim, work the last sc through both loops instead of BLO.
This helps keep the exposed brim edge straight and tidy.
Before You Begin
The full width of the crochet piece represents the height of the hat.
The sample uses approximately:
- 26 stitches for the fold-up brim
- 30 stitches for the main hat/crown
Total:
56 foundation chains
The source sample measures approximately:
16.5 cm / 6½ in from crown to the start of the brim
plus approximately:
15 cm / 6 in of brim depth before folding
Your measurements can vary depending on yarn and tension.
Foundation
Using your main yarn:
Ch 56.
Do not crochet tightly.
The foundation should remain flexible.
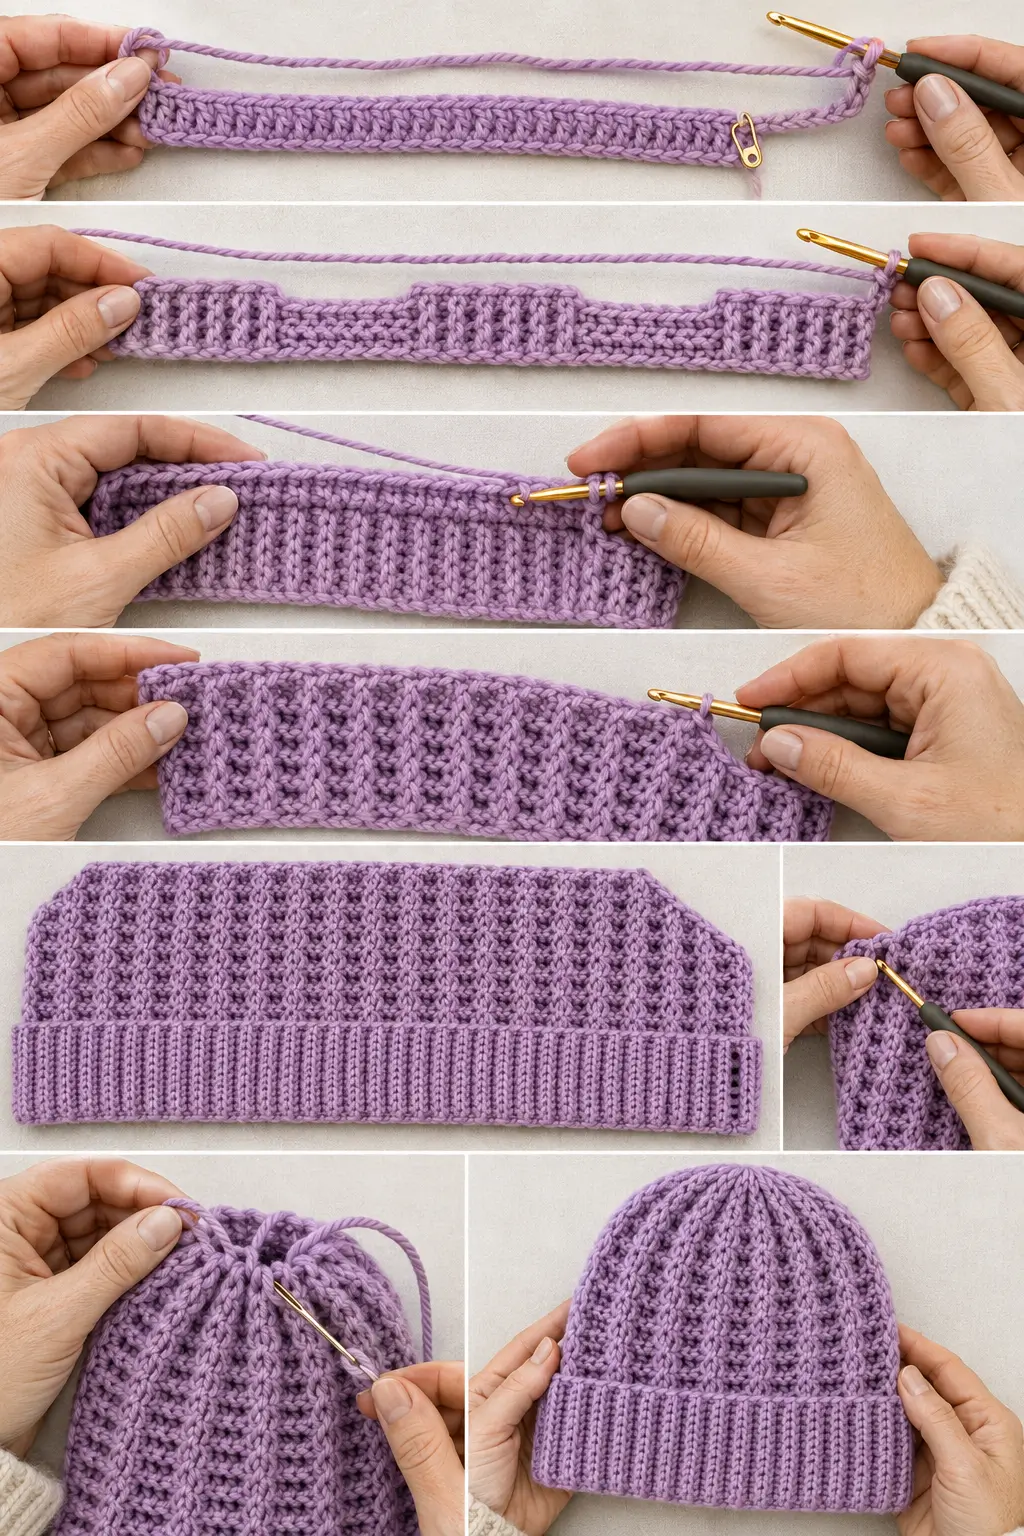
ROW 1 — FIRST SHORT ROW
Ch 1.
Starting in the second chain from the hook:
Brim
Sc in each of the next:
26 chains
Place a stitch marker in the 26th sc.
This marker separates the brim from the textured section.
Honeycomb Section
Work:
6 hdc
Then:
6 sl sts
Then:
6 hdc
Then:
6 sl sts
You have worked:
50 stitches total
There are still:
6 foundation chains left unworked
Do not crochet into them yet.
Ch 1.
Turn.
ROW 2 — SECOND SHORT ROW
This row returns from the crown toward the brim.
From this point onward, work in the back loops unless instructed otherwise.
Starting in the first stitch:
BLO sl st in next 6 sts
Then:
BLO hdc in next 6 sts
Then:
BLO sl st in next 6 sts
Then:
BLO hdc in next 6 sts
You have reached the marker.
Now work:
BLO sc in next 26 sts
For the final sc at the outer brim edge, insert through both loops.
You should have worked:
50 stitches
Ch 1.
Turn.
ROW 3 — EXTEND TO THE CROWN
Work from the brim toward the crown.
Brim
BLO sc in next:
26 sts
Move your marker to the final sc of this section.
Honeycomb
BLO sl st in next:
6 sts
BLO hdc in next:
6 sts
BLO sl st in next:
6 sts
BLO hdc in next:
6 sts
You have now reached the end of the short-row fabric.
Six foundation chains are still waiting at the crown.
Work:
1 sl st into each of those 6 remaining foundation chains
Do not tighten these slip stitches.
You have now reached the full crown edge.
Total worked across this row:
56 sts
Ch 1.
Turn.
ROW 4 — FULL-WIDTH RETURN ROW
Starting at the crown:
BLO sl st in next 6 sts
BLO hdc in next 6 sts
BLO sl st in next 6 sts
BLO hdc in next 6 sts
BLO sl st in next 6 sts
You have now worked the full:
30-stitch crown/honeycomb section
Continue across the brim:
BLO sc in next 26 sts
Work the final brim stitch through both loops.
Total:
56 sts
Ch 1.
Turn.
The 4-Row Honeycomb Repeat
Rows 1–4 form the complete shaping repeat.
From this point onward, repeat the same sequence.
The important difference is that after the first repeat, the 6 crown stitches you temporarily leave unworked are no longer foundation chains.
They will be the final 6 stitches of the previous full-width row.
ROW 5 — REPEAT ROW 1
Work:
26 BLO sc
Move marker.
Then:
6 BLO hdc
6 BLO sl sts
6 BLO hdc
6 BLO sl sts
Leave the final:
6 crown-edge stitches unworked
Ch 1.
Turn.
ROW 6 — REPEAT ROW 2
Work:
6 BLO sl sts
6 BLO hdc
6 BLO sl sts
6 BLO hdc
Then:
26 BLO sc
Work the final outer-edge sc through both loops.
Ch 1.
Turn.
ROW 7 — RECONNECT THE CROWN
Work:
26 BLO sc
Then:
6 BLO sl sts
6 BLO hdc
6 BLO sl sts
6 BLO hdc
You now reach the edge of the short row.
Six exposed stitches from the previous full-width row remain at the crown.
Work 6 slip stitches into those 6 exposed crown-edge stitches, one by one.
Keep these slip stitches relaxed.
Ch 1.
Turn.
ROW 8 — FULL-WIDTH RETURN
Work:
6 BLO sl sts
6 BLO hdc
6 BLO sl sts
6 BLO hdc
6 BLO sl sts
Then:
26 BLO sc
Work the final sc through both loops.
Ch 1.
Turn.
Continue the Pattern
Repeat:
Rows 5–8
until the hat reaches the required circumference.
Each 4-row repeat creates another section of honeycomb texture while continuing the crown shaping.
Sample Adult Hat
The sample shown in the supplied instructions uses:
72 rows total
That equals:
18 complete 4-row repeats
The final row should correspond to:
Row 4 / Row 8
—a full-width return row.
This is important because it allows the honeycomb pattern to meet correctly at the seam.
Do Not Depend Only on the Row Count
Your yarn and tension may differ.
Before seaming, wrap the strip around the intended wearer’s head.
The fabric should fit snugly but comfortably when slightly stretched.
For an adult head of approximately:
55–57 cm / 21¾–22½ in
the two short edges should meet without forcing the fabric.
If it is too loose, remove one complete 4-row repeat.
If it is too tight, add one complete 4-row repeat.
Whenever possible, finish on a Row-4-style full-width row.
What the Fabric Should Look Like
As the piece grows, you should see two clearly different sections.
Along One Long Edge
A deep ribbed single-crochet section.
This becomes the folded brim.
Above It
Raised alternating ridges that form elongated honeycomb shapes.
At the Opposite Long Edge
The fabric gradually narrows because of the repeated short rows.
This becomes the crown.
Why the Honeycomb Texture Appears
The pattern alternates groups of:
6 BLO slip stitches
and:
6 BLO half double crochets
Slip stitches create low, compressed sections.
Half double crochet creates taller sections.
When these blocks alternate from row to row, the fabric bends and rises into the textured honeycomb pattern.
Keep the Slip Stitches Loose
This is one of the most important parts of the entire pattern.
Do not pull your slip stitches tightly.
Tight slip stitches can make:
- the honeycomb section stiff
- the next row difficult to crochet
- the hat circumference smaller
- the crown shaping uneven
If necessary, consciously lift your working loop slightly higher when making each slip stitch.
PART 2 — SEAM THE HAT
When your piece reaches the correct circumference, finish after a full-width row.
Leave a long yarn tail.
Place the two short ends together with the wrong side facing outward.
The first and final rows should line up.
Slip-Stitch Seam
You can seam with the crochet hook.
Insert the hook through the corresponding edge loop on one side and the matching loop on the other side.
Work a slip stitch.
Continue matching the rows evenly.
Do not pull the seam tightly.
The seam should have approximately the same stretch as the surrounding fabric.
Continue from the brim edge all the way to the crown.
Fasten off, leaving enough yarn for securing if necessary.
Check the Seam
Turn the hat right side out temporarily.
The honeycomb texture should flow naturally across the seam.
The ribbed brim should also line up.
If the seam noticeably pulls or twists, undo it and work more loosely.
PART 3 — CLOSE THE CROWN
Turn the hat wrong side out again.
Thread a long yarn tail through a large-eye yarn needle.
Working around the entire crown edge, pass the needle through the edge loops.
Do not skip large sections.
Continue until you have gone completely around the crown.
Gather the Top
Pull the yarn slowly.
The crown should begin closing toward the center.
Do not yank the yarn sharply.
The short-row shaping has already removed much of the excess fabric, so only moderate gathering should be necessary.
Pull until the opening closes neatly.
Secure the Crown
Once closed:
Pass the needle across the gathered opening several times.
Stitch through opposite sections of the crown to reinforce it.
Knot securely on the inside.
Weave the tail through several nearby stitches.
Trim.
PART 4 — FOLD THE BRIM
Turn the hat right side out.
Fold the deep ribbed sc section upward.
For the sample construction, the brim is deliberately generous so you can adjust the finished hat depth.
Fold approximately:
2½–3 inches
or whatever depth feels most comfortable.
The remaining ribbing can sit inside the fold.
Finished Adult Size
The supplied construction is intended for approximately:
55–57 cm / 21¾–22½ in head circumference
with a generous folded brim.
Because crochet stretches, measure the actual piece rather than assuming every 72-row hat will fit identically.
Adjusting the Brim Depth
The original construction uses:
26 sc stitches
for a deep brim section.
If you want a shallower fold, you can reduce this number.
For example, instead of 26 brim stitches, you could make fewer foundation chains allocated to the sc section.
However, keep the honeycomb/crown section at:
30 stitches
if you want to preserve the same adult crown depth and honeycomb shaping.
Important Sizing Note
The supplied source mentions reducing the brim section for a child’s hat, but it does not provide a complete tested child-size crown circumference and row count.
For that reason, I would not label a reduced version as a tested children’s size without making a separate gauge and sizing calculation.
For the pattern above, use the supported adult 55–57 cm sizing.
How to Make the Hat Shallower
To reduce total depth while preserving the honeycomb:
reduce the number of brim sc stitches.
Every stitch removed from the brim section shortens the unfolded hat by approximately one stitch height.
You must also remove the same number from the starting chain.
Example:
If you reduce the brim from:
26 sts to 20 sts
reduce the foundation from:
56 chains to 50 chains
because the honeycomb section remains:
30 stitches
Do Not Change the Crown Short-Row Count Randomly
The:
6-stitch short-row section
is part of the crown shaping and honeycomb repeat.
Changing it affects:
- the crown angle
- honeycomb proportions
- the final closure
For a first hat, keep it exactly as written.
What If My Honeycombs Look Flat?
Check three things.
1. Are you working BLO?
Working through both loops will reduce the ribbed texture.
2. Are the slip stitches too tight?
They need to remain relaxed.
3. Are you alternating the 6-stitch sections correctly?
The pattern depends on consistent groups of six.
What If I Lose Track of the 26 Brim Stitches?
Keep the marker in the stitch where the brim ends.
Move the marker every time you reach that division.
This means you do not need to recount all 26 stitches on every row.
What If I Keep Missing the Last Brim Stitch?
The final stitch can tilt toward the edge and become difficult to see.
Look carefully for the last V.
On brim-ending rows, work that last sc through:
both loops
rather than BLO.
This also helps produce a cleaner edge.
What If the Hat Is Too Loose?
If you have not yet seamed it:
remove complete sets of:
4 rows
until the piece fits.
Do not remove only one or two rows unless you are prepared for the honeycomb pattern to stop matching correctly at the seam.
What If the Hat Is Too Tight?
Add another:
4-row repeat
Try it around the head again.
Continue until the strip fits with comfortable stretch.
What If the Crown Opening Is Too Bulky?
First check that you actually worked the short rows.
Rows 1–2 of every repeat should stop 6 stitches before the full crown edge.
Without those short rows, the top will contain substantially more fabric and become harder to gather neatly.
What If the Crown Has a Hole?
After gathering, use the same yarn tail to stitch across the center opening several times.
Alternate directions.
You can easily close a small remaining gap without changing the outside appearance.
Can I Add a Pom-Pom?
Yes.
After closing the crown, you can attach a removable pom-pom if desired.
For the clean ribbed look shown here, the hat also looks beautiful without one.
Can I Use a Different Yarn?
Yes.
A medium-weight yarn with good elasticity works best.
The original construction uses approximately:
240 meters per 100 grams
with a:
5 mm hook
If your yarn is significantly thicker or thinner, the row count and finished measurements will change.
Can I Use Acrylic?
Yes.
Acrylic works well and is easy to wash.
Choose one with enough softness and bounce to let the ribbing recover after stretching.
Can I Use Wool?
Yes.
Wool gives excellent elasticity and warmth.
A wool/acrylic blend is particularly practical for this style.
Can I Make a Matching Cowl?
Yes.
The same alternating BLO slip-stitch and hdc texture can be adapted into a rectangular or circular cowl.
For a cowl you do not need the 6-stitch crown short-row shaping because there is no crown to close.
Can I Make Matching Mittens?
The honeycomb stitch can also be used decoratively on mittens, but mitten shaping requires a separate pattern.
Do not simply use the hat stitch counts for mittens.
Frequently Asked Questions
Is the hat crocheted in the round?
No.
It is crocheted sideways in rows.
The first and final rows are joined afterward.
How many chains do I start with?
For the adult sample:
56 chains
How many stitches form the brim?
26 single crochet stitches
How many stitches form the full honeycomb/crown section?
30 stitches
Why are some rows only 50 stitches?
Those are the crown short rows.
They leave:
6 crown stitches unworked
to create shaping.
How many rows are in one repeat?
4 rows
How many rows are in the sample hat?
72 rows
or:
18 complete repeats
What size does the sample fit?
Approximately:
55–57 cm / 21¾–22½ in head circumference
Does the turning chain count as a stitch?
No.
The ch 1 is used only for turning.
Begin the row in the first actual stitch.
Are the stitches worked through both loops?
Mostly no.
From Row 2 onward, the texture is worked primarily in the:
back loop only
The final sc at the exposed brim edge is worked through both loops for a cleaner finish.
Do I need to decrease at the crown?
No traditional decreases are used.
The crown is shaped with:
short rows
and then gathered closed.
Why does the pattern use so many slip stitches?
The low height of the slip stitch contrasts with the taller half double crochet sections.
That difference is what produces the dimensional honeycomb effect.
Final Thoughts
The clever part of this hat is that the finished texture looks much more complicated than the actual repeat.
You are really working with only three basic stitches:
single crochet
half double crochet
and:
slip stitch
The brim stays stretchy because of the back-loop single crochet.
The alternating short and tall stitches create the honeycomb.
And instead of complicated crown decreases, a repeating 6-stitch short row quietly shapes the top while you crochet.
Once the 4-row rhythm becomes familiar, you simply keep repeating it until the strip fits around the head.
Seam it.
Gather the crown.
Fold the brim.
And a flat textured strip becomes a warm one-skein crochet beanie.




Hi,
I love the way this hat pattern is turning out. It looks similar to the almond stitch. However, the pattern doesn’t match the image shown at the top of this page. Is there any way you could direct me to the pattern for the hat in the image at the top of this page? I would love to make it as well. Thank you for your consideration.