Oversized Two-Color Crochet Scarf With Fringe
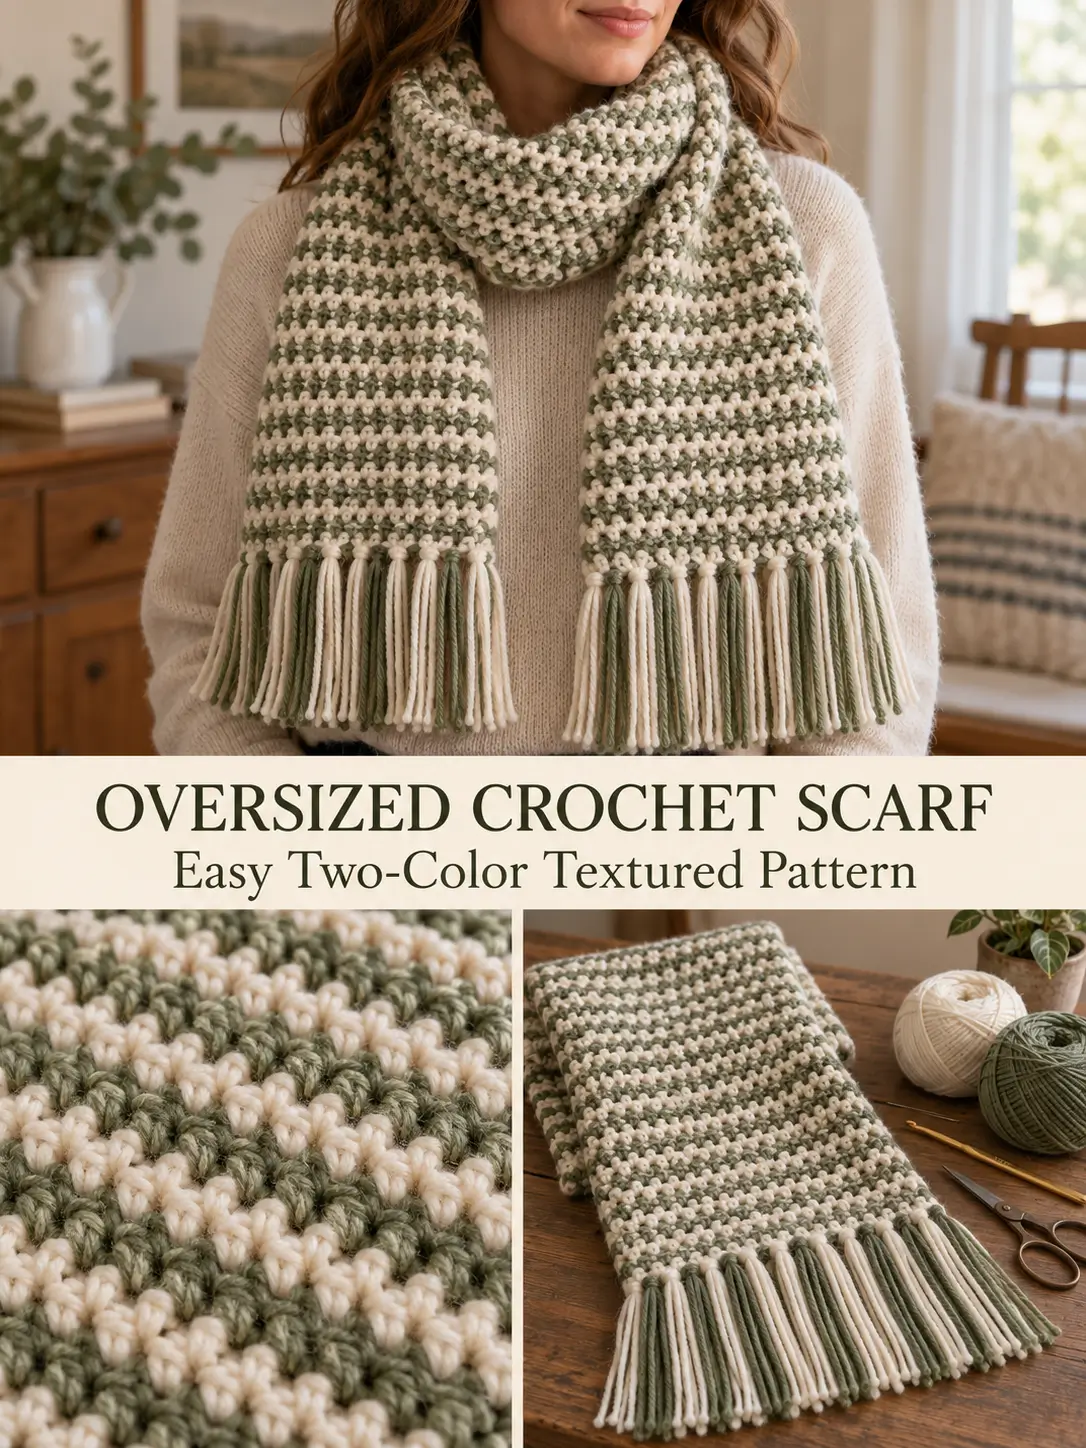
This oversized crochet scarf combines a very simple stitch repeat with alternating cream and sage-green yarn to create a dense, pebbled checkerboard texture.
The scarf is worked back and forth in one long rectangle. There is no shaping, increasing, decreasing, or seaming. The texture comes from alternating single crochet and double crochet stitches, then placing the opposite stitch into each stitch on the following row.
Finished Size
Approximately:
75 inches / 191 cm long
by
19 inches / 48 cm wide
This measurement does not need to be exact.
For an oversized scarf, the most important measurements are:
- about 18–20 inches wide
- about 70–80 inches long before fringe
The fringe adds approximately another 8–9 inches / 20–23 cm at each end.
Materials
- Medium weight #4 / worsted yarn
- Color A: soft cream or off-white
- Color B: sage, olive, or muted green
- 5 mm crochet hook
- Yarn needle
- Scissors
- Measuring tape
- Stitch markers, optional
For a scarf close to the sample size, plan on roughly 600 yards of each color, plus additional yarn if you want a full fringe. The reference scarf uses about 609 yards of off-white and 574 yards of olive for the body. (Zamiguz)
Skill Level
Easy
You only need to know:
- chain
- single crochet
- double crochet
- changing colors
- fastening off
The scarf is an excellent project if you want something repetitive enough to crochet while watching TV or listening to a podcast.
Abbreviations
This pattern uses US crochet terminology.
ch — chain
sc — single crochet
dc — double crochet
st / sts — stitch / stitches
rep — repeat
A — cream yarn
B — sage-green yarn
Understanding the Stitch Pattern
The scarf uses a simple two-stitch repeat:
single crochet, double crochet
The next row reverses the order:
double crochet, single crochet
This means that a tall double crochet is generally worked into a short single crochet from the previous row, while a short single crochet is worked into a tall double crochet.
That alternating stitch height creates the small raised texture visible across the scarf.
Changing color every row makes the texture much more pronounced because tiny sections of cream and green appear to interlock.
Important Turning-Chain Rule
The turning chains in this pattern do not count as stitches.
When a row begins with a single crochet:
ch 1, turn
and work the first sc directly into the first stitch.
When a row begins with a double crochet:
ch 2, turn
and work the first dc directly into the first stitch.
Do not skip the first stitch after turning.
Keeping this rule consistent will prevent the sides of the scarf from becoming narrower.
Starting Chain
With Color A — cream, ch:
56
This gives you 55 working stitches after the first row.
The stitch pattern needs an odd number of working stitches so that one row can begin and end with sc while the alternating row begins and ends with dc.
If you want to change the width, start with any even number of chains.
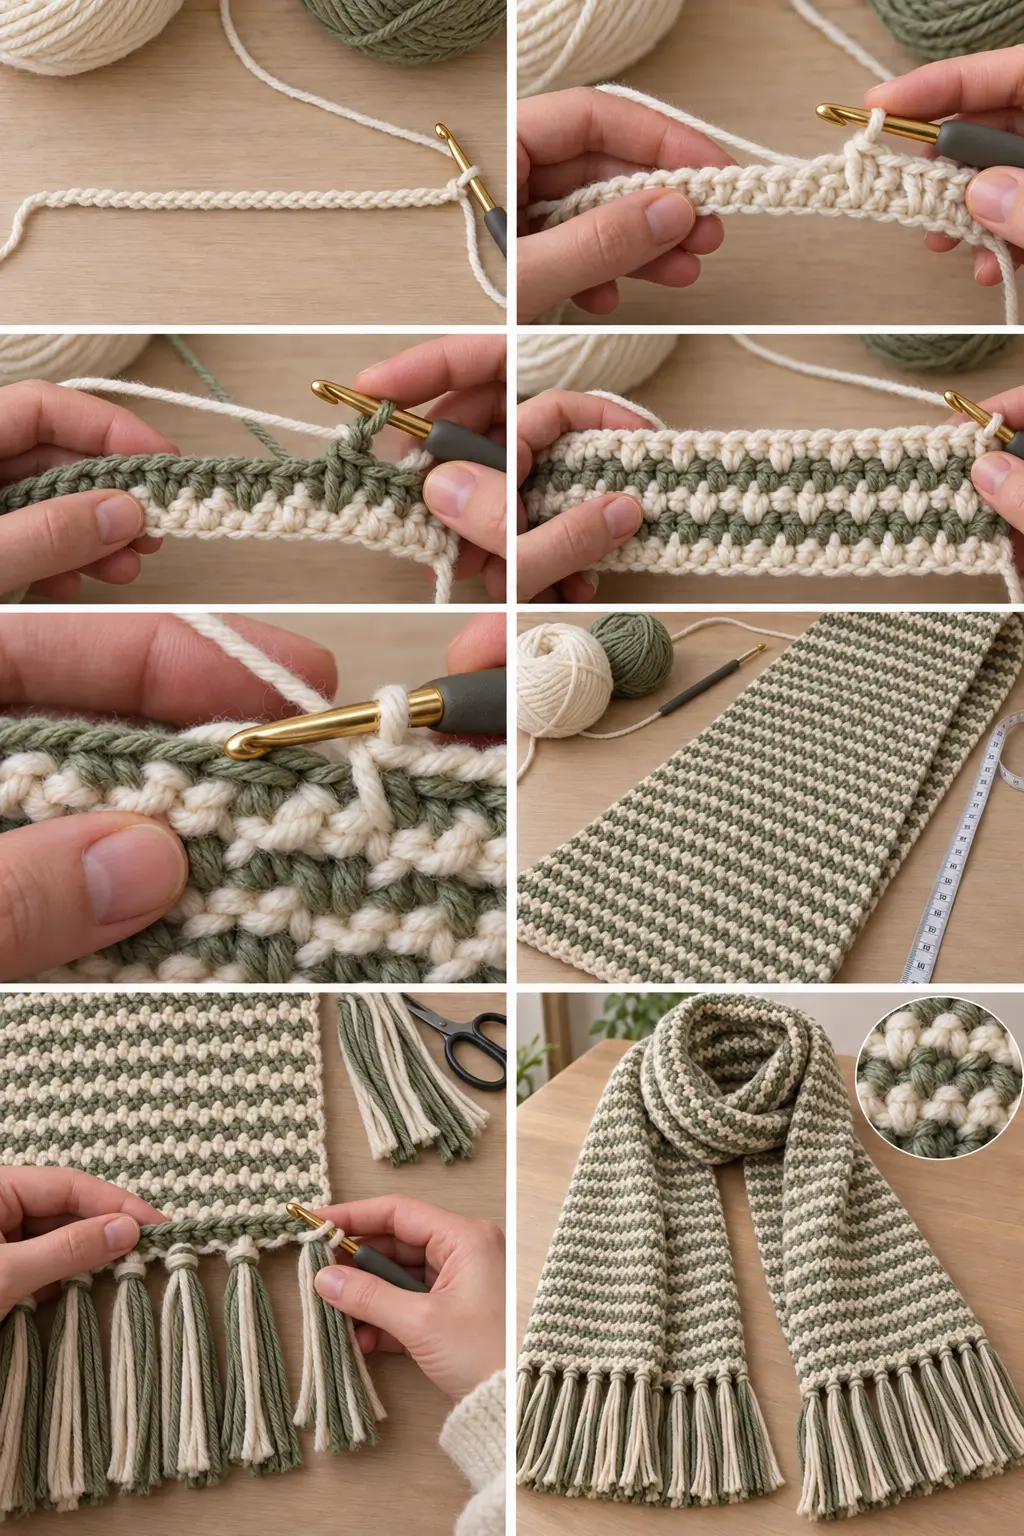
Row 1 — Cream
Beginning in the second chain from the hook, work:
sc in first chain
Dc in next chain.
Then repeat:
sc in next ch, dc in next ch
across.
Because you have 55 working stitches, the row will finish with:
1 sc
You should have:
55 stitches
Ch 2.
Turn.
Row 2 — Sage Green
Change to Color B before beginning the row.
Dc in the first stitch.
Sc in the next stitch.
Repeat:
dc in next st, sc in next st
across until only 1 stitch remains.
Dc in the final stitch.
You should still have:
55 stitches
Ch 1.
Turn.
Row 3 — Cream
Change back to Color A.
Sc in the first stitch.
Dc in the next stitch.
Repeat:
sc in next st, dc in next st
across until 1 stitch remains.
Sc in the final stitch.
55 stitches
Ch 2.
Turn.
Row 4 — Sage Green
Change to Color B.
Dc in first stitch.
Sc in next stitch.
Continue alternating:
dc, sc
across.
Finish with:
dc
Ch 1.
Turn.
Continue the Scarf
Continue repeating:
Row 2
and
Row 3
while changing color every row.
Your sequence will always look like this:
Cream rows
sc, dc, sc, dc… ending sc
Green rows
dc, sc, dc, sc… ending dc
Continue until the scarf reaches approximately:
75 inches / 191 cm long
The reference version reaches its target length at approximately 169 rows, although your exact row count may differ with tension and yarn.
Measuring the length is more reliable than forcing your scarf to match a particular number of rows.
How to Know Which Stitch Comes Next
If you put the scarf down and forget where you are, look at the first stitch of the row.
If you are beginning a cream row, start with:
sc
If you are beginning a green row, start with:
dc
Then alternate across.
You can also inspect the stitches below.
The goal is to work:
sc into the taller dc
and:
dc into the shorter sc
This keeps the textured pattern balanced.
Changing Colors Cleanly
For the neatest color transition, change yarn during the final pull-through of the last stitch of the row.
For example, at the end of a cream row:
Begin the final stitch using cream.
Stop when the stitch has its final loops waiting on the hook.
Drop the cream yarn.
Pick up the sage-green yarn.
Use green to complete the final pull-through.
Now turn and begin the next row with green.
This produces a much cleaner transition than finishing the entire stitch with the old color.
Carrying the Unused Yarn
Because the color changes every row, cutting the yarn after every row would create a huge number of ends.
Instead, carry the unused color inside the stitches.
Lay the unused yarn strand along the top of the previous row.
Crochet the new stitches around it as you work.
Keep the carried strand relaxed.
It should disappear inside the crochet without pulling the fabric inward.
At the end of the row, switch colors and carry the other yarn back across.
Avoid Pulling the Carried Yarn Too Tight
This matters especially on a scarf this wide.
After every 8–10 stitches, gently spread the crocheted fabric along the carried yarn.
The scarf should remain close to its full width.
If the fabric begins curling sideways or narrowing, the unused strand is probably being carried too tightly.
Undo that section and loosen the carried yarn before continuing.
Checking the Width
After approximately 10 rows, lay the scarf flat without stretching it.
It should measure close to:
19 inches / 48 cm wide
A small difference is fine.
If yours is dramatically narrower, your tension is probably tighter than the sample.
You can either:
- use a slightly larger hook
- restart with more chains
- accept a narrower scarf
For this project, exact gauge is not critical.
Keeping the Sides Straight
The easiest place to make mistakes is at the beginning and end of the rows.
Remember:
Every row contains:
55 stitches
Count occasionally.
Cream rows begin and end with:
sc
Green rows begin and end with:
dc
The turning chains do not count.
If you accidentally skip the first stitch after turning, the scarf will slowly become narrower.
Finishing the Scarf Body
When the scarf measures approximately 75 inches or reaches your preferred length, complete the final row.
Fasten off both yarn colors.
Leave tails about:
6–8 inches / 15–20 cm
long.
Thread each tail onto a yarn needle.
Weave it back and forth through several stitches of the same color.
Change direction once.
Weave through a few more stitches.
Trim the excess.
Adding the Fringe
The fringe is optional, but it gives this oversized scarf the long, cozy appearance shown in the finished version.
Use both cream and sage yarn so the fringe coordinates with the scarf body.
Cut the Fringe
Cut strands approximately:
18 inches / 46 cm long
Each strand will be folded in half when attached.
That produces fringe approximately:
8–9 inches / 20–23 cm long
after attaching and trimming.
A piece of cardboard approximately 9 inches wide makes cutting many identical strands much easier.
Wrap the yarn around the cardboard repeatedly.
Cut along one edge.
You now have matching strands without measuring them individually.
The reference scarf uses groups of four strands and approximately 28 groups at each end. (Zamiguz)
Make Fringe Bundles
For each tassel, hold together:
4 strands of yarn
You can use:
- 4 cream
- 4 green
- 2 cream + 2 green
Using mixed bundles gives the scarf a soft alternating effect that matches the two-color body.
Fold all 4 strands together in half.
You now have a loop at one end and 8 loose ends at the other.
Attach the First Fringe Bundle
Insert your crochet hook through a stitch along the short edge of the scarf.
Catch the folded loop of the fringe bundle.
Pull that loop approximately 1–2 inches through the scarf edge.
Pass all loose fringe ends through the loop.
Pull gently but firmly.
The bundle will tighten against the scarf edge.
Continue Adding Fringe
Attach fringe bundles evenly across the entire short edge.
Then repeat on the opposite end.
Keep the spacing consistent.
The scarf is wide enough to support a generous amount of fringe, but avoid crowding so many bundles together that the edge becomes stiff.
Trim the Fringe
Lay one scarf end flat.
Comb the fringe gently with your fingers.
Place a straight ruler or piece of cardboard across the ends if helpful.
Trim away the uneven yarn with sharp scissors.
Repeat on the second end.
The final fringe should look relaxed rather than perfectly rigid.
Finished Scarf Measurements
After completing the body, your scarf should be approximately:
75 inches / 191 cm long
19 inches / 48 cm wide
with approximately:
8–9 inches / 20–23 cm fringe
at both ends.
The result is intentionally oversized.
It should be long enough to:
- hang loose on both sides
- wrap once around the neck
- wrap more generously for cold weather
Making the Scarf Narrower
Start with fewer chains.
Keep your foundation chain an even number.
For example:
40 chains
will create:
39 working stitches
Then follow the exact same stitch pattern.
The scarf will be narrower, but nothing else needs to change.
Making the Scarf Wider
Add foundation chains in multiples of:
2
For example:
60 chains
gives:
59 working stitches
and:
64 chains
gives:
63 working stitches
The working stitch count should remain odd.
Making a Shorter Scarf
Simply stop crocheting when the rectangle reaches the length you want.
A more traditional scarf might measure approximately:
60–65 inches / 152–165 cm
before fringe.
There is no shaping at the ends, so you can stop after any completed row.
Making a One-Color Version
This texture also works beautifully in one solid color.
Ch 56.
Work Row 1 normally.
Then repeat the alternating stitch rows without changing yarn.
You will still work:
sc over dc
and:
dc over sc
The texture will be more subtle because there will be no contrasting color to emphasize it.
Making a More Colorful Version
You can change colors every row using three or more shades.
A soft palette might include:
- cream
- sage
- dusty rose
- muted gold
Or keep the body neutral and make the fringe colorful.
The stitch pattern does not need to change.
If Your Texture Looks Like Stripes
Make sure you are alternating the stitch heights.
Do not work:
sc into every stitch
or:
dc into every stitch
The textured effect depends on alternating:
sc, dc, sc, dc
and reversing that sequence on the next row.
If the Scarf Feels Too Stiff
A seed-stitch scarf should feel dense but still drape around the neck.
If the fabric feels rigid:
- loosen your tension
- try a 5.5 mm hook
- choose a softer worsted yarn
Do not use such a large hook that the fabric develops large holes.
The small pebbled texture should remain clearly visible.
If the Scarf Is Curling
A small amount of movement at the edges is normal while you crochet.
Severe curling usually means:
- the foundation chain is too tight
- the carried yarn is too tight
- the turning stitches are being pulled firmly
Try making the foundation chain with a slightly larger hook if needed.
Then return to the 5 mm hook for the scarf body.
Final Pattern at a Glance
Foundation:
Ch 56.
Row 1 — Cream:
Sc in 2nd ch, dc in next, alternate sc and dc across, ending sc.
55 sts.
Row 2 — Green:
Dc in first st, sc in next, alternate across, ending dc.
55 sts.
Row 3 — Cream:
Sc in first st, dc in next, alternate across, ending sc.
55 sts.
Repeat Rows 2 and 3 until the scarf measures approximately:
75 inches / 191 cm
Finish both ends with optional fringe made from approximately:
18-inch / 46 cm yarn strands
folded in bundles.
The finished scarf is a long, wide, cozy rectangle with a dense two-color texture and generous fringe—simple enough for an easy project, but visually much richer than basic rows of single crochet.