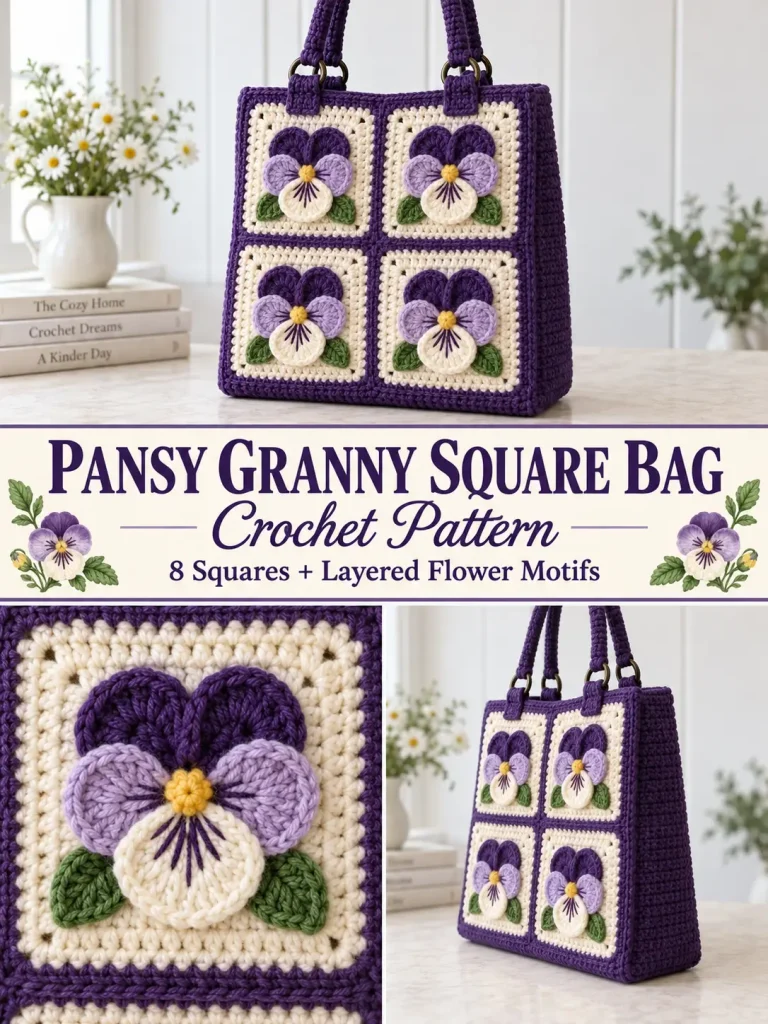
This flower granny square handbag combines creamy crochet squares, deep purple edging, layered pansy flowers, and sturdy rounded handles for a bag that looks much more complicated than it actually is.
Each flower is crocheted separately and sewn onto a simple granny square, which means you can work through the project in easy stages: make the squares, crochet the pansies, assemble the bag, then add the handles.
The finished handbag is roomy enough for everyday essentials while still keeping the structured, decorative look that makes floral crochet bags so eye-catching.
Pattern at a Glance
Skill level: Intermediate
Terminology: US crochet terms
Finished bag size: Approximately 10½–11 inches wide × 10 inches tall × 3 inches deep
Total height with handles: Approximately 18 inches
Construction: 8 granny squares + separate gusset + 2 handles
Squares: 4 front + 4 back
Flower motifs: 8
Hook: 4 mm
Yarn weight: Worsted / Category 4 cotton or cotton blend
Materials
You will need:
- 500–600 yards warm ivory worsted-weight cotton
- 300–350 yards deep violet or plum yarn
- 100–120 yards lavender yarn
- approximately 50 yards golden-yellow yarn
- approximately 120 yards leaf-green yarn
- 4 mm crochet hook
- yarn needle
- scissors
- stitch markers
- 4 purse rings, approximately 1¼ inches
- approximately 36 inches of 5 mm cotton cord for handles, optional
- fabric lining, optional
Choose a cotton or cotton-blend yarn with enough structure to prevent the bag from becoming too stretchy.
Color Palette
For the version shown in this pattern:
Color A
Warm Ivory
Color B
Deep Violet
Color C
Soft Lavender
Color D
Leaf Green
Color E
Golden Yellow
The contrast between the ivory squares and dark purple borders makes the flowers stand out beautifully.
Abbreviations
- ch = chain
- sc = single crochet
- hdc = half double crochet
- dc = double crochet
- tr = treble crochet
- sl st = slip stitch
- BLO = back loop only
- st = stitch
- sts = stitches
- sp = space
- rnd = round
- rep = repeat
Gauge
One completed granny square after edging should measure approximately:
5 to 5¼ inches square
Exact gauge is less important than making sure all 8 squares are the same size.
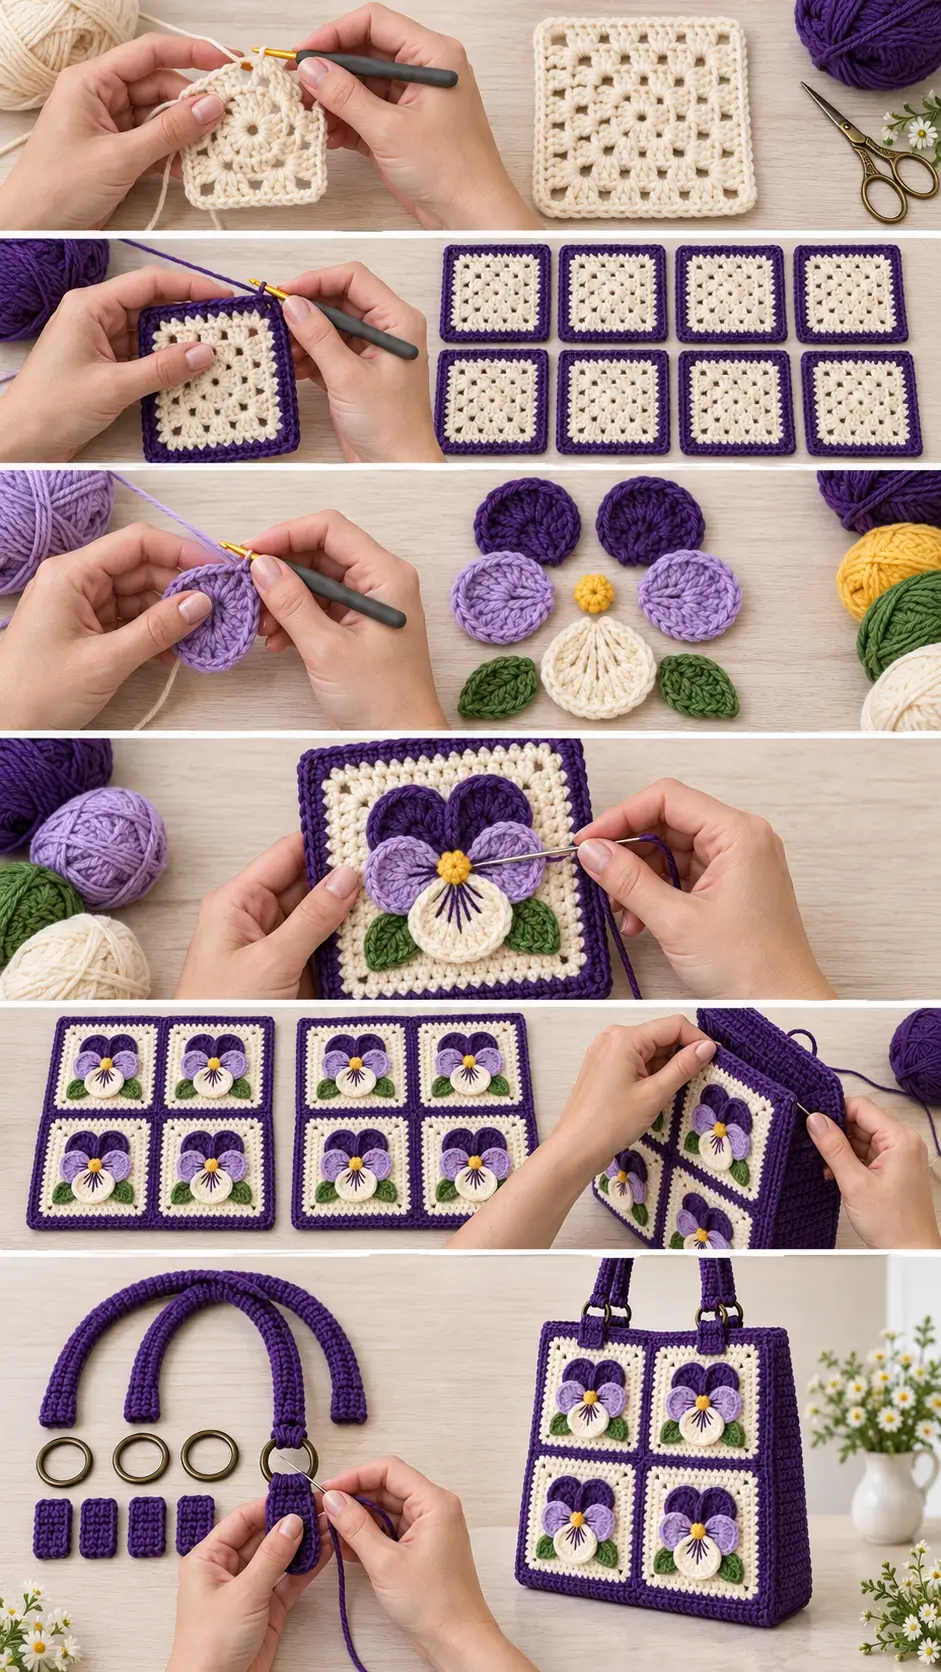
PART 1 — CROCHET THE GRANNY SQUARES
Make:
8 squares
Use warm ivory for the main square.
Round 1
Make a magic ring.
Ch 3.
The ch-3 counts as the first dc.
Work:
2 dc, ch 2
into the ring.
Then repeat:
3 dc, ch 2
3 more times.
Join with sl st to the top of the beginning ch-3.
You should have:
- 4 groups of 3 dc
- 4 ch-2 corner spaces
Round 2
Sl st across to the first corner space.
Ch 3.
Work:
2 dc, ch 2, 3 dc
in the same corner.
Ch 1.
In the next corner work:
3 dc, ch 2, 3 dc
Ch 1.
Repeat around.
Join with sl st.
Round 3
Sl st into the first corner.
Ch 3.
Work:
2 dc, ch 2, 3 dc
in the corner.
Ch 1.
Work:
3 dc
in the next ch-1 space.
Ch 1.
In the next corner work:
3 dc, ch 2, 3 dc
Continue around in this manner.
Join.
Round 4
Sl st into the first corner.
Work:
3 dc, ch 2, 3 dc
in each corner.
Along each side, work:
3 dc in each ch-1 space
with:
ch 1
between each cluster.
Join.
Round 5
Repeat the same granny-square construction.
Work:
3 dc, ch 2, 3 dc
in every corner.
Work:
3 dc
in every ch-1 side space.
Ch 1 between clusters.
Join.
Fasten off the ivory yarn.
PART 2 — PURPLE SQUARE EDGING
Join deep violet in any corner.
Ch 1.
Work:
3 sc
into the corner.
Sc evenly across the side, working into every stitch and ch-1 space.
At the next corner:
3 sc
Continue around.
Join with sl st.
Fasten off.
Block the square lightly.
Finished measurement should be approximately:
5–5¼ inches square
Make all 8 squares the same size.
PART 3 — CROCHET THE PANSY PETALS
Each flower contains:
- 2 deep-violet upper petals
- 2 lavender side petals
- 1 ivory lower petal
- 1 yellow center
- 2 green leaves
Make enough pieces for:
8 complete pansies
Petal Pattern
Use the appropriate petal color.
Ch 6.
Starting in the second chain from the hook:
Sc in next chain.
Hdc in next.
Dc in next.
Work:
2 tr
in the next chain.
Work:
5 tr
in the final chain.
Rotate the work so you can crochet along the unused loops on the opposite side of the foundation chain.
Work:
2 tr
in the next chain.
Dc in next.
Hdc in next.
Sc in final chain.
Sl st to the beginning.
Fasten off, leaving a sewing tail.
Petal Counts for One Flower
Make:
Deep Violet
2 petals
Lavender
2 petals
Warm Ivory
1 petal
Repeat until you have enough for 8 flowers.
That means:
- 16 deep-violet petals
- 16 lavender petals
- 8 ivory petals
PART 4 — YELLOW FLOWER CENTERS
Using golden yellow:
Make a magic ring.
Round 1
Work:
10 sc
into the ring.
Join.
Round 2
Work:
2 sc in each stitch around
You should have:
20 sc
Join.
Fasten off, leaving a long sewing tail.
Make:
8 yellow centers
PART 5 — CROCHET THE LEAVES
Using leaf green:
Ch 8.
Starting in second chain from hook, work:
- sc
- hdc
- dc
- tr
- dc
- hdc
Work:
3 sc
into the final chain.
Continue down the opposite side of the foundation chain:
- hdc
- dc
- tr
- dc
- hdc
- sc
Join with sl st.
Fasten off.
Make:
16 leaves
Two leaves are used for each flower.
PART 6 — ASSEMBLE EACH PANSY
Place one ivory granny square flat with the right side facing up.
Arrange the flower in the center.
Start with the leaves.
Place:
- one green leaf pointing toward the lower left
- one green leaf pointing toward the lower right
Next arrange the five petals.
Upper Petals
Place the two deep-violet petals at the top.
Allow them to overlap slightly in the center.
Side Petals
Place one lavender petal on each side.
Lower Petal
Place the ivory petal at the bottom.
Its upper edge should tuck slightly beneath the lavender petals.
The five petals should form a broad pansy shape rather than a perfectly round flower.
Add the Yellow Center
Place the yellow center over the points where all five petals meet.
Sew it securely through:
- center
- petals
- granny square
This helps anchor the entire flower.
Secure the Petals
Using matching yarn, sew around the inner half of each petal.
Leave the outer edges slightly free.
This creates a dimensional flower instead of flattening every petal against the square.
Secure the leaves in the same way.
Optional Pansy Markings
For a more realistic pansy look, thread a yarn needle with deep violet yarn.
On the lower ivory petal, add:
3 short straight stitches
radiating outward from the yellow center.
You can also add one short dark stitch onto each lavender petal.
Keep the markings subtle.
Repeat for All Squares
Attach one complete pansy to every granny square.
You should now have:
8 floral granny squares
PART 7 — MAKE THE FRONT PANEL
Take 4 squares.
Arrange them:
2 squares across × 2 squares down
Make sure all flowers face the same direction.
Using deep violet yarn, join the squares.
You can use:
- slip-stitch joining
- mattress stitch
- whip stitch
A visible purple slip-stitch join looks especially attractive because it coordinates with the square borders.
First join the two squares in each row.
Then join the two rows together.
PART 8 — MAKE THE BACK PANEL
Repeat with the remaining:
4 squares
You now have:
- 1 front panel
- 1 back panel
Both panels should measure approximately:
10–10½ inches square
before the final panel edging.
PART 9 — PANEL BORDER
Using deep violet, join yarn at one corner of the front panel.
Ch 1.
Sc evenly around the entire panel.
At each corner work:
3 sc
Join.
Fasten off.
Repeat around the back panel.
After edging, each panel should measure approximately:
10½–11 inches square
Keep both panels the same size.
PART 10 — CROCHET THE GUSSET
The gusset creates the bottom and side depth of the handbag.
Using deep violet:
Ch 125.
Gusset Row 1
Starting in second chain from hook:
Sc across.
124 sc
Ch 1.
Turn.
Rows 2–12
Sc in every stitch across.
124 sts
Ch 1 and turn after each row.
After Row 12, the strip should measure approximately:
3 inches wide
and approximately:
30–31 inches long
Fasten off, leaving a long sewing tail.
Check the Gusset Length
The gusset must travel:
down one side + across the bottom + up the opposite side
of one bag panel.
Before sewing, place the strip around the front panel.
If your square gauge is slightly different, adjust the gusset length by adding or removing rows or stitches as needed.
The gusset ends should stop at the two upper corners of the bag.
PART 11 — ATTACH THE GUSSET TO THE FRONT
Place the front panel right side up.
Pin or clip the gusset around:
- left side
- bottom
- right side
The floral front should remain visible.
Using deep violet yarn, sew or slip stitch the gusset to the panel.
At the bottom corners, ease the strip gently around the turn.
Do not pull the seam tightly.
The corners should remain softly rounded.
PART 12 — ATTACH THE BACK
Position the back panel on the remaining long edge of the gusset.
Make sure:
- flowers face outward
- upper edges line up
- both panels remain level
Sew the back to the gusset.
You should now have a structured three-dimensional handbag approximately:
10½–11 inches wide
10 inches high
3 inches deep
PART 13 — FINISH THE TOP OPENING
Join deep violet at one side of the top opening.
Ch 1.
Sc evenly around the complete opening.
This includes:
- front top edge
- first gusset end
- back top edge
- second gusset end
Join.
Top Round 2
Ch 1.
Sc in each stitch around.
Join.
Fasten off.
These two rounds help stabilize the opening before the handles are attached.
PART 14 — HANDLE RING TABS
Make:
4 tabs
Using deep violet:
Ch 5.
Tab Row 1
Sc in second chain from hook and across.
4 sc
Ch 1.
Turn.
Rows 2–12
Sc across.
4 sc
Ch 1 and turn.
Fasten off, leaving a long sewing tail.
Attach the Rings
Insert one tab through a purse ring.
Fold the tab in half around the ring.
Sew the two short ends securely to the top edge of the bag.
Position the rings approximately:
2 inches inward from each upper corner
Attach:
- 2 rings to the front
- 2 rings to the back
Make sure the front pair and back pair are evenly aligned.
PART 15 — CROCHET THE HANDLES
Make:
2 handles
Using deep violet:
Ch 65.
Handle Row 1
Starting in second chain from hook:
Sc across.
64 sc
Ch 1.
Turn.
Rows 2–5
Sc in BLO across.
64 sts
Ch 1 and turn.
After Row 5, fasten off, leaving a very long sewing tail.
Make a Rounded Handle
Cut a piece of cotton cord approximately:
17–18 inches long
Place it along the center of the crocheted handle strip.
Fold the crochet strip lengthwise around the cord.
Using the long yarn tail, whip stitch the long edges together.
This forms a firm rounded crochet handle.
Do not sew the final ¾ inch at either end closed yet.
Attach Handle to Rings
Pass one handle end through a front purse ring.
Fold approximately:
¾–1 inch
back against the handle.
Sew securely.
Repeat at the opposite ring.
Attach the second handle to the two back rings.
Make several passes with the yarn needle because the handles carry the weight of the bag.
Handle Size
Each finished handle should rise approximately:
7–8 inches above the bag
This produces comfortable handbag-style handles rather than long shoulder straps.
PART 16 — OPTIONAL DECORATIVE BEADS
If you want a more ornate finish, you can add one large wooden or acrylic bead beside each handle ring.
Choose beads with openings large enough for strong yarn or cord.
Secure them firmly.
Avoid delicate beads if the bag will be used frequently.
PART 17 — OPTIONAL CLOSURE
The handbag can be left open, but you can add a simple loop-and-button closure.
At the center of the back opening, join deep violet yarn.
Ch:
10–12
depending on button size.
Sl st back into the same area to form a loop.
Sew a coordinating button to the center front edge.
Check the fit before securing the button permanently.
OPTIONAL FABRIC LINING
A lining makes this bag much more practical for everyday use.
It prevents:
- keys from poking through stitches
- small items from falling through gaps
- the bag from stretching excessively
Cut two fabric rectangles approximately:
½ inch larger than the front and back interior measurements
plus a strip matching the gusset.
Sew the fabric pieces into a simple bag shape.
Insert the lining inside the crochet bag.
Fold the upper raw edge inward.
Hand sew the lining around the inside of the crochet opening.
Keep all stitches hidden from the outside.
Finished Measurements
The finished handbag measures approximately:
10½–11 inches wide
10 inches tall
3 inches deep
With handles:
approximately 18 inches total height
Individual measurements may vary slightly depending on yarn and tension.
How Many Granny Squares Do I Need?
This pattern uses:
8 squares total
Arrange them as:
Front
4 squares
Back
4 squares
Each panel uses a:
2 × 2 arrangement
How Many Flowers Do I Need?
Make:
8 pansy flowers
One flower is attached to every square.
For 8 flowers you will need:
- 16 deep-violet petals
- 16 lavender petals
- 8 ivory petals
- 8 yellow centers
- 16 green leaves
Can I Make the Bag Larger?
Yes.
The easiest method is to make larger granny squares.
For example, add another granny round to every square before the purple edging.
If each square grows by approximately 1 inch, the finished bag becomes roughly:
2 inches wider and 2 inches taller
because each panel contains two squares across and two down.
Remember to make a longer gusset to match.
Can I Make a Tote Version?
Yes.
Instead of the short handbag handles, crochet two longer straps.
For a shoulder tote, make each strap approximately:
24–28 inches long
For a crossbody version, make one adjustable strap approximately:
45–50 inches long
A lined bag is strongly recommended for long straps because shoulder straps place more stress on the upper edge.
Can I Use Acrylic Yarn?
Yes.
Acrylic works, but cotton produces a firmer bag.
If using soft acrylic:
- use a slightly smaller hook
- add fabric lining
- reinforce handle attachment points
This will reduce stretching.
Can I Use Crochet Handles Without Rings?
Yes.
Skip the purse rings and tabs.
Sew each finished handle directly to the top edge.
Overlap approximately:
1½ inches
of each handle end with the bag.
Sew in a square, then stitch diagonally through the square to create an:
X-shaped reinforcement
This provides much more strength than sewing only along one line.
Can I Use Different Flowers?
Absolutely.
Once you have the basic bag construction, the granny squares can be decorated with:
- daisies
- sunflowers
- roses
- violets
- simple leaves
- plain granny-square centers
You can also leave some squares undecorated for a cleaner design.
Alternative Color Palette — Soft Cottage
Squares: warm cream
Borders: dusty sage
Upper petals: muted plum
Side petals: dusty lavender
Lower petal: ivory
Centers: mustard yellow
Leaves: olive green
Alternative Color Palette — Vintage Pansy
Squares: antique cream
Borders: deep aubergine
Upper petals: burgundy-purple
Side petals: mauve
Lower petals: pale yellow
Centers: golden yellow
Leaves: moss green
Alternative Color Palette — Blue Garden
Squares: soft ivory
Borders: midnight navy
Upper petals: royal blue
Side petals: powder blue
Lower petals: white
Centers: yellow
Leaves: forest green
What If My Granny Squares Are Different Sizes?
Block every square before joining.
If one square is slightly smaller:
- lightly stretch it while blocking
- pin it to the same dimensions as the others
- allow it to dry completely
Large differences usually mean your tension changed while crocheting.
What If the Bag Feels Too Soft?
Try one or more of these:
- use cotton yarn
- reduce hook size
- add fabric lining
- add lightweight interfacing to the lining
- reinforce the top edge
- use cord inside the handles
The flower motifs can remain soft while the bag itself stays structured.
What If the Flowers Curl?
Lightly steam or wet block the petals before attaching them.
Do not flatten them completely.
The outer portions of the petals should remain slightly raised for a dimensional pansy effect.
What If the Bag Stretches When Filled?
The most effective solution is a fabric lining.
You can also work the gusset with a slightly smaller hook for a denser fabric.
Avoid carrying very heavy items in an unlined crochet handbag.
Final Thoughts
The secret to this bag is making the decorative part separately from the structural part.
The granny squares themselves are simple.
The bag construction is just:
four squares for the front + four squares for the back + one gusset.
Then the pansies transform those basic squares into something much more dramatic.
The combination of deep violet edging, warm ivory crochet, layered flowers, green leaves, and rounded handles creates a handbag that looks detailed and special while still being built from manageable pieces.
It is also an easy design to customize. Change the flower colors, make larger squares, add a lining, or switch the short handles for shoulder straps to create a completely different version from the same basic pattern.




this is a beautiful bag.. I am going to try and make it!!!
TY for sharing