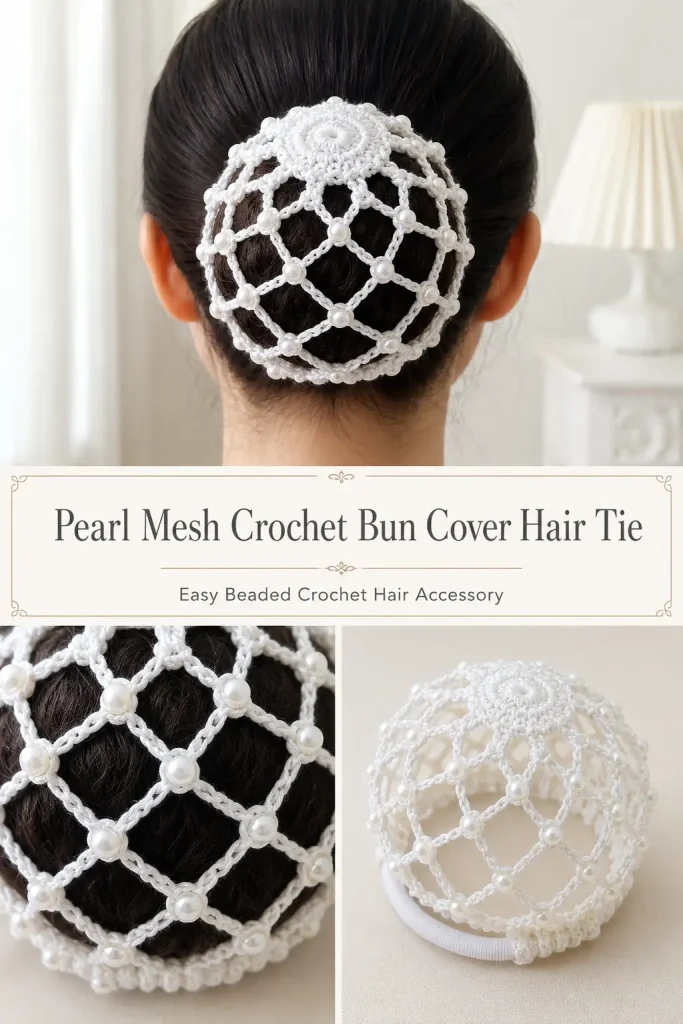
This pearl mesh crochet bun cover turns a simple hair elastic into an elegant handmade accessory. The open diamond-style netting sits neatly over a bun, while the pearl beads add a delicate decorative finish.
Although the finished piece looks detailed, the construction uses basic crochet stitches and repeated chain loops. It is a lovely beginner crochet project for weddings, special occasions, dance performances, summer hairstyles, or handmade gifts.
Description
The finished crochet bun cover has a small circular center that expands into a soft mesh dome. Alternating rounds of plain chain loops and pearl-decorated loops create an airy netted texture. The lower edge is gathered securely around a matching hair elastic, allowing the cover to stretch around different bun sizes while keeping the hairstyle neat.
Materials
- Fine crochet thread in white or your preferred color
- 1 mm crochet hook
- Size 8 pearl beads
- Hair elastic in a matching color
- Fine needle that fits through the bead holes
- Stitch marker
- Scissors
- Yarn needle for finishing
The original version uses a 1 mm hook, size 8 pearl beads, a white hair elastic, and a center made with 10 half double crochet stitches.
Abbreviations
- ch – chain
- dc – double crochet
- hdc – half double crochet
- MR – magic ring
- sc – single crochet
- sl st – slip stitch
- sp – space
- st – stitch
- sts – stitches
Pattern Notes
- This pattern uses US crochet terminology.
- Thread all the required pearl beads onto the crochet thread before beginning.
- The bead is secured by sliding it close to the hook and making the next chain around it.
- The first mesh round creates five sections around the center.
- Beaded and unbeaded mesh rounds are alternated.
- Continue the mesh until it reaches the depth needed to cover your bun.
- The tutorial sample uses approximately six mesh rounds before the final attachment round.
- The last mesh round must be worked without beads so it can be attached comfortably to the elastic.
- Keep the chain loops relaxed and even. Tight chains may prevent the cover from stretching properly.
Step-by-Step Instructions
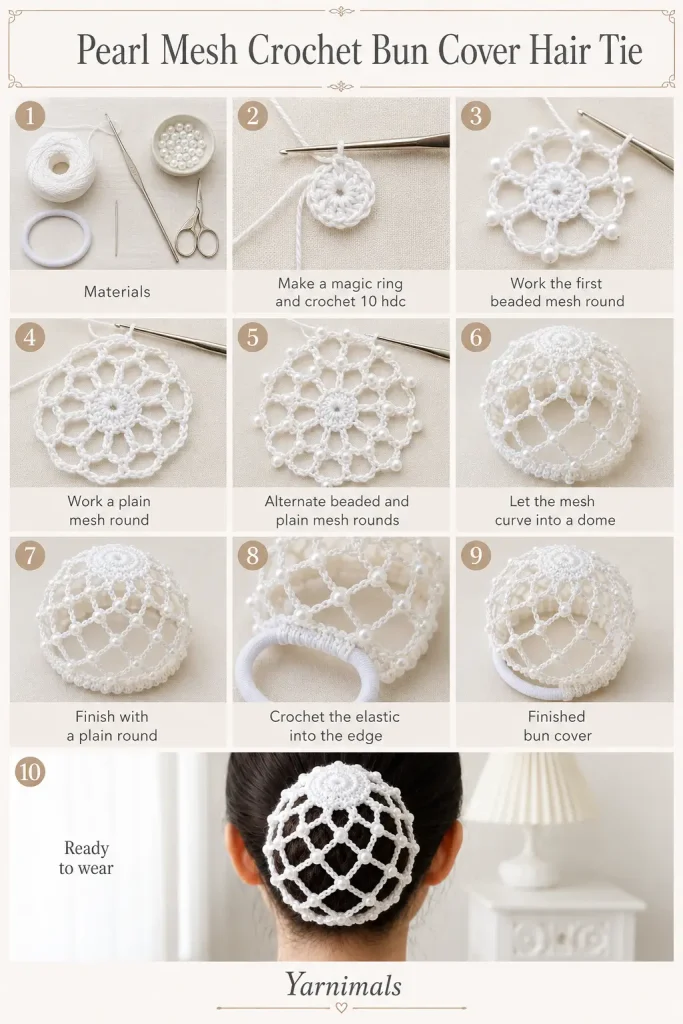
Prepare the Beads
Using a fine needle, thread a small quantity of size 8 pearl beads onto the crochet thread.
Slide the beads farther down the thread so they do not interfere while you make the center. Bring one bead forward only when the pattern tells you to add it.
The amount needed depends on the number of beaded rounds you make. Approximately half a strand of beads should be more than enough for one bun cover.
Crochet the Center
Make an MR.
Work 10 hdc into the ring.
Pull the ring firmly closed.
Join with a sl st in the first hdc.
You should now have a small, flat circular center with 10 stitches.
First Beaded Mesh Round
Ch 5.
Slide one pearl bead up the thread until it sits beside the hook.
Ch 1 to secure the bead. You now have a six-chain section with the pearl held in the final chain.
Skip the next stitch of the center and work 1 sc in the following stitch.
Repeat around:
Ch 5, slide one bead forward, ch 1 around the bead, skip 1 st, sc in the next st.
Continue until the round is complete. The 10-stitch center produces five beaded mesh sections.
At the end of the round, ch 2 and join in the third chain of the beginning chain section. A sl st may be used for the join.
First Plain Mesh Round
This round is worked without beads.
Ch 5.
Work 1 dc into the next mesh section or chain space.
Repeat around:
Ch 5, dc into the next mesh space.
Continue around the entire piece.
To close the round, ch 2 and join in the third chain of the beginning chain section.
The work will begin to curve slightly. This shaping creates the rounded cover that sits over the bun.
Second Beaded Mesh Round
Ch 5.
Bring one pearl bead forward.
Ch 1 to secure the bead.
Work 1 dc into the next mesh space.
Repeat around:
Ch 5, slide one bead forward, ch 1 around the bead, dc into the next mesh space.
At the end, ch 2 and join in the third chain of the beginning chain section.
Continue the Mesh
Continue alternating the two mesh rounds.
Beaded Round
Ch 5, slide one bead forward, ch 1 around the bead, and work 1 dc into the next mesh space.
Repeat around.
Plain Round
Ch 5 and work 1 dc into the next mesh space.
Repeat around without adding beads.
As more rounds are added, the crochet mesh will naturally form a small dome. Check the depth regularly by placing it over the intended bun or a similar rounded object.
Continue until the net is deep enough to cover the bun comfortably. The sample uses approximately six mesh rounds, but you may add or remove rounds to change the size.
Final Plain Mesh Round
The final round must be worked without beads.
Ch 5.
Work 1 dc into the next mesh space.
Repeat around:
Ch 5, dc into the next mesh space.
Close the round with the same ch-2 joining method.
Do not fasten off. The working thread will now be used to attach the hair elastic.
Attach the Hair Elastic
Place the matching hair elastic directly behind the final crochet round.
Insert the hook through the next mesh section and under the elastic.
Work 1 hdc around the elastic, catching the crochet mesh and the elastic together.
Continue working hdc stitches around the complete elastic. Gather each mesh section evenly as you crochet.
Make sure every section of the final round is attached. Do not leave any loose spaces that could pull away from the elastic.
The wide mesh edge will gather as it is joined to the smaller elastic. This gathering creates the ruffled lower band visible around the finished bun cover.
You may use sc instead of hdc for a narrower, firmer edge.
Finishing
Join the final stitch with a sl st.
Cut the thread, leaving a tail long enough to secure.
Pull the tail through the final loop and tighten.
Use the yarn needle to weave the tail securely through several stitches around the elastic.
Trim the excess thread.
Stretch the elastic gently and arrange the gathered stitches so they are distributed evenly around the band.
Slide the pearl mesh cover over a finished bun and allow the elastic edge to sit securely around its base.
Tips and Variations
Use crochet thread and pearls in the same color for a soft, coordinated appearance. White thread with white pearls creates a bridal or formal look, while black, burgundy, navy, or gold can make the accessory more dramatic.
A larger hook will create a softer, more open mesh. A smaller hook produces a firmer and more structured cover.
For a smaller child-sized bun cover, make fewer mesh rounds. For a large or thick bun, add additional alternating rounds before attaching the elastic.
Avoid pulling the beaded chains too tightly. Each pearl should sit neatly at the top of its loop without twisting the surrounding stitches.
Test the hair elastic before attaching it. It should stretch easily around the bun but return to its original size without becoming loose.
Size 6 beads may also be used for a more noticeable pearl effect, provided the bead holes are wide enough for the crochet thread.
The same pattern can be made without beads for a simple everyday mesh bun cover.
Frequently Asked Questions
Can a beginner make this crochet bun cover?
Yes. The pattern uses chains, single crochet, half double crochet, double crochet, and slip stitches. The repeated mesh rounds become easy once the first two rounds are completed.
How do I make the bun cover larger?
Add more alternating beaded and plain mesh rounds before working the final plain round. Check the cover against the bun regularly so it does not become too deep.
Can I add a pearl to every round?
You can, but alternating the pearl rounds with plain rounds keeps the finished accessory lighter and prevents the design from becoming crowded or heavy.
Conclusion
This pearl mesh crochet bun cover is a delicate way to dress up a simple hairstyle with handmade texture. The repeating chain pattern is relaxing to crochet, and the elastic edge makes the finished accessory practical as well as decorative. Save the pattern and try it in your favorite thread and pearl combinations for weddings, parties, dance outfits, or elegant everyday buns.




This look so elegant so I want to try it but I can’t understand properly. I wish I could watch the video of the this.
Thank you!