Pink Blossom Axolotl Amigurumi Crochet Pattern
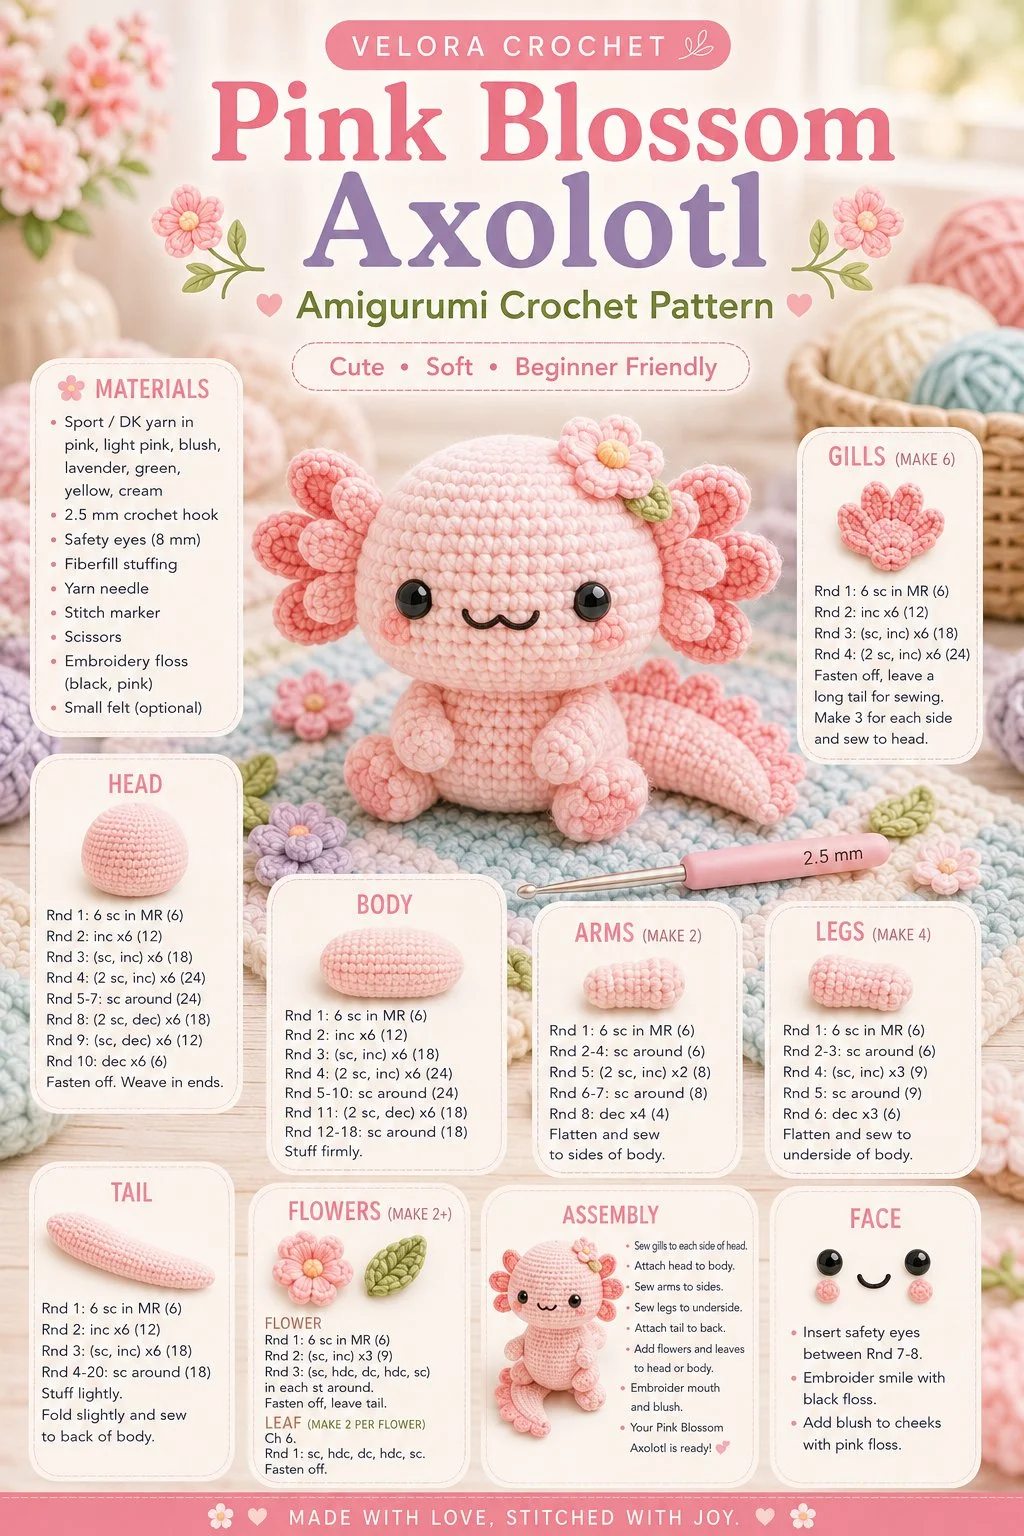
Create an adorable pink blossom axolotl plush with this fun crochet pattern. This delightful project features a rounded head, a soft body, tiny legs, a long tail, petal-shaped side gills, and charming little flower accents. It’s not only trendy but also easy to construct, making it suitable for all skill levels, including beginners. Dive into this cozy DIY crochet project and bring your very own pastel axolotl to life!
Materials
- Worsted weight yarn in pink, green, and a contrasting color for flower accents
- Crochet hook (size G/4.0 mm)
- Yarn needle
- Stuffing
- Stitch marker
- Scissors
Abbreviations
- MR: magic ring
- ch: chain
- sc: single crochet
- inc: increase
- dec: decrease
- sl st: slip stitch
Instructions
Head
- Start with a magic ring.
- Round 1: 6 sc in MR (6 stitches)
- Round 2: inc around (12 stitches)
- Round 3: (sc, inc) around (18 stitches)
- Round 4: (2 sc, inc) around (24 stitches)
- Rounds 5-10: sc in each stitch (24 stitches)
- Fasten off and leave a long tail for sewing.
Body
- Start with a magic ring.
- Round 1: 6 sc in MR (6 stitches)
- Round 2: inc around (12 stitches)
- Round 3: (sc, inc) around (18 stitches)
- Round 4: (2 sc, inc) around (24 stitches)
- Rounds 5-12: sc in each stitch (24 stitches)
- Round 13: (2 sc, dec) around (18 stitches)
- Rounds 14-15: sc in each stitch (18 stitches)
- Round 16: (sc, dec) around (12 stitches)
- Round 17: sc in each stitch (12 stitches)
- Fasten off, leaving a long tail.
Gills
- Start with a magic ring.
- Round 1: 6 sc in MR (6 stitches)
- Round 2: inc around (12 stitches)
- Rounds 3-4: sc in each stitch (12 stitches)
- Fasten off, leaving a long tail for sewing. Make two gills.
Arms
- Start with a magic ring.
- Round 1: 5 sc in MR (5 stitches)
- Rounds 2-5: sc in each stitch (5 stitches)
- Fasten off, leaving a long tail for sewing. Make two arms.
Legs
- Start with a magic ring.
- Round 1: 6 sc in MR (6 stitches)
- Rounds 2-4: sc in each stitch (6 stitches)
- Fasten off, leaving a long tail for sewing. Make two legs.
Tail
- Start with a magic ring.
- Round 1: 6 sc in MR (6 stitches)
- Round 2: inc around (12 stitches)
- Rounds 3-6: sc in each stitch (12 stitches)
- Round 7: (sc, dec) around (8 stitches)
- Rounds 8-10: sc in each stitch (8 stitches)
- Fasten off, leaving a long tail for sewing.
Flower Details
Make small flowers by chaining four and joining with a slip stitch to form a circle. Work five petals with sc around the circle. Sew onto the axolotl body as desired.
Face Details
Sew on small black beads or embroidery for eyes. You can also create a small stitched smile underneath the eyes to give your axolotl a friendly expression.
Assembly
- Attach the head to the body using the long tail from the head.
- Sew gills on either side of the head.
- Attach arms on the upper sides of the body.
- Sew legs at the bottom of the body.
- Finally, sew the tail at the back.
- Add flower details wherever you like to bring even more charm.
Tips for the Best Result
- Avoid overstuffing your axolotl to keep it looking soft and cuddly.
- Use stitch markers to keep track of your rounds, especially when making the head and body.
- Take your time when sewing the limbs to ensure they are symmetrical and securely attached.
Conclusion
This delightful pink blossom axolotl plush makes a wonderful gift for anyone who loves cute and cuddly creations or just as a unique decoration for your own home. Have fun experimenting with different color combinations or embellishments to give your plush a one-of-a-kind personality! Happy crocheting!