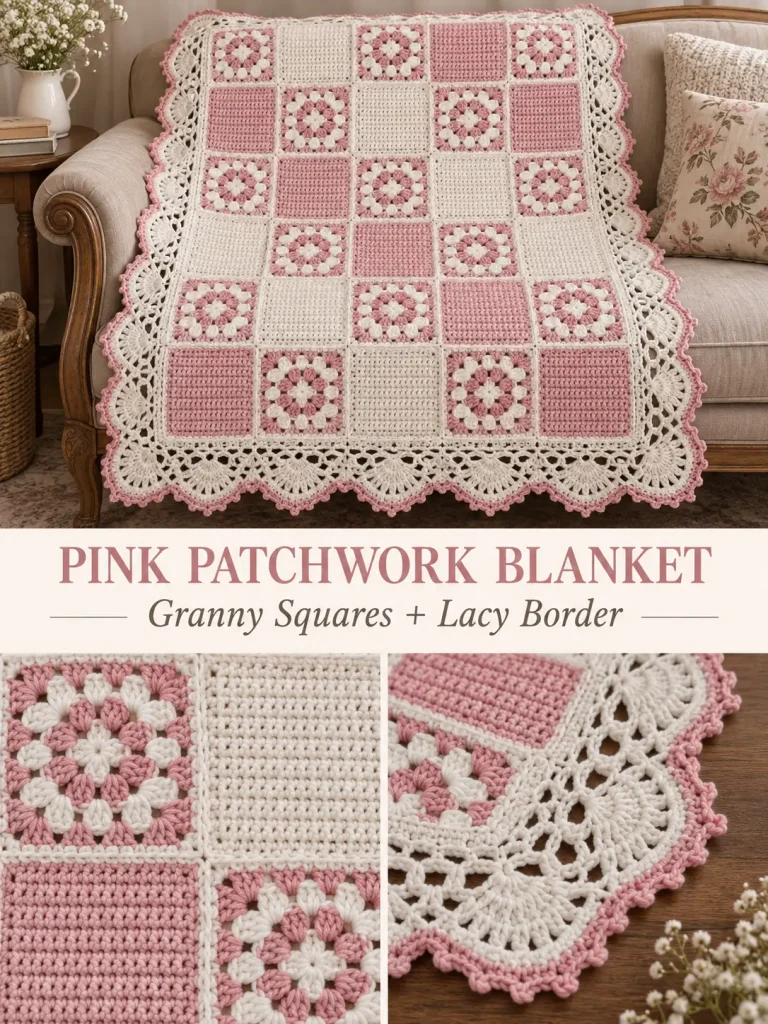
This soft pink-and-white crochet blanket combines two different square styles: classic granny squares with alternating colors and simple solid crochet squares. Once the blocks are joined, a wide openwork fan border gives the blanket the decorative vintage finish seen in the inspiration.
The photograph clearly shows the overall construction, although an exact original row-by-row pattern cannot be recovered from an image alone. The pattern below is therefore an original, complete construction designed to reproduce the same patchwork look without copying an unknown original pattern.
Skill Level
Confident Beginner to Intermediate
The individual squares use basic stitches. The most important skills are keeping every block the same size, joining the squares evenly, and working the multi-round lace border.
Finished Size
Using the 5 × 6 layout below:
- 30 squares total
- each blocked square: approximately 6 inches
- joined center: approximately 30 × 36 inches
- finished blanket with border: approximately 34 × 40 inches
For a larger blanket, simply make additional squares.
Materials
- DK / light #3 yarn in soft pink
- DK / light #3 yarn in cream or white
- Approximately 1,400–1,700 yards total for the 30-square version
- 4 mm crochet hook
- Yarn needle
- Scissors
- Stitch markers
- Measuring tape
- Blocking mats and pins, optional but recommended
Choose a soft washable yarn if making the blanket for a baby or child.
Abbreviations — US Terms
ch – chain
sl st – slip stitch
sc – single crochet
hdc – half double crochet
dc – double crochet
st(s) – stitch(es)
sp – space
ch-sp – chain space
Special Stitches
Granny Cluster
Work 3 dc into the same space.
Granny Corner
Work:
3 dc, ch 2, 3 dc
into the same corner space.
Picot
Ch 3, then sl st into the first chain made.
This creates the tiny pointed pink detail along the final border.
Blanket Construction
The blanket uses three types of squares:
Square A — Pink & White Granny Square
Make 15.
Square B — Solid White Square
Make 7.
Square C — Solid Pink Square
Make 8.
All squares are finished with a preparation round so they can be blocked to the same size and joined neatly.
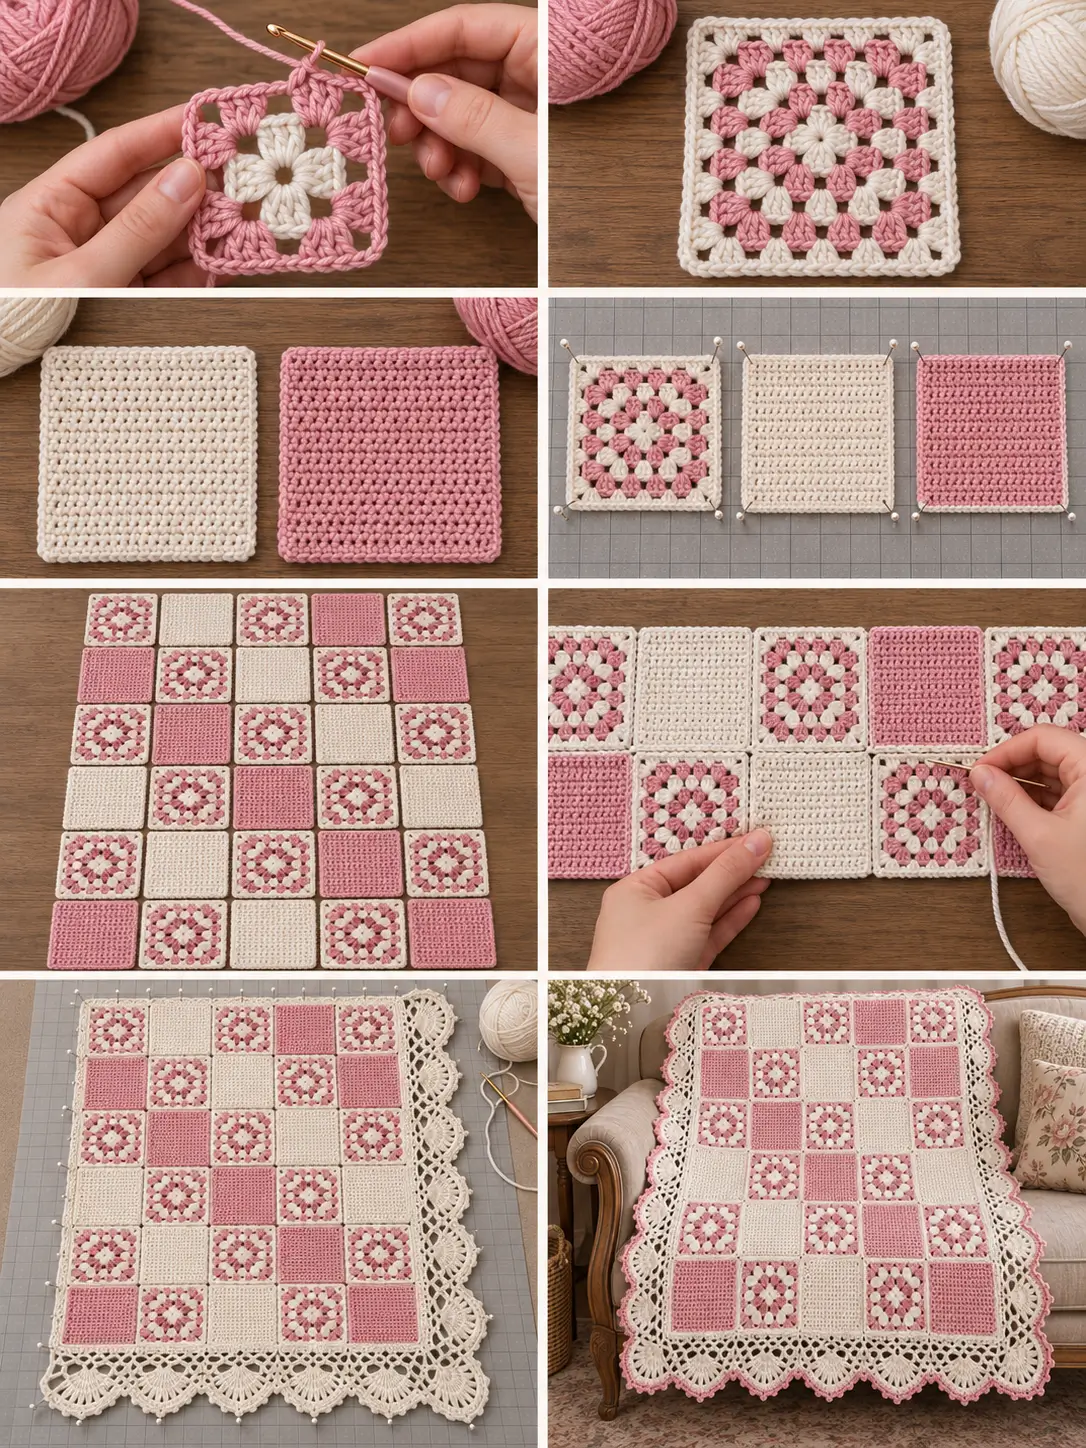
Square A — Pink & White Granny Square
The granny squares create the open, textured sections visible throughout the blanket.
Use alternating pink and white rounds.
Round 1 — White
Make a magic ring.
Ch 3. The ch-3 counts as the first dc.
Work:
2 dc into the ring, ch 2.
Then repeat 3 more times:
3 dc into ring, ch 2.
Join with a sl st to the top of the beginning ch-3.
You should have:
- four groups of 3 dc
- four ch-2 corner spaces
Fasten off white.
Round 2 — Pink
Join pink yarn in any ch-2 corner space.
Ch 3 and work 2 dc in the same corner space.
Ch 2, then work 3 dc into that same corner.
You have formed the first corner.
Ch 1.
In each of the next three corner spaces, work:
3 dc, ch 2, 3 dc
with ch 1 between corners.
Join with a sl st.
Fasten off pink.
At the end of this round, the square should have four clear corners.
Round 3 — White
Join white yarn in any corner.
Work:
3 dc, ch 2, 3 dc
in the corner.
Ch 1.
Work 3 dc in the next ch-1 side space.
Ch 1.
In the next corner work:
3 dc, ch 2, 3 dc.
Continue around in this manner.
Each side now contains one granny cluster between the two corners.
Join and fasten off.
Round 4 — Pink
Join pink in a corner.
Work the normal granny corner:
3 dc, ch 2, 3 dc.
Ch 1.
Work 3 dc in each ch-1 space across the side, placing ch 1 between clusters.
At the next corner work:
3 dc, ch 2, 3 dc.
Repeat around.
Join and fasten off.
There should now be two side clusters between each pair of corners.
Round 5 — White
Repeat the same granny-square construction.
Work:
3 dc, ch 2, 3 dc
in every corner.
Work:
3 dc
in every ch-1 space along each side, with ch 1 between clusters.
Join and fasten off.
The granny square should now have three side clusters between its corner groups.
Square B — Solid White Square
Use white yarn.
Foundation
Ch 25.
Row 1
Hdc in the second chain from the hook and in every chain across.
24 hdc
Ch 1 and turn.
The turning chain does not count as a stitch.
Rows 2–20
Hdc in each of the 24 stitches across.
Ch 1 and turn after every row.
After Row 20, check the shape.
The block should be close to square. Because crochet tension varies, you may need one additional row or may need to stop one row earlier.
The important requirement is that the block can be blocked to approximately 6 × 6 inches.
Fasten off.
Square C — Solid Pink Square
Make this square exactly like Square B, but use pink yarn.
Foundation
Ch 25.
Row 1
Hdc in second chain from hook and across.
24 hdc
Ch 1 and turn.
Rows 2–20
Hdc across.
Ch 1 and turn after every row.
Finish when the block can be blocked to approximately 6 × 6 inches.
Fasten off.
Preparation Border for Every Square
This step is important because the granny squares and solid squares are constructed differently.
The preparation round gives them consistent edges for joining.
For the granny squares, use white.
For solid white squares, use pink.
For solid pink squares, use white.
Attach yarn in one corner.
Ch 1.
Work approximately 24 sc evenly along the first side.
At the corner work:
sc, ch 1, sc
Continue with approximately 24 sc along the next side.
Repeat around.
Join with a sl st.
Fasten off.
Important
The goal is not to force the fabric.
Every square should have:
- the same finished dimensions
- the same number of stitches along corresponding sides
- four clear corner spaces
If necessary, slightly adjust the spacing of your sc stitches along the edges of the solid blocks.
Blocking the Squares
Block all 30 squares before joining.
Shape each square to approximately:
6 × 6 inches
Pay particular attention to the granny squares because their open construction can make them appear slightly larger than the solid blocks before blocking.
Allow the squares to dry completely before assembly.
Patchwork Layout
Arrange the squares in 5 columns × 6 rows.
Use:
G = granny square
W = solid white square
P = solid pink square
Row 1
G – W – G – P – G
Row 2
P – G – W – G – P
Row 3
G – P – G – W – G
Row 4
W – G – P – G – W
Row 5
G – W – G – P – G
Row 6
P – G – W – G – P
This creates the irregular-but-balanced patchwork appearance visible in the inspiration.
Before joining anything, take a photo of your layout so you can refer back to it.
Joining the Squares
A flat sewn join works especially well because it allows the decorative squares to remain the focus.
Mattress-Stitch Join
Place two squares next to each other with their right sides facing upward.
Thread a yarn needle with white yarn.
Beginning at one corner, pass the needle through corresponding edge stitches on both squares.
Continue working back and forth between the two pieces.
Pull the yarn gently every few stitches.
The seam should close without puckering.
Fasten securely at the opposite corner.
Join the Blanket in Rows
First join the five squares in Row 1.
Repeat for all six rows.
You will now have six horizontal strips.
Next, join:
- Row 1 to Row 2
- Row 2 to Row 3
- Row 3 to Row 4
- Row 4 to Row 5
- Row 5 to Row 6
Make sure the four-square intersections meet neatly.
Preparing the Blanket Border
Once all squares are joined, the center of the blanket is complete.
The decorative border is worked around the entire assembled blanket.
Use white yarn first.
Border Round 1 — Foundation Round
Attach white yarn near any corner.
Ch 1.
Sc evenly around the entire blanket.
Across the straight edges, work approximately one sc into each available border stitch.
Where two squares meet, make sure the join remains flat.
At each blanket corner work:
3 sc in the corner
Continue around.
Join with a sl st to the first sc.
Check
The blanket should lie flat.
If the edge begins to ruffle, you have too many stitches.
If the edge pulls inward, add a few more stitches evenly on the next attempt.
Border Round 2 — Openwork Foundation
Ch 1.
Sc in the first stitch.
Now work:
ch 4, skip approximately 3 sts, sc in next st
Repeat around.
The exact spacing may need a small adjustment before each corner because the total edge stitch count can vary slightly after joining.
At each corner, work:
sc, ch 4, sc
into the corner stitch.
The important goal is to create evenly spaced ch-4 arches around the blanket.
Join with a sl st.
Border Round 3 — Large White Fans
Sl st into the first ch-4 space.
Ch 3.
Work 6 more dc into the same ch-4 space.
You now have a 7-dc fan.
Sc into the next sc between arches.
In the next ch-4 space work:
7 dc
Sc into the next sc.
Continue around:
7 dc in next ch-4 space, sc in next sc
At the larger corner arches, work:
9 dc
instead of 7.
This creates a wider fan at each corner and helps the border turn smoothly.
Join at the end of the round.
Do not fasten off yet if you want an additional white structural round, or fasten off now if moving directly to the pink trim.
Border Round 4 — Decorative Open Fan Detail
For a more lace-like appearance similar to the inspiration, continue with white.
Sl st to the center dc of the first fan.
Work:
sc in center dc, ch 5
Move to the center dc of the next fan and work:
sc in center dc, ch 5
Repeat around.
At the corner fans, work:
sc in center dc, ch 3, sc in same center dc, ch 5
This creates another airy row around the fan points.
Join.
Fasten off white.
Border Round 5 — Pink Scalloped Picot Edging
Join pink yarn in one ch-5 space.
Work:
3 sc, picot, 3 sc
into the same ch-5 space.
In the next ch-5 space work:
3 sc, picot, 3 sc
Repeat around the entire blanket.
At a corner ch-space, work:
4 sc, picot, 4 sc
to give the corner slightly more room.
Join with a sl st.
Fasten off.
This final pink edging creates the small decorative points around the white lace border and ties the entire blanket back to the pink squares.
Weave In All Ends
Because this blanket uses many separate squares and color changes, there will be a substantial number of yarn ends.
Weave every end through several stitches on the wrong side.
Change direction once while weaving to help secure the tail.
Trim only after the end feels secure.
Final Blocking
Lay the complete blanket flat.
Shape the center so the square joins remain straight.
Stretch the lace border gently enough to open the fan motifs without distorting them.
Pay special attention to the four corners.
Allow the blanket to dry completely before removing the pins.
Blocking makes a particularly noticeable difference in the outer lace border.
How to Make the Blanket Larger
Because the blanket is modular, resizing is straightforward.
6 × 7 Squares
42 squares total.
Approximate center size:
36 × 42 inches
7 × 8 Squares
56 squares total.
Approximate center size:
42 × 48 inches
8 × 10 Squares
80 squares total.
Approximate center size:
48 × 60 inches
Then add the same border.
You can maintain the patchwork effect simply by alternating granny, pink solid, and white solid blocks.
Making Larger or Smaller Squares
You can also change the size of each individual block.
For the solid blocks, add or remove foundation stitches and work until the height matches the width.
For the granny squares, add additional granny rounds.
Each additional granny round contains:
- one granny corner in every corner
- one 3-dc cluster in every ch-1 side space
- ch 1 between neighboring clusters
Block every finished square to exactly the same dimensions before joining.
Color Variations
The two-color construction makes this blanket easy to personalize.
Vintage Rose
Dusty pink + warm cream
Soft Baby Palette
Blush pink + bright white
Lavender
Pale lavender + cream
Sage
Soft sage green + ivory
Blue
Powder blue + white
Neutral
Beige + cream
For a more colorful patchwork version, use several pastel shades for the solid squares while keeping the granny-square backgrounds and outer border white.
Tips for Consistent Squares
Measure Often
Do not wait until all 30 squares are finished before checking their size.
Measure the first square of each style.
Use the Same Hook
Even a small hook-size change can make the two square styles difficult to join evenly.
Keep Granny Corners Loose
The ch-2 corners need enough space for two granny clusters.
Do Not Overtighten Joins
Tight seams can pull the blanket inward and create ridges between squares.
Block Before Joining
This is especially important when combining solid fabric with open granny squares.
Common Problems
Granny Squares Are Larger Than the Solid Squares
The open granny construction usually stretches more easily.
Block both styles to the same measurement before changing the pattern.
If the difference is significant, remove the final granny round or adjust your hook size for the granny blocks.
Solid Squares Look Rectangular
Add or remove a row until the height matches the width.
The row count is less important than the finished measurement.
Blanket Ripples After Joining
Check that the seams are not too tight and that all blocks were blocked to the same dimensions.
Border Ruffles
Too many stitches were placed around the foundation round or too many arches were crowded along the edge.
Reduce the number slightly.
Border Pulls Inward
The border needs more ease.
Add a few foundation stitches or reduce the number of stitches skipped between ch-4 arches.
Corners Curl Up
Make sure each border corner receives additional stitches or a larger corner fan.
Why the Mixed-Square Design Works
The contrast between dense solid blocks and open granny squares gives the blanket much more texture than a blanket made from only one type of square.
The solid pink and white sections provide calm areas, while the granny squares create decorative detail.
The wide white lace border then connects everything visually, and the small pink outer edging repeats the accent color used throughout the center.
The result is a soft, romantic patchwork crochet blanket with a vintage feel while still relying on straightforward crochet techniques.




Beautiful!!!🩷🌟