Playful Otter Amigurumi – River Slide Buddy
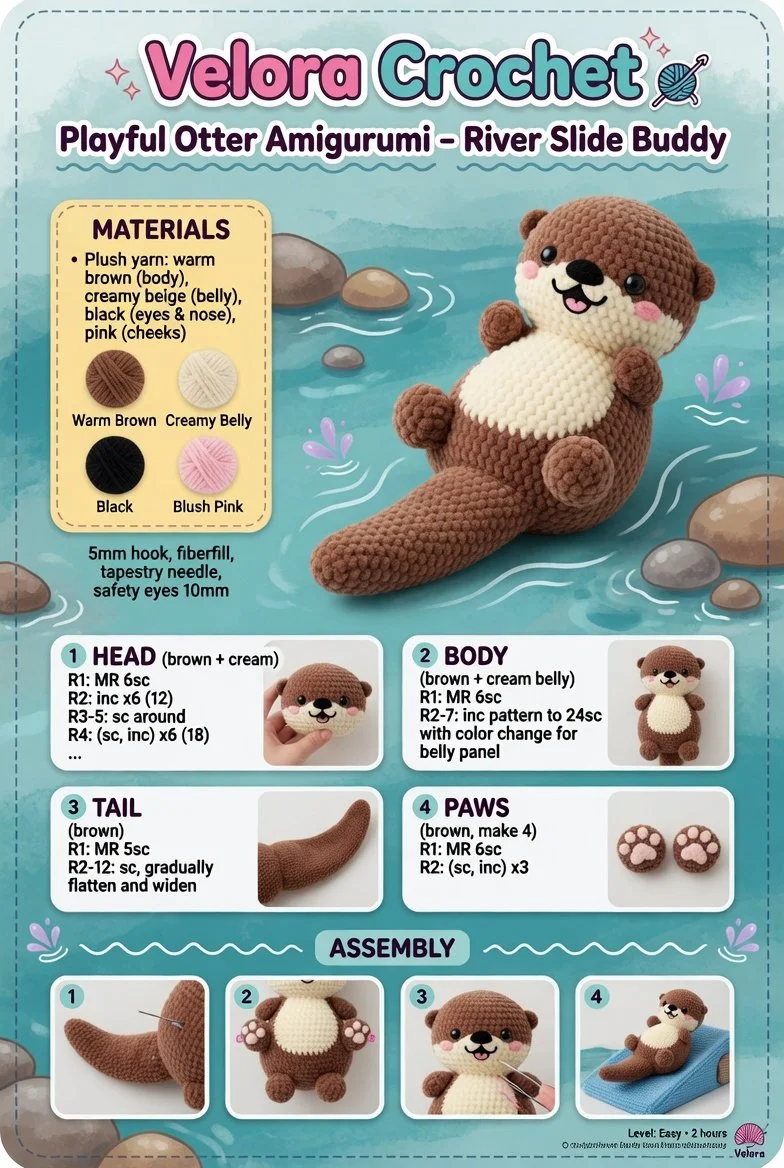
Dive into the delightful world of amigurumi with this charming crochet pattern designed for creating a playful otter. This mini crochet project is perfect for beginners, allowing you to explore your creativity while crafting an adorable river slide buddy.
Materials
- Worsted weight yarn in brown, cream, and black
- 3.5 mm crochet hook
- Safety eyes (10 mm)
- Polyester fiberfill for stuffing
- Tapestry needle for weaving in ends
- Stitch marker
- Scissors
Abbreviations
- ch: chain
- sc: single crochet
- inc: increase
- dec: decrease
- sl st: slip stitch
- st(s): stitch(es)
Pattern Instructions
Head
- With brown yarn, create a magic ring.
- Round 1: 6 sc in the ring (6).
- Round 2: Inc in each st (12).
- Round 3: Sc in next st, inc around (18).
- Rounds 4-7: Sc in each st (18).
- Round 8: Sc in next st, dec around (12).
- Insert safety eyes between Rounds 5 and 6, approximately 6 stitches apart.
- Round 9: Dec around (6).
- Fasten off, leaving a long tail for sewing.
Body
- With brown yarn, create a magic ring.
- Round 1: 6 sc in the ring (6).
- Round 2: Inc in each st (12).
- Round 3: Sc in next st, inc around (18).
- Rounds 4-11: Sc in each st (18).
- Round 12: Sc in next st, dec around (12).
- Stuff lightly and fasten off, leaving a long tail for sewing.
Arms
- With brown yarn, create a magic ring.
- Round 1: 6 sc in the ring (6).
- Round 2: Inc in each st (12).
- Rounds 3-5: Sc in each st (12).
- Fasten off and leave a long tail for sewing. Make two arms.
Legs
- With brown yarn, create a magic ring.
- Round 1: 6 sc in the ring (6).
- Round 2: Inc in each st (12).
- Rounds 3-6: Sc in each st (12).
- Fasten off and leave a long tail for sewing. Make two legs.
Ears / Details
- With brown yarn, create a magic ring.
- Round 1: 6 sc in the ring (6).
- Round 2: Inc in each st (12).
- Rounds 3-4: Sc in each st (12).
- Fasten off and leave a long tail for sewing. Make two ears.
- For the inner ears, with cream yarn, create a smaller magic ring and follow the same pattern for 2 rounds.
Accessories
- Optional: You can create a simple scarf using cream yarn by chaining a length of 30 and sc in each stitch.
Assembly & Finishing
- Sew the head to the body securely.
- Attach the arms on either side of the body, positioning them near the top but allowing for a playful pose.
- Attach the legs to the bottom of the body, spacing them evenly.
- Position the ears on top of the head and securely stitch them down.
- Weave in any loose ends using your tapestry needle.
Tips for Best Results
- Keep your tension consistent to maintain a uniform appearance in your stitches.
- Use stitch markers to help keep track of your rounds for accuracy.
- Experiment with different colors to create unique versions of your otter.
- Make sure to stuff your pieces firmly but not overly so, ensuring a cuddly texture.
- Take your time with assembly to ensure all pieces fit snugly and securely.
Conclusion
This playful otter amigurumi is a delightful project for crochet enthusiasts of all skill levels. With this crochet pattern, you’ll create a charming companion that brings joy and creativity into your crafting journey. Enjoy the process, and don’t hesitate to modify your otter to make it your own! Happy crocheting!