Introduction
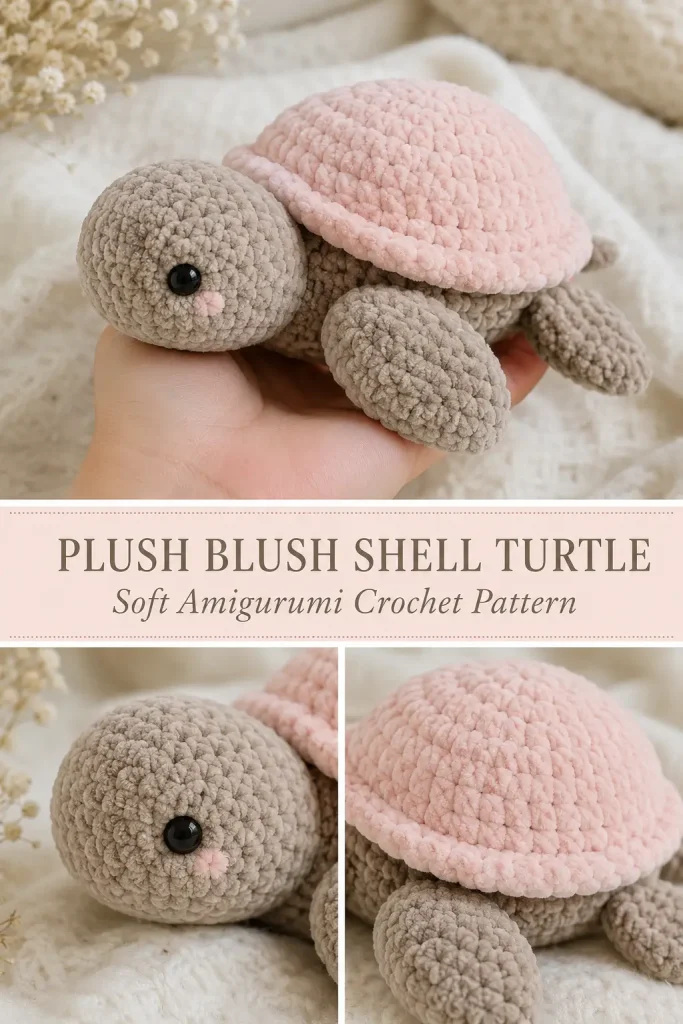
A plush crochet turtle has such a soft, comforting look. The rounded head, sleepy little flippers, and domed shell make it feel like a sweet handmade toy you would want to keep on a nursery shelf, gift to a child, or add to an amigurumi collection.
This Plush Blush Shell Turtle Amigurumi is an original pattern inspired by the design idea in your screenshot: a soft chenille turtle with a gray-beige body and a pale pink rounded shell. The construction, stitch counts, shell shaping, flippers, head, tail, and assembly are created fresh so the pattern is unique and buildable.
The finished turtle has a chunky plush texture, a rounded body, a soft raised shell, large front flippers, smaller back flippers, a tiny tail, and a gentle cute face.
Description
This amigurumi turtle is made with super bulky chenille yarn for a soft squishy result. The body is worked as a rounded oval base, while the shell is made separately as a domed oval piece and sewn on top. A raised shell rim gives the turtle that finished layered look.
The head is rounded and slightly forward-facing. The front flippers are larger and paddle-shaped, while the back flippers are smaller and sit near the tail. The shell uses pale blush pink, and the body uses warm mushroom gray or taupe beige for a soft modern nursery style.
This plush crochet toy is great as a handmade gift, nursery decor, baby shower present, turtle lover gift, or beginner-friendly plush amigurumi project for makers who are comfortable with basic shaping.
Materials
- Super bulky chenille yarn in warm mushroom gray or taupe beige for the body
- Super bulky chenille yarn in pale blush pink for the shell
- Small amount of black yarn for embroidered eyes, or 12 mm safety eyes
- Small amount of pale pink yarn for cheek details, optional
- 6 mm crochet hook
- Yarn needle
- Scissors
- Stitch marker
- Polyester fiberfill
- Pins for assembly
Finished Size
Approximate finished size with super bulky chenille yarn:
- Length: 10–12 inches from head to tail
- Width: 7–8 inches across front flippers
- Height: about 4 inches
Finished size may vary depending on yarn, hook size, stuffing, and tension.
Gauge
Gauge is not strict for this plush turtle.
Your stitches should be tight enough to hold stuffing.
If stuffing shows through, use a smaller hook.
If the fabric feels too stiff, use a slightly larger hook.
Abbreviations
- MR: magic ring
- ch: chain
- sc: single crochet
- hdc: half double crochet
- dc: double crochet
- inc: increase, 2 sc in same stitch
- dec: invisible decrease
- sl st: slip stitch
- st: stitch
- sts: stitches
- FO: fasten off
- BLO: back loop only
- FLO: front loop only
Pattern Notes
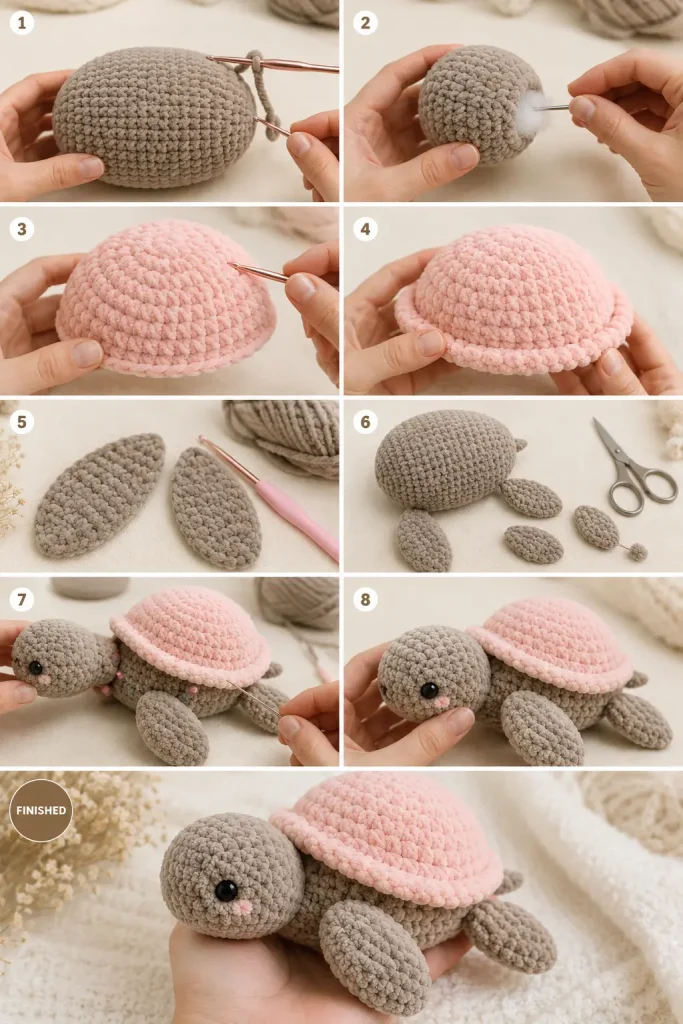
The turtle is made in separate pieces and sewn together.
The head, body, shell, flippers, and tail are made separately.
The shell is lightly stuffed before being sewn onto the body so it has a rounded dome shape.
Use stitch markers to keep track of rounds.
For baby-safe toys, embroider the eyes instead of using plastic safety eyes.
Do not overstuff the flippers; they should stay soft and slightly flat.
Step-by-Step Instructions
Body Base
Use warm mushroom gray or taupe beige yarn.
Round 1
Make a MR.
Work 6 sc into the ring. (6)
Round 2
Inc in each st around. (12)
Round 3
Repeat around: sc in next st, inc in next st. (18)
Round 4
Repeat around: sc in next 2 sts, inc in next st. (24)
Round 5
Repeat around: sc in next 3 sts, inc in next st. (30)
Round 6
Repeat around: sc in next 4 sts, inc in next st. (36)
Rounds 7–10
Sc in each st around. (36)
Round 11
Repeat around: sc in next 4 sts, dec. (30)
Round 12
Repeat around: sc in next 3 sts, dec. (24)
Begin stuffing the body lightly.
The body should be oval and slightly flat, not a round ball.
Round 13
Repeat around: sc in next 2 sts, dec. (18)
Add more stuffing if needed.
Round 14
Repeat around: sc in next st, dec. (12)
Round 15
Dec around. (6)
FO and close the opening.
Shape the body into a soft oval.
Head
Use warm mushroom gray or taupe beige yarn.
Round 1
Make a MR.
Work 6 sc into the ring. (6)
Round 2
Inc in each st around. (12)
Round 3
Repeat around: sc in next st, inc in next st. (18)
Round 4
Repeat around: sc in next 2 sts, inc in next st. (24)
Rounds 5–8
Sc in each st around. (24)
If using safety eyes, place them between Rounds 5 and 6, about 6 stitches apart.
Round 9
Repeat around: sc in next 2 sts, dec. (18)
Begin stuffing the head firmly.
Round 10
Repeat around: sc in next st, dec. (12)
Round 11
Sc in each st around. (12)
FO, leaving a long tail for sewing.
The last round creates a short neck area for attaching the head to the body.
Shell Dome
Use pale blush pink yarn.
The shell is worked as a soft oval dome.
Round 1
Ch 8.
Sc in the 2nd ch from hook.
Sc in next 5 ch.
Work 3 sc in last ch.
Now work along the opposite side of the chain.
Sc in next 5 ch.
Work 2 sc in last ch. (16)
Round 2
Inc in first st.
Sc in next 5 sts.
Inc in each of next 3 sts.
Sc in next 5 sts.
Inc in each of last 2 sts. (22)
Round 3
Sc in next st, inc in next st.
Sc in next 5 sts.
Repeat 3 times: sc in next st, inc in next st.
Sc in next 5 sts.
Repeat 2 times: sc in next st, inc in next st. (28)
Round 4
Sc in next 2 sts, inc in next st.
Sc in next 5 sts.
Repeat 3 times: sc in next 2 sts, inc in next st.
Sc in next 5 sts.
Repeat 2 times: sc in next 2 sts, inc in next st. (34)
Rounds 5–8
Sc in each st around. (34)
Round 9
Repeat around: sc in next 15 sts, dec.
Continue until round is complete. (32)
Round 10
Working in BLO, sc in each st around. (32)
FO, leaving a long tail for sewing.
Lightly stuff the shell dome before attaching it.
Do not overstuff; the shell should be rounded but still sit flat on the body.
Raised Shell Rim
Use pale blush pink yarn.
Join yarn to any front loop left from Round 10 of the shell.
Rim Round
Working in the front loops from Round 10, sl st in first loop.
Sc in next loop.
Hdc in next loop.
Sc in next loop.
Repeat around: sl st in next loop, sc in next loop, hdc in next loop, sc in next loop.
Join with sl st.
FO and weave in end.
This creates a soft raised rim around the shell.
Front Flippers
Make 2 using warm mushroom gray or taupe beige yarn.
These are larger paddle-shaped flippers.
Round 1
Make a MR.
Work 6 sc into the ring. (6)
Round 2
Inc in each st around. (12)
Round 3
Repeat around: sc in next st, inc in next st. (18)
Rounds 4–5
Sc in each st around. (18)
Round 6
Repeat around: sc in next st, dec. (12)
Flatten the flipper.
Do not stuff, or stuff only very lightly.
Round 7
Sc through both layers across the opening. (6)
FO, leaving a long tail for sewing.
Shape the flipper into a soft oval paddle.
Back Flippers
Make 2 using warm mushroom gray or taupe beige yarn.
These are smaller than the front flippers.
Round 1
Make a MR.
Work 6 sc into the ring. (6)
Round 2
Inc in each st around. (12)
Rounds 3–4
Sc in each st around. (12)
Flatten the flipper.
Do not stuff.
Round 5
Sc through both layers across the opening. (6)
FO, leaving a long tail for sewing.
Tail
Use warm mushroom gray or taupe beige yarn.
Round 1
Make a MR.
Work 5 sc into the ring. (5)
Round 2
Sc in each st around. (5)
Round 3
Repeat around: sc in next st, inc in next st.
You may end with one extra sc. (7)
Round 4
Sc in each st around. (7)
Flatten the opening slightly.
FO, leaving a long tail for sewing.
The tail should be tiny and rounded.
Face
If you did not use safety eyes, embroider two small black eyes on the head between Rounds 5 and 6.
Optional: add two tiny pale pink cheek stitches just below the eyes.
Optional: embroider a small curved smile using black yarn.
Keep the face simple and soft.
Assembly
Pin all pieces before sewing.
This helps make sure the turtle sits evenly.
Attach the Head
Place the head at the front of the body.
The neck opening should sit against the body edge.
Sew around the neck several times until the head feels secure.
Angle the head slightly upward for a sweet plush look.
Attach the Front Flippers
Place one large flipper on each side of the body, slightly behind the head.
The flippers should angle forward and outward.
Sew the flattened edge of each flipper to the body.
Leave the rounded end free.
Attach the Back Flippers
Place the smaller flippers near the back sides of the body.
Angle them slightly backward.
Sew securely along the flattened edge.
Attach the Tail
Place the tail at the back center of the body.
Sew firmly in place.
The tail should sit between the two back flippers.
Attach the Shell
Place the blush pink shell on top of the body.
The raised rim should sit around the sides like a soft shell edge.
Make sure the shell is centered between the head, flippers, and tail.
Pin in place.
Sew around the lower edge of the shell, stitching through the shell and body.
Add a little extra stuffing under the shell before closing the final inch if needed.
Do not overstuff, or the shell may tilt.
Finishing
Weave in all yarn tails.
Check that every piece is sewn securely.
Shape the turtle with your hands.
Gently press the body flatter so the turtle sits nicely.
Smooth the shell dome so it looks rounded.
Trim any loose chenille fibers carefully.
Size Adjustments
Smaller Turtle
Use worsted weight yarn and a 3.5 mm hook.
The finished turtle will be smaller and firmer.
Larger Plush Turtle
Use jumbo chenille yarn and an 8 mm hook.
Add extra stuffing carefully so the turtle keeps its shape.
Wider Shell
Add one extra increase round before working the shell straight rounds.
Flatter Turtle
Use less stuffing in the body and shell.
Rounder Turtle
Add one extra straight round to the body and shell before decreasing or finishing.
Tips & Variations
Use gray-beige for a soft neutral turtle body.
Use pale pink for the shell to match the sweet plush look.
Use mint green or lavender for a different nursery-style shell.
Use cream for the body and blush for the shell for a very soft baby gift version.
Use embroidered eyes for baby-safe toys.
Use safety eyes only for display plushies or older children.
Do not overstuff the flippers, or they will look like balls instead of paddles.
Use pins before sewing so all four flippers line up evenly.
Add a tiny bow near the shell for a gift version, but avoid small loose accessories for young children.
FAQ
Is this turtle amigurumi beginner-friendly?
This pattern is best for confident beginners. The stitches are simple, but the shaping and assembly need careful placement.
Is this the exact pattern from the photo?
No. This is a new original turtle amigurumi pattern based on the visible idea in the screenshot: a plush turtle with a neutral body and pale pink shell. The stitch counts, shaping, shell construction, flippers, and assembly are original.
What yarn works best?
Super bulky chenille yarn works best for the soft plush look. Worsted yarn can also be used for a smaller, firmer turtle.
Can I make the shell removable?
This version has a sewn-on shell so the turtle is secure and durable. A removable shell would need straps or buttons, which are not recommended for young children.
How do I make the shell sit nicely?
Do not overstuff the shell. Pin it evenly on the body, add light stuffing under the dome, then sew slowly around the edge.
Conclusion
The Plush Blush Shell Turtle Amigurumi is soft, sweet, and full of handmade charm. The warm neutral body, pale pink shell, rounded head, paddle flippers, and tiny tail create a cozy plush turtle that feels perfect for gifts, nursery decor, or amigurumi collections.
Make it in soft chenille yarn for the squishiest result, or try cotton or acrylic for a smaller keepsake turtle. This crochet turtle pattern is detailed enough to look special but simple enough to enjoy as a relaxing plush project.



