Introduction
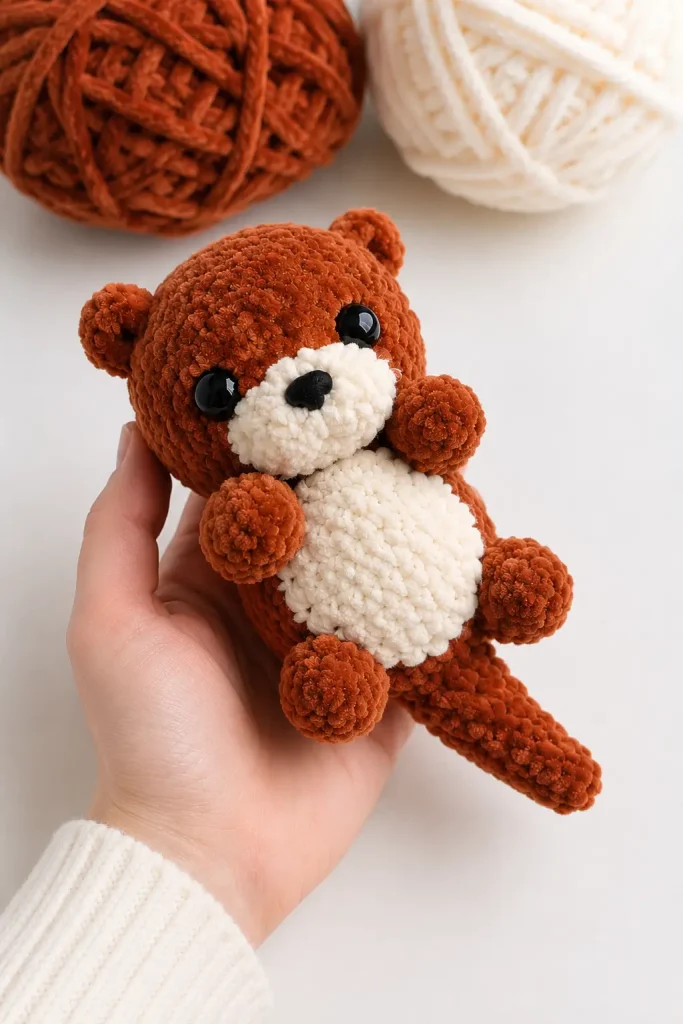
A tiny handmade otter is one of those crochet projects that feels sweet from the very first round. Soft, rounded, and small enough to fit in your hand, this pocket otter amigurumi has all the charm of a cuddly woodland-and-water animal in a quick plush crochet toy.
This easy crochet pattern is perfect for cozy evenings, handmade gift baskets, nursery shelves, craft fair tables, or anyone who loves cute animal amigurumi. The warm brown body, creamy face and belly, tiny rounded ears, little paws, and long tail give this otter a playful floating pose that looks adorable from every angle.
The original pocket-style otter idea is designed as a small palm-sized stuffed animal, around 5 inches long when made with super bulky chenille yarn. It is also commonly made with plush, velvet, or blanket-style yarn for a soft cuddly finish.
Description
This pocket otter crochet pattern creates a small plush otter with a rounded head, cream muzzle, oval cream belly, short arms, tiny legs, small ears, and a long tapered tail. The body has a relaxed floating shape, giving the finished plush a sweet and playful look.
The color palette is simple and cozy: warm reddish brown for the otter’s body, cream or ivory for the face and tummy, and black details for the eyes and nose. The contrast between the brown body and cream belly makes the finished plush easy to recognize as an otter while keeping the design soft and beginner-friendly.
This plush crochet toy is a lovely choice for handmade gifts, pocket plush collections, baby shower decor, ocean-themed nurseries, market makes, stocking stuffers, or keychain-style mini amigurumi if made with thinner yarn.
Materials
- Super bulky plush or chenille yarn in warm brown
- Super bulky plush or chenille yarn in cream or ivory
- Small amount of black yarn for nose and mouth embroidery
- Crochet hook suitable for your yarn, usually 5 mm to 6 mm
- 10 mm to 14 mm black safety eyes
- Polyester fiberfill stuffing
- Yarn needle
- Stitch markers
- Scissors
- Straight pins for assembly
For a smaller keychain version, use thinner yarn with a smaller hook.
Finished Size
Using plush chenille yarn and a 5 mm to 6 mm hook, the finished otter will measure approximately 5–7 inches long, depending on your tension and yarn thickness.
Using worsted-weight yarn and a smaller hook will create a smaller, firmer otter.
Skill Level
Confident beginner.
This beginner crochet project uses basic amigurumi techniques, including single crochet, increases, decreases, simple color changes, stuffing, and sewing pieces together.
Abbreviations
- MR: magic ring
- ch: chain
- sc: single crochet
- inc: increase, 2 sc in the same stitch
- dec: decrease, single crochet 2 stitches together
- sl st: slip stitch
- st: stitch
- sts: stitches
- R: round
- FO: fasten off
Pattern Notes
Work in continuous rounds unless stated otherwise.
Use a stitch marker to mark the first stitch of each round.
Stuff the head and body firmly but gently. Plush yarn can stretch if overstuffed.
Do not overstuff the arms, legs, ears, or tail. Smaller pieces look softer when lightly filled.
Pin all pieces in place before sewing so the otter’s face and body stay balanced.
For children under 3, embroider the eyes instead of using safety eyes.
Step-by-Step Instructions
Head
Use warm brown yarn.
R1: 6 sc in MR. (6)
R2: inc around. (12)
R3: (sc 1, inc) repeat around. (18)
R4: (sc 2, inc) repeat around. (24)
R5–R8: sc around. (24)
R9: (sc 2, dec) repeat around. (18)
Insert safety eyes between R5 and R6, about 6 stitches apart.
Begin stuffing the head.
R10: (sc 1, dec) repeat around. (12)
R11: dec around. (6)
FO, close the opening, and weave in the end.
Cream Muzzle
Use cream or ivory yarn.
R1: 6 sc in MR. (6)
R2: inc around. (12)
R3: sc around. (12)
FO, leaving a long tail for sewing.
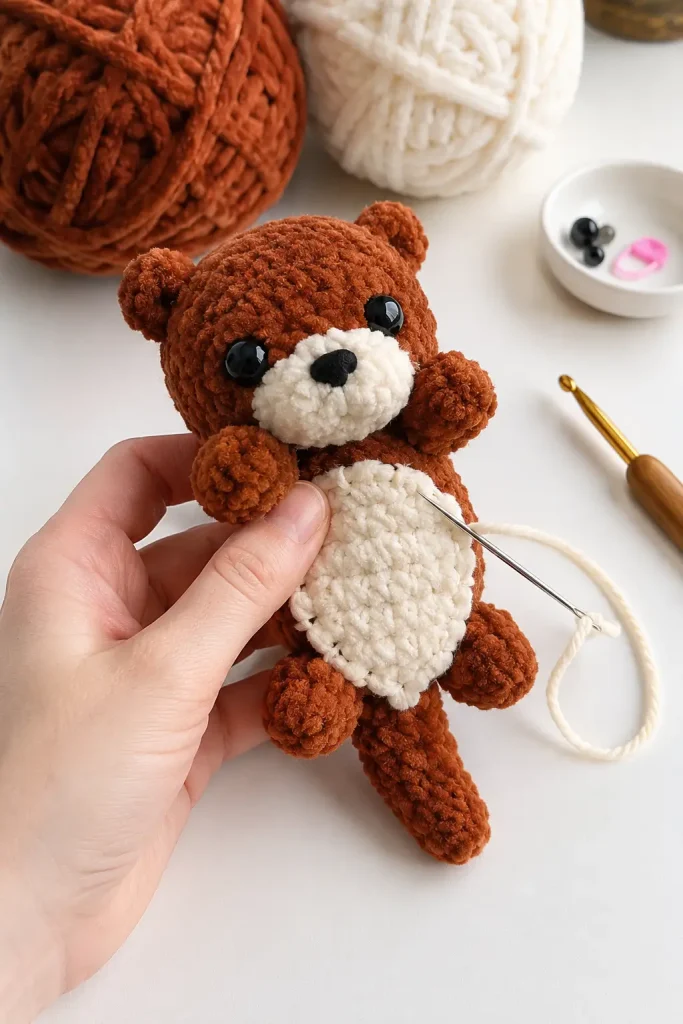
Do not overstuff. Add only a tiny pinch of stuffing if you want the muzzle to be slightly raised.
Sew the muzzle to the lower front of the head, centered between the eyes.
Embroider a small black nose in the center of the muzzle. Add a tiny stitched smile underneath if desired.
Body
Use cream or ivory yarn for the belly front.
R1: 6 sc in MR. (6)
R2: inc around. (12)
R3: (sc 1, inc) repeat around. (18)
Switch to warm brown yarn.
R4: (sc 2, inc) repeat around. (24)
R5–R8: sc around. (24)
R9: (sc 2, dec) repeat around. (18)
Begin stuffing the body.
R10: sc around. (18)
R11: (sc 1, dec) repeat around. (12)
Finish stuffing.
R12: dec around. (6)
FO, close the opening, and weave in the end.
The cream section should sit on the front of the body as the otter’s soft rounded belly.
Arms
Make 2 using warm brown yarn.
R1: 6 sc in MR. (6)
R2: (sc 1, inc) repeat around. (9)
R3–R5: sc around. (9)
Stuff very lightly.
Flatten the opening and sc through both layers to close. (4)
FO, leaving a long tail for sewing.
The arms should be short and rounded, like tiny paws resting near the belly.
Legs
Make 2 using warm brown yarn.
R1: 6 sc in MR. (6)
R2: inc around. (12)
R3–R4: sc around. (12)
Stuff lightly.
R5: (sc 1, dec) repeat around. (8)
Flatten the opening and sc through both layers to close. (4)
FO, leaving a long tail for sewing.
The legs should look like small rounded feet near the lower body.
Ears
Make 2 using warm brown yarn.
R1: 6 sc in MR. (6)
R2: (sc 1, inc) repeat around. (9)
FO, leaving a long tail for sewing.
Do not stuff.
Flatten each ear slightly before sewing.
Sew the ears to the top sides of the head, around R3–R5. Place them evenly so they sit like small rounded bumps.
Tail
Use warm brown yarn.
R1: 6 sc in MR. (6)
R2: sc around. (6)
R3: (sc 1, inc) repeat around. (9)
R4–R5: sc around. (9)
R6: (sc 2, inc) repeat around. (12)
R7–R10: sc around. (12)
R11: (sc 3, inc) repeat around. (15)
R12–R13: sc around. (15)
Stuff lightly as you work. The tail should stay soft and slightly tapered.
Flatten the opening and sc through both layers to close. (7)
FO, leaving a long tail for sewing.
Face
After the muzzle is sewn in place, use black yarn to embroider a small oval nose.
Add a short vertical stitch below the nose.
Add a tiny curved smile if you want a sweeter expression.
For a softer look, you can add small pink blush stitches beside the muzzle.
Keep the face simple so the otter keeps its tiny pocket-plush charm.
Assembly
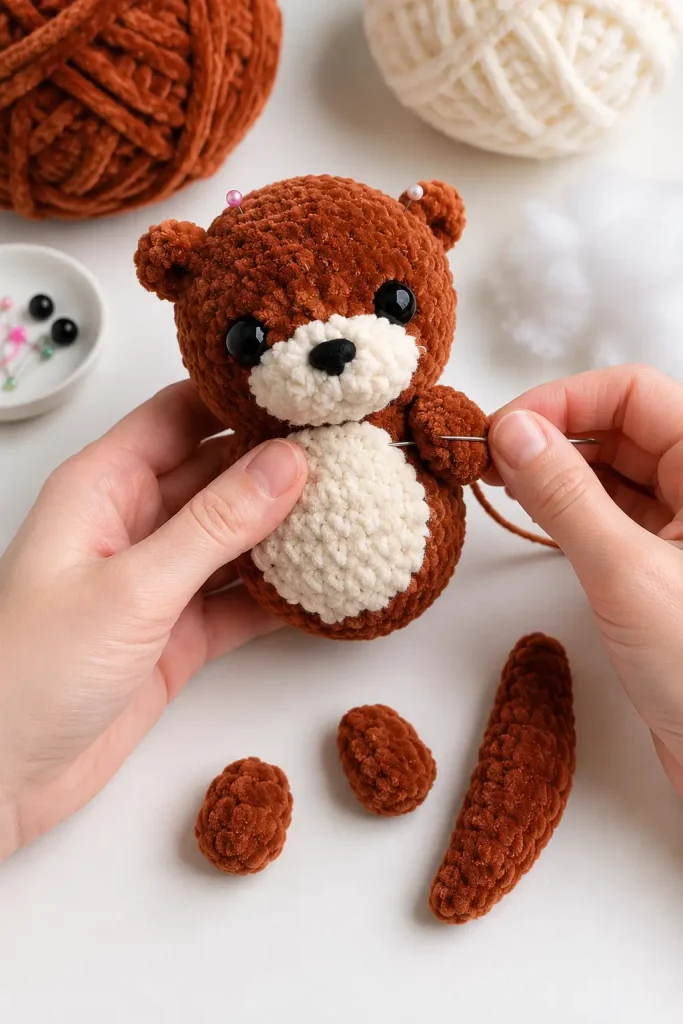
Sew the head to the top of the body. Angle the head slightly upward so the otter looks relaxed and playful.
Sew the arms to each side of the upper body. Place them so they curve slightly inward toward the cream belly.
Attach the legs near the lower sides of the body. Keep them rounded and close to the belly.
Sew the tail to the back lower body. Angle it downward and slightly outward so the otter has a floating pose.
Attach the ears to the top sides of the head.
Check the face placement and make sure the muzzle is centered.
Weave in all yarn tails securely.
Shape the finished otter gently with your hands, smoothing the head, belly, paws, and tail.
Tips & Variations
For the softest plush crochet toy, use chenille or blanket yarn. This gives the otter a fluffy, cuddly texture and helps it work up quickly.
For a smaller pocket version, use cotton or acrylic yarn with a smaller hook. The finished otter will be more compact and may work well as a keychain or bag charm.
Try a chocolate brown body with cream details for a classic otter look, or use caramel brown for a warmer, softer appearance.
For a pastel otter, use dusty rose, soft beige, light gray, or muted blue with a cream belly.
If your plush yarn makes the stitches hard to see, count every round carefully and use a stitch marker.
Stuff the body little by little. A small amigurumi otter looks best when it is rounded but not stretched.
Pin the ears, arms, legs, and tail before sewing. This helps you create a balanced finished toy.
For a baby-safe version, embroider the eyes and avoid plastic parts.
FAQ
Is this pocket otter crochet pattern beginner-friendly?
Yes. This pattern is suitable for confident beginners who know how to crochet in the round, increase, decrease, and sew amigurumi pieces together.
What yarn is best for a soft otter amigurumi?
Plush chenille yarn or blanket yarn gives the softest result. Cotton yarn creates a smaller and more structured otter, while acrylic yarn is easy to use and budget-friendly.
Can I make this otter smaller?
Yes. Use thinner yarn and a smaller hook to create a mini otter. Keep the same stitch counts, but use smaller eyes or embroidered eyes.
Can I make this otter without safety eyes?
Yes. Embroidered eyes are a great option, especially for baby gifts or toys for young children.
How do I make the otter look like it is floating?
Angle the head slightly upward, sew the arms close to the belly, and attach the tail so it points away from the body. This gives the otter a relaxed floating pose.
Conclusion
This pocket otter amigurumi crochet pattern is a sweet and cozy project for anyone who loves handmade animals. With its warm brown body, cream belly, tiny ears, rounded paws, and long soft tail, it has all the charm of a little otter in plush crochet form.
Make one as a gift, add it to your amigurumi collection, or create a batch for craft fairs and market tables. This easy crochet pattern is small, soft, and full of personality, making it a lovely project to save for your next relaxing crochet day.




Cute. Please make a kitten similar to this pattern.