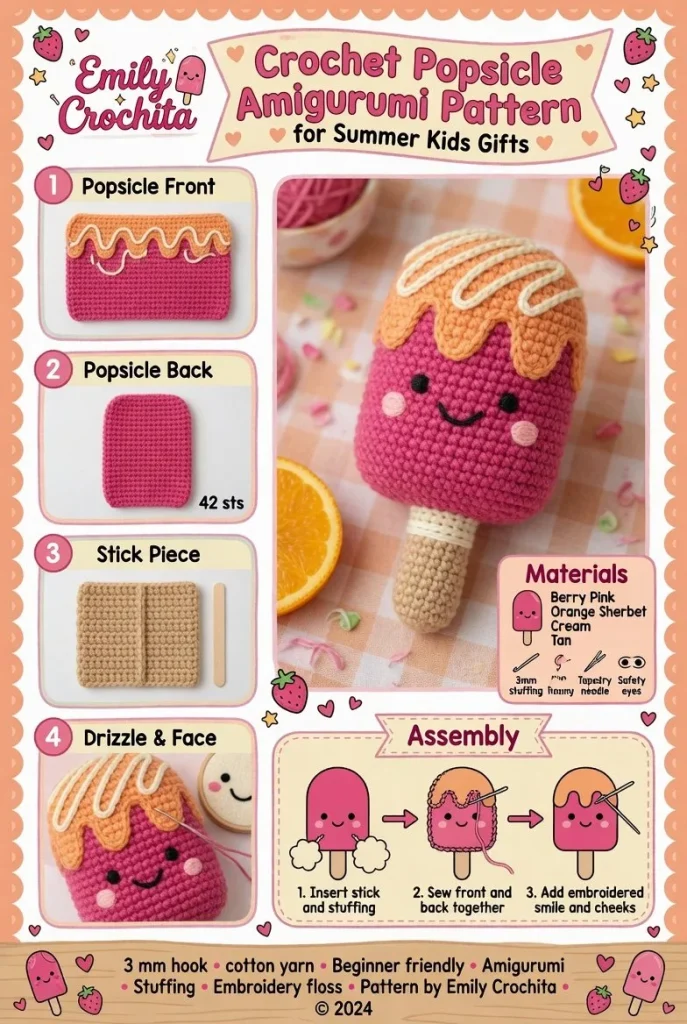
Crafting a delightful crochet popsicle is a whimsical project that brings a touch of summer to your handmade collection. This soft, rounded rectangular amigurumi popsicle features a charming smiling face, a wooden-stick base, and an optional drizzle stripe to add a burst of flavor to your plush creation. It’s not just a fun crochet project; it makes the perfect gift for kids, a cute decor piece, or a colorful addition to any craft fair booth.
Materials
- Berry pink yarn
- Orange sherbet yarn
- Cream yarn (for drizzle)
- Tan yarn (for stick)
- Black embroidery thread
- Stuffing
- 3mm crochet hook
- Stitch marker (optional)
Abbreviations
- MR: magic ring
- ch: chain
- sc: single crochet
- hdc: half double crochet
- dc: double crochet
- inc: increase
- dec: decrease
- sl st: slip stitch
Popsicle Body
Start with the berry pink yarn to create the main part of the popsicle.
Rounds 1-5:
- Begin with a magic ring (MR) and crochet 6 single crochets (sc) into the ring. (6)
- Increase in each stitch around. (12)
- Sc in the next stitch, inc twice around. (18)
- Sc in the next 2 stitches, inc around. (24)
- Sc in the next 3 stitches, inc around. (30)
Rounds 6-10:
Continue to crochet in rounds, maintaining the popsicle shape.
6. Sc around for 5 rounds without increases. (30 in each round)
Color Change for Drizzle
In this step, you’ll introduce the cream yarn for the drizzle effect.
- Switch to cream yarn at the beginning of round 11.
- Sc in the next 2 stitches, inc twice for the first round with drizzle. Continue with sc for the remainder of this round. (36)
Round 12: Sc around. (36)
- To finish the drizzle, sc in the next 4 stitches, dec around. (30)
Stuffing and Assembly of the Stick
Before sealing the popsicle, don’t forget to add a generous amount of stuffing to give it a plushy demeanor.
- Use the tan yarn to create the stick:
- Ch 10, starting from the base of the popsicle, then sc back along the chain to form a flat stick.
- Attach securely to the base.
Make sure the stick is inserted firmly into the crochet popsicle to keep everything stable.
Face Embroidery
Using the black embroidery thread, stitch a simple smiling face onto the popsicle. Feel free to make it as cute or whimsical as you desire! The perfect finishing touch will make your popsicle come alive.
Final Touches and Display
Give your popsicle a little fluff by adjusting the stuffing, ensuring it looks full yet not overstuffed, which can affect the shape. Now it’s ready for display, whether on a shelf, as a toy, or as part of a lovely handmade gift.
Tips for the Best Result
- When stuffing your popsicle, aim for a balanced fullness to maintain the shape without overdoing it.
- Keep your tension consistent; this will ensure that your stitches appear even and neat.
- Use a stitch marker to identify the start of your rounds, especially during the color changes for drizzle.
Creating this delightful crochet popsicle will not only enhance your crochet skills but also add a cheerful touch to your summer projects. Consider trying out different color variations and drizzle effects for even more fun! If you enjoyed this project, you might also love creating other crochet plush toys, such as this adorable Cinnamon Drift Otter crochet pattern. Whether as a decorative piece or a beloved toy, your handmade popsicle is sure to bring smiles!



