Introduction
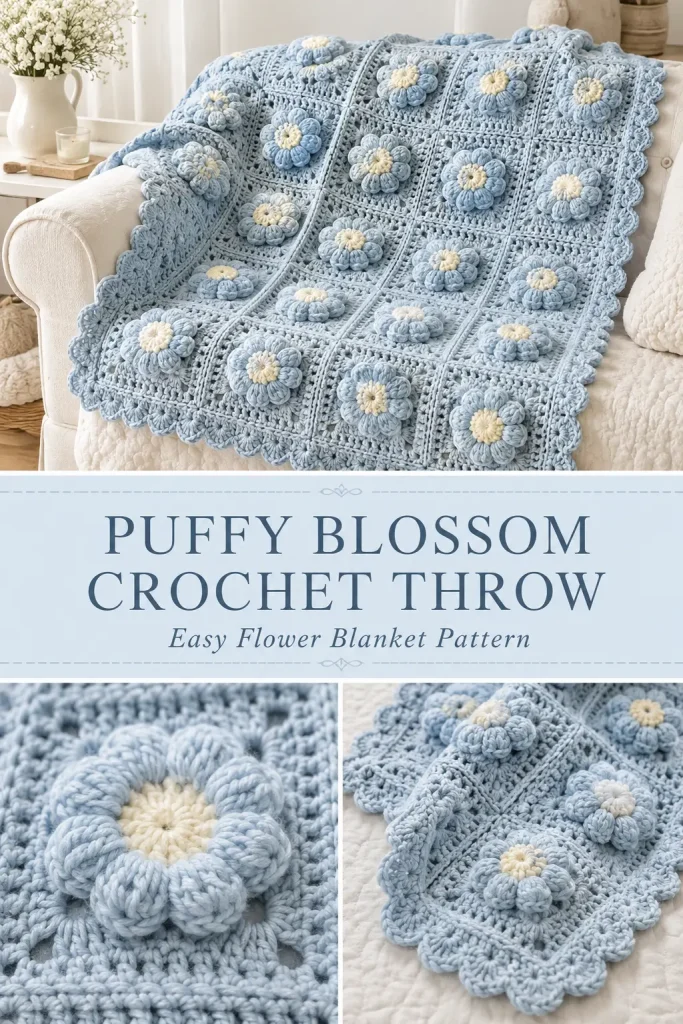
A flower crochet blanket has such a soft, handmade charm. The raised petals make the texture feel cozy and special, while the repeating floral look gives the whole blanket a sweet cottage-style finish.
This Puffy Blossom Crochet Throw Blanket is a unique version of a flower blanket design. Instead of copying the original pattern, this version uses separate granny-style squares with soft puffy flower appliqués sewn to the center of each square. It gives the same beautiful floral feeling, but the construction is simpler, more customizable, and easier to adjust.
This easy crochet pattern is perfect for a decorative throw blanket, sofa blanket, bed runner, handmade gift, or cozy chair accent. Because the flowers are raised and dimensional, this blanket is best used as decorative home decor rather than a crib blanket for very young babies.
Description
The Puffy Blossom Crochet Throw Blanket is made from soft square motifs joined together into a larger blanket. Each square has a simple granny-style base in a gentle background color, with a raised puffy flower sewn in the center. The flower petals sit on top of the square, creating a plush, textured floral effect.
The sample design uses a soft misty blue base with pale blue flowers and warm ivory centers, but you can make it in blush, cream, lavender, sage, dusty rose, or any cozy color palette you love. The finished blanket feels floral, soft, and textured without being too complicated.
This beginner crochet project is great for makers who enjoy repetitive motifs and want a blanket that looks detailed but is still buildable one small piece at a time.
Materials
- Worsted weight yarn in misty blue for the blanket squares
- Worsted weight yarn in pale blue for the flower petals
- Worsted weight yarn in warm ivory for the flower centers
- 5 mm crochet hook
- Yarn needle
- Scissors
- Stitch markers or pins
- Measuring tape
Finished Size
Approximate finished size:
- 34 inches wide
- 43 inches long
This size uses:
- 63 square motifs total
- 7 squares across
- 9 squares long
Each finished square measures about 4.5 inches before joining.
Finished size may vary depending on yarn, hook size, and tension.
Gauge
Gauge is not extremely strict for this blanket, but all squares should be the same size.
One finished square should measure about 4.5 inches.
If your square is too small, use a larger hook.
If your square is too large or too loose, use a smaller hook.
Abbreviations
- MR: magic ring
- ch: chain
- sc: single crochet
- dc: double crochet
- sl st: slip stitch
- st: stitch
- sts: stitches
- sp: space
- FO: fasten off
Puff Stitch
Yarn over, insert hook into the indicated stitch, yarn over and pull up a loop.
Repeat this 3 more times in the same stitch.
You should have 9 loops on your hook.
Yarn over and pull through all 9 loops.
Do not pull the puff too tightly. The petals should look soft and rounded.
Pattern Notes
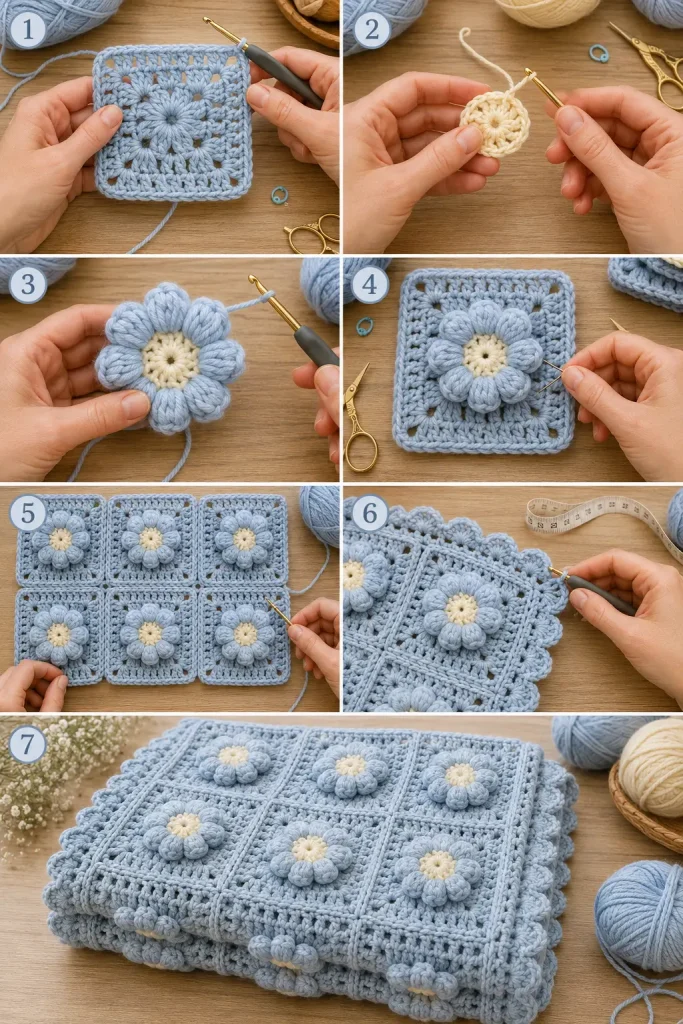
The blanket is made from separate crochet squares.
Each square is decorated with one puffy flower.
The flowers are sewn onto the squares before the blanket is joined.
The squares are joined in a 7 by 9 layout.
The border is added after all squares are joined.
This is a decorative textured blanket. Because of the raised flowers, do not use it as an unsupervised sleep blanket for babies.
Step-by-Step Instructions
Granny Square Base
Make 63 squares using misty blue yarn.
Round 1
Make a MR.
Ch 3. This counts as the first dc.
Work 2 dc into the ring.
Ch 2.
Repeat 3 times: 3 dc into the ring, ch 2.
Pull the ring closed.
Join with sl st to the top of beginning ch 3.
You should have 4 clusters and 4 corner spaces.
Round 2
Sl st into the next corner ch-2 sp.
Ch 3, work 2 dc, ch 2, 3 dc in the same corner sp.
Ch 1.
In each remaining corner ch-2 sp, work: 3 dc, ch 2, 3 dc.
Ch 1 between each corner group.
Join with sl st to top of beginning ch 3.
Round 3
Sl st into the next corner ch-2 sp.
Ch 3, work 2 dc, ch 2, 3 dc in the same corner sp.
Ch 1.
Work 3 dc in each ch-1 side space.
Ch 1 between side clusters.
In each corner ch-2 sp, work: 3 dc, ch 2, 3 dc.
Continue around.
Join with sl st to top of beginning ch 3.
Rounds 4–5
Repeat Round 3.
Each round adds one more 3-dc cluster along each side.
After Round 5, FO and weave in ends.
Lightly block the squares if needed so they are all the same size.
Flower Centers
Make 63 using warm ivory yarn.
Round 1
Make a MR.
Ch 1.
Work 8 sc into the ring.
Pull the ring closed.
Join with sl st to first sc.
FO and weave in the center tail.
Puffy Flower Petals
Use pale blue yarn.
Join pale blue yarn to any stitch of the flower center.
Petal Round
Ch 2.
Work 1 puff stitch into the same stitch.
Ch 2.
Sl st into the same stitch.
Sl st into the next stitch.
Repeat around each stitch of the flower center:
Ch 2, puff stitch in same stitch, ch 2, sl st in same stitch, sl st in next stitch.
After the final petal, join neatly with sl st.
FO, leaving a long tail for sewing.
You should have 8 soft puffy petals.
Make 63 flowers total.
Attaching Flowers to Squares
Place one flower in the center of each granny square.
Pin the flower in place.
Using the long pale blue yarn tail, sew around the underside of the flower center and lightly tack down the base of each petal.
Do not sew the petals completely flat. Leave the top of each petal raised so the flower keeps its puffy texture.
Weave in ends on the back of the square.
Repeat for all 63 squares.
Blanket Layout
Arrange the finished flower squares in this layout:
- 7 squares across
- 9 squares down
Make sure all flowers face the same direction.
Move squares around until the texture and color look balanced.
Pin rows together if needed before joining.
Joining the Squares
Use misty blue yarn.
You can join with a whip stitch or slip stitch seam.
Whip Stitch Join
Place two squares with right sides facing up.
Line up the edges.
Using a yarn needle, whip stitch through the outer loops of both squares.
Do not pull too tightly.
Join the squares into 9 horizontal rows of 7 squares.
Then join the rows together to form the full blanket.
Weave in ends as you go.
Slip Stitch Join
Place two squares with wrong sides together.
Insert hook through the outer loops of both squares.
Sl st evenly across the edge.
Keep your tension loose so the seam stays flexible.
Continue joining all squares.
Blanket Border
Join misty blue yarn in any corner of the blanket.
Border Round 1
Ch 1.
Sc evenly around the entire blanket.
Work 3 sc in each corner.
Join with sl st to first sc.
Border Round 2
Ch 1.
Sc in each st around.
Work 3 sc in the center stitch of each corner.
Join with sl st to first sc.
Border Round 3
Ch 1.
Sc in each st around.
Work 3 sc in each corner.
Join with sl st to first sc.
Soft Scalloped Edge
Use misty blue yarn or switch to pale blue for a softer finish.
Border Round 4
Ch 1.
Repeat around: skip next st, 5 dc in next st, skip next st, sl st in next st.
Continue around all sides.
At the corners, adjust the spacing slightly if needed so each corner has a rounded scallop.
Join with sl st.
FO and weave in all ends.
Finishing
Weave in every remaining yarn tail.
Lay the blanket flat.
Gently shape the corners and scalloped border.
Lightly steam-block the blanket if your yarn label allows it, but do not press down on the puffy flowers.
Let the blanket dry completely before folding.
Size Adjustments
Small Lap Blanket
Make 42 squares.
Arrange them 6 across by 7 down.
Baby Photo Prop Blanket
Make 30 squares.
Arrange them 5 across by 6 down.
Use only for supervised photos or decor because of the raised flower texture.
Larger Throw Blanket
Make 80 squares.
Arrange them 8 across by 10 down.
Wider Sofa Blanket
Make 72 squares.
Arrange them 8 across by 9 down.
Tips & Variations
Use one solid color for a clean textured flower blanket.
Use pale blue flowers on a misty blue base for a soft cloud-like look.
Use cream squares with blush flowers for a romantic nursery-style blanket.
Use sage squares with ivory flowers for a botanical cottagecore look.
Use lavender and cream for a gentle spring blanket.
For extra texture, make the flower centers in a contrasting color.
For a flatter blanket, sew the petals down more firmly.
For a puffier blanket, tack only the center and base of each petal.
Use cotton-blend yarn for more stitch definition.
Use soft acrylic yarn for a lighter and warmer throw.
FAQ
Is this flower blanket beginner-friendly?
Yes. This pattern is beginner-friendly if you know basic granny squares, single crochet, double crochet, and simple sewing. The puff flowers add texture but are easy once you practice one or two.
Is this the same as the original flower blanket?
No. This is a new original version. It uses separate granny squares and sewn-on puffy flower appliqués instead of copying the original pattern construction.
Can I make this as a baby blanket?
You can make it as nursery decor or a supervised photo blanket, but because the flowers are raised and textured, it should not be used as an unsupervised crib blanket for babies.
What yarn works best?
Soft worsted weight yarn works well. Acrylic yarn makes it cozy and lightweight, while cotton-blend yarn gives more structure and stitch definition.
Can I resize the blanket?
Yes. Simply make more or fewer squares and arrange them into the size you want.
Conclusion
The Puffy Blossom Crochet Throw Blanket is a soft, textured, floral blanket that feels cozy and handmade without being too complicated. The granny square base keeps the project simple, while the puffy flower appliqués add the beautiful raised blossom effect.
Make it in soft blue, cream, blush, lavender, sage, or any color palette that fits your home. This easy crochet pattern is perfect for decorative throws, handmade gifts, cottagecore room styling, and anyone who loves flower crochet projects with a soft, cozy finish.




I am having trouble downloading the PDF file. When I use button to “download file” it sends the file to my printer, not as a PDF file. While it’s sitting in my printer I can save it as a PDF file……with no name and I don’t know where it is saved to!!
I’m not very computer literate when it comes to this sort of thing. Can you help??
Hi Maureen, check the printer setting on your computer. If you want to save a file asc a PDF be sure your printer is set for PDF before you hit print or save.
Also you should have a PDF program to do this funtion. If you don’t, Best Buy can help you with this.
Happy Crocheting,
Debbie
I am having trouble downloading the PDF file. When I use button to “download file” it sends the file to my printer, not as a PDF file. While it’s sitting in my printer I can save it as a PDF file……with no name and I don’t know where it is saved to!!
I’m not very computer literate when it comes to this sort of thing. Can you help??
Reply
Thank you so much for letting me know. You were right — the old button was opening the browser print screen, which can be confusing. I’ve updated the download system so the main button now downloads the PDF file directly with a proper file name. Please try the Download PDF button again, and it should save as a normal PDF file. If your browser still opens a print screen, you can choose the direct download option or open the page in Chrome/Safari.