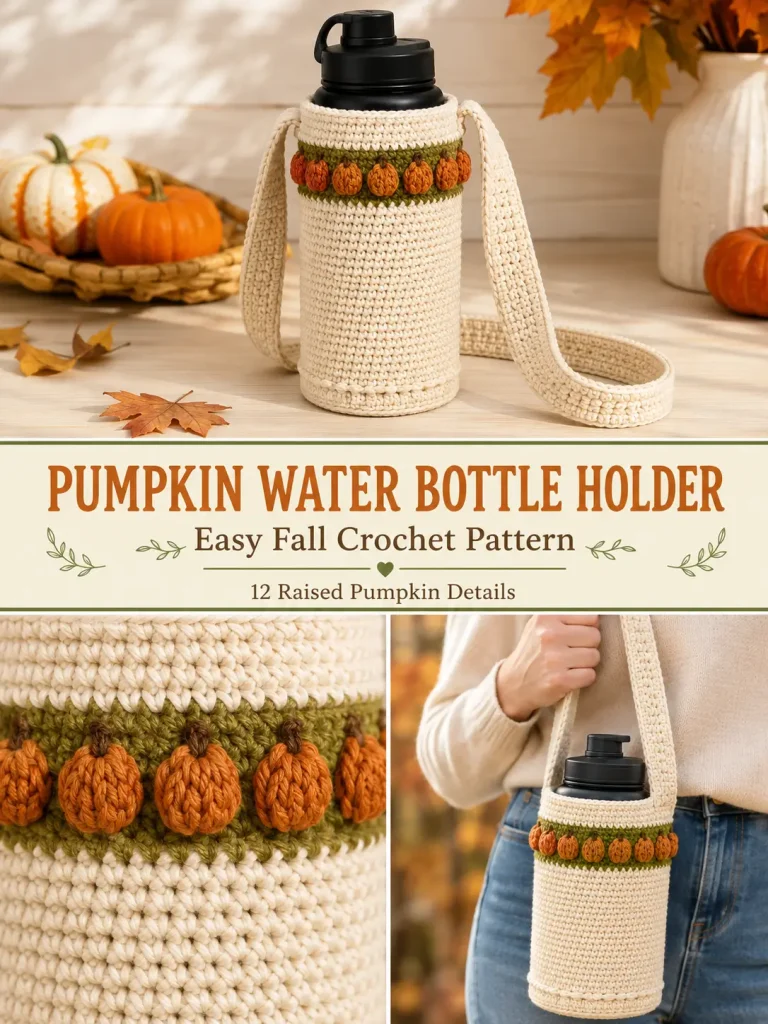
This fall crochet bottle carrier combines a sturdy cream body, a row of little raised pumpkins, and a long shoulder/crossbody strap.
The project is worked bottom-up in continuous rounds. A flat circular base supports the bottle, a back-loop round turns the base into the wall, and the body stays at one stitch count so there is very little shaping to remember.
Near the top, a contrasting olive-and-orange band contains 12 raised pumpkin bobbles. The strap is crocheted separately and securely sewn to opposite sides of the holder.
The linked design uses worsted/Aran yarn, a 4 mm hook, a ribbed base, long carrying strap, and a designer-specific pumpkin stitch. (Ravelry) The pattern below is an original construction with different counts, a different pumpkin-bobble motif, different upper band, and its own strap and finishing method.
Pattern at a Glance
Skill level: Confident beginner
Terminology: US crochet terms
Construction: Bottom-up in continuous rounds
Suggested yarn: Worsted / Category 4 cotton or cotton blend
Hook: 4 mm / G
Main stitch count: 48 stitches
Finished holder circumference: Approximately 10½–11¼ inches
Finished body height: Approximately 7–7½ inches
Base diameter: Approximately 3½ inches
Pumpkins: 12
Sample strap: Approximately 44–46 inches before attachment
This size is designed around a medium-to-large reusable water bottle approximately 3¼–3½ inches in diameter.
Measure your bottle before beginning.
Colors
For this version use:
Color A — Warm Cream
Main holder and strap
Color B — Moss Olive
Pumpkin band
Color C — Burnt Pumpkin Orange
Raised pumpkins
Optional:
Color D — Deep Brown
Tiny embroidered pumpkin details
Materials
You will need:
- 150–180 yards warm-cream worsted cotton
- 20–30 yards moss-olive worsted cotton
- 20–30 yards burnt-orange worsted cotton
- small amount deep brown, optional
- 4 mm crochet hook
- locking stitch marker
- yarn needle
- scissors
- measuring tape
Cotton or a firm cotton blend is recommended because it stretches less than very soft acrylic when carrying a full bottle.
Gauge
Approximately:
17 sc = 4 inches
and:
19 sc rounds = 4 inches
Gauge matters more than usual because the holder should fit the bottle without being extremely loose.
Before Starting
Measure around the widest part of your bottle.
The finished crochet circumference should be approximately:
½–1 inch smaller than the bottle circumference
if your yarn has some stretch.
For the written version, 48 stitches at gauge measures approximately:
11¼ inches around
before stretching.
Abbreviations
- ch = chain
- sc = single crochet
- sl st = slip stitch
- BLO = back loop only
- inc = 2 sc in same stitch
- PB = pumpkin bobble
- st = stitch
- sts = stitches
- rep = repeat
Special Stitch — Pumpkin Bobble
The small pumpkins are made from a five-partial-double-crochet bobble.
PB
In the indicated stitch:
- Yarn over.
- Insert hook into stitch.
- Yarn over and pull up a loop.
- Yarn over and pull through 2 loops.
Leave the remaining loops on the hook.
Repeat Steps 1–4 four more times in the same stitch.
You should now have:
6 loops on the hook.
Yarn over.
Pull through all 6 loops.
Ch 1 tightly to close the bobble.
Push the bobble gently toward the outside/right side of the holder.
Important
The PB counts as:
1 stitch
The closing ch 1 does not count as a stitch.
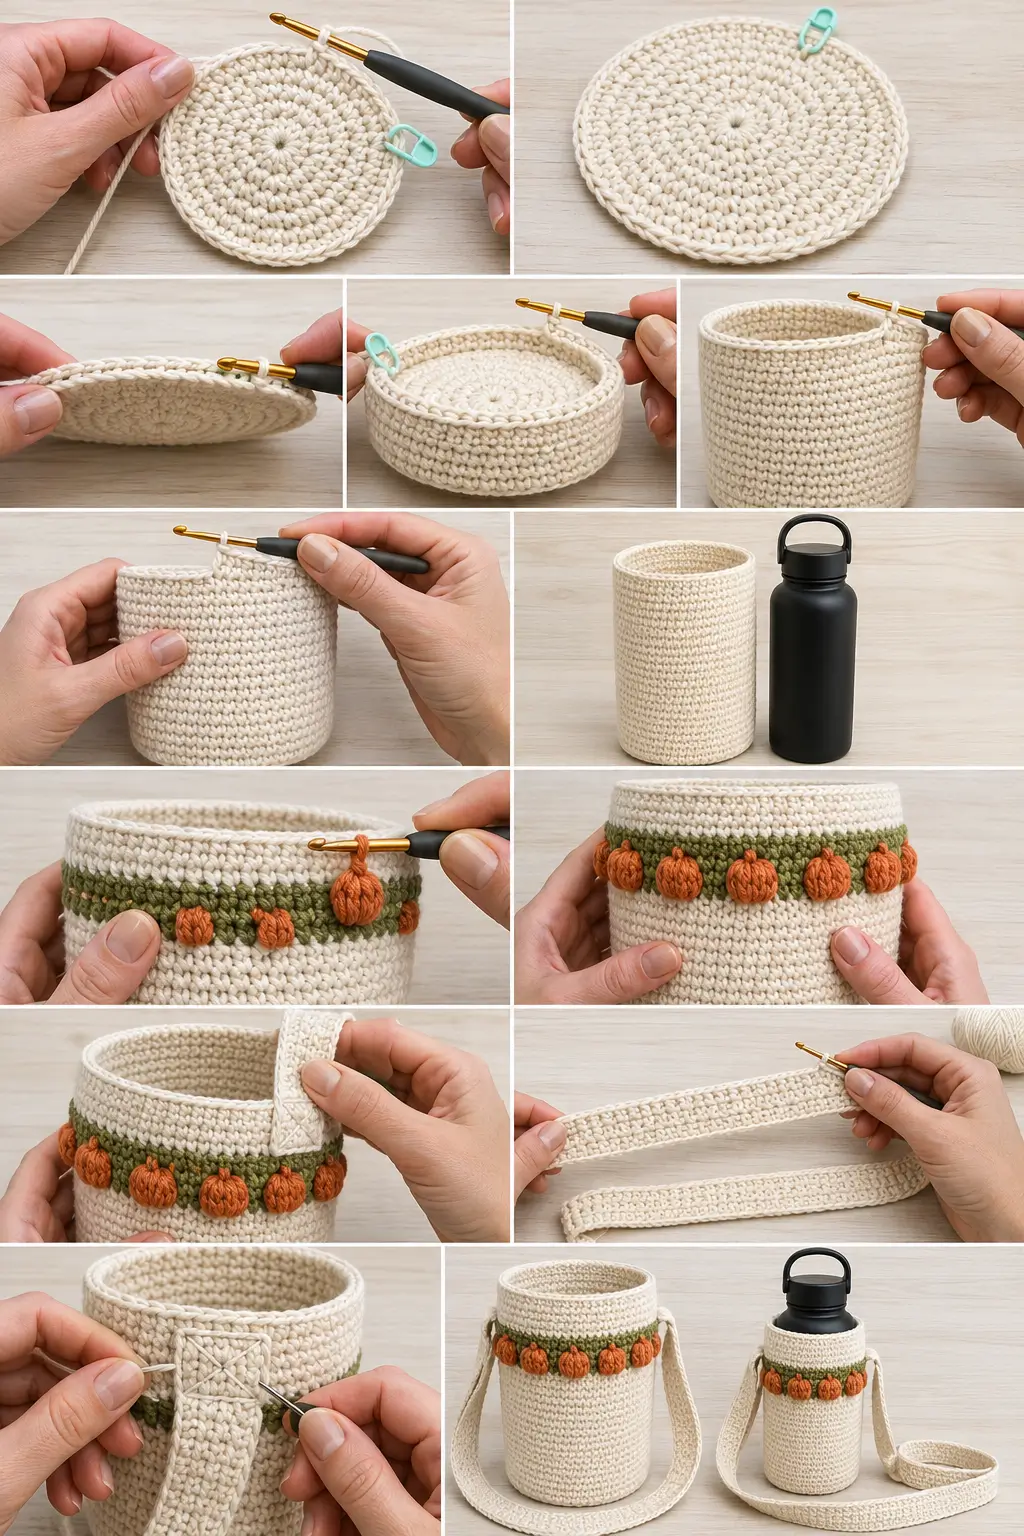
PART 1 — CROCHET THE ROUND BASE
Using warm cream, make a magic ring.
Work in continuous rounds.
Place a marker in the first stitch of each round.
Round 1
Work:
6 sc into magic ring
6 sts
Pull ring closed.
Round 2
Work:
2 sc in every stitch
12 sts
Round 3
Repeat:
sc in next st, inc
around.
18 sts
Round 4
Repeat:
sc in next 2 sts, inc
around.
24 sts
Round 5
Repeat:
sc in next 3 sts, inc
around.
30 sts
Round 6
Repeat:
sc in next 4 sts, inc
around.
36 sts
Round 7
Repeat:
sc in next 5 sts, inc
around.
42 sts
Round 8
Repeat:
sc in next 6 sts, inc
around.
48 sts
Check the Base
The circle should measure approximately:
3½ inches across
and lie reasonably flat.
Place your bottle on top.
The bottom of the bottle should sit almost completely over the crochet circle without a large amount of crochet extending beyond it.
If the Base Is Too Small
If your bottle is slightly wider, add:
Optional Round 9
Repeat:
sc in next 7 sts, inc
around.
You will have:
54 sts
However, if you use 54 stitches, all later pumpkin-band math must be changed.
For the easiest version, use a bottle that works with the 48-stitch base.
PART 2 — TURN THE BASE INTO THE WALL
Round 9
Working through the back loops only:
Sc BLO in every stitch around
48 sts
This leaves a visible ridge around the base and encourages the fabric to turn upward.
PART 3 — MAIN CREAM BODY
Return to normal single crochet through both loops.
Round 10
Sc in every stitch around.
48 sts
Rounds 11–35
Repeat:
sc in every stitch
Keep:
48 sts per round
There are no increases.
At the end of Round 35, the cream body should measure approximately:
5½–6 inches above the base ridge
depending on your gauge.
Fit Check
Slide the bottle into the holder.
The fabric should:
- fit closely
- stretch slightly
- stay upright
- not squeeze the bottle excessively
- not slide off when lifted
If your bottle is shorter, you can stop the cream body a few rounds earlier.
If it is taller, add several rounds before beginning the pumpkin band.
Keep:
48 stitches
at all times.
PART 4 — OLIVE PUMPKIN BAND
Change to moss olive.
Round 36
Sc in every stitch around.
48 sts
Join neatly at the color change.
PART 5 — RAISED PUMPKIN ROUND
Change to burnt pumpkin orange.
Round 37
Repeat around:
Sc in next 3 sts, PB in next st
Repeat the sequence:
12 times
You should have:
- 36 ordinary sc
- 12 pumpkin bobbles
Total:
48 stitches
What the Pumpkin Round Should Look Like
There should be exactly:
12 evenly spaced orange bobbles
around the bottle holder.
Each bobble should sit on the outside of the fabric.
The olive round beneath it creates a subtle vine-like background.
PART 6 — COMPLETE THE PUMPKIN BAND
Change back to moss olive.
Round 38
Sc in every stitch around.
When reaching each pumpkin bobble, work one sc into the top of the bobble stitch.
Do not work into the closing ch 1.
Keep:
48 sts
PART 7 — UPPER CREAM CUFF
Change to warm cream.
Round 39
Work:
Sc BLO in every stitch
48 sts
This creates a small ridge above the pumpkin band.
Rounds 40–42
Sc in every stitch around.
48 sts
Optional Final Rim Round
For a slightly firmer top:
Round 43
Sl st loosely in every stitch around.
Fasten off.
Do not make the slip stitches tight or the bottle opening may become difficult to stretch.
Check the Finished Body
The bottle holder should now measure approximately:
7–7½ inches high
from the bottom to the top rim.
The bottle neck or lid should remain exposed and easy to access.
PART 8 — OPTIONAL PUMPKIN DETAIL
If you want the bobbles to read more clearly as tiny pumpkins, use a small amount of deep-brown yarn.
Thread it onto a yarn needle.
For each orange bobble:
Make one tiny vertical stitch over the center of the bobble.
Keep the stitch loose enough that it creates a slight groove rather than crushing the bobble.
Then add one tiny brown stitch directly above it to suggest a stem.
This step is optional.
The holder still works well with plain orange bobbles.
PART 9 — CROCHET THE STRAP
Use warm cream.
Because everybody has a different preferred carrying length, measure the chain rather than relying on an exact chain count.
For the sample crossbody strap:
Chain until the foundation measures approximately 46 inches without stretching.
For a shorter shoulder strap:
Aim for approximately:
34–36 inches
For a longer crossbody strap:
Aim for approximately:
50–52 inches
Strap Row 1
Starting in the second chain from the hook:
Sc in every chain across.
Ch 1.
Turn.
Strap Row 2
Sc in every stitch across.
Ch 1.
Turn.
Strap Row 3
Sc in every stitch across.
Fasten off leaving approximately:
12 inches of yarn
for attaching.
The strap should be approximately:
¾–1 inch wide
depending on your yarn and tension.
Why Use Three Rows?
A single chain strap can stretch considerably when carrying a full bottle.
Three dense sc rows distribute the weight more comfortably and make the strap much stronger.
PART 10 — FIND THE STRAP POSITIONS
Lay the holder flat with the pumpkin band facing you.
Choose one side of the holder as:
Position A
The opposite side becomes:
Position B
The strap ends need to sit approximately:
24 stitches apart
because the holder contains 48 stitches around.
This puts the strap attachments directly opposite each other.
PART 11 — ATTACH THE FIRST STRAP END
Overlap approximately:
1½ inches
of one strap end against the inside of the holder.
Position the end so its lower edge reaches slightly below the pumpkin band.
Using the long yarn tail and yarn needle, sew through:
- strap
- holder wall
- strap
- holder wall
several times.
Create a small rectangular stitching area.
Then stitch diagonally across that rectangle to form an:
X
This creates a strong attachment.
Do not sew only through the uppermost rim.
The strap should be anchored across several body rounds.
PART 12 — ATTACH THE SECOND END
Before sewing the second end:
Make sure the strap is not twisted.
Position it directly opposite the first attachment.
Overlap approximately:
1½ inches
inside the holder.
Sew using the same:
rectangle + X
reinforcement.
Weave in the tail securely.
Strap Test
Before using the holder outdoors:
Place the bottle inside.
Hold the carrier a few inches above a soft surface.
Check:
- both strap attachments
- top rim
- base
- bobble band
- overall stretch
Do not use the carrier until both attachment points feel secure.
OPTIONAL STRAP REINFORCEMENT
Cotton usually stretches less than acrylic, but you can make the strap even firmer.
Join cream yarn at one strap attachment.
Work a line of:
surface slip stitches
straight down the center of the strap.
Stop at the opposite attachment.
Fasten off.
This adds another reinforcing strand through the entire strap.
Finished Measurements
Approximately:
Base
3½ inches diameter
Body circumference
10½–11¼ inches
Height
7–7½ inches
Strap
Approximately 44–46 inches finished, depending on tension
The finished dimensions can vary slightly.
Bottle Size
The written version works best for bottles approximately:
3¼–3½ inches in diameter
with a usable body height of around:
7–8 inches
The bottle lid should remain above the holder.
How to Fit Your Own Bottle
Measure the bottle circumference.
Then crochet a small sc swatch.
Calculate your stitches per inch.
Use:
bottle circumference × stitches per inch
Then subtract a small amount for stretch.
Round the result to a number that works comfortably with your decorative repeat.
For this pumpkin band, the stitch count should be divisible by:
4
because each repeat uses:
3 sc + 1 pumpkin bobble
Easy Size Formula
The pumpkin repeat is:
multiple of 4
So good possible body stitch counts include:
- 40
- 44
- 48
- 52
- 56
If you change the body stitch count, make sure your circular base finishes with the same number of stitches before beginning the straight walls.
Smaller Bottle Version
For a narrow bottle, use:
44 stitches
for the finished base circumference.
On the pumpkin round repeat:
3 sc, PB
around.
You will have:
11 pumpkins
Larger Bottle Version
For a wider bottle, use:
52 stitches
around.
The pumpkin round will contain:
13 pumpkins
Why Cotton Is a Good Choice
A full reusable bottle can be surprisingly heavy.
Cotton provides:
- strong stitch definition
- less bounce
- less stretching
- durable strap fabric
- good support
A cotton/acrylic blend can also work.
Can I Use Acrylic?
Yes.
But expect more stretch.
If using acrylic:
- crochet firmly
- consider a smaller hook
- reinforce the strap
- test the holder with the full bottle before regular use
Can I Use a 5 mm Hook?
Yes, but your fabric will probably be looser and larger.
Because this holder carries weight, a dense fabric is preferable.
Use the hook that gives you a sturdy fabric rather than following the hook size blindly.
Can I Make the Body Taller?
Yes.
Simply add additional cream sc rounds before Round 36.
Do not change the stitch count.
Then add the pumpkin band and cuff normally.
Can I Move the Pumpkin Band Lower?
Yes.
The pumpkin decoration can sit anywhere on the straight wall.
For the visual style used here, placing it approximately:
1–1½ inches below the top
keeps the pumpkins visible even when the bottle is inside.
Alternative Fall Color Palette
Try:
Body
Oatmeal
Band
Deep forest green
Pumpkins
Burnt rust
Strap
Oatmeal
Softer Autumn Version
Body
Warm cream
Band
Muted sage
Pumpkins
Dusty terracotta
Strap
Warm cream
This creates a less traditional, more modern fall palette.
Halloween Version
Body
Charcoal
Band
Deep olive
Pumpkins
Bright pumpkin orange
Strap
Charcoal
The raised pumpkin row becomes much more dramatic against the dark body.
Can I Add a Bow?
You can, but for this version I would leave it off.
The pumpkin band is already the focal point, and a cleaner holder is easier to use repeatedly.
Can I Add a Button Closure?
A closure is usually unnecessary.
The snug cylindrical body and exposed bottle neck keep a standard bottle secure.
Avoid putting anything over the bottle lid that interferes with normal opening and closing.
What If the Bottom Sags?
Possible causes:
- yarn too stretchy
- hook too large
- bottle too heavy for the fabric
Solutions:
- use cotton
- crochet the base more tightly
- add a removable circular plastic-canvas insert inside the bottom
- reinforce the underside with a second round of surface slip stitch
For ordinary reusable water bottles, dense cotton should usually be enough.
What If the Bottle Holder Is Too Loose?
If you are only a few rounds into the wall, undo it and reduce the circumference.
A holder that is slightly snug is better than one that allows the bottle to swing around.
What If the Bottle Will Not Fit?
Do not force it.
Add another increase round to the base and recalculate the body count.
The holder should stretch slightly but should not strongly compress the bottle.
What If the Pumpkin Bobbles Stay Inside?
After completing each PB:
Push it toward the outside of the holder with your finger before continuing.
This is normal with bobble stitches.
What If the Pumpkin Bobbles Are Too Small?
Try making a 6-partial-dc bobble instead of five.
Keep the same technique for every pumpkin so the decorative band remains consistent.
What If the Pumpkins Are Too Bulky?
Use a 4-partial-dc bobble.
Again, keep all pumpkins identical.
Washing
Follow the care instructions for your yarn.
If using cotton:
- reshape the holder while damp
- straighten the strap
- allow it to dry completely before carrying a heavy bottle again
Do not hang the wet carrier by its strap because the extra water weight can stretch it.
Safety and Use
This is a bottle carrier, not a toy.
Before each use, check:
- strap attachment
- seams
- loose yarn
- stretched stitches
Use extra care with glass bottles.
Do not use a damaged holder to carry breakable containers.
Long straps can also pose an entanglement hazard for young children, so this version is intended for adult or appropriately supervised use.
Frequently Asked Questions
Is the holder made from separate panels?
No.
The holder is worked continuously from the center of the bottom upward.
What is the main body stitch count?
48 stitches
How many pumpkins are around the sample?
12 raised pumpkins
Are the pumpkins separate appliqués?
No.
They are crocheted directly into the decorative round using bobble stitches.
Is the strap crocheted separately?
Yes.
A three-row sc strap is made separately and securely attached to opposite sides.
Why not crochet the strap as one long chain directly from the rim?
A separate three-row strap is easier to reinforce and easier to replace if it wears out.
Can I adjust the strap length?
Yes.
Measure the starting chain to the length you prefer before working the three sc rows.
Can I make it crossbody?
Yes.
For most adults, start testing around:
48–52 inches
depending on height and preferred carrying position.
Is the decorative stitch the same as the linked designer’s pumpkin stitch?
No.
This version intentionally uses a different raised bobble-pumpkin repeat so the construction is original while keeping the broad fall water-bottle-carrier idea.
Final Thoughts
This project looks much more decorative than the construction really is.
The base is just a simple increasing circle.
Once it reaches 48 stitches, the increases stop.
Then you crochet straight upward.
Near the top, every fourth stitch becomes a little orange bobble:
three single crochets, one pumpkin
repeated around.
Add the olive rounds, finish the cream cuff, attach the long strap, and the plain bottle carrier suddenly looks like a tiny row of pumpkins wrapped around your water bottle.
It is useful, quick enough for a seasonal project, and distinctive enough to get attention without requiring complicated tapestry colorwork or dozens of pieces to sew together.



