Introduction
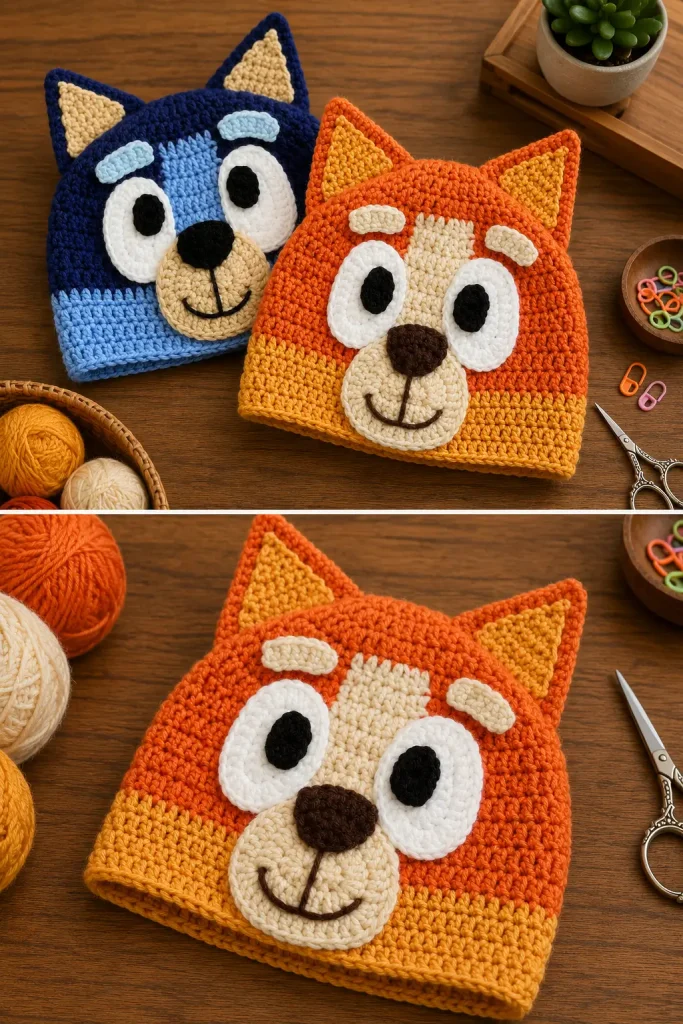
A handmade animal hat has a special kind of magic. It keeps little ears warm, adds personality to everyday outfits, and makes dress-up time feel extra fun. This puppy face crochet hat is playful, colorful, and full of character, with big oval eyes, pointed ears, a rounded snout, and a sweet stitched smile.
This crochet hat pattern is designed as a cute puppy-inspired beanie, not a branded character hat. The color-blocked base gives the hat a lively cartoon-style look, while the sewn-on features bring the face to life. It is a fun project for crocheters who enjoy making handmade gifts, costume hats, winter accessories, and playful crochet beanies for kids.
The pattern uses basic stitches and simple shapes, but there are several pieces to make and attach. Take your time with placement, pin everything before sewing, and enjoy watching the puppy face appear piece by piece.
Description
This puppy face crochet hat features a double crochet beanie base with a darker upper section, a lighter vertical face stripe, and a contrasting lower band. The large oval eyes, black pupils, rounded triangle snout, small nose, embroidered smile, expressive eyebrows, and tall triangular ears create a cheerful animal face that feels bold and playful.
The finished hat is best described as a kids’ large or adult small size, depending on your yarn, hook, and tension. The base is made with worsted-weight yarn and a 5 mm hook, while the facial features are worked with a slightly smaller hook for cleaner shaping.
This cute animal beanie is great for handmade birthday gifts, winter dress-up, costume play, themed parties, cozy photo shoots, or fun everyday wear. You can make it in blue tones, orange tones, brown tones, gray tones, or any puppy-inspired palette you love.
Materials
- Worsted-weight yarn in Color A for the main upper hat color
- Worsted-weight yarn in Color B for the center stripe and lower band
- Optional Color C for the lower band if making a three-color version
- Worsted-weight yarn in white for the eyes
- Worsted-weight yarn in black or dark brown for pupils, nose, and mouth
- Worsted-weight yarn in tan, cream, or beige for the snout and inner ears
- 5 mm crochet hook for the base hat and outer ears
- 4 mm crochet hook for eyes, pupils, snout, and nose
- Yarn needle
- Scissors
- Stitch markers
- Pins for placement
Abbreviations
- ch: chain
- sc: single crochet
- hdc: half double crochet
- dc: double crochet
- inc: increase, 2 stitches in the same stitch
- sl st: slip stitch
- st: stitch
- sts: stitches
- MR: magic ring
Pattern Notes
This pattern uses U.S. crochet terms.
The ch 2 at the beginning of each beanie round does not count as a stitch.
When joining each round, join with a sl st into the top of the first dc of the round, not into the beginning chains.
The ch 2 and first dc of the next round are worked into the same stitch where you joined.
The base beanie is worked in joined rounds.
The hat is written as a kids’ large or adult small. You may need to add or subtract a row depending on the wearer’s head size.
The top two-thirds of the hat are mainly Color A, with a vertical Color B stripe between the eyes. The lower section is worked in Color B or Color C.
Use your eye when placing color changes. If your stripe placement looks slightly different because of tension, adjust it so the face looks balanced.
Step-by-Step Instructions
Head
For this project, the “head” is the main puppy beanie base.
Use a 5 mm crochet hook.
Base Beanie
Round 1
With Color A, ch 2.
Work 10 dc in a magic ring.
Join with a sl st. (10 sts)
Round 2
Ch 2.
Dc inc in every stitch around.
Join with a sl st. (20 sts)
Round 3
Ch 2.
Increase every second stitch: dc, dc inc around.
Join with a sl st. (30 sts)
Round 4
Ch 2.
Increase every third stitch: dc, dc, dc inc around.
Join with a sl st. (40 sts)
Round 5
Ch 2.
Dc, dc, dc, dc inc x4.
Pull through the last loop with Color B to change color.
Dc, dc, dc, dc inc, dc, dc.
Pull through the last loop with Color A to change color back.
Dc, dc inc.
Dc, dc, dc, dc inc x4.
Join with a sl st. (50 sts)
Round 6
Ch 2.
Dc, dc, dc, dc, dc inc x4.
Pull through the last loop of the increase with Color B to change color.
Dc, dc, dc, dc, dc inc, dc, dc.
Pull through the last loop with Color A to change color back.
Dc, dc, dc inc.
Dc, dc, dc, dc, dc inc x5 to the end of the round.
Join with a sl st. (60 sts)
Round 7
Ch 2.
Dc, dc, dc, dc, dc, dc, dc, dc, dc, dc inc x2.
Dc, dc, dc, dc.
Pull through the last loop with Color B to change color.
Dc, dc, dc, dc, dc, dc inc, dc, dc.
Pull through the last loop with Color A to change color back.
Dc, dc, dc, dc, dc, dc, dc, dc inc.
Dc, dc, dc, dc, dc, dc, dc, dc, dc, dc inc x2.
Join with a sl st. (66 sts)
No more increases.
Rounds 8–12
Ch 2.
Dc around, changing to Color B where needed to continue the lighter vertical stripe between the eyes.
A balanced version is:
Color A for 26 sts, Color B for 9 sts, Color A for 31 sts. (66 sts)
Join each round with a sl st.
Rounds 13–16
With Color B or Color C, ch 2.
Dc around. (66 sts)
Join each round with a sl st.
Cut yarn and pull through.
Join neatly. An invisible join works well.
Knot the tail inside the hat and weave in the end.
Body
This project does not include a separate body. The main beanie base forms the puppy head shape.
Arms
This pattern does not include arms.
Legs
This pattern does not include legs.
Ears
The ears are made in two parts: an outer cone and an inner triangle.
Use a 5 mm hook for the outer ears.
Make 2 outer ear cones.
Outer Ear Cone
Use Color A.
Round 1: In a magic ring, ch 1 and make 6 sc. Pull the tail tight to close. (6 sts)
Round 2: Increase in every 3rd stitch: (sc, sc, inc) x2. (8 sts)
Round 3: Increase in every 4th stitch: (sc, sc, sc, inc) x2. (10 sts)
Round 4: Increase in every 5th stitch: (sc, sc, sc, sc, inc) x2. (12 sts)
Round 5: Increase in every 6th stitch: (sc, sc, sc, sc, sc, inc) x2. (14 sts)
Round 6: Increase in every 7th stitch: (sc, sc, sc, sc, sc, sc, inc) x2. (16 sts)
Round 7: Increase in every 8th stitch: (sc, sc, sc, sc, sc, sc, sc, inc) x2. (18 sts)
Round 8: Increase in every 9th stitch: (sc, sc, sc, sc, sc, sc, sc, sc, inc) x2. (20 sts)
Round 9: Increase in every 10th stitch: (sc, sc, sc, sc, sc, sc, sc, sc, sc, inc) x2. (22 sts)
Round 10: Increase in every 11th stitch: (sc, sc, sc, sc, sc, sc, sc, sc, sc, sc, inc) x2. (24 sts)
Round 11: Increase in every 12th stitch: (sc, sc, sc, sc, sc, sc, sc, sc, sc, sc, sc, inc) x2. (26 sts)
Round 12: Increase in every 13th stitch: (sc, sc, sc, sc, sc, sc, sc, sc, sc, sc, sc, sc, inc) x2. (28 sts)
Round 13: Increase in every 14th stitch: (sc, sc, sc, sc, sc, sc, sc, sc, sc, sc, sc, sc, sc, inc) x2. (30 sts)
Round 14: Increase in every 15th stitch: (sc, sc, sc, sc, sc, sc, sc, sc, sc, sc, sc, sc, sc, sc, inc) x2. (32 sts)
Fasten off, leaving a long tail for sewing.
Do not sew the ear cone closed yet. Sew the inner ear triangle to the front first, so your stitches go only through the front layer.
If the ear looks too tall or too short for your hat, you may stop after Round 13 or add another round. Use the hat size and your own tension as a guide.
Inner Ear Triangle
Use tan, cream, yellow, or another contrast color.
Make 2.
Row 1: Ch 2. In the first chain, sc. Ch 1, turn. (1 st)
Row 2: inc. Ch 1, turn. (2 sts)
Row 3: inc, inc. Ch 1, turn. (4 sts)
Row 4: sc in each stitch across. Ch 1, turn. (4 sts)
Row 5: inc, sc, sc, inc. Ch 1, turn. (6 sts)
Row 6: sc in each stitch across. Ch 1, turn. (6 sts)
Row 7: inc, sc, sc, sc, sc, inc. Ch 1, turn. (8 sts)
Row 8: sc in each stitch across. (8 sts)
Row 9: inc, sc, sc, sc, sc, sc, sc, inc. Ch 1, turn. (10 sts)
Row 10: sc in each stitch across.
Fasten off, leaving a long tail for sewing.
Sew one inner ear triangle onto the front of each outer ear cone.
After the inner ear is attached, flatten the ear cone into a double-thickness triangle and sew the bottom closed.
Tail
This crochet hat pattern does not include a tail.
Face
The face is made from large oval eyes, small pupils, eyebrows, a rounded triangle snout, a nose, and an embroidered smile.
Eyes
Use a 4 mm hook.
White Oval Eye
Make 2 with white yarn.
Round 1: Ch 7.
You will crochet on both sides of the chain. In the first 5 stitches, work under 2 loops.
Dc in 2nd ch from hook, dc, dc, dc, 7 dc in same stitch, dc, dc, 5 dc in same stitch.
Join with a sl st to the top of the first dc.
Round 2: Ch 2, dc in same stitch.
Dc, dc, dc, dc, dc.
3 dc in same stitch, 3 dc in next stitch, 3 dc in next stitch.
Dc, dc, dc, dc, dc, dc.
3 dc in same stitch, 3 dc in next stitch, 3 dc in next stitch.
Join with an invisible join or fasten off neatly.
Leave a long tail for sewing the eye onto the hat.
Black Pupil
Make 2 with black yarn.
Round 1: Make a magic ring.
Work the following stitches into the ring:
Sc, hdc, dc, dc, hdc, sc, sc, hdc, dc, dc, hdc, sc.
Join and fasten off with a long tail.
Pull the magic ring as tightly as possible to close the center.
Sew each black pupil onto a white oval eye.
Do not sew the pupil directly in the middle. Place each pupil closer to the inner side of the eye, near where the snout will sit. This gives the puppy a cute cartoon expression.
You may also place both pupils toward the lower side of the ovals for a playful side-eye look.
Eyebrows
Use a 5 mm hook.
Make 2.
Choose one method.
Eyebrow Method 1: Foundation Double Crochet
Make a row of 7 foundation double crochet stitches.
Fasten off, leaving a long tail for sewing.
Eyebrow Method 2: Chain Method
Ch 10.
Starting in the 3rd ch from hook, work dc across the chain.
Fasten off, leaving a long tail for sewing.
Set the eyebrows aside for assembly.
Snout
Use a 4 mm hook and tan, cream, beige, or buff-colored yarn.
Rounded Triangle Snout
Round 1: In a magic ring, ch 2 and make 12 dc.
Join with a sl st in the top of the first dc.
Pull the tail tight to close the circle.
Round 2: Ch 2.
(DC, ch 1, DC) all in the same stitch.
2 dc in each of the next 3 stitches.
(DC, ch 1, DC) all in the next stitch.
2 dc in each of the next 3 stitches.
(DC, ch 1, DC) all in the next stitch.
2 dc in each of the remaining stitches to the end of the round.
Join with a sl st in the top of the first dc.
Round 3: Ch 2.
Dc in the same stitch.
(2 dc, ch 1, 2 dc) in the chain space from the previous round.
Dc in each stitch until the next chain space.
(2 dc, ch 1, 2 dc) in the chain space.
Dc in each stitch until the next chain space.
(2 dc, ch 1, 2 dc) in the chain space.
Dc in each stitch to the end of the round.
Cut yarn, leaving a long tail for sewing.
Pull through on the last dc of the round and join to the first dc with an invisible join.
Pull the magic ring tail tight, knot it securely, and weave it in on the back of the piece.
Nose
Use a 4 mm hook and black or dark brown yarn.
Row 1: Ch 3. In the first chain, which is the 2nd ch from hook, work 5 dc. Ch 1 and turn.
Row 2: Hdc x5. Ch 1 and turn.
Row 3: 2 hdc in first stitch, hdc, hdc, hdc, 2 hdc in last stitch. Ch 1 and turn.
Row 4: Sc in every stitch across. (7 sts)
Cut yarn, leaving a long tail for sewing.
Pull through the last stitch.
Mouth
Before sewing the snout onto the hat, embroider the mouth onto the snout.
Use black or dark brown yarn.
Follow the gentle curved line between Rounds 2 and 3 of the snout.
A whipped back stitch works well if you want the mouth to look like a solid curved line.
Assembly
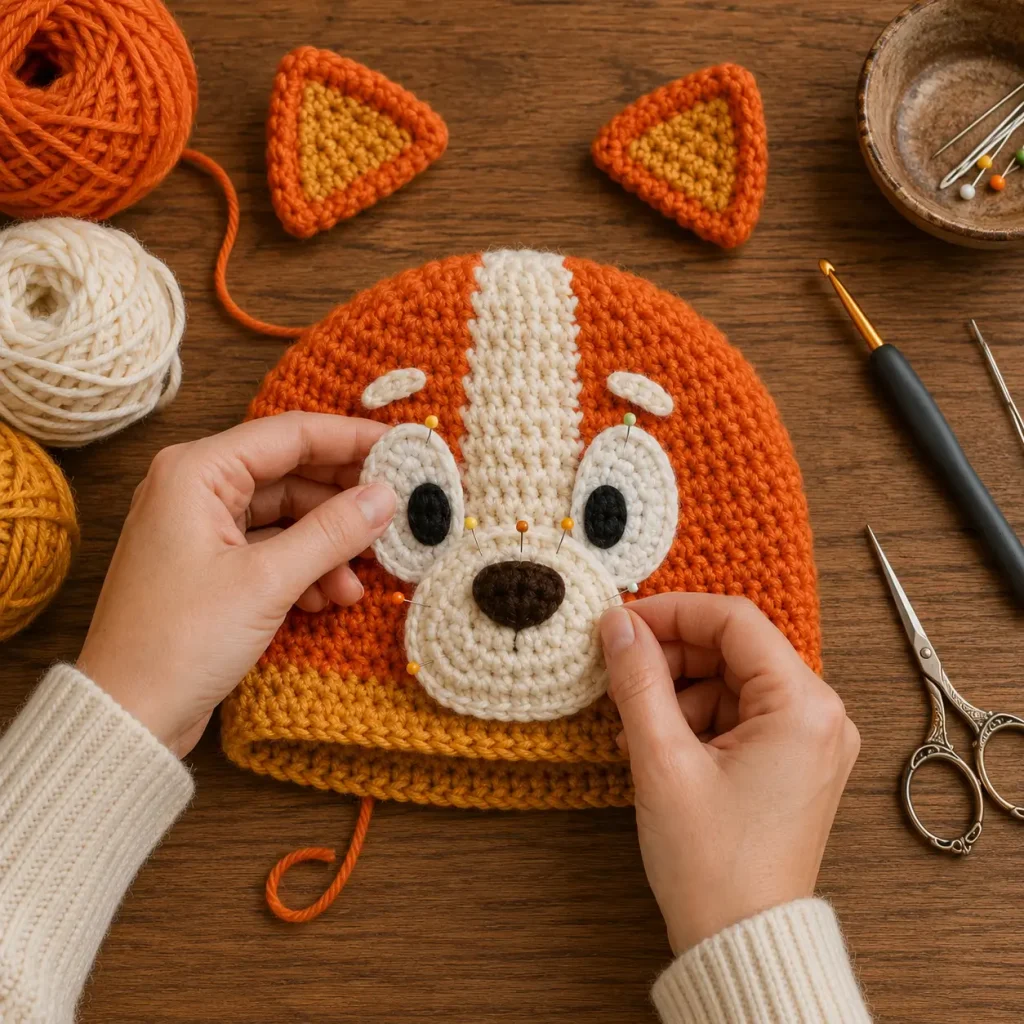
Pin all pieces before sewing. This is the most important step for a balanced face.
Place the eyes first.
The eyes should slightly overlap the vertical face stripe in the middle of the hat.
Make sure both pupils are positioned the way you want before sewing the eyes to the hat.
Place the eyebrows above the eyes.
The eyebrows should sit roughly in line with the top of the vertical color stripe, with a small gap between the eyebrows and the tops of the eyes.
Sew the nose onto the snout first.
Position the snout like a rounded triangle pointing upward, with the flat side at the bottom.
Position the nose opposite the snout, pointing downward with the flat side at the top.
The nose should sit at the top point of the snout, with the top edge of the nose slightly overlapping or hanging over the top of the snout.
After the nose and mouth are attached to the snout, sew the full snout piece to the bottom center front of the hat.
The snout may slightly overlap the bottom inner corners of the eyes, depending on your placement.
Place the ears near the top of the hat, one on each side of the first magic ring circle.
Pin them in place and check the front view before sewing.
Sew the ears securely to the hat.
Weave in or knot all ends on the inside of the hat.
Tips & Variations
Choose colors that create a strong face contrast. A dark upper hat with a lighter stripe gives the puppy a bold cartoon look.
For a blue puppy hat, use navy or royal blue for Color A and light blue for Color B.
For an orange puppy hat, use bright orange for Color A, cream for the face stripe, and deeper orange for the lower band.
For a softer woodland puppy, try chocolate brown, tan, and cream.
If the hat feels too short, add one extra plain dc round before finishing. A slightly longer hat usually fits better than one that is too short.
If the ears look too large, stop the ear cone at Round 12 or 13.
If the ears look too small, add Round 15 following the same increase pattern.
Make both eyes in the same sitting so they match as closely as possible.
Do the same with both pupils and both eyebrows.
Do not rush face placement. The position of the eyes, pupils, and snout changes the whole expression.
Use pins generously before sewing anything down.
FAQ
Is this puppy crochet hat beginner-friendly?
This pattern is best for confident beginners or intermediate crocheters. The base beanie uses simple double crochet increases, but the facial pieces and assembly require patience.
What size does this hat make?
As written, the hat fits approximately a kids’ large or adult small. Fit may vary depending on yarn, hook, tension, and number of rounds worked.
Can I resize this crochet hat?
Yes. You can adjust the size by changing the number of increase rounds, adding or removing length rounds, or using a different hook size. Always check the hat against the wearer’s head if possible.
Can I use different yarn?
Yes. Any worsted-weight yarn with similar tension should work. Keep in mind that yarn thickness changes the finished size and shape.
How do I make the face look balanced?
Pin every piece before sewing. Look at the hat from the front, side, and slightly above. Adjust the eyes, eyebrows, snout, and ears until the expression looks right.
Conclusion
This puppy face crochet hat is a playful, colorful project that turns a simple beanie into a fun handmade animal accessory. The bold eyes, expressive eyebrows, rounded snout, stitched smile, and tall ears make it full of personality while still keeping the construction approachable.
Make it in blue, orange, brown, gray, or any cheerful puppy-inspired palette you love. Whether you create it for dress-up, winter warmth, birthday gifts, or handmade photo props, this cute animal beanie is sure to bring smiles.




Thank you so much for sharing your experience with others creators!