Quick & Easy Crochet Crossbody Bag With Adjustable Strap
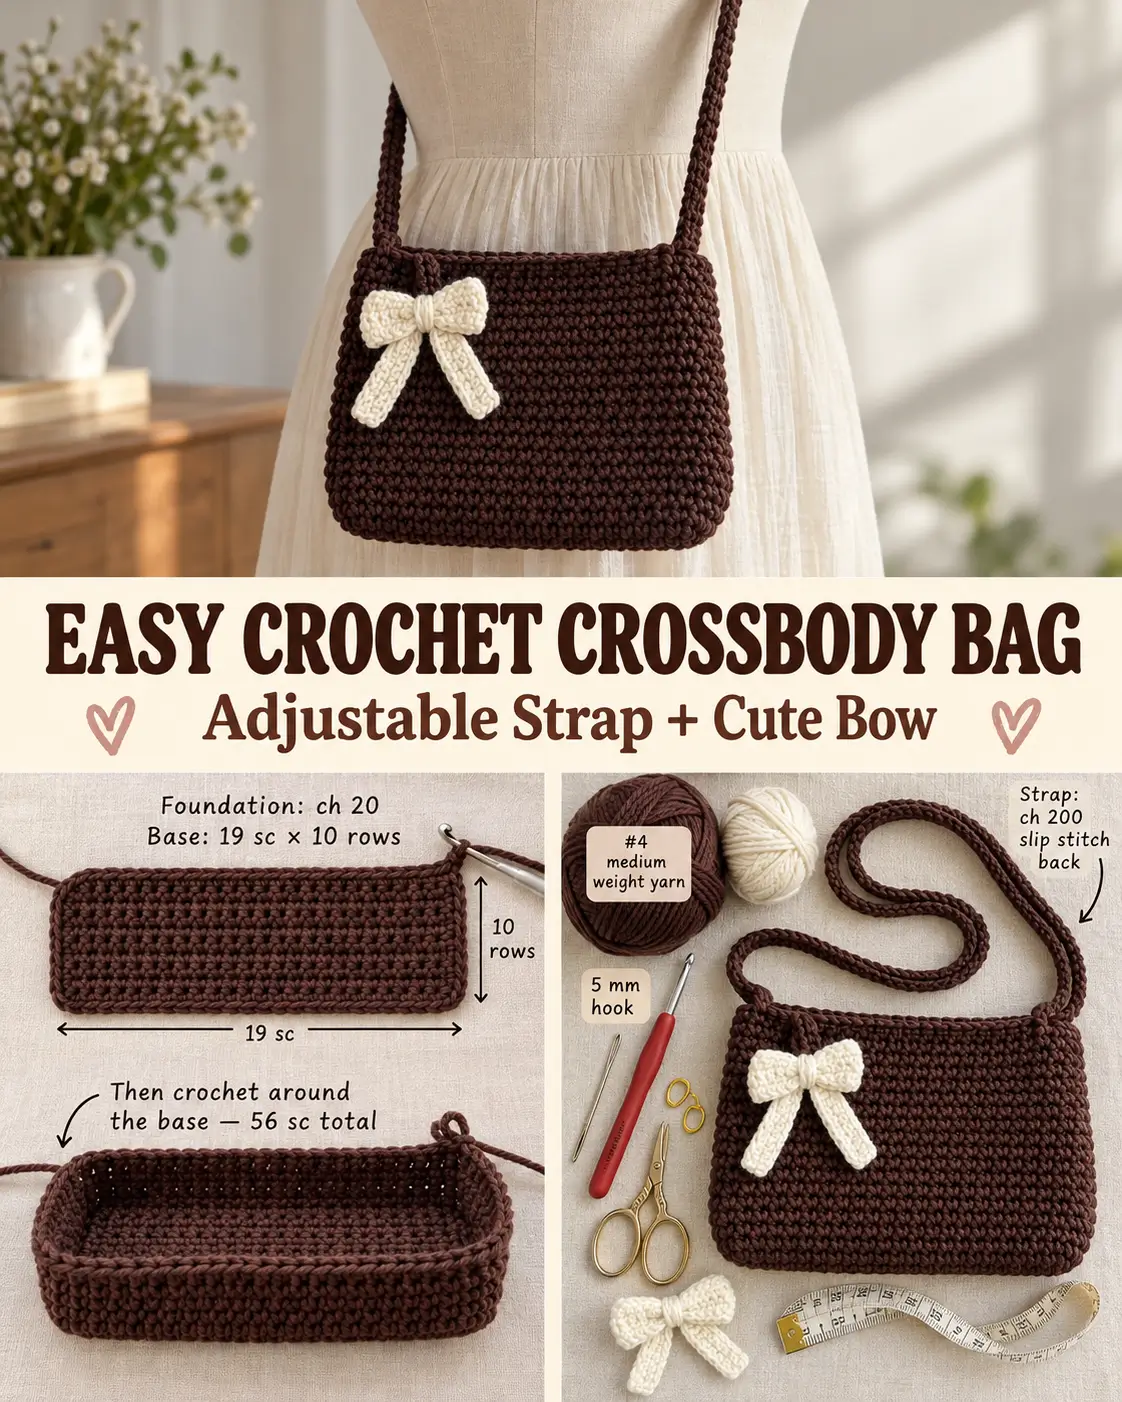
This simple crochet bag is made almost entirely with single crochet, beginning with a flat rectangular base and then working upward in joined rounds. A long crocheted cord creates the strap, allowing the bag to be worn as a shoulder bag or made longer for a crossbody fit.
For the closest match to the reference, keep the colors exactly as shown:
Bag: deep chocolate brown
Decorative bow: warm ivory / cream
The main bag uses a 5 mm crochet hook, starts with 20 chains, and maintains 56 stitches around the body.
Finished Size
The exact finished measurement depends on your yarn and tension.
With medium-weight yarn and a 5 mm hook, expect a small everyday crossbody bag approximately:
7½–8½ inches / 19–22 cm wide
6½–7½ inches / 16.5–19 cm tall
with a base approximately:
3 inches / 7.5 cm deep
The strap length is completely customizable.
Materials
- Medium weight #4 yarn in dark chocolate brown
- Small amount of ivory/cream yarn for the optional bow
- 5 mm crochet hook
- Tapestry needle
- Scissors
- Stitch markers
- Measuring tape
A cotton, cotton-blend, or sturdy acrylic yarn works well.
Choose a yarn that produces dense fabric rather than loose, stretchy stitches.
Skill Level
Beginner
You should know:
- chain
- single crochet
- slip stitch
- working in rows
- working in joined rounds
- sewing with a tapestry needle
Abbreviations
US crochet terminology:
ch — chain
sc — single crochet
sl st — slip stitch
st / sts — stitch / stitches
rnd — round
Important Pattern Notes
The bottom is worked first as a flat rectangle:
19 stitches × 10 rows
After the base is finished, crochet around its entire outside edge.
The bag body then contains:
56 stitches
around every round.
When working single crochet:
insert the hook through both loops unless otherwise stated.
The ch-1 at the beginning of a round does not count as a stitch.
PART 1 — CROCHET THE BAG BASE
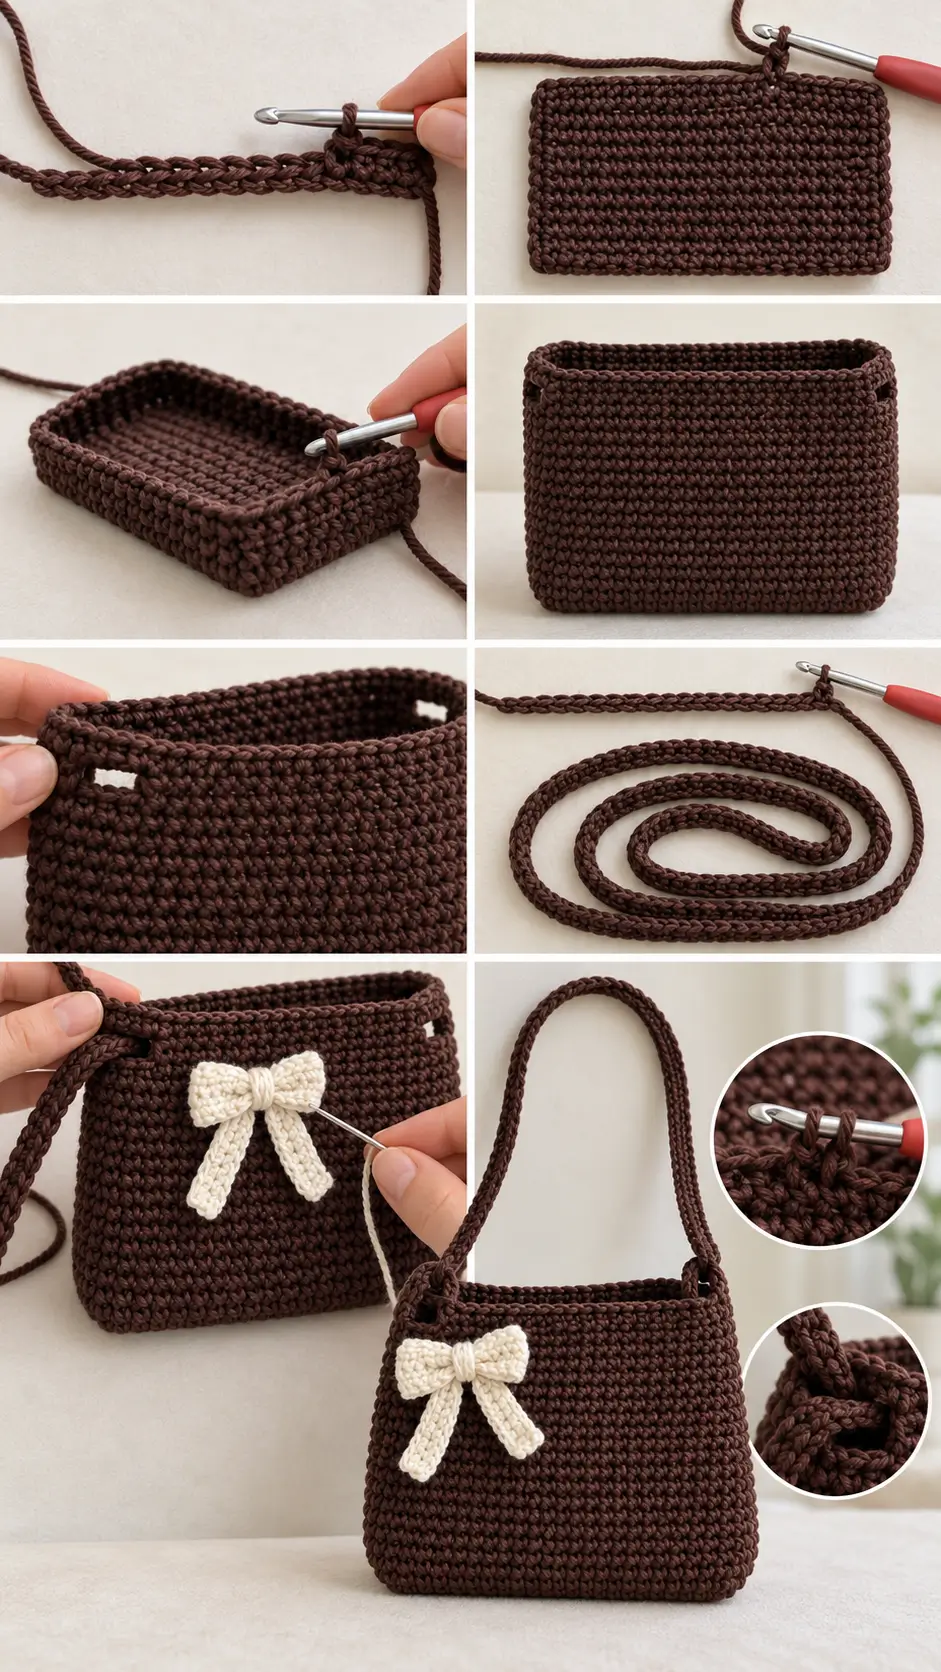
Using chocolate-brown yarn and the:
5 mm hook
make a slip knot.
Ch:
20
Row 1
Skip the first chain from the hook.
Beginning in the:
2nd chain
work:
1 sc in each chain across
You should have:
19 sc
Ch:
1
Turn.
Row 2
Sc in every stitch across.
19 sc
Ch 1.
Turn.
Rows 3–10
Repeat Row 2.
For every row:
19 sc
At the end of Row 10, do not fasten off.
You should have a dense rectangular base measuring:
19 stitches wide × 10 rows deep
Check the Base
Lay the rectangle flat.
It should have:
- two long edges
- two short edges
- square corners
- dense single-crochet fabric
Do not stretch the base while measuring.
This rectangle determines the width and depth of the finished bag.
PART 2 — CROCHET AROUND THE BASE
You will now stop turning and begin working around the entire rectangle.
Round 11
Ch:
1
Work single crochet around all four sides of the rectangle.
Your goal is:
56 sc total
A practical distribution is:
First long edge
19 sc
First short edge
9 sc evenly
Opposite long edge
19 sc
Final short edge
9 sc evenly
Total:
19 + 9 + 19 + 9 = 56 stitches
Join with a sl st to the first sc.
Important Corner Tip
Do not add large corner increases.
The purpose of Round 11 is to make the flat base begin turning upward into the walls of the bag.
The fabric should naturally form a shallow tray shape.
PART 3 — CROCHET THE BAG BODY
From this point forward:
do not turn
Work joined rounds.
Round 12
Ch:
1
Sc in every stitch around.
56 sc
Join with a sl st to the first sc.
Rounds 13–27
Repeat Round 12:
ch 1
56 sc around
sl st to join
Continue through:
Round 27
Always maintain:
56 stitches
The bag should now have:
- rectangular bottom
- straight front
- straight back
- narrow side panels
- open top
Keeping the Seam Straight
Your joining point may naturally drift slightly.
To minimize this:
- join carefully into the first actual sc
- do not join into the ch-1
- place a stitch marker in the first sc of every round
Check the Bag Height
After Round 27, the body should resemble the dark-brown bag in the reference.
The sides should be tall enough for:
- phone
- small wallet
- keys
- lip balm
- other small essentials
If you want a taller bag, add additional rounds of:
56 sc
before making the strap openings.
PART 4 — ROUND 28 STRAP OPENINGS
The supplied tutorial confirms that Round 28 creates openings for the strap and uses stitch markers to identify the stitches that are skipped, but it does not give the exact skip-and-chain counts in the supplied transcript.
For a symmetrical reconstruction that keeps the 56-stitch body intact, make one small opening at the center of each short side.
Mark the Side Centers
Lay the bag flat.
Find the center of:
left side panel
and:
right side panel
At each side, mark:
2 adjacent stitches
These are the stitches that will be skipped to create each strap opening.
Make sure both openings are at exactly the same height.
Round 28 — Reconstructed Strap-Opening Round
Ch:
1
Sc around until you reach the first two marked stitches.
Ch:
2
Skip the:
2 marked stitches
Continue sc around until you reach the two marked stitches on the opposite side.
Ch:
2
Skip those:
2 stitches
Sc in every remaining stitch.
Join with a sl st.
You now have:
two small strap openings
positioned opposite one another.
The ch-2 spaces replace the skipped stitches, so the round still maintains the same overall stitch structure.
Optional Reinforcement Round
For a firmer top edge, work one additional round:
Ch 1.
Sc in every sc.
When you reach each ch-2 opening:
work:
2 sc around the ch-2 space
Continue around.
Join.
Fasten off.
If you want the openings left larger for easier strap movement, omit this reinforcement round.
PART 5 — CROCHET THE STRAP
The tutorial uses:
200 chains
for the long strap.
This is suitable for a long shoulder or crossbody-style strap, although your finished length depends on yarn and tension.
Strap Foundation
Using chocolate-brown yarn:
Ch:
200
Before continuing, hold the chain against your body.
Check where the finished strap will sit.
For a shorter shoulder bag:
remove chains.
For a longer crossbody bag:
add chains.
Slip Stitch Back Along the Strap
Beginning in the:
2nd chain from the hook
work:
1 sl st in every chain
all the way back to the beginning.
Keep the slip stitches relaxed.
A very tight slip-stitch cord can twist excessively.
The completed strap should look:
- narrow
- rounded
- firm
- cord-like
- much less stretchy than a plain chain
Check the Strap
Allow the strap to relax before attaching it.
The original sample uses approximately:
200 foundation chains
but this number can be adjusted freely.
For a child or short shoulder strap, use considerably fewer chains.
For an adult crossbody strap, test the actual length against the wearer before joining.
PART 6 — ATTACH THE STRAP
Thread one end of the strap through the first side opening.
Pass the opposite end through the opening on the other side.
Make sure the cord is:
- not twisted
- positioned evenly
- moving cleanly through both openings
Use a tapestry needle and matching brown yarn to secure the strap ends firmly.
The attachment must be able to support the weight of the bag.
Take several passes through the cord rather than relying on one stitch.
Adjustable Length
The simplest way to customize this bag is to adjust the strap before permanently securing it.
Try the bag as:
Shoulder Bag
Shorten the strap until the bag sits comfortably beneath the arm.
Crossbody Bag
Lengthen the strap so the bag rests comfortably around the hip.
Once you like the length:
secure the ends firmly with the tapestry needle.
PART 7 — FINISHING THE BAG
Weave all loose yarn tails securely into the inside of the bag.
Check:
- base corners
- round joins
- strap openings
- strap attachment
Trim excess yarn.
Shape the bag with your hands.
The finished body should have a slightly structured rectangular shape.
OPTIONAL CREAM CROCHET BOW
The reference bag includes an ivory bow on the front. The supplied bag transcript does not include instructions for that decoration, so the bow below is a simple optional add-on designed to recreate the visual look without changing the main bag construction.
Use:
warm ivory / cream yarn
Bow Center Piece
Ch:
12
Beginning in the second chain:
sc across.
Ch 1.
Turn.
Continue working:
11 sc
for approximately:
5–6 rows
Fasten off.
You now have a small cream rectangle.
Shape the Bow
Weave the yarn tail toward the center.
Pinch the rectangle tightly in the middle.
Wrap cream yarn around the center several times.
This creates:
- left bow loop
- narrow middle
- right bow loop
Secure the wrapping yarn at the back.
Bow Tail 1
Join cream yarn near the lower center of the bow.
Ch:
12–15
Beginning in the second chain:
sl st or sc back along the chain.
Fasten off.
Bow Tail 2
Repeat on the opposite side.
Make both tails the same length.
The finished bow should be:
- soft
- small
- cream
- proportional to the bag
- positioned toward the upper front
Attach the Bow
Place the bow on the front of the bag approximately:
1½–2 inches / 4–5 cm below the top edge
Center it or move it slightly to one side, depending on the look you prefer.
Use cream yarn and a tapestry needle.
Sew through:
the back of the bow → surface of the bag
Take small stitches around the center and back edges.
Do not sew through both the front and back of the bag.
Check inside the pouch frequently while sewing.
Optional Lining
The original construction does not require a lining, but you can add one if the bag will carry small objects.
Cut two pieces of cotton fabric slightly larger than the front and back of the finished bag.
Sew them together around:
- sides
- bottom
Leave the top open.
Fold the upper raw edge inward.
Insert the lining.
Hand-sew it just below the crochet top edge.
Do not sew across the strap openings.
If the Base Curls
Your foundation chain may be too tight.
Try:
- making the starting chain more loosely
- using a slightly larger hook for the chain only
Return to the 5 mm hook for Row 1.
If the Base Is Too Soft
Use:
- tighter tension
- cotton yarn
- cotton-blend yarn
- slightly smaller hook
The base should hold a rectangular shape without becoming rigid.
If the Bag Widens as You Crochet
Count each round.
Every body round should contain:
56 stitches
Do not accidentally work into:
the joining slip stitch
or:
the beginning ch-1
If the Bag Gets Narrower
Make sure you do not skip the first stitch after joining.
Place a marker in the first sc of every round.
Move the marker upward after each join.
If the Side Walls Lean
Check your stitch count first.
Also make sure you distributed Round 11 evenly around the base.
The two long edges should contain the same number of stitches.
The two short edges should also match one another.
If the Strap Twists
Slip-stitch straps naturally have some twist.
To reduce it:
- keep slip stitches loose
- straighten the chain frequently while working
- block the finished cord lightly before attaching
Do not steam acrylic yarn aggressively.
If the Strap Stretches Too Much
A slip-stitch strap should stretch less than a simple chain.
For even more stability, you can:
- use cotton yarn
- work with slightly tighter tension
- sew a narrow ribbon to the underside
If the Strap Openings Stretch
Reinforce them with:
single crochet
or:
slip stitch
around the opening.
Do not close the opening so tightly that the strap can no longer pass through.
Making the Bag Wider
The original base begins with:
20 chains → 19 sc
To make it wider, increase the foundation chain.
However, you must also increase the number of stitches around the base proportionally.
For the closest result to the reference, keep:
20 chains
Making the Bag Deeper
The depth comes from the:
10-row base
Add rows before beginning Round 11.
For example:
12 base rows
will create a deeper bag.
Remember that the stitch count around the base will then need to increase because the short edges are longer.
Making the Bag Taller
This is the easiest adjustment.
Simply add more rounds after:
Round 27
before making the strap openings.
Keep:
56 sc per round
Color
For the exact reference look, use:
Main Bag
deep chocolate brown
Strap
deep chocolate brown
Optional Bow
warm cream / ivory
Do not change the bag to black, tan, or multicolor if you want the same visual appearance.
Final Pattern at a Glance
Base
Ch 20
Row 1
19 sc
Rows 2–10
19 sc
Begin Bag Body
Round 11
Sc around entire base.
56 sc
Rounds 12–27
56 sc around
Join each round with sl st.
Round 28
Create two symmetrical strap openings at the side panels.
The supplied tutorial confirms the strap-hole round but does not provide the exact hole spacing in the supplied transcript; the two-opening construction above keeps the openings centered and symmetrical.
Strap
Ch 200
Slip stitch back along the chain.
Adjust the foundation chain if a different strap length is needed.
Attach securely using a tapestry needle.
Optional Bow
Make a small ivory crochet rectangle.
Pinch and wrap the center.
Add two narrow tails.
Sew securely to the front.
Finished Bag
The completed project should have a compact chocolate-brown single-crochet body, rectangular base, straight sides, open top, narrow matching crochet strap, and optional cream bow on the front.
Keep the stitch texture dense and simple. The bag should work as a short shoulder bag or a longer crossbody depending on the strap length you choose.