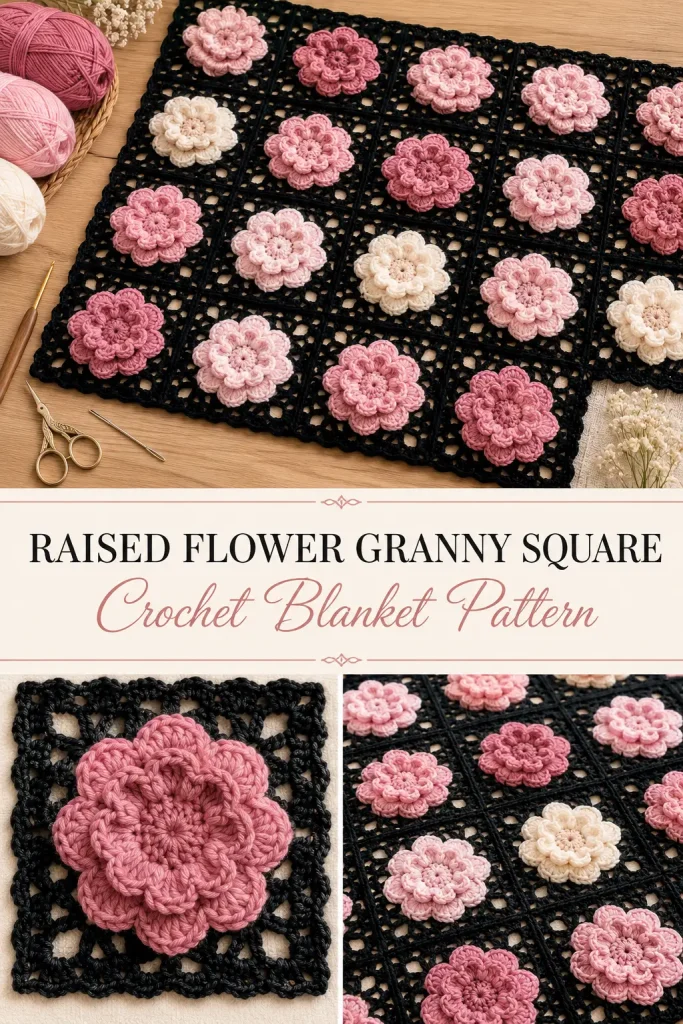
This raised flower granny square pattern is a beautiful crochet motif for anyone who loves textured floral designs. Each square has a soft layered flower in the center, framed with a dark lacy crochet border that makes the flower colors stand out beautifully.
The finished motifs can be joined into a blanket, table runner, cushion cover, bag panel, or decorative crochet mat. The sample style uses dusty pink, blush, cream, and soft rose flowers with a black lace frame, giving the finished piece a bold vintage floral look.
This is a detailed original crochet pattern inspired by the visible flower square design. It creates the same style of raised flower motifs with a dark square lace frame and joined panel finish.
Description
This crochet motif begins with a textured flower center worked in one color. The flower has layered raised petals that sit above the surface, giving it a dimensional handmade look. After the flower is complete, a black crochet lace frame is added around it to turn the round flower into a square motif. The motifs are then joined together into rows and columns, creating a striking patchwork of raised flowers against a dark openwork background. The finished project is soft, decorative, and perfect for handmade home decor.
Materials
- Medium weight yarn in dusty rose
- Medium weight yarn in blush pink
- Medium weight yarn in pale pink
- Medium weight yarn in cream
- Medium weight yarn in black for the square frame and joining
- 4.0 mm crochet hook
- Yarn needle
- Scissors
- Stitch markers
- Blocking mat and pins, optional
Abbreviations
- MR = magic ring
- ch = chain
- sl st = slip stitch
- sc = single crochet
- hdc = half double crochet
- dc = double crochet
- tr = treble crochet
- st = stitch
- sts = stitches
- sp = space
- rep = repeat
Pattern Notes
- This pattern is written in US crochet terms.
- Each motif is worked in rounds.
- The flower is made first, then the black square lace frame is added.
- The flower color changes from motif to motif, but the black frame stays the same.
- The petals should look raised and dimensional.
- The black frame creates the square shape and open lace spaces between motifs.
- Block each square before joining if you want a very neat blanket or table runner.
- You can make the panel any size by changing the number of motifs.
Finished Size
One finished motif measures about 4.5 to 5.5 inches, depending on yarn, hook size, and tension.
Suggested layouts:
- Small mat: 3 x 4 motifs
- Table runner: 3 x 8 motifs
- Baby blanket: 5 x 6 motifs
- Throw blanket: 6 x 8 motifs
- Cushion front: 4 x 4 motifs
Special Stitch: Puff Petal
Yarn over, insert hook into the indicated stitch or space, yarn over and pull up a long loop. Repeat 4 more times in the same stitch or space.
Yarn over and pull through all loops on the hook.
Ch 1 to close the puff.
This creates one raised petal.
Step-by-Step Instructions
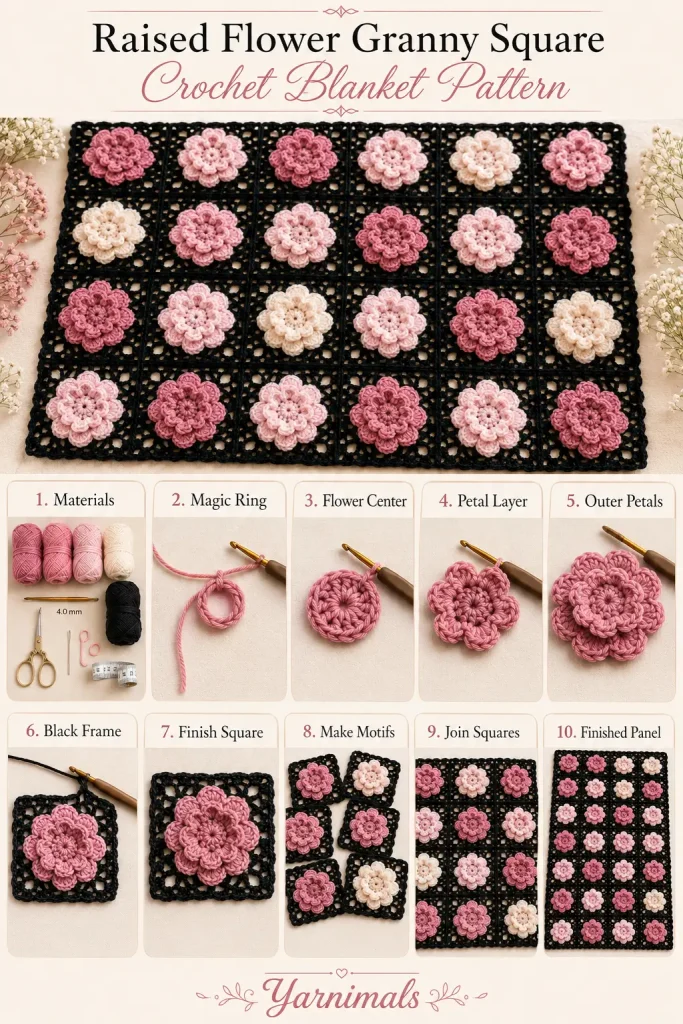
Flower Granny Square Motif
Make as many motifs as needed for your project.
Use one flower color for Rounds 1–5.
Use black yarn for Rounds 6–8.
Round 1: Flower Center
With flower color, make a MR.
Ch 1.
Work 8 sc into the ring.
Pull the ring closed.
Join with sl st to the first sc.
8 sc
Round 2: Center Increase
Ch 1.
Work 2 sc in each st around.
Join with sl st to the first sc.
16 sc
This creates the small round flower center.
Round 3: First Raised Petal Layer
Ch 1.
Sl st in the first st.
In the same st, work 1 Puff Petal.
Ch 2.
Sl st in the next st.
Repeat around:
Sl st in next st, Puff Petal in same st, ch 2, sl st in next st.
Continue until you have 8 small raised petals around the center.
Join with sl st near the base of the first petal.
Do not fasten off.
Gently push the petals forward with your fingers.
Round 4: Back Loop Petal Setup
Turn the flower slightly so you can work behind the first petal layer.
Ch 1.
Sc behind the first petal, working around the base space between petals.
Ch 4.
Sc behind the next petal.
Repeat around:
Ch 4, sc behind next petal.
Join with sl st to the first sc.
You should have 8 ch-4 spaces behind the first petal layer.
Round 5: Large Outer Petals
In each ch-4 space, work:
Sc, hdc, dc, 3 tr, dc, hdc, sc.
Repeat in each ch-4 space around.
Join with sl st to the first sc.
Fasten off the flower color and weave in the center tail.
You now have a raised layered flower.
Round 6: Black Flower Outline
Join black yarn at the top center of any outer petal.
Ch 1.
Sc in the same petal top.
Ch 4.
Sc in the top center of the next petal.
Repeat around:
Ch 4, sc in the top center of next petal.
Join with sl st to first sc.
You should have 8 ch-4 spaces around the flower.
This round outlines the flower and prepares it for the square frame.
Round 7: Black Square Frame
Sl st into the first ch-4 sp.
Ch 3. This counts as the first dc.
Work 2 dc in the same sp.
Ch 3.
Work 3 dc in the same sp.
This makes the first corner.
Ch 2.
In the next ch-4 sp, work 3 dc.
Ch 2.
In the next ch-4 sp, work 3 dc, ch 3, 3 dc.
Ch 2.
In the next ch-4 sp, work 3 dc.
Ch 2.
Repeat this sequence around until you have 4 corners and 4 side groups.
Join with sl st to the top of the beginning ch 3.
The motif should now look square, with the flower centered inside a black lace frame.
Round 8: Black Lace Finishing Round
Ch 1.
Sc in each dc across the first side.
In the corner ch-3 sp, work:
Sc, ch 3, sc.
Ch 2.
Sc in the next ch-2 side space.
Ch 2.
Sc in each dc across the next side.
In the next corner ch-3 sp, work:
Sc, ch 3, sc.
Continue around the square, working sc across the dc groups, ch-2 over the side spaces, and sc, ch 3, sc in each corner.
Join with sl st to the first sc.
Fasten off and weave in ends.
Optional Picot Edge
If you want the black frame to look more decorative, add small picots on the final round.
When working into each corner, make:
Sc, ch 3, sl st into first ch, sc.
You can also add a picot in the center of each side for a more lace-like finish.
Make More Motifs
Make several flower squares in different soft colors.
Suggested color mix:
- dusty rose flowers
- blush pink flowers
- pale pink flowers
- cream flowers
- soft mauve flowers
Keep the black frame the same for every motif so the finished panel has a bold, connected lace look.
For the style shown in the image, make stacks of flower motifs first, then add the black square frame before joining.
Arrange the Motifs
Lay all motifs on a flat surface.
Arrange the colors before joining.
Try not to place too many of the same flower color next to each other.
A soft random layout works beautifully:
Row 1: dusty rose, blush, cream, pink
Row 2: pale pink, rose, blush, cream
Row 3: cream, dusty rose, pale pink, rose
Row 4: blush, cream, dusty rose, pink
Adjust the layout to match your project size.
Joining the Squares
You can join the motifs with black yarn so the seams blend into the lace frame.
Slip Stitch Join
Place 2 squares with right sides facing each other.
Insert hook through the back loop of one square and the matching back loop of the second square.
Sl st across the side.
Repeat to join squares into rows.
Then join the rows together.
This creates a neat raised seam.
Flat Sewn Join
Place 2 squares side by side with right sides facing up.
Thread a yarn needle with black yarn.
Sew through the inner loops of the edge stitches from one square to the next.
Pull gently so the seam closes without puckering.
This gives a flatter join.
Join-As-You-Go Option
If you prefer, you can join motifs during Round 8.
At the corner or side ch spaces, replace the middle chain with a slip stitch into the matching space of the finished square.
This method creates a connected lace look and reduces sewing later.
Full Blanket or Panel Border
After all motifs are joined, add a simple black border around the full piece.
Border Round 1
Join black yarn in any corner.
Ch 1.
Sc evenly around the entire blanket or panel.
Work 3 sc in each corner.
Join with sl st to first sc.
Border Round 2
Ch 1.
Sc in each st around.
At each corner, work 3 sc in the middle corner stitch.
Join with sl st to first sc.
Border Round 3: Soft Scallop Edge
Ch 1.
Skip 1 st.
Work 5 dc in next st.
Skip 1 st.
Sl st in next st.
Repeat around.
Adjust spacing at the corners if needed so the scallops sit flat.
Fasten off and weave in all ends.
Finishing
Weave in all loose yarn tails.
Lay the finished piece flat.
Shape each flower gently with your fingers so the petals stand up.
Pin the corners and edges if needed.
Lightly steam or damp block the finished piece, but do not press the raised flowers flat.
Let it dry completely before using.
Tips & Variations
Use cotton yarn for a firmer table runner or decorative mat.
Use soft acrylic yarn for a blanket or cushion cover.
Try black frames for a bold vintage look like the image.
Use cream frames instead of black for a softer romantic version.
For a pastel nursery blanket, use pale pink, cream, lavender, and soft beige flowers with a white frame.
For a dramatic throw blanket, use jewel-tone flowers with a black frame.
If the square curls, block each motif before joining.
If the flower looks flat, pull the puff petals forward after finishing.
If the frame feels too tight, use a slightly larger hook for the black rounds.
FAQ
Is this a granny square pattern?
Yes, it is a floral granny square-style motif. The center is a raised crochet flower, and the black outer rounds turn it into a square that can be joined with other motifs.
Can beginners make this pattern?
Confident beginners can try it if they know basic stitches and are comfortable working in rounds. The raised petals and lace frame may take a little practice.
Can I make this into a blanket?
Yes. Make as many squares as needed, join them into rows, then add a border around the full blanket.
Can I use fewer colors?
Yes. You can make all flowers in one color for a simple elegant version, or use two or three shades for a softer coordinated look.
Conclusion
This raised flower granny square pattern is a beautiful way to create a textured crochet blanket, table runner, cushion, or decorative panel. The soft flower colors and black lace frames give the finished piece a bold handmade look with plenty of dimension.
Make a few motifs first to test your color palette, then keep adding squares until your project becomes the perfect size for your home, gift, or handmade collection.



