Intro
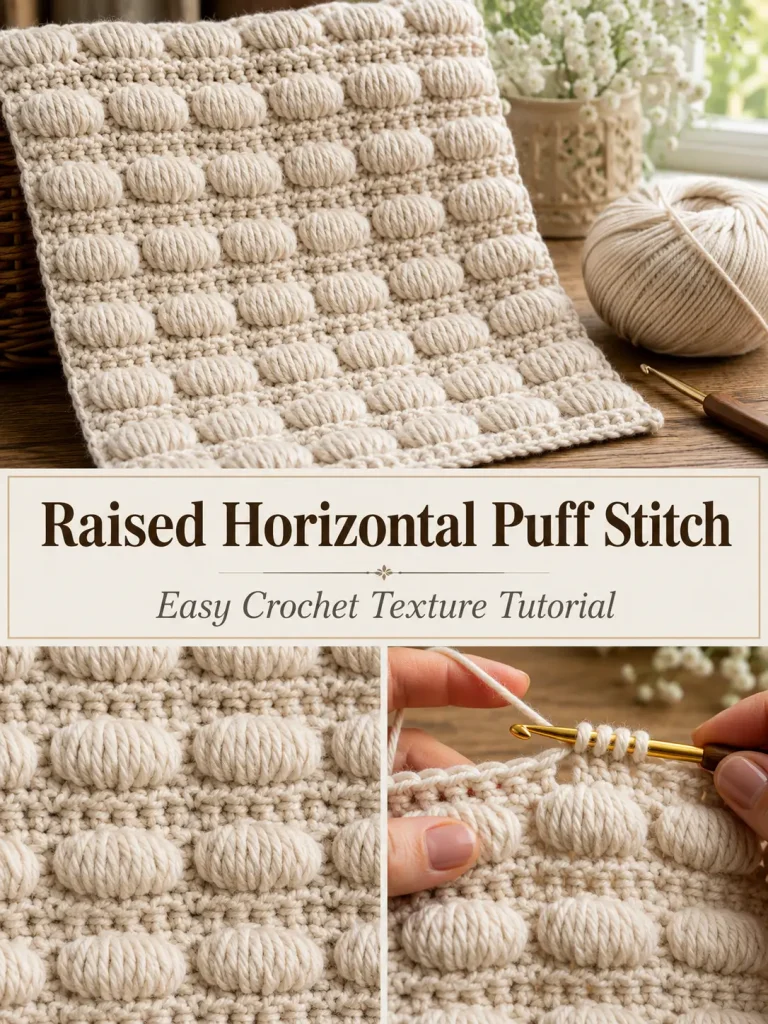
This crochet texture looks much more complicated than it really is. The large raised oval sections create a padded, almost woven appearance, while narrow vertical anchors and simple connecting rows keep the fabric organized.
The visible design is built around a horizontal puff-style stitch rather than an ordinary upright puff. The long loops are pulled sideways across a short chain span, creating the wide capsule-shaped texture visible in the reference.
This is an original, count-locked interpretation of the visible stitch structure. It is designed so every raised section has a clear starting point, every row finishes with the correct number of anchors, and the texture can be enlarged for blankets, cushion covers, scarves, bags, and crochet home decor.
Description
The finished fabric features rows of large horizontal raised puffs arranged in straight columns.
Each textured section contains:
- one narrow anchor at the left
- one chain span across the top
- six elongated yarn loops pulled to equal height
- one locking chain
- one narrow anchor at the right
Between textured rows, a simple chain-and-double-crochet scaffold creates the strong horizontal ridge visible around the raised ovals.
The pattern repeats over 4 foundation stitches per puff.
You can make the fabric with any number of raised sections by using the sizing formula included below.
Materials
- Worsted weight #4 yarn in cream, oatmeal, beige, or your preferred color
- 5 mm crochet hook
- Yarn needle
- Scissors
- Stitch markers, optional
- Measuring tape
- Blocking mat and pins, optional
A smooth yarn with good stitch definition works best for showing the raised texture.
Abbreviations
- ch – chain
- sc – single crochet
- dc – double crochet
- sl st – slip stitch
- st – stitch
- sts – stitches
- sp – space
- yo – yarn over
- LHP – Long Horizontal Puff
Pattern Notes
- US crochet terminology is used.
- Difficulty: confident beginner to intermediate.
- The pattern is worked flat in turned rows.
- The raised puffs appear on one main side of the fabric.
- The starting chain is a multiple of 4 + 2 chains.
- Each complete pattern section creates one horizontal puff.
- Do not work into the top loops of the horizontal puffs when making the scaffold row.
- The small single crochet stitches between the puffs are the anchor stitches for the next row.
- Pull every elongated puff loop to approximately the same height as the ch-4 span.
- Loose, even tension is much more important than pulling the puff tightly.
- The practice sample below makes 5 horizontal puffs across.
Special Stitch: Long Horizontal Puff
The large raised oval is the most important part of this pattern.
Work the LHP immediately after making an anchor sc.
Long Horizontal Puff – LHP
From the anchor sc just made:
Ch 4.
Now work back into the same sc.
- Yo.
- Insert hook into the same sc.
- Yo and pull up a long loop until it reaches approximately the height of the ch-4.
- Keep this loop loose.
Repeat this process until you have made 6 elongated draw-ups total into the same sc.
After 6 draw-ups, you should have:
13 loops on the hook
That is:
- original working loop = 1
- 6 yarn overs = 6
- 6 pulled-up loops = 6
Total:
13 loops
Yo and carefully pull through all 13 loops.
Ch 1 to lock the puff.
The long loops will spread sideways beside the ch-4, forming a wide padded oval.
Do not tighten the locking chain excessively.
Step-by-Step Instructions
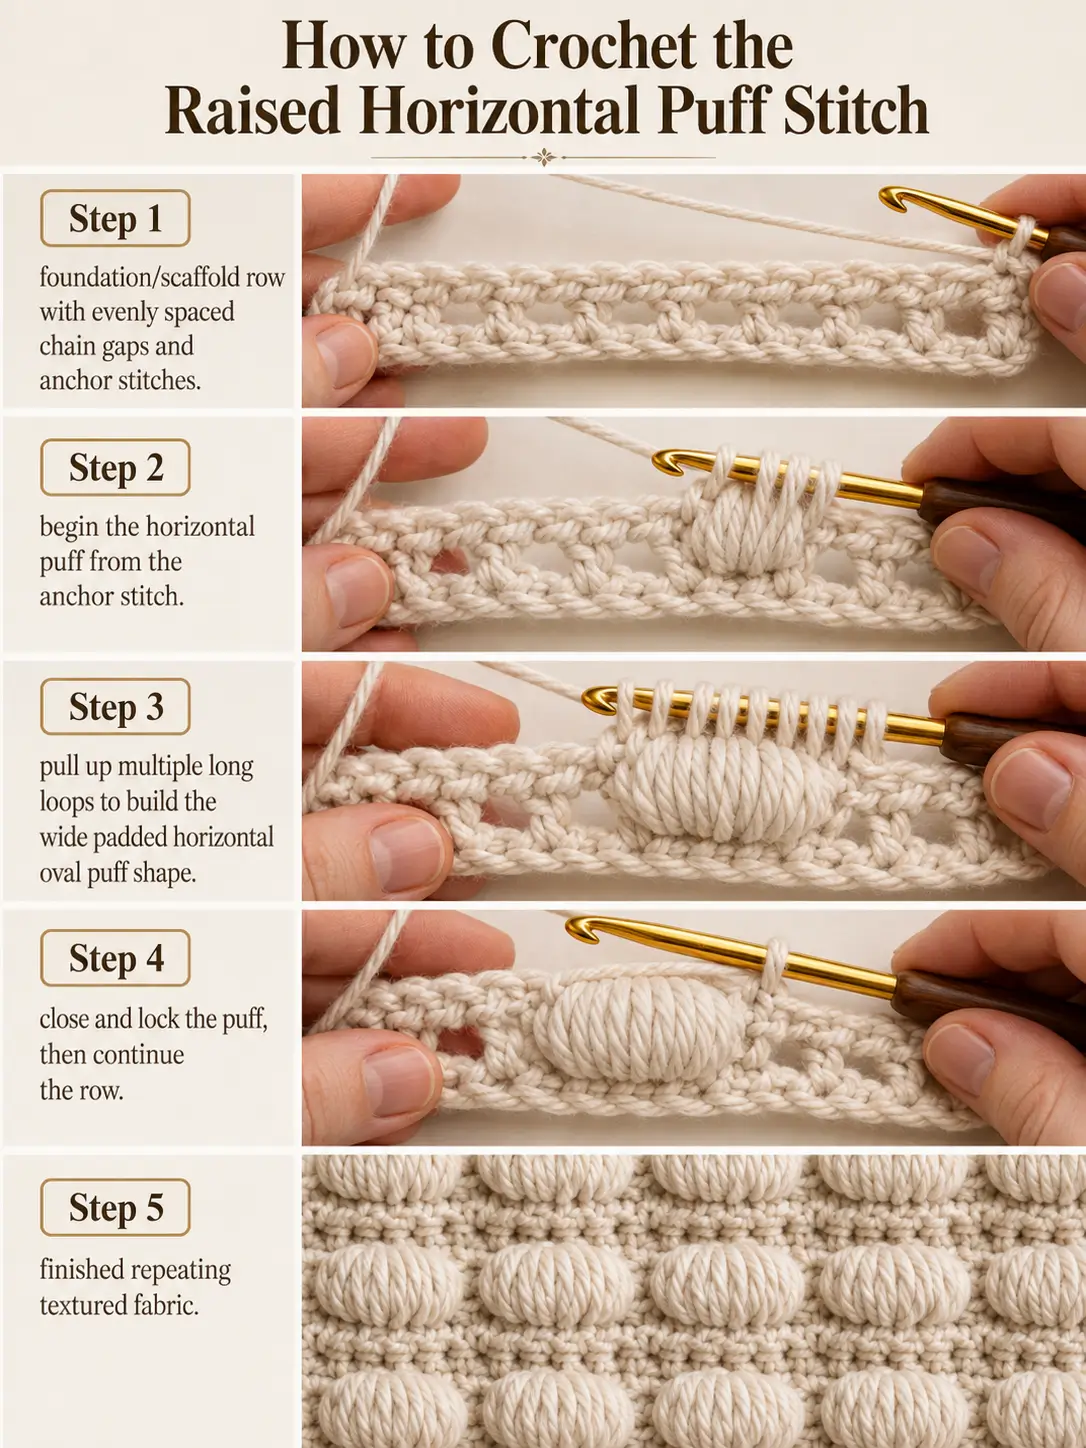
Practice Swatch
For 5 raised puffs across, begin with:
Ch 22
This follows the formula:
5 puffs × 4 = 20
20 + 2 = 22 chains
Row 1 – Foundation
Sc in the second ch from hook.
Sc in every chain across.
You should have:
21 sc
Ch 3 and turn.
The ch 3 counts as the first dc of the next row.
Row 2 – First Scaffold Row
The scaffold establishes the exact positions of the horizontal puffs.
Your turning ch-3 counts as the first dc.
Work:
ch 3, sk next 3 sc, dc in next sc
Repeat this sequence across.
For a 21-stitch foundation, repeat it 5 times.
At the end you should have:
- 6 dc anchor posts, including the beginning ch-3
- 5 ch-3 spaces
The structure should look like:
dc – ch-3 space – dc – ch-3 space – dc – ch-3 space – dc – ch-3 space – dc – ch-3 space – dc
Do not add another stitch at the end.
Ch 1 and turn.
Row 3 – First Horizontal Puff Row
Sc in the first dc.
You now have the first anchor.
First Puff
Work one LHP from the sc you just made:
- ch 4
- make 6 elongated draw-ups into the same sc
- yo and pull through all 13 loops
- ch 1 to lock
Now sc into the next dc anchor from Row 2.
Do not work into the ch-3 space.
You now have:
1 horizontal puff
Continue:
LHP from the sc just made, sc in next dc anchor
Repeat across.
At the end you should have:
- 5 horizontal puffs
- 6 sc anchor stitches
The final stitch is one sc in the final dc.
Do not add another puff after the final sc.
Row 4 – Rebuild the Scaffold
Ch 3 and turn.
The ch-3 counts as the first dc.
The important rule on this row is:
work only into the sc anchors between the puffs.
Do not crochet into:
- elongated puff loops
- locking chains
- the body of the puff
Work:
ch 3, dc in next sc anchor
Repeat across until you reach the final sc anchor.
You should again have:
- 6 dc anchor posts
- 5 ch-3 spaces
The new ch-3 spaces sit above the raised puffs.
This creates the narrow horizontal ridge between textured rows.
Ch 1 and turn.
Row 5 – Second Horizontal Puff Row
Sc in first dc.
Work:
LHP from the sc just made, sc in next dc
Repeat across.
You should again finish with:
- 5 horizontal puffs
- 6 sc anchors
The new puffs sit directly above the previous puffs.
This creates the straight stacked columns visible in the design.
Continue the Pattern
Repeat:
Rows 4 and 5
until the fabric reaches your desired height.
Always check the counts after each row.
Scaffold Row Count
For the 5-puff sample:
- 6 dc anchors
- 5 ch-3 spaces
Puff Row Count
For the 5-puff sample:
- 5 LHP
- 6 sc anchors
These counts do not change.
Final Row
For a clean finished upper edge, stop after a puff row.
Turn.
Ch 1.
Sc in the first sc anchor.
Then work approximately 3 sc evenly across each raised section, placing the stitches into the stable scaffold chains behind the puff rather than through the long decorative loops.
Work 1 sc in every remaining anchor stitch.
The goal is a straight upper edge without crushing the raised puffs.
Fasten off.
How the Horizontal Puff Is Formed
The shape depends on three separate parts.
The Ch-4
This determines the horizontal length of the raised section.
The Six Long Draw-Ups
These create the padded center.
Every loop should be pulled to approximately the same length.
The Locking Chain
This closes the six long loops together at the far side.
Together, these pieces create the oval shape rather than an ordinary upright puff.
Why the Puff Must Stay Loose
If you pull the elongated loops too tightly, the stitch becomes:
- narrow
- stiff
- difficult to close
- more vertical than horizontal
When drawing up each loop, hold the ch-4 gently between your fingers and pull the new loop until it reaches the same length.
The six loops should lie beside one another rather than bunching tightly at the hook.
Stitch Count Formula
This pattern is easy to resize.
Choose the number of horizontal puffs you want across.
Use:
Number of puffs × 4 + 2 chains
Examples:
4 Puffs
4 × 4 + 2 =
Ch 18
Row 1:
17 sc
5 Puffs
5 × 4 + 2 =
Ch 22
Row 1:
21 sc
6 Puffs
6 × 4 + 2 =
Ch 26
Row 1:
25 sc
8 Puffs
8 × 4 + 2 =
Ch 34
Row 1:
33 sc
10 Puffs
10 × 4 + 2 =
Ch 42
Row 1:
41 sc
The number of scaffold spaces always equals the number of puffs.
The number of vertical anchors is always:
number of puffs + 1
Design Consistency Lock
For the closest result to the visible reference, keep these details consistent.
Yarn
Use:
- cream
- ivory
- oatmeal
- pale beige
A smooth medium-weight yarn makes the long puff loops easy to see.
Puff Shape
Each raised section should be:
- wide
- oval
- horizontal
- densely padded
- made from 6 elongated draw-ups
Do not replace it with a standard upright puff stitch.
Layout
Keep the puffs:
- arranged in straight horizontal rows
- aligned vertically from one textured row to the next
- separated by narrow anchor columns
Connecting Rows
Keep:
- small vertical dc anchors
- ch-3 spans
- narrow horizontal ridges
These connecting rows are an important part of the visible design.
Making a Wider Raised Puff
The reference has very substantial padded sections.
For an even fuller version, use:
7 elongated draw-ups
instead of 6.
You will have:
15 loops on the hook
before the final pull-through.
Keep every draw-up loose enough that the hook can pass through all loops without forcing it.
Making a Smaller Puff
For a lighter fabric, use:
5 elongated draw-ups
You will have:
11 loops on the hook
before closing the stitch.
This uses less yarn and produces a flatter texture.
Yarn Choice
The texture is most visible in smooth yarn.
Good options include:
- acrylic
- smooth wool blends
- cotton blends
- soft anti-pilling yarn
Very fuzzy yarn can hide the separate strands inside each raised oval.
Extremely stiff yarn may make the large puffs difficult to close.
Hook Size
For worsted weight yarn, start around:
5 mm
If your puffs are difficult to close, try:
5.5 mm
If the surrounding fabric feels too loose, try:
4.5 mm
The best hook allows you to pull the long loops smoothly without creating a floppy scaffold.
Using This Stitch for a Blanket
This texture makes a thick decorative blanket because the horizontal puffs use considerably more yarn than ordinary flat stitches.
For a blanket, first make a small swatch and measure it.
Then calculate how many 4-stitch repeats you need for the desired width.
Because the raised fabric is already visually busy, a simple single crochet border works well.
Using This Stitch for a Cushion
This stitch is especially effective for a textured cushion front.
Make one rectangular or square puff panel.
For the back, use a flatter stitch such as:
- single crochet
- half double crochet
- simple fabric backing
This reduces bulk while keeping the dramatic raised texture on the front.
Using This Stitch for a Scarf
For a scarf, use approximately:
4–6 puffs across
depending on yarn thickness.
Continue the two-row repeat until the desired length.
Because the texture is thick, choose a soft yarn that feels comfortable against the neck.
Using This Stitch for a Bag
The stitch can also be used as a decorative bag panel.
For better durability:
- use the puff stitch on the front and back
- use solid crochet for the base
- use solid crochet for the upper band
- line the finished bag
Avoid attaching handles directly to the elongated puff loops.
Handles should be anchored into solid crochet.
Troubleshooting
My Puff Is Standing Upright
Your elongated loops are probably too short.
Pull every loop up to approximately the same length as the ch-4.
The long distance between the anchor and locking point is what produces the horizontal shape.
I Cannot Pull Through All the Loops
Loosen the draw-ups.
Do not tighten each yarn over against the hook shaft.
You can also move the accumulated loops onto the widest straight section of your hook before the final pull-through.
My Puffs Are Different Sizes
Make sure every puff contains exactly:
6 elongated draw-ups
Also keep the ch-4 and loop height consistent.
My Pattern Is Getting Wider
You are probably accidentally treating the puff top or locking chain as a new anchor.
Only the sc stitches between puffs are used as anchors for the next scaffold row.
My Pattern Is Getting Narrower
You may have missed one sc anchor.
Count them after every puff row.
For 5 puffs you must always have:
6 sc anchors
My Scaffold Has the Wrong Number of Spaces
Every scaffold row must contain exactly one ch-3 space above each puff.
For 5 puffs:
5 spaces
For 8 puffs:
8 spaces
Tips & Variations
Two-Color Version
Work the scaffold rows in one color and the horizontal puff rows in another.
This emphasizes the raised capsule shape.
Tonal Version
Use two closely related shades, such as cream and oatmeal, for a subtle woven appearance.
Larger Home Decor Version
Use bulky yarn and a larger hook, but reduce the number of puff repeats because each raised section becomes significantly larger.
Keep the Edges Straight
Use a stitch marker in the first and last anchor of every puff row.
These are the easiest stitches to accidentally miss.
FAQ
What stitch creates the large horizontal oval?
This version uses a custom Long Horizontal Puff. Six elongated draw-ups are worked back into the same anchor after a ch-4 span, then closed together to create the padded horizontal shape.
How many loops should I have before closing the puff?
With 6 elongated draw-ups, you should have exactly 13 loops on your hook before the final yarn over and pull-through.
What is the pattern repeat?
The foundation is based on 4 stitches per puff. Begin with a chain that equals the number of desired puffs multiplied by four, plus two chains.
Why do I ignore the puff loops on the next row?
The long loops are decorative and need to remain free to preserve their rounded shape. The small sc stitches between the puffs act as the structural anchors.
Is this suitable for beginners?
The basic stitches are simple, but managing 13 loops on the hook requires a little practice. Once the first few horizontal puffs are comfortable, the two-row repeat becomes very repetitive.
Conclusion
This raised horizontal puff crochet pattern creates an impressive textured fabric from a simple repeating structure. The key is keeping the scaffold counts unchanged and making every long puff loop the same height.
With a multiple-of-four foundation, fixed anchor stitches, six elongated loops per puff, and a two-row repeat, you can scale the design from a small practice swatch to a cushion, scarf, bag panel, or cozy textured blanket while keeping every raised section evenly aligned.



