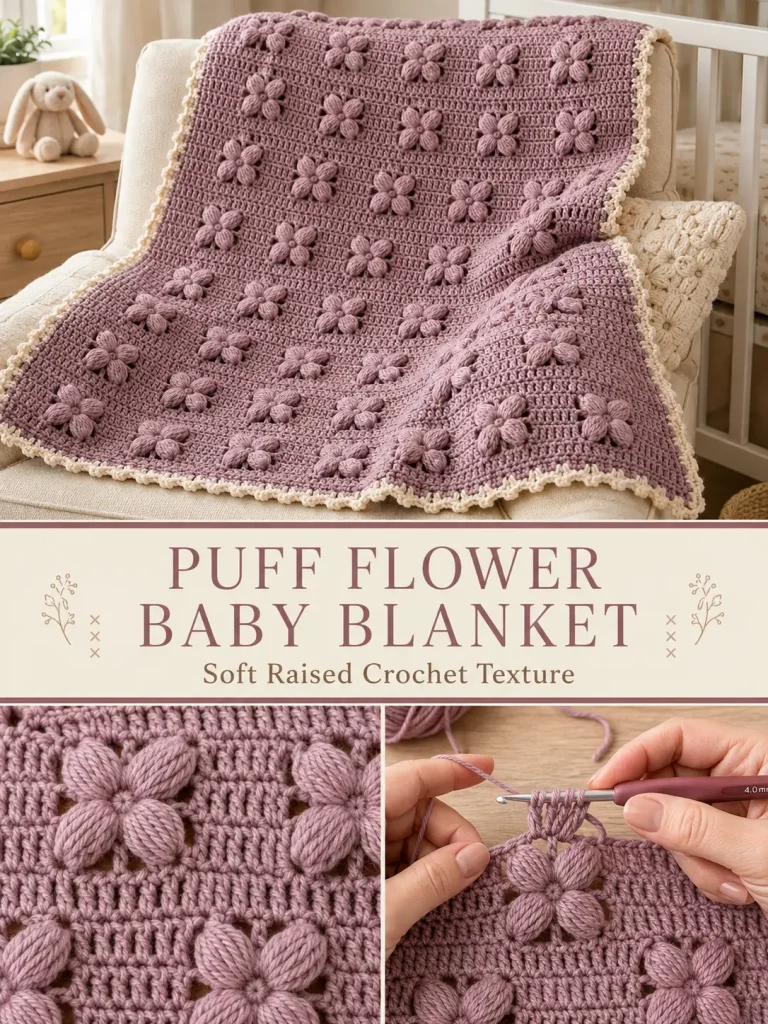
This soft crochet baby blanket combines a simple openwork grid with raised four-petal puff flowers.
The finished texture looks intricate, but the construction is surprisingly repetitive. Solid double-crochet blocks alternate with open chain spaces, and the flowers are worked directly into those spaces—there are no separate motifs to sew together afterward.
For this version, I used a soft dusty mauve for the blanket body and a narrow warm-cream border for a slightly different, modern finish.
The result is a cozy textured blanket that works beautifully for a nursery, baby shower gift, or small lap blanket.
Pattern at a Glance
Skill level: Confident beginner / intermediate
Terminology: US crochet terms
Construction: Worked flat in rows
Finished size: Approximately 30 × 36 inches including border
Main color: Dusty mauve
Border: Warm cream
Suggested yarn: DK / Category 3
Hook: 4 mm crochet hook
Foundation: 149 stitches
Main repeat: Raised puff-flower rows alternating with open spacer rows
The finished dimensions will depend on your yarn, tension, and puff height.
Materials
You will need:
- DK / Category 3 yarn in dusty mauve
- Small amount of DK yarn in warm cream for the border
- 4 mm crochet hook
- Yarn needle
- Scissors
- Stitch markers
- Measuring tape
Because puff stitches use considerably more yarn than ordinary double crochet, it is best to have approximately 1,400 yards or more of the main color available for a blanket around this size.
Exact usage varies significantly with how high you pull the puff loops.
Choosing Yarn for a Baby Blanket
For a baby blanket, I recommend yarn that is:
- soft
- washable
- durable
- comfortable against sensitive skin
Smooth acrylic, cotton blends, and many baby-specific DK yarns work well.
Avoid yarn with loose decorative pieces or fibers that shed excessively.
Always follow the yarn manufacturer’s care instructions.
Abbreviations
- ch = chain
- sc = single crochet
- dc = double crochet
- sl st = slip stitch
- sp = space
- st = stitch
- sts = stitches
- rep = repeat
- PP = petal puff
- 4PF = four-petal puff flower
Special Stitch: Petal Puff
The raised petals are made with elongated puff stitches.
Petal Puff — PP
Working into the indicated chain space:
- Yarn over.
- Insert hook into the space.
- Yarn over and pull up a long loop approximately the height of a double crochet.
Repeat Steps 1–3 three more times in the same space.
You should now have 9 loops on the hook.
Yarn over.
Pull through all 9 loops.
Ch 1 to secure the puff.
One petal puff is complete.
Important
Pull every long loop to approximately the same height.
Uneven loop height creates uneven petals.
Special Stitch: Four-Petal Puff Flower
The whole flower is worked into one ch-4 space.
4PF
In the same ch-4 space:
PP, sl st into the same space
Repeat that sequence 4 times total.
You should have four thick puff petals grouped closely together.
After the fourth sl st:
Ch 1
and continue with the pattern.
Gently spread the four puffs with your fingers so they resemble a small raised flower.
Do not pull the anchoring slip stitches tightly.
Before Starting the Full Blanket
Make a small swatch.
Ch 33.
Work the Foundation Row and the first four pattern rows below.
Check:
- puff size
- stitch definition
- softness
- drape
- whether the flower lies reasonably flat
If the fabric feels stiff, try a 4.5 mm hook.
If the open spaces feel too loose, try a slightly smaller hook.
FOUNDATION
Using dusty mauve:
Ch 150.
Starting in the second chain from the hook:
Sc in every chain across.
You should have:
149 sc
Turn.
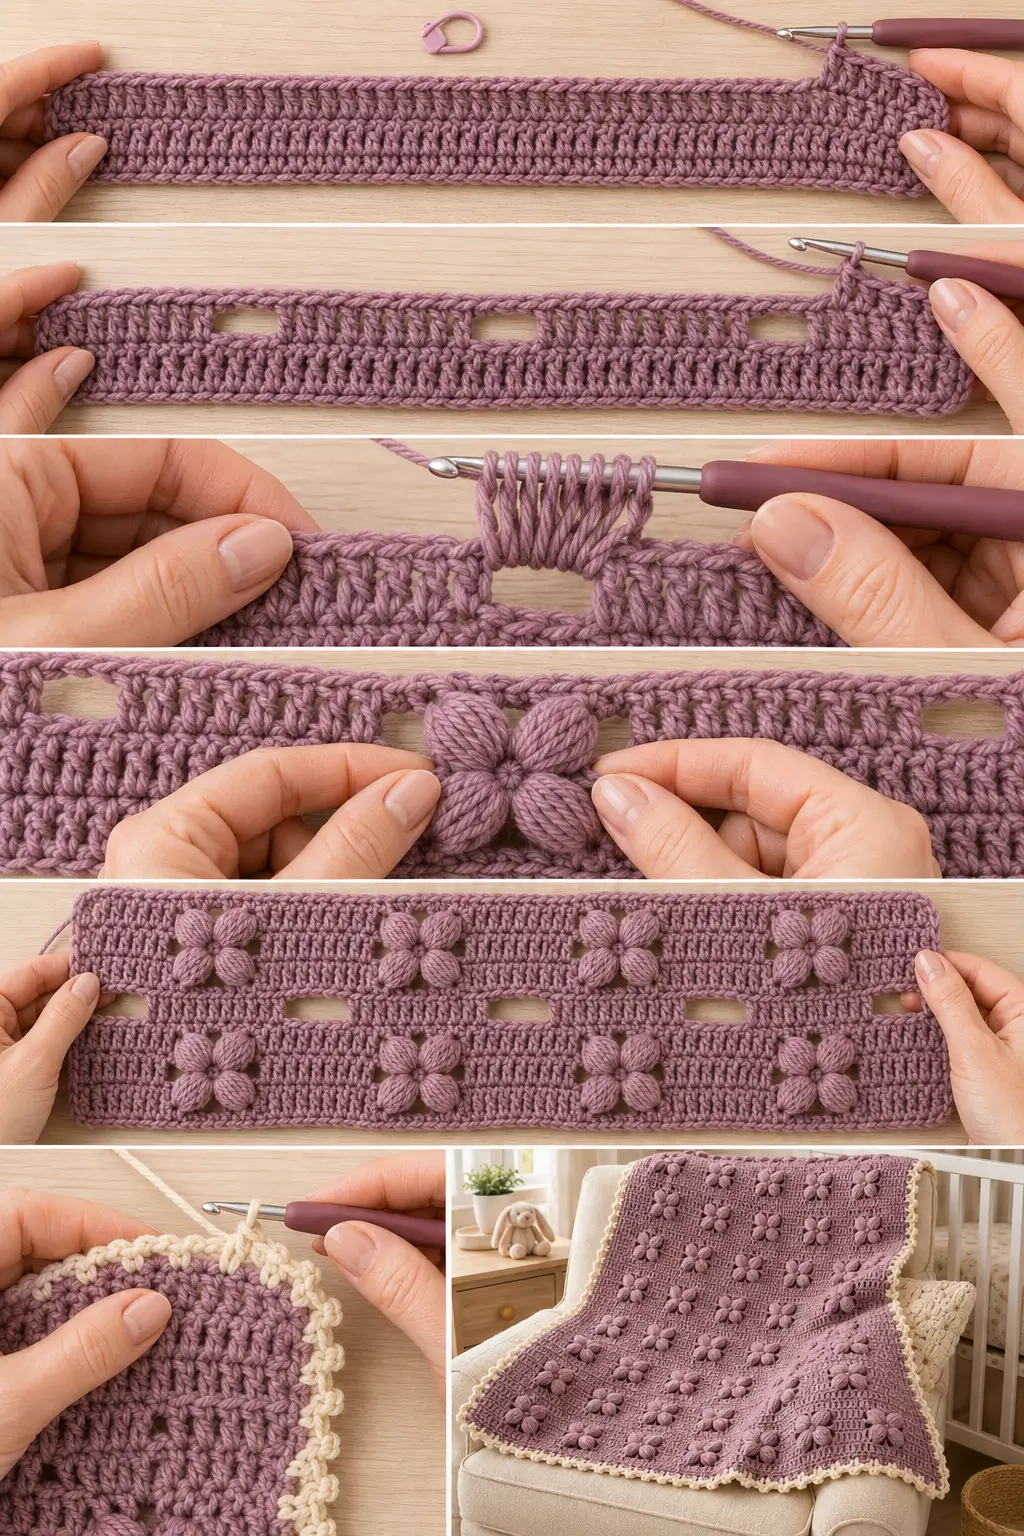
ROW 1 — SOLID FOUNDATION ROW
Ch 3.
The ch 3 counts as the first dc.
Dc in each remaining stitch across.
You should have:
149 dc
Turn.
ROW 2 — CREATE THE FLOWER SPACES
Ch 3.
Dc in each of the next 4 stitches.
Including the turning chain, you now have a block of:
5 dc
Now repeat:
Ch 4, skip 4 sts, dc in each of next 5 sts
across.
Repeat the sequence 16 times.
You should finish with a 5-dc block at the far edge.
Turn.
The row now consists of:
5 dc → ch-4 space → 5 dc → ch-4 space
repeated across.
ROW 3 — PUFF FLOWER ROW
Ch 3.
Dc in each of the next 4 dc.
You again have a 5-dc edge block.
Now repeat:
Work 1 4PF into the next ch-4 space.
Then:
Dc in each of the next 5 dc.
Repeat across all 16 ch-4 spaces.
Turn.
You should have:
- 16 raised puff flowers
- solid blocks of 5 dc between them
- 5 dc at both outer edges
ROW 4 — OPEN SPACER ROW
Ch 3.
Dc in each of the next 4 dc.
Now:
Ch 4 loosely over the next puff flower.
Do not crochet into the individual puff petals.
Dc in each of the next 5 dc.
Repeat:
ch 4 over flower, 5 dc
across.
Turn.
This recreates the open spaces needed for the next flower row.
ROW 5
Repeat Row 3.
Work a new four-petal puff flower into every ch-4 space.
ROW 6
Repeat Row 4.
MAIN PATTERN REPEAT
Continue repeating:
Row 3 — Puff Flower Row
then
Row 4 — Open Spacer Row
until the blanket measures approximately:
33½–34 inches long
before the finishing rows and border.
For the cleanest top edge, finish after a Row 4 spacer row.
FINAL BODY ROW
Ch 3.
Dc in each of the next 4 dc.
Now repeat across:
Work 4 dc into the next ch-4 space.
Dc in each of the next 5 dc.
Continue across.
This fills the open spaces and gives the top of the blanket a more solid edge.
Fasten off dusty mauve.
What the Finished Fabric Should Look Like
The blanket should have:
- raised four-petal puff flowers
- flowers arranged in straight repeating rows
- rectangular blocks of double crochet between motifs
- small open spaces around each flower
- soft dimensional texture
- straight solid outer edges
The flowers should sit slightly above the surrounding fabric rather than forming hard round bobbles.
How to Keep the Flowers Consistent
The visual quality of this blanket depends heavily on puff consistency.
For every petal:
Pull the loops to the same height
Do not make one petal tall and the next short.
Keep the closing chain relaxed
A very tight closing chain can make the puff look pinched.
Do not overtighten the anchoring slip stitch
The petal should remain full.
Shape the petals after finishing the row
Use your fingers to gently spread the four petals around their shared space.
What If My Flowers Look Like Bobbles?
Your pulled-up loops may be too short.
For a softer petal:
- pull each loop slightly taller
- relax your tension
- avoid tightening the final pull-through excessively
The petals should look elongated rather than like tiny balls.
What If the Flowers Are Too Large?
Make only 3 pull-up repetitions instead of 4 when creating each PP.
That produces:
7 loops on the hook
before the final pull-through.
Use the same number of pull-ups for every flower in the blanket.
What If the Blanket Starts Narrowing?
Count the solid blocks.
Every pattern row should retain:
- 5 dc at the first edge
- 16 flower or ch-4 sections
- 5-dc blocks between them
- 5 dc at the final edge
A common mistake is missing the first or last dc beside a flower.
Stitch markers at the two edge blocks can help.
What If the Edges Look Uneven?
Keep your turning chain tension consistent.
Do not accidentally work an extra dc into the base of the turning chain.
The beginning ch 3 counts as the first dc.
PART 2 — WARM CREAM BORDER
The flower texture is already decorative, so I would keep the border clean and simple.
Using warm cream yarn, join in any corner.
Border Round 1
Ch 1.
Work sc evenly around the entire blanket.
Across the top and bottom
Work approximately:
1 sc in each stitch
Along the side edges
Work evenly into the row ends.
A good starting point is approximately:
2 sc for every dc-row end
but watch the fabric.
At each corner work:
3 sc
Join with a sl st to the first sc.
Check the Border
Lay the blanket flat.
If the border begins:
Ruffling
You have too many side stitches.
Undo the affected section and space them slightly farther apart.
Pulling inward
Add a few more stitches along that edge.
The blanket should remain flat before you continue.
Border Round 2
Ch 1.
Sc in every stitch around.
At each corner:
3 sc in the center corner stitch
Join.
Border Round 3 — Soft Picot Edge
For a subtle decorative finish:
Ch 1.
Sc in the first 3 stitches.
Then:
Ch 3, sl st into the first chain just made
This creates one tiny picot.
Continue:
Sc in next 4 sts, picot
around.
At each corner, place a picot near the center of the corner rather than forcing the repeat exactly.
Join.
Fasten off.
If you prefer a simpler blanket, skip the picot round and finish after Border Round 2.
Weave In the Ends
Thread each tail onto a yarn needle.
Weave through several stitches on the wrong side.
Change direction at least once.
Trim only after the yarn is secure.
Blocking the Blanket
Blocking helps:
- straighten the sides
- settle the flowers
- even the open spaces
- improve the border
Use a blocking method appropriate for your yarn.
Do not flatten the puff flowers aggressively.
The raised texture is part of the design.
Finished Measurements
The sample is designed to finish around:
30 inches wide × 36 inches long
including the border.
Your measurements may vary.
That is completely normal.
How to Make the Blanket Wider
The stitch pattern works over:
multiples of 9 stitches, plus 5
For the foundation chain, add one additional chain because the first chain is skipped for the foundation sc.
So to widen the blanket:
add 9 chains at a time.
Each additional repeat adds:
- one ch-4 flower space
- one 5-dc block
How to Make It Narrower
Remove:
9 foundation chains
for every pattern repeat you want to remove.
Always make a small swatch first if exact finished width matters.
How to Make the Blanket Longer
Simply continue repeating:
Flower Row → Spacer Row
until you reach the desired length.
Then work the Final Body Row and border.
Stroller Blanket Size
For a smaller stroller blanket, aim for approximately:
26 × 32 inches
Reduce the number of width repeats and stop the row repeat earlier.
Larger Baby Blanket
For a larger nursery blanket, aim for approximately:
34 × 40 inches
Add width repeats in groups of 9 stitches and continue the length repeat.
Lap Blanket Version
This stitch also works beautifully for an adult lap blanket.
Aim for approximately:
40 × 50 inches
Because puff flowers use significant yarn, make a swatch and estimate yarn before beginning a much larger version.
Alternative Color Ideas
The design is beautiful in one main color because shadows define the flowers.
Try:
Dusty Sage
with an oatmeal border
Soft Lavender
with a cream border
Muted Blue
with an ivory border
Warm Oatmeal
with a dusty rose border
Deep Plum
with a mushroom-beige border
Antique Gold
with a soft cream border
For the version in this pattern, keep:
dusty mauve + warm cream
throughout.
Can I Make the Blanket in One Color?
Absolutely.
Work the border in the same dusty mauve yarn.
A single-color blanket puts even more attention on the raised stitch texture.
Can I Use Worsted-Weight Yarn?
Yes.
The blanket will become larger and heavier.
Use a suitable hook and reduce the number of width repeats if necessary.
Do not use the DK measurements blindly with thicker yarn.
Can I Use Cotton?
Yes.
Cotton provides excellent stitch definition, which makes the flowers very clear.
Keep in mind that a large cotton blanket can be heavier than an acrylic version.
Why Do the Flowers Use So Much Yarn?
Every puff contains several elongated yarn-over loops.
Four puffs are then used for each flower.
That creates the beautiful dimensional texture—but also increases yarn consumption significantly.
This is normal.
Estimating Yarn More Accurately
If you want a larger blanket, make a swatch containing at least:
4 flowers across × 4 flower rows
Measure and weigh the finished swatch.
Then calculate approximately how many swatch-sized sections are needed for your planned blanket.
Multiply that number by the swatch weight.
Add additional yarn for:
- border
- swatching
- tension differences
- joining a new ball
This is much more reliable than assuming all crocheters make identical puff stitches.
Baby Blanket Safety
Keep the finished design simple.
Do not attach:
- buttons
- beads
- pom-poms
- long tassels
- loose cords
The puff flowers in this pattern are crocheted directly into the blanket and are not separate sewn embellishments.
Always inspect handmade baby items regularly for loose yarn or damaged stitches.
Frequently Asked Questions
Are the flowers crocheted separately?
No.
Every flower is worked directly into a ch-4 space while crocheting the blanket row.
There is no motif assembly.
How many petals does each flower have?
Each motif contains:
4 raised puff petals.
Is this a puff stitch blanket?
Yes.
The flower petals are made from elongated puff stitches, while the surrounding fabric uses ordinary double crochet and chains.
How many flowers are across the sample blanket?
The standard width contains:
16 flowers across each flower row.
Do I crochet into the flowers on the next row?
No.
The spacer row works a loose ch 4 over each flower, while the solid 5-dc blocks remain aligned.
Can beginners make this?
If you already know:
- chain
- single crochet
- double crochet
- slip stitch
- yarn over
the only new technique is the elongated puff.
Practice several flowers on a swatch before starting the full blanket.
Why does my flower look different from the photo?
Puff stitches can change dramatically depending on:
- yarn thickness
- hook size
- tension
- loop height
- number of pull-up loops
The important goal is a soft raised four-petal motif with consistent proportions throughout your blanket.
Should I use a larger hook for the puff rows?
Usually not.
Try using the same hook first.
Simply pull the puff loops deliberately higher.
Switching hook sizes every row makes the blanket more difficult to keep consistent.
Is the blanket reversible?
Both sides look attractive, but the raised flower effect is strongest on the right side.
The back shows a flatter version of the stitch structure.
Final Thoughts
This is one of those crochet stitches that looks much more complicated once an entire blanket is finished.
One flower is cute.
A whole row starts looking impressive.
Then another flower row appears above it.
Before long, the entire blanket is covered in little raised four-petal motifs.
But the actual rhythm stays simple:
five double crochets
one flower
five double crochets
then on the next row:
five double crochets
chain over the flower
and repeat.
The texture does all the visual work.
And in soft dusty mauve with that little cream edge, it makes a baby blanket that feels delicate without needing any separate appliqués or complicated assembly.



