Removable Duck Ice Cream Cone Amigurumi Free Crochet Pattern
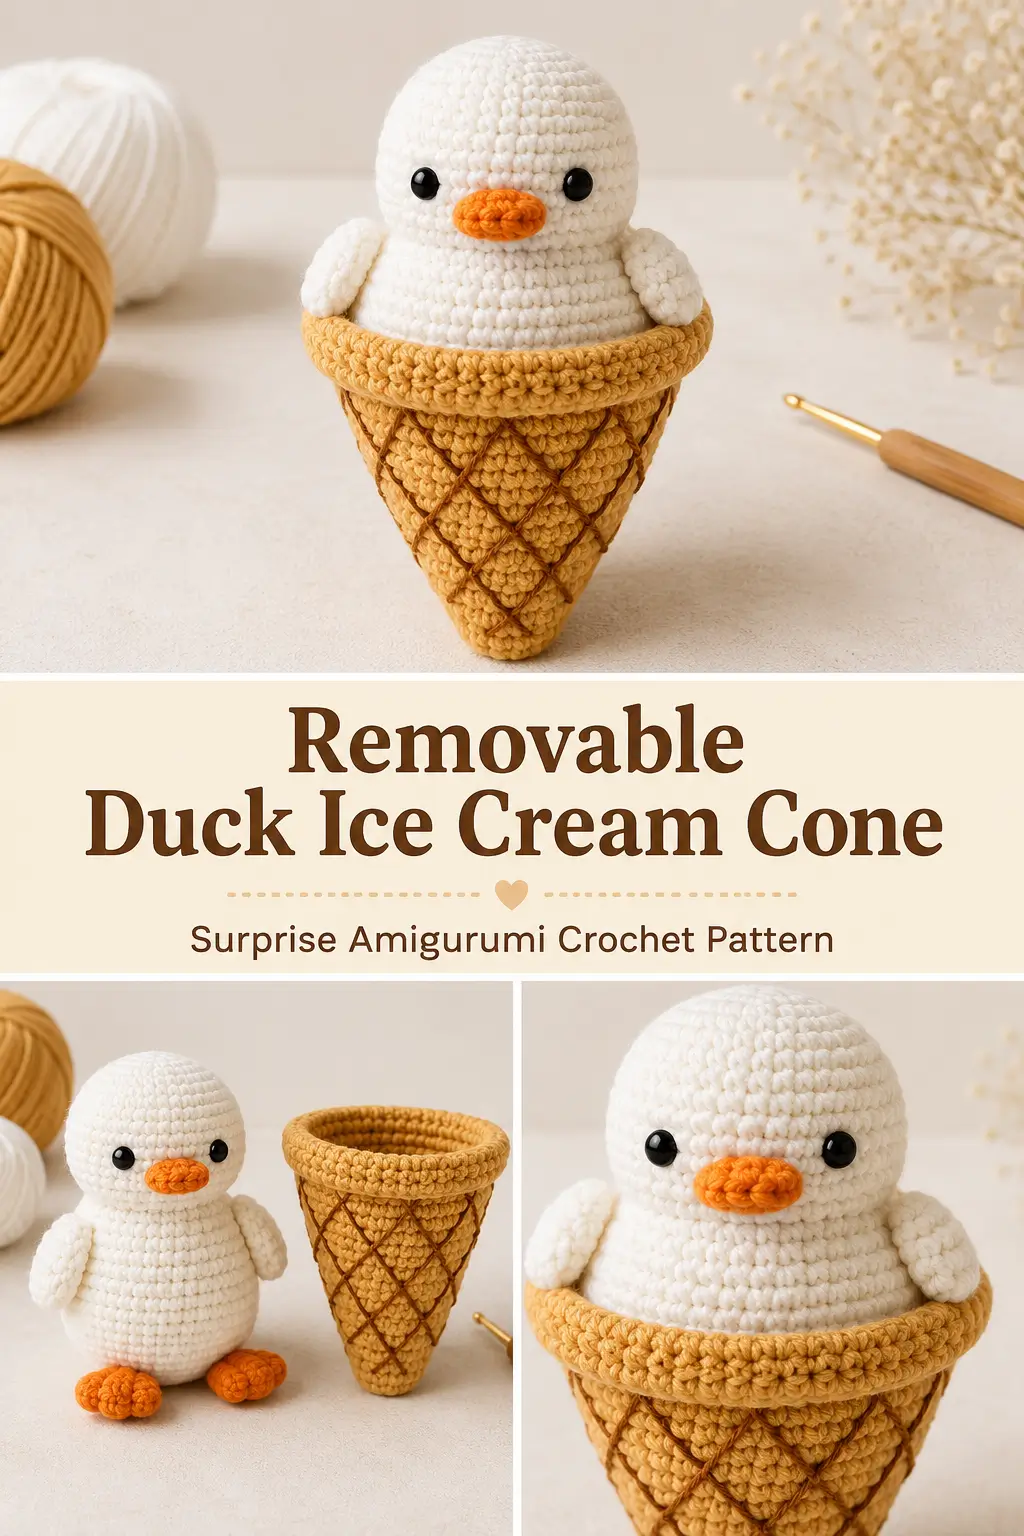
This duck ice cream cone amigurumi combines two adorable ideas in one playful crochet project. At first glance, it looks like a white scoop of ice cream sitting inside a golden waffle cone. Lift the scoop out, and it becomes a complete little duck with wings, a tail, a beak, and orange feet.
The duck and cone are made separately, so the finished toy can be displayed in either form. It is a fun amigurumi pattern for gifts, desk decor, craft markets, or anyone who enjoys unusual crochet food toys.
Description
The finished project includes a plump white duck and a removable golden-brown waffle cone. The duck has an elongated pear-shaped body, a rounded head, small side wings, a bobble tail, black eyes, an orange beak, and two orange webbed feet. The cone is worked from the pointed base upward, finished with a thick folded rim, and embroidered with diagonal lines to create a waffle texture. When the duck is placed inside, its head and upper body resemble a soft scoop of ice cream.
Approximate finished measurements:
- Duck height: 11–13 cm
- Duck width: 6–7 cm
- Cone height: 7–8 cm
- Cone opening: 7–8 cm across
The exact size will depend on your yarn, hook, tension, and stuffing.
Materials
- DK or light worsted-weight yarn in white
- DK or light worsted-weight yarn in golden tan
- Small amount of darker brown yarn for the waffle lines
- Small amount of orange yarn for the beak and feet
- 2.5–3 mm crochet hook
- Polyester stuffing
- Two 6–8 mm safety eyes or black embroidery thread
- Yarn needle
- Scissors
- Stitch marker
- Pins for positioning the pieces
Abbreviations
- ch – chain
- dc – double crochet
- dec – invisible decrease
- hdc – half double crochet
- inc – work 2 sc in the same stitch
- MR – magic ring
- sc – single crochet
- sl st – slip stitch
- st – stitch
- sts – stitches
Pattern Notes
- This pattern uses US crochet terminology.
- Work the duck and cone in continuous rounds unless instructed otherwise.
- Mark the first stitch of every round.
- Stuff the duck firmly enough to hold its shape, but do not overstuff the neck.
- The duck and cone remain separate so the duck can be removed.
- The cone should fit snugly around the lower half of the duck without stretching.
- Embroidered eyes are recommended when making the project for a young child.
- Safety eyes and small parts are not suitable for children under three.
Step-by-Step Instructions
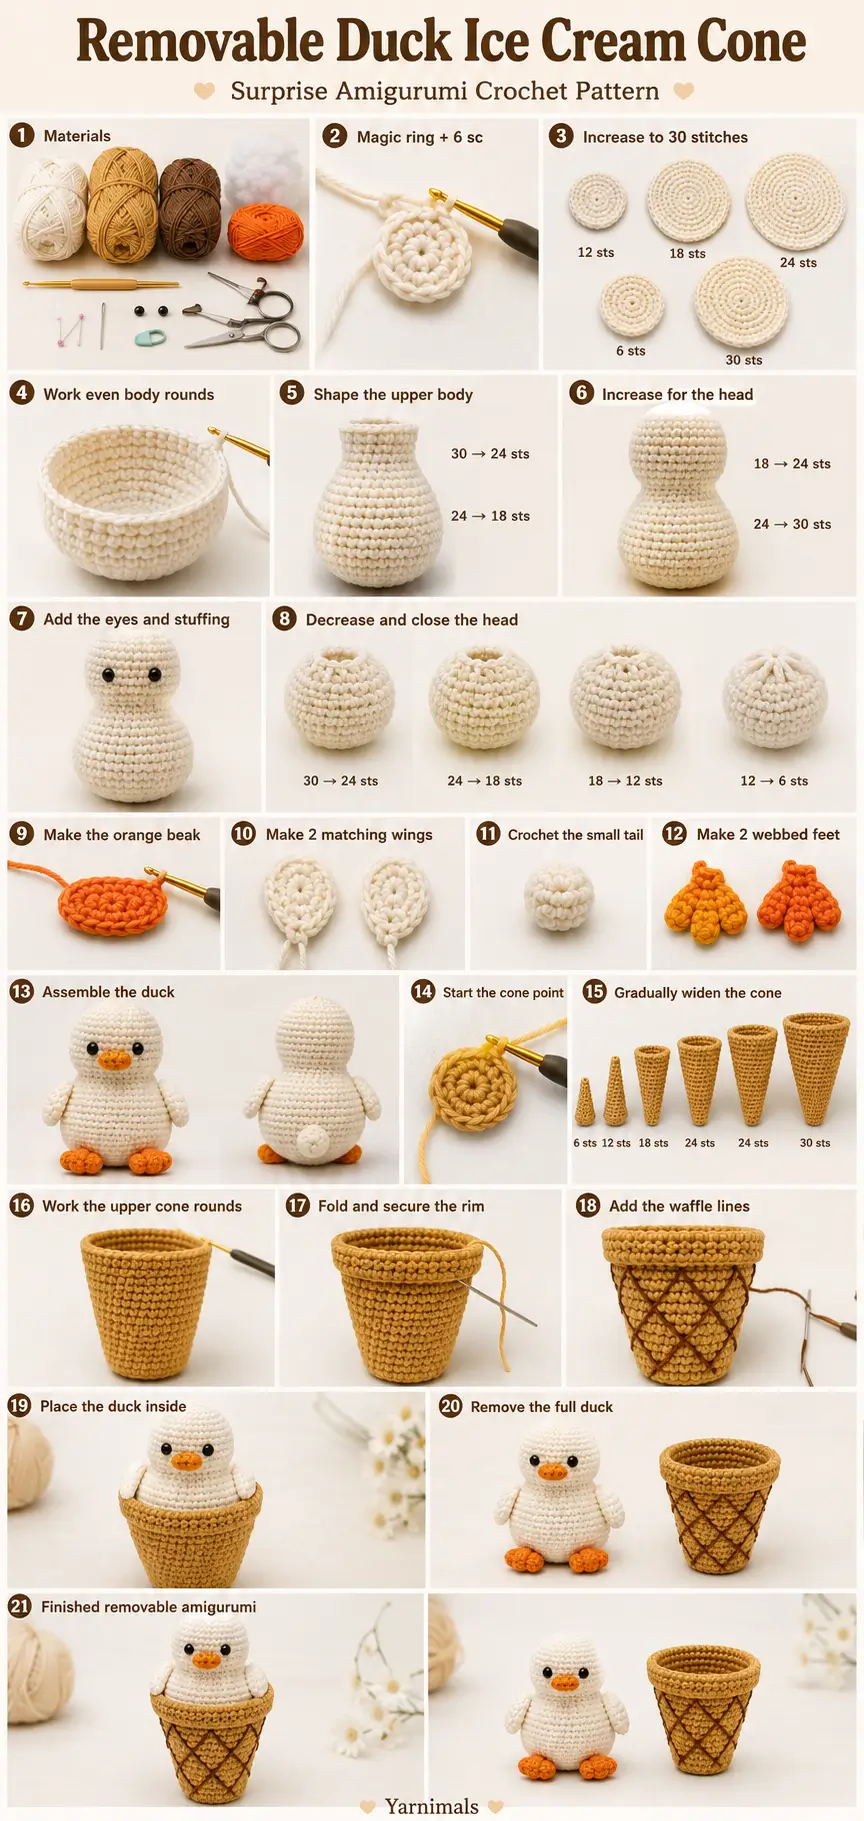
Duck Body and Head
Begin at the bottom of the duck using white yarn.
Round 1
Make an MR and work 6 sc into the ring.
(6 sts)
Round 2
Inc in every st around.
(12 sts)
Round 3
Sc 1, inc; repeat around.
(18 sts)
Round 4
Sc 2, inc; repeat around.
(24 sts)
Round 5
Sc 3, inc; repeat around.
(30 sts)
Rounds 6–10
Sc in every st around.
(30 sts)
The lower body should now be full and rounded.
Round 11
Sc 3, dec; repeat around.
(24 sts)
Round 12
Sc in every st around.
(24 sts)
Round 13
Sc 2, dec; repeat around.
(18 sts)
Round 14
Sc in every st around.
(18 sts)
Begin stuffing the lower body firmly. Keep the bottom rounded so the duck can sit upright when it is outside the cone.
Shape the Neck and Head
Round 15
Sc 2, inc; repeat around.
(24 sts)
Round 16
Sc 3, inc; repeat around.
(30 sts)
Rounds 17–21
Sc in every st around.
(30 sts)
Insert the safety eyes between Rounds 18 and 19, approximately 6 stitches apart.
Check that the eyes are centered on the front of the head before securing them.
Continue stuffing the head. Add smaller amounts of stuffing around the neck so it remains smooth rather than sharply pinched.
Round 22
Sc 3, dec; repeat around.
(24 sts)
Round 23
Sc 2, dec; repeat around.
(18 sts)
Round 24
Sc 1, dec; repeat around.
(12 sts)
Finish stuffing the head.
Round 25
Dec around.
(6 sts)
Cut the yarn, leaving a tail.
Thread the tail through the remaining front loops, pull the opening closed, and weave in the end.
Gently shape the duck so the lower body is plump, the neck is slightly narrower, and the head is rounded.
Beak
Using orange yarn, ch 4.
Starting in the second ch from the hook, work:
- 1 sc
- 1 hdc
- 3 sc in the final ch
Continue along the opposite side of the foundation chain:
- 1 hdc
- 1 sc
Join with a sl st.
Fasten off, leaving a long sewing tail.
Fold the small oval slightly so it forms a flattened beak.
Sew it horizontally between the eyes, approximately between Rounds 19 and 20.
Secure the center and both outer corners so the beak projects slightly from the face.
Wings
Make two using white yarn.
Ch 7.
Starting in the second ch from the hook, work:
- 1 sc
- 1 hdc
- 1 dc in each of the next 2 ch
- 1 hdc
- 3 sc in the final ch
Continue along the opposite side of the chain:
- 1 hdc
- 1 dc in each of the next 2 sts
- 1 hdc
- 1 sc
Join with a sl st.
Fasten off, leaving a long sewing tail.
The finished wing should be a small elongated oval with a softly pointed tip.
Attach the Wings
Pin one wing to each side of the body.
Position the upper edge near Round 11 and the lower tip near Round 7.
Angle the wings slightly backward.
Sew around the upper and side edges, leaving the lower tip lightly raised for dimension.
Tail
Using white yarn:
Round 1
Make an MR and work 6 sc into the ring.
(6 sts)
Round 2
Sc 1, inc; repeat around.
(9 sts)
Round 3
Sc in every st around.
(9 sts)
Stuff lightly.
Round 4
Sc 1, dec; repeat around.
(6 sts)
Fasten off, leaving a sewing tail.
Sew the tail to the center back of the duck around Rounds 8–10.
The tail should point slightly upward and remain visible when the duck is removed from the cone.
Webbed Feet
Make two using orange yarn.
Make an MR.
Work the following three times into the ring:
- Ch 3
- 2 dc into the ring
- Ch 3
- Sl st into the ring
Pull the ring closed.
Fasten off, leaving a sewing tail.
Each foot should have three rounded toe sections.
Attach the Feet
Position the feet beneath the lower body.
Place them near the front of the duck, approximately 3–4 stitches apart.
Sew the back of each foot securely to the body while leaving the toe sections free.
Angle the outer toes slightly outward.
Check that the duck can sit upright before weaving in the tails.
Waffle Cone
Use golden tan yarn.
The cone is worked from the pointed bottom upward.
Round 1
Make an MR and work 6 sc into the ring.
(6 sts)
Round 2
Sc in every st around.
(6 sts)
Round 3
Inc in every st around.
(12 sts)
Round 4
Sc in every st around.
(12 sts)
Round 5
Sc 1, inc; repeat around.
(18 sts)
Round 6
Sc in every st around.
(18 sts)
Round 7
Sc 2, inc; repeat around.
(24 sts)
Round 8
Sc in every st around.
(24 sts)
Round 9
Sc 3, inc; repeat around.
(30 sts)
Round 10
Sc in every st around.
(30 sts)
Round 11
Sc 4, inc; repeat around.
(36 sts)
Rounds 12–14
Sc in every st around.
(36 sts)
The cone should now have a tapered base and a wide open top.
Test the duck inside the cone. The lower body should slide inside while the head and upper body remain visible.
Do not stuff the cone.
Folded Cone Rim
Round 15
Working in the back loops only, sc in every st around.
(36 sts)
The unused front loops will be used to secure the folded rim.
Rounds 16–18
Sc in every st around.
(36 sts)
Fasten off with a long tail.
Fold Rounds 15–18 outward over the upper exterior of the cone.
Thread the tail through a yarn needle.
Sew the final round to the unused front loops from Round 14.
Match one stitch to one loop around the complete opening.
Keep the seam relaxed so the opening does not become too tight.
The folded section should create the thick rolled cone rim visible beneath the duck.
Embroider the Waffle Texture
Thread a long strand of darker brown yarn through a yarn needle.
Beginning near the lower point of the cone, embroider diagonal lines traveling upward from left to right.
Space the lines approximately two stitches apart.
Make a second set of diagonal lines traveling from right to left.
The crossing lines should create small diamond shapes across the cone.
Keep the stitches on the surface of the crochet and avoid pulling them tightly.
Knot and hide the yarn ends inside the cone.
Optional Cone Edge Shading
For more dimension, use a slightly darker golden yarn to surface slip stitch around the lower edge of the folded rim.
Keep the line subtle and even.
This is optional and should not reduce the size of the opening.
Final Assembly and Shaping
The duck and cone should remain separate.
Place the duck feet-first into the cone.
Gently compress the lower body while sliding it through the opening.
Position the duck so:
- The head remains fully visible
- The wings sit just above or against the cone rim
- The cone covers the feet and most of the lower body
- The white body resembles a scoop of ice cream
- The orange beak remains centered at the front
Remove the duck by holding the upper body and gently pulling upward.
Do not pull on the wings, tail, or beak.
Tips & Variations
Use cotton yarn for crisp stitches and a firm cone. Acrylic yarn creates a softer and more cuddly duck.
A slightly smaller hook can be used for the cone if you want it to hold its shape more firmly.
Check the cone opening before making the folded rim. Add one even round when more height is needed.
When the duck fits too tightly, remake the cone with a hook 0.5 mm larger or add six evenly spaced increases before the straight upper rounds.
When the cone is too loose, use a smaller hook or reduce the final increase round to 33 stitches by spacing three increases evenly instead of six.
Add small pink embroidered cheek lines beneath the eyes for a sweeter expression.
Use cream yarn instead of bright white to create a vanilla ice cream appearance.
The duck can also be made in pale yellow, but the white version most closely matches the visible design.
For a keychain-sized version, use fingering-weight yarn and a 1.75–2 mm hook.
For a larger plush toy, use bulky yarn and a hook small enough to prevent stuffing from showing.
Frequently Asked Questions
Is the duck permanently attached to the cone?
No. The duck and waffle cone are separate pieces. The duck can be placed inside the cone for display and removed to reveal its complete body and feet.
Why is the cone not stuffed?
Leaving the cone unstuffed creates an open space for the duck. The dense crochet stitches and folded rim help it hold its shape.
How can I make the cone fit my duck?
Test the fit before completing the rim. Increase the cone hook size when the opening is too small or decrease it when the opening is too loose.
Can I embroider the eyes instead of using safety eyes?
Yes. Use black yarn or embroidery thread to create small round eyes between Rounds 18 and 19.
Is this pattern suitable for beginners?
The stitches are beginner-friendly, but the project includes shaping, small pieces, embroidery, and assembly. It is best for an adventurous beginner or intermediate crocheter.
Conclusion
This removable duck ice cream cone amigurumi is a playful crochet project with a fun surprise hidden inside. The white duck resembles an ice cream scoop while sitting in its embroidered waffle cone, then transforms into a complete little bird when lifted out. Make it as a handmade gift, desk companion, nursery decoration, or an unusual addition to your amigurumi collection.