Retro Sunburst Cluster Granny Blanket
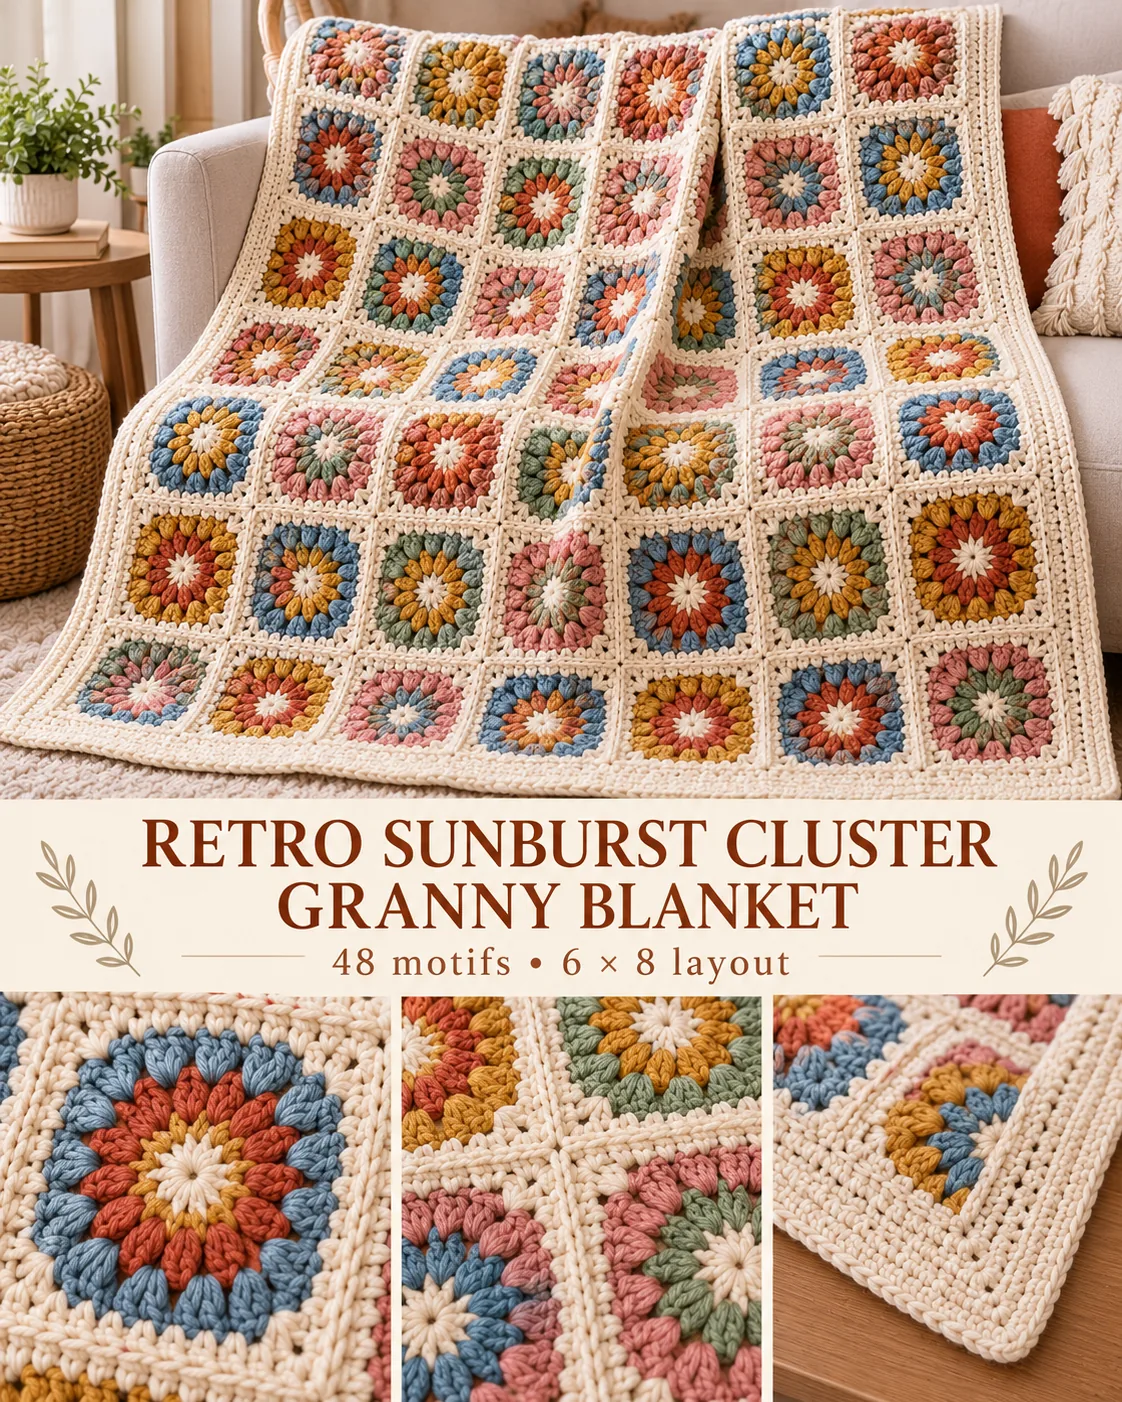
The Retro Sunburst Cluster Granny Blanket is a 48-motif crochet throw built from dimensional cluster centers, structured square frames, a visible cream joining grid, and a four-round border. This corrected Yarnimals version uses one fixed 6-by-8 layout and one fixed set of six color combinations, so every motif count, joining seam, and outer-edge count is defined before you begin.
Each square starts with a cream 16-double-crochet center. A ring of 16 raised clusters creates the sunburst texture, the third round converts the circle into a square, and two cream rounds establish a consistent 96-stitch outer perimeter. Every finished motif is blocked to 6.75 inches before assembly.
Finished Size and Project Specification
- Finished size after blocking: approximately 44 x 58 inches (112 x 147 cm)
- Motifs: exactly 48
- Layout: exactly 6 motifs across x 8 motifs down
- Blocked motif size: 6.75 inches / 17 cm square
- Outer stitches per motif: 96 total, 24 per side
- Yarn: #4 worsted-weight
- Hook: 5.0 mm H-8, or size needed to obtain the blocked motif size
- Main color: soft natural cream
- Accent colors: muted mustard, dusty rose, terracotta, sage, denim blue
- Joining: cream flat slip stitch through matching back loops
- Border: 4 cream rounds
Materials
- Approximately 1,700-1,900 yd / 1,555-1,737 m cream worsted yarn
- Approximately 250-300 yd / 229-274 m of each accent color
- 5.0 mm crochet hook
- Tapestry needle
- Scissors
- Blocking mats
- Rust-proof blocking pins
- Stitch markers
Skill Level
Confident beginner to intermediate. You should be comfortable crocheting in joined rounds, changing colors, making partial-double-crochet clusters, working taller treble stitches, identifying chain spaces, blocking motifs, and joining completed squares.
Abbreviations
- ch = chain
- sc = single crochet
- hdc = half double crochet
- dc = double crochet
- tr = treble crochet
- sl st = slip stitch
- sp = space
- st(s) = stitch(es)
- BLO = back loop only
- MR = magic ring
Special Stitch: 4-dc Cluster
Yarn over, insert the hook in the indicated stitch, yarn over and pull up a loop, yarn over and pull through 2 loops. Repeat this partial-double-crochet sequence three more times in the same stitch. You will have 5 loops on the hook. Yarn over and pull through all 5 loops. Ch 1 after the cluster when instructed. The cluster counts as one raised stitch.
Locked Color Combinations
Round 1 and Rounds 4-5 are cream on every square. Rounds 2 and 3 use the following accent pairs:
- A: mustard cluster round + dusty rose squaring round
- B: dusty rose cluster round + sage squaring round
- C: sage cluster round + denim blue squaring round
- D: denim blue cluster round + terracotta squaring round
- E: terracotta cluster round + mustard squaring round
- F: mustard cluster round + denim blue squaring round
Make exactly 8 motifs of each combination, for 48 motifs total.
Fixed 6 x 8 Layout
- Row 1: A, B, C, D, E, F
- Row 2: B, C, D, E, F, A
- Row 3: C, D, E, F, A, B
- Row 4: D, E, F, A, B, C
- Row 5: E, F, A, B, C, D
- Row 6: F, A, B, C, D, E
- Row 7: A, B, C, D, E, F
- Row 8: D, E, F, A, B, C
Construction Overview
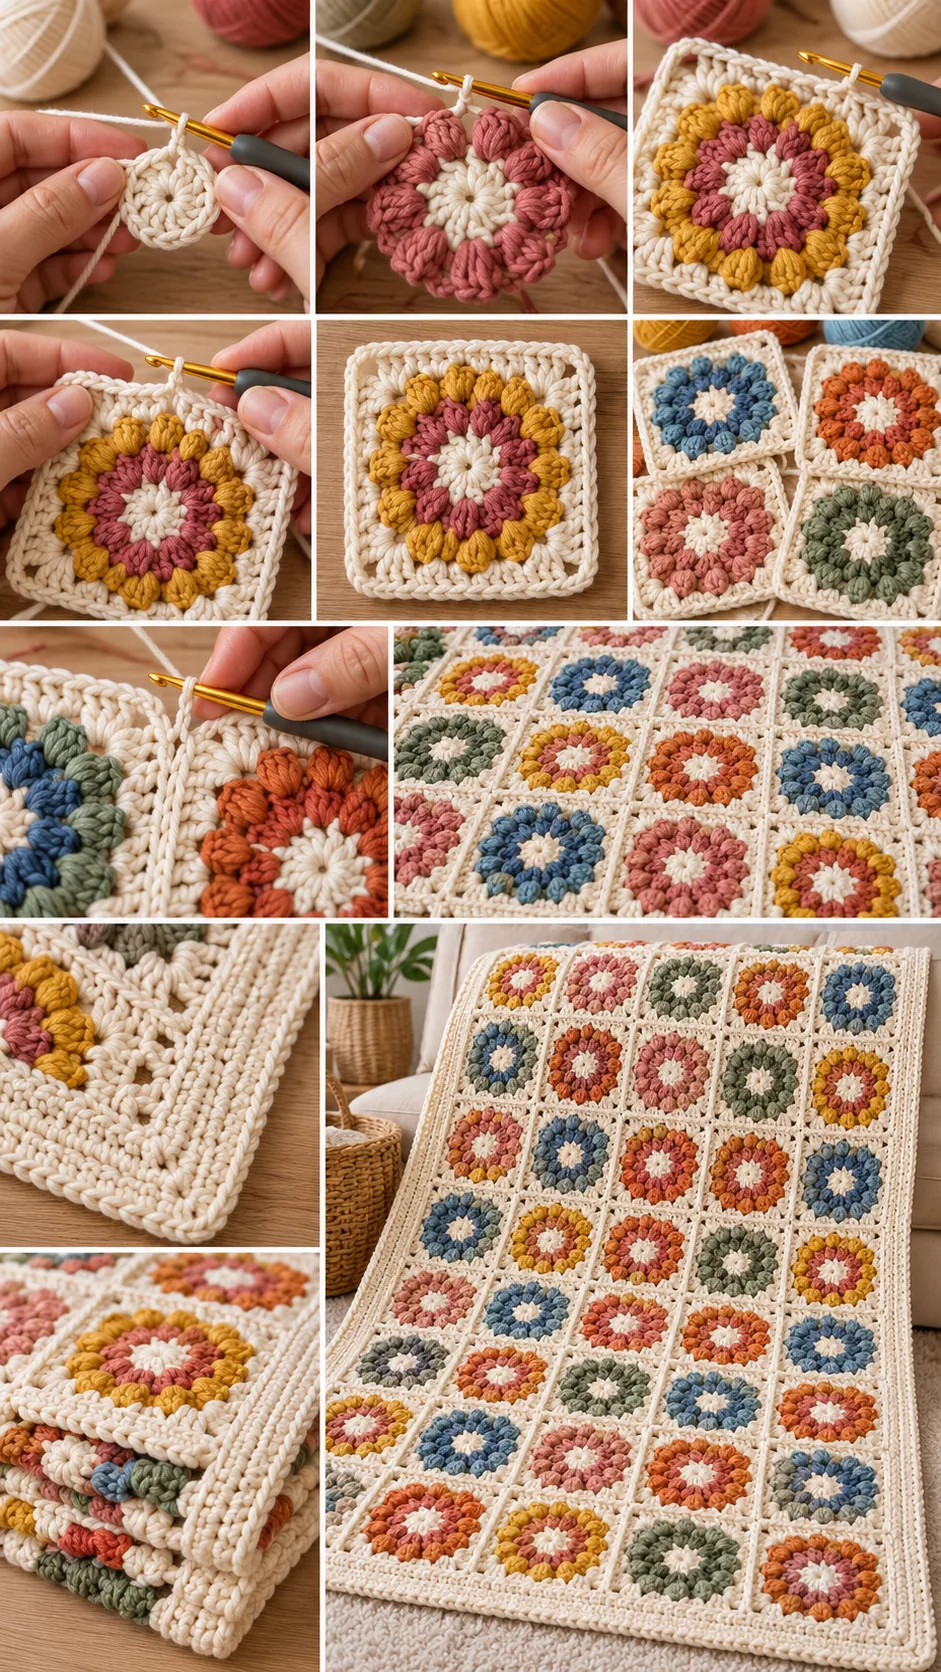
Make all 48 motifs first. Block every motif to the same 6.75-inch square measurement. Arrange them in the fixed layout. Join the six motifs in each horizontal row, then join the eight completed rows together. Each paired motif edge contains 24 outer stitches and is joined stitch-for-stitch. After assembly, the blanket perimeter contains 144 existing stitch positions across each short edge and 192 along each long edge. Four border rounds then add controlled corner increases.
Detailed Pattern
Sunburst Motif — Make 48
Round 1 — cream: Make a MR. Ch 3; this counts as the first dc. Work 15 dc into the ring. Pull the ring closed. Join with sl st to top of beginning ch-3. Fasten off. 16 dc.
Round 2 — first accent color: Join yarn in any Round 1 stitch. Ch 2. Make one 4-dc cluster in the same stitch, ch 1. *Make one 4-dc cluster in the next stitch, ch 1* around. Join to the top of the first cluster. Fasten off. 16 clusters and 16 ch-1 spaces.
Round 3 — second accent color: Join yarn in any ch-1 space. Ch 4; this does not count as a stitch. In the same space work (3 tr, ch 2, 3 tr) for the first corner. Ch 1. Work 3 dc in each of the next 3 ch-1 spaces, placing ch 1 between groups and also ch 1 after the third side group. In the next ch-1 space work (3 tr, ch 2, 3 tr), ch 1. Repeat this side sequence around until all 16 Round 2 spaces have been used. Join to the first tr. Fasten off.
Round 3 count: 4 corner groups containing 6 tr each, 12 side groups containing 3 dc each, 4 ch-2 corner spaces, and 16 ch-1 separating spaces.
Round 4 — cream: Join cream in any ch-2 corner space. Ch 1. Work 3 hdc in the corner space. Working toward the next corner, hdc once in each of the next 3 tr, each ch-1 space, each of the three 3-dc side groups, and the next 3 tr. You will make 19 hdc along each side between corner spaces. Work 3 hdc in each ch-2 corner space. Continue around. Join to first hdc. 88 hdc total.
Round 5 — cream: Ch 1. Sc in BLO of each stitch around. At each corner, identify the center stitch of the 3-hdc corner group from Round 4 and work 3 BLO sc in that center stitch instead of 1. Join to first sc and fasten off. 96 sc total; 24 outer stitch positions per side.
Motif Quality Check
- Round 1: 16 dc
- Round 2: 16 clusters
- Round 3: 4 corners and 12 side groups
- Round 4: 88 hdc
- Round 5: 96 sc
- Blocked size: 6.75 inches square
If a motif is not square after Round 3, stop and recount before adding the cream frame. Every corner must use one Round 2 chain space and exactly three non-corner spaces must sit between successive corners.
Blocking All 48 Motifs
Weave in the motif color-change tails. Lightly dampen each square according to the yarn-care instructions. Pin to 6.75 inches, measuring both width and height. Pin the four corners first, then straighten the sides without overstretching the cream frame. Allow every motif to dry fully before joining.
Do not join noticeably different motif sizes and rely on the seams to correct them. A consistent blocked measurement is what keeps the final 6 x 8 rectangle square and flat.
Joining the Horizontal Rows
Lay out Row 1 exactly as listed above with every motif RS facing upward. Place the first two squares side by side. Join cream yarn at the upper corner of the shared edge.
Insert the hook through the BLO of the first outer stitch on the left motif and the BLO of the matching first outer stitch on the right motif. Yarn over and pull through both motif loops and the loop already on the hook to make a flat slip stitch. Continue this way through all 24 matching edge positions. Fasten off or continue to the next pair if you are comfortable managing the seam intersections.
Join Square 2 to Square 3, then 3 to 4, 4 to 5, and 5 to 6. Repeat for all eight horizontal rows. Each completed strip contains exactly six motifs.
Joining the Eight Rows
Place Row 1 above Row 2 with RS facing upward and the square columns aligned. Join the full lower edge of Row 1 to the full upper edge of Row 2 through matching back loops. Each six-square seam spans 144 motif-edge positions: 6 motif edges x 24 positions.
At every four-square intersection, keep the seam relaxed and make sure the motif corners meet without stacking multiple slip stitches into the same corner loop. Continue until the seven full-width seams are complete and all eight rows are joined.
Assembly Check Before Border
- 6 motifs across
- 8 motifs down
- 48 motifs total
- Approximately 40.5 inches wide before border
- Approximately 54 inches long before border
- 144 existing stitch positions across each short outer edge
- 192 existing stitch positions along each long outer edge
Four-Round Cream Border
Border Round 1 — 680 sc: Join cream at any blanket corner. Ch 1. At the existing corner position work 3 sc instead of 1. Sc once in each remaining outer stitch position along the edge. Work 3 sc in each of the other three blanket corner positions, always replacing the single stitch that would otherwise be worked there. Join to first sc. 680 sc total.
Border Round 2 — 688 hdc: Ch 1. Hdc in every stitch around. At each corner, work 3 hdc in the center stitch of the previous 3-sc corner. Join. 688 hdc.
Border Round 3 — 696 BLO hdc: Ch 1. Hdc in BLO of each stitch around. At each corner work 3 BLO hdc in the center stitch of the previous corner group. Join. 696 hdc.
Border Round 4 — 704 sc: Ch 1. Sc in each stitch around. At each corner work 3 sc in the center stitch of the previous corner group. Join and fasten off. 704 sc.
Finishing and Final Blocking
Weave in every seam and border tail. Dampen or wash the blanket according to the yarn label. Lay flat and square the corners. Shape to approximately 44 x 58 inches. The joining grid should remain narrow and the border should lie completely flat before the blanket dries.
Visual Checkpoints
After Round 2 of a motif: you should see exactly 16 raised clusters and 16 spaces.
After Round 3: there should be four clear corners, with exactly three 3-dc side groups between adjacent corners.
After Round 5: count 96 outer stitches. If you do not have 96, correct the motif before blocking.
After blocking: stack several motifs. Their corners and outer edges should align.
After joining the first six-square row: the strip should measure approximately 40.5 inches before the border and should lie flat without seam puckering.
Troubleshooting
The cluster ring looks uneven
Round 2 must place exactly one cluster in each of the 16 Round 1 stitches. Count both the clusters and ch-1 spaces.
My motif still looks round after Round 3
Recheck the corner placement. Every fourth Round 2 space becomes a corner, and each corner contains 3 tr, ch 2, 3 tr.
The cream frame pulls inward
Round 4 may be worked too tightly. The round contains 88 hdc and must reach comfortably around the squared Round 3 shape.
The joining grid puckers
Flat slip stitches should be worked with relaxed tension. The joined edge must remain the same length as an unjoined 6.75-inch motif edge.
The outer border waves
Confirm the assembly is blocked and the first border round uses one sc per existing outer stitch position except the four corners, where 3 sc replace 1 sc.
Pattern at a Glance
- Make 48 five-round motifs.
- Make exactly 8 each of color combinations A-F.
- Each finished motif has 96 outer stitches and blocks to 6.75 inches.
- Arrange exactly 6 across x 8 down.
- Join matching motif edges through 24 back-loop positions.
- Border counts: 680 sc, 688 hdc, 696 BLO hdc, 704 sc.
- Block finished blanket to approximately 44 x 58 inches.
This version removes guesswork from the motif and border construction: every motif round has a defined count, every square is blocked to one measurement, every paired edge uses the same 24-stitch join, and the final border grows by exactly eight stitches per round.