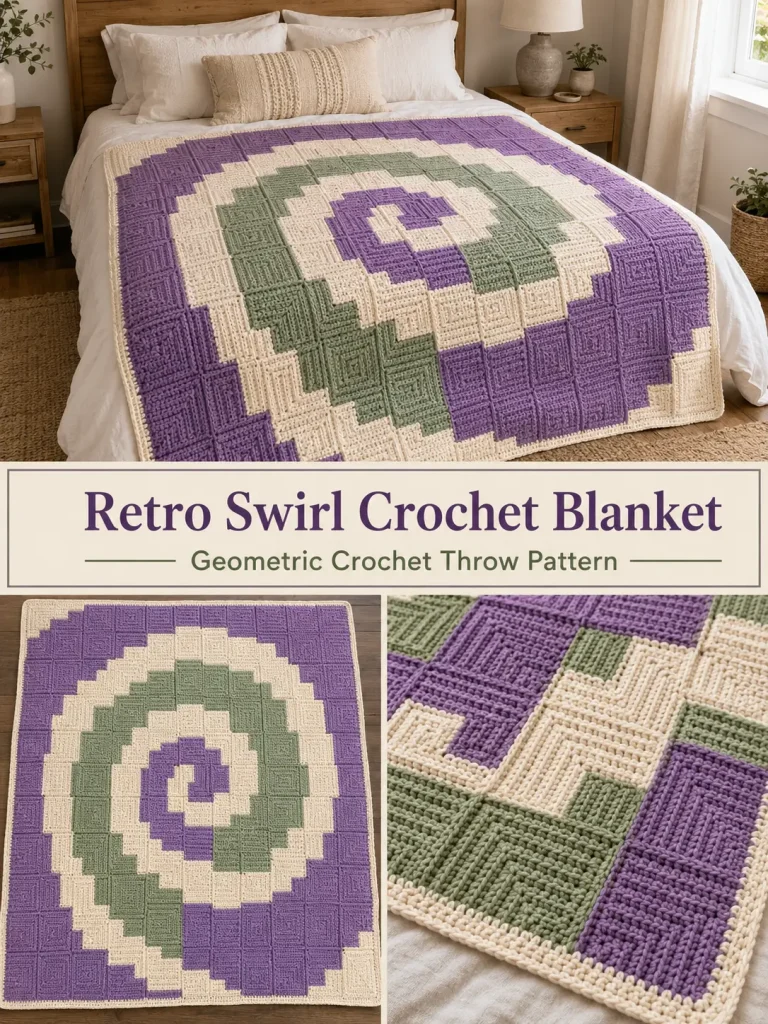
If you love bold geometric crochet blankets, this retro swirl crochet blanket is such a fun project to make. The look is inspired by the optical spiral style in the photo, with repeating curved corner blocks that create a striking movement across the whole blanket.
This is an original crochet blanket pattern built from repeated log-cabin style crochet blocks. Each block uses soft sage green, cream, and purple, then the blocks are rotated during assembly so the finished blanket forms that beautiful swirling effect.
Description
The finished blanket is a medium throw made from square crochet blocks joined together in a repeating spiral layout. Each square starts with a small sage green center, then grows with cream and green bands, and finishes with a purple outer section. When all the squares are rotated toward the center, the blanket creates a flowing maze-like design that looks vintage, cozy, and eye-catching.
This crochet blanket works beautifully as a sofa throw, reading blanket, bed throw, or handmade crochet gift. The color palette in the sample stays true to the image: soft sage green, warm cream, and a medium lavender-purple.
Materials
- Worsted weight yarn in:
- Sage green
- Warm cream
- Lavender-purple
- 5 mm crochet hook
- Yarn needle
- Scissors
- Stitch markers
- Measuring tape
Abbreviations
- ch – chain
- st – stitch
- sts – stitches
- hdc – half double crochet
- sc – single crochet
- sl st – slip stitch
- RS – right side
- WS – wrong side
- rep – repeat
Pattern Notes
- US crochet terms are used.
- The blanket is made from identical square blocks.
- The swirl effect comes from rotating the blocks during assembly.
- Each block is worked in rows.
- The block construction is simple, but the full project is best for an advanced beginner or intermediate crocheter because of the number of blocks and the layout.
Finished Size
Using the block size below and making 48 blocks, the blanket measures approximately:
- 42 x 56 inches before border
- about 43 x 57 inches after border
Blanket Layout
Make:
- 48 blocks total
- Arrange them in 6 blocks across and 8 blocks down
Step-by-Step Instructions
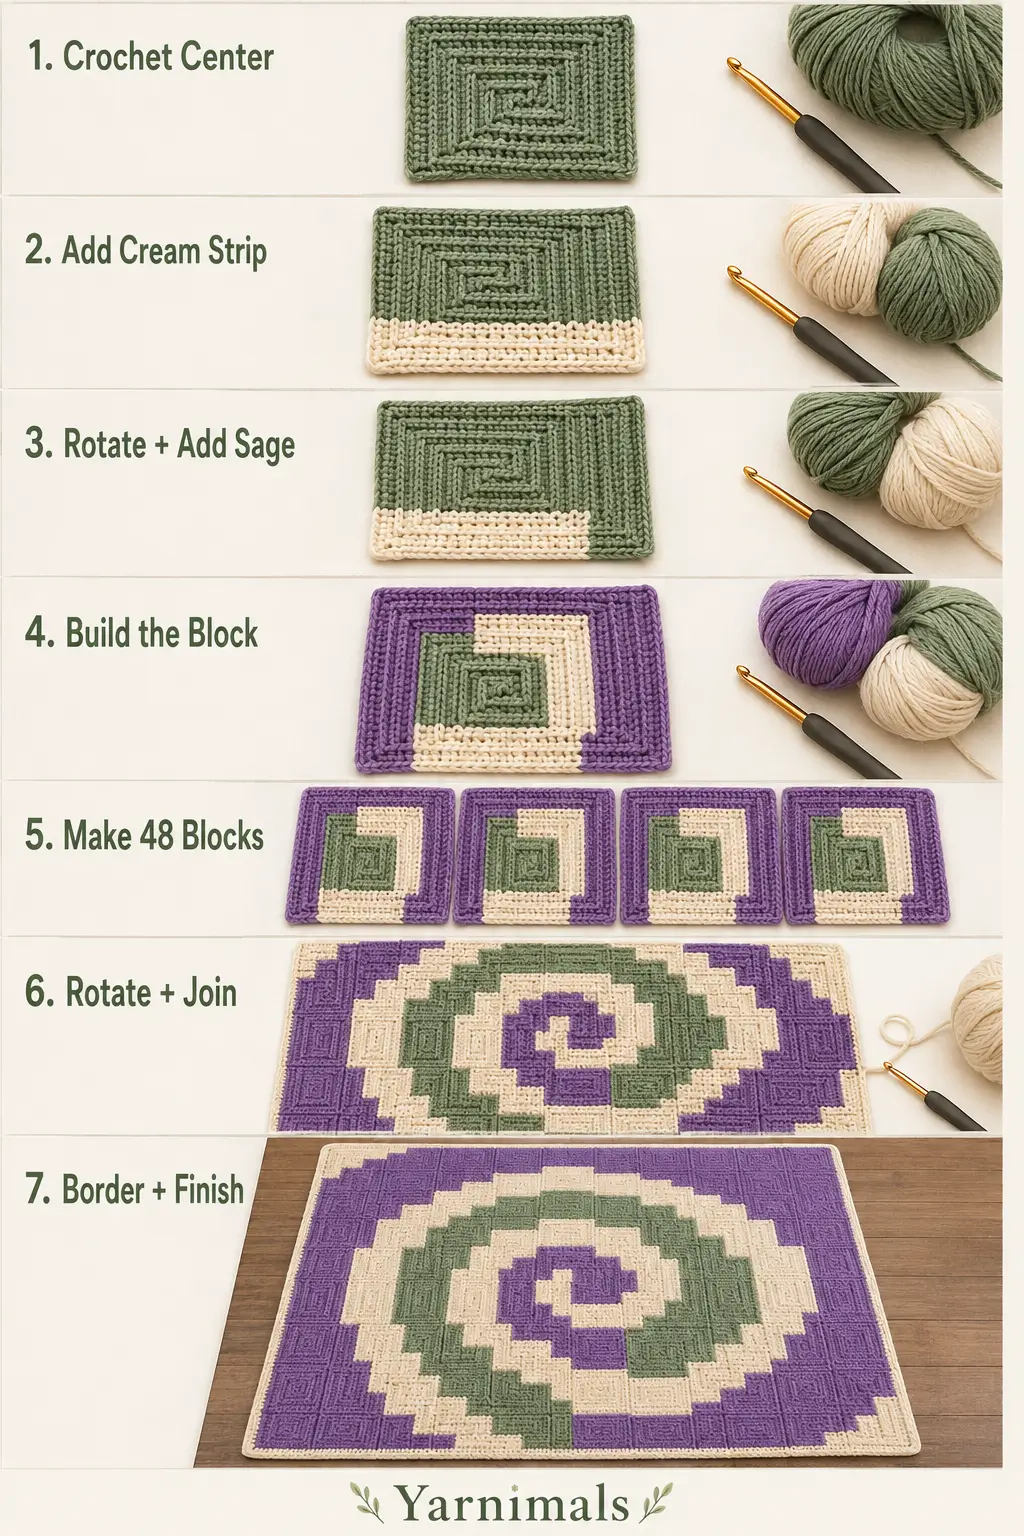
Part 1 – Make the Swirl Cabin Block
Each block is worked in strips, building outward in a rotating direction.
The sample block uses this color order:
- Center square: sage green
- Strip 1: cream
- Strip 2: sage green
- Strip 3: cream
- Strip 4: purple
- Strip 5: purple
This creates the same curved nested look seen in the blanket image.
Center Square – Sage Green
Ch 11.
Row 1
Hdc in 2nd ch from hook and in each ch across.
10 sts.
Ch 1, turn.
Rows 2–10
Hdc in each st across.
10 sts.
Fasten off.
You now have a small square center.
Strip 1 – Cream
With RS facing, join cream yarn to the top edge of the center square.
Row 1
Ch 1. Work 10 hdc evenly across the top edge of the center square.
Ch 1, turn.
Rows 2–4
Hdc in each st across.
10 sts.
Fasten off.
Strip 2 – Sage Green
Rotate the piece clockwise so the cream strip sits on the right side.
Join sage green yarn to the new top edge, which is the full side of the center square plus the cream strip.
Row 1
Ch 1. Work 14 hdc evenly across this side edge.
Ch 1, turn.
Rows 2–4
Hdc in each st across.
14 sts.
Fasten off.
Your block is square again.
Strip 3 – Cream
Rotate the piece clockwise again.
Join cream yarn to the new top edge.
Row 1
Ch 1. Work 14 hdc evenly across.
Ch 1, turn.
Rows 2–4
Hdc in each st across.
14 sts.
Fasten off.
Strip 4 – Purple
Rotate the piece clockwise again.
Join purple yarn to the new top edge.
Row 1
Ch 1. Work 18 hdc evenly across.
Ch 1, turn.
Rows 2–4
Hdc in each st across.
18 sts.
Fasten off.
Your piece is square again.
Strip 5 – Purple
Rotate the piece clockwise one more time.
Join purple yarn to the new top edge.
Row 1
Ch 1. Work 18 hdc evenly across.
Ch 1, turn.
Rows 2–4
Hdc in each st across.
18 sts.
Fasten off.
Strip 6 – Purple
Rotate clockwise again.
Join purple yarn to the new top edge.
Row 1
Ch 1. Work 22 hdc evenly across.
Ch 1, turn.
Rows 2–4
Hdc in each st across.
22 sts.
Fasten off.
The block should now be square again.
Block Size
Each finished block should measure about 7 x 7 inches.
Make More Blocks
Repeat the block pattern until you have:
48 total blocks
Try to keep your tension consistent so all squares stay close to the same size.
Part 2 – Arrange the Blanket Layout
Lay out the 48 blocks in:
- 6 columns
- 8 rows
The swirl effect comes from the direction of each block.
How to Rotate the Blocks
Each block has a smallest inner green corner.
Arrange the blanket so:
- the smallest green corner of each block points toward the center area of the blanket
- the four blocks nearest the middle create a pinwheel effect
- the surrounding blocks continue that turning direction outward
A simple way to do this is to lay all the blocks out on the floor first and keep rotating them until the curved green and cream bands appear to flow in a spiral across the blanket.
Do not join anything until you are happy with the full arrangement.
Part 3 – Join the Blocks
Use purple yarn to match the outer edge of the blocks.
You can use your favorite joining method. A simple whip stitch or mattress stitch works very well for this blanket.
Join Rows First
- Join the 6 blocks of Row 1
- Join the 6 blocks of Row 2
- Continue until all 8 rows are complete
Join the Rows Together
Sew the rows together in order to form the full blanket.
Take care to keep all blocks in the correct rotated direction while joining.
Part 4 – Add the Border
The blanket in the image has a neat light outer edge, so this version uses a simple cream border.
With cream yarn, join in any corner.
Border Round 1
Ch 1.
Work sc evenly around the whole blanket.
Place:
- 1 sc in each hdc row end as needed
- 3 sc in each corner
Join with sl st to first sc.
Border Round 2
Ch 1.
Sc in each st around, working 3 sc in the center sc of each corner.
Join with sl st.
Fasten off.
Weave in all ends.
Finishing
- Check all joins
- Weave in remaining tails securely
- Lightly block if needed
- Lay flat to shape
Your retro swirl crochet blanket is complete.
Tips & Variations
If you want a larger blanket, simply make more blocks and keep the same rotation idea.
If you want a smaller baby blanket, try making:
- 20 blocks in a 4 x 5 layout
You can also change the color palette while keeping the same design. Good combinations include:
- dusty blue, cream, and navy
- blush, ivory, and taupe
- mustard, cream, and charcoal
- terracotta, oatmeal, and olive
If you want a chunkier result, use a thicker yarn and a larger hook. The same block construction still works well.
For the cleanest look, always rotate the block in the same direction while making it. This keeps every block identical, which makes layout much easier later.
FAQ
Is this a beginner crochet blanket?
It is suitable for an advanced beginner who is comfortable with half double crochet and sewing blocks together. The stitch work is simple, but there are many blocks to make.
Can I use double crochet instead of half double crochet?
Yes, but the blocks will turn out larger and a little looser. If you change the stitch, make one sample block first and measure it before making the whole blanket.
Do I have to follow the exact color order?
No, but the swirl effect is strongest when you keep a clear contrast between the inner bands and the purple outer section.
Conclusion
This retro swirl crochet blanket is a beautiful project for anyone who loves geometric crochet, cozy home decor, and statement throws. The repeated square blocks are easy to make one at a time, and once they are rotated into place, the whole blanket comes alive with movement. It is a lovely way to create a handmade crochet blanket that feels both vintage and fresh at the same time.
If you make this blanket, try laying out all the blocks before joining so you can enjoy watching the swirl pattern appear.



