Ribbed HDC Crochet Baby Hat With Built-In Fun Fringe
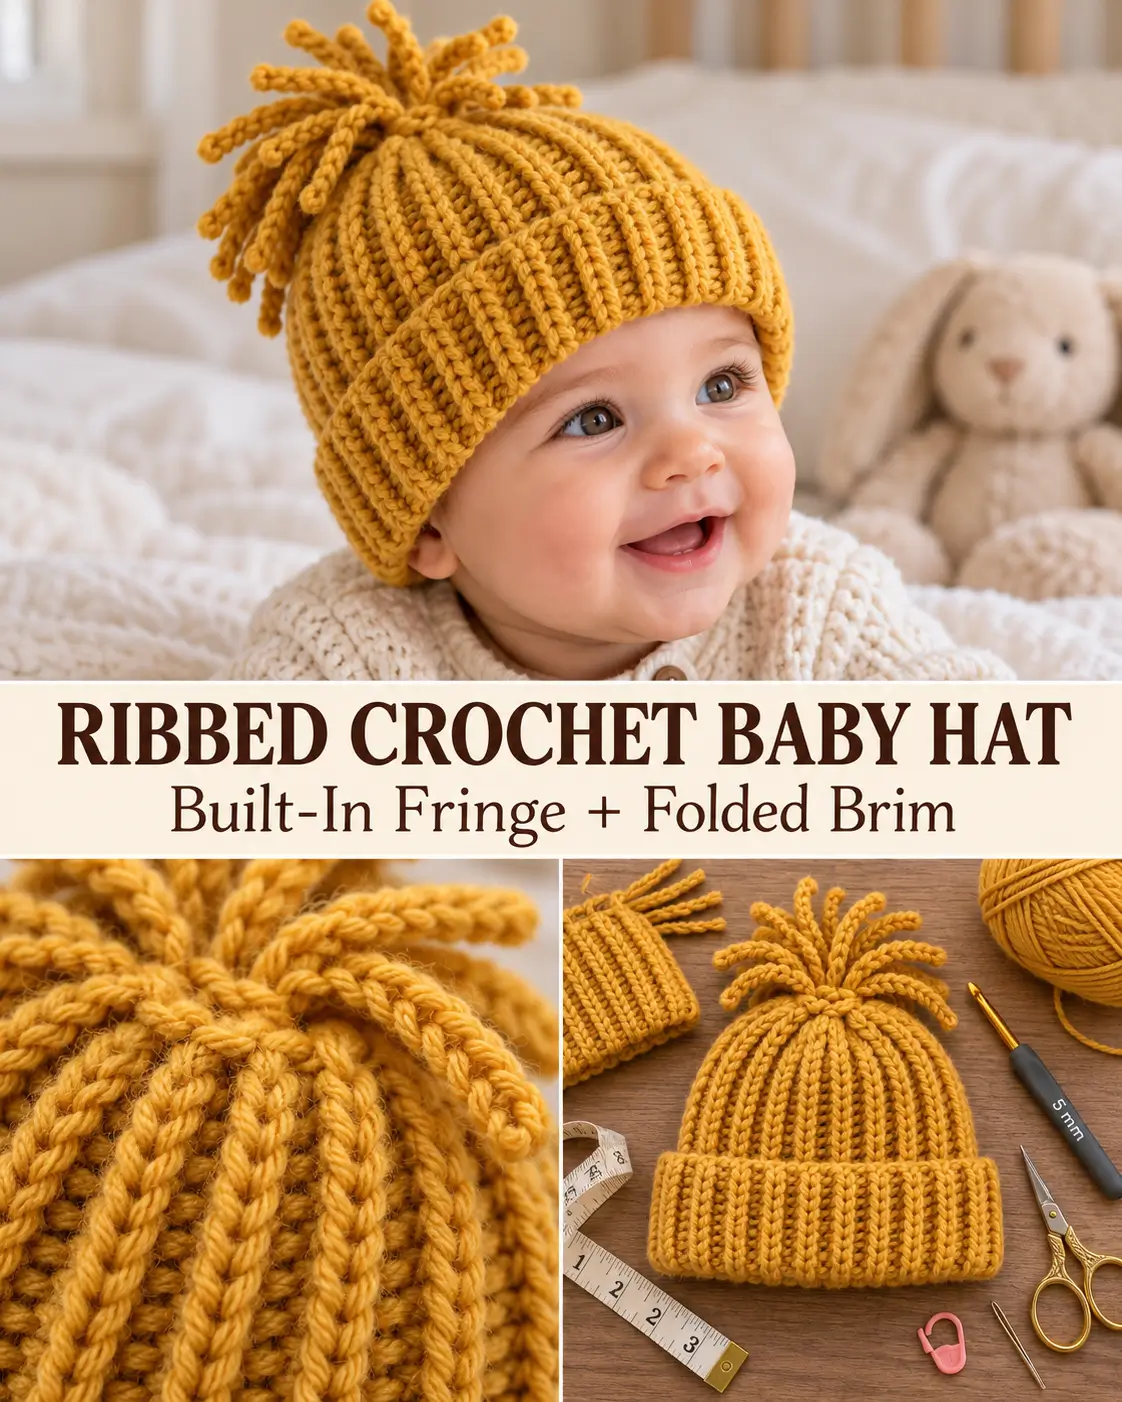
This cozy crochet hat combines stretchy half double crochet ribbing, a folded brim, and playful fringe that is crocheted directly into the fabric as you work.
Instead of making a separate pom-pom and attaching it later, the fringe strands are created during the rows at the crown edge. When the rectangle is finished, the short ends are joined and the crown is gathered tightly just below the fringe.
The result is a soft ribbed beanie with a fun tassel-like top and no separate pom-pom assembly.
This version is written for approximately 6–12 months, but the construction is easy to adapt for other sizes.
Materials
- Medium weight #4 acrylic or soft worsted yarn
- Approximately 1 ball / up to 205 yards
- 5 mm / H crochet hook
- Tapestry needle
- Scissors
- Measuring tape
- Stitch markers, optional
A soft acrylic with a little bounce works especially well because the hat needs to stretch comfortably around the head.
Skill Level
Beginner / confident beginner
You should know:
- chain
- half double crochet
- slip stitch
- back loop only crochet
- joining with slip stitches
- simple gathering with a yarn needle
Abbreviations
US crochet terminology:
ch — chain
hdc — half double crochet
sl st — slip stitch
BLO — back loop only
st / sts — stitch / stitches
rep — repeat
How the Hat Is Constructed
This hat is not crocheted in rounds.
Instead, you make a:
long ribbed rectangle
from side to side.
One long edge becomes the:
folded brim
The opposite long edge becomes the:
crown
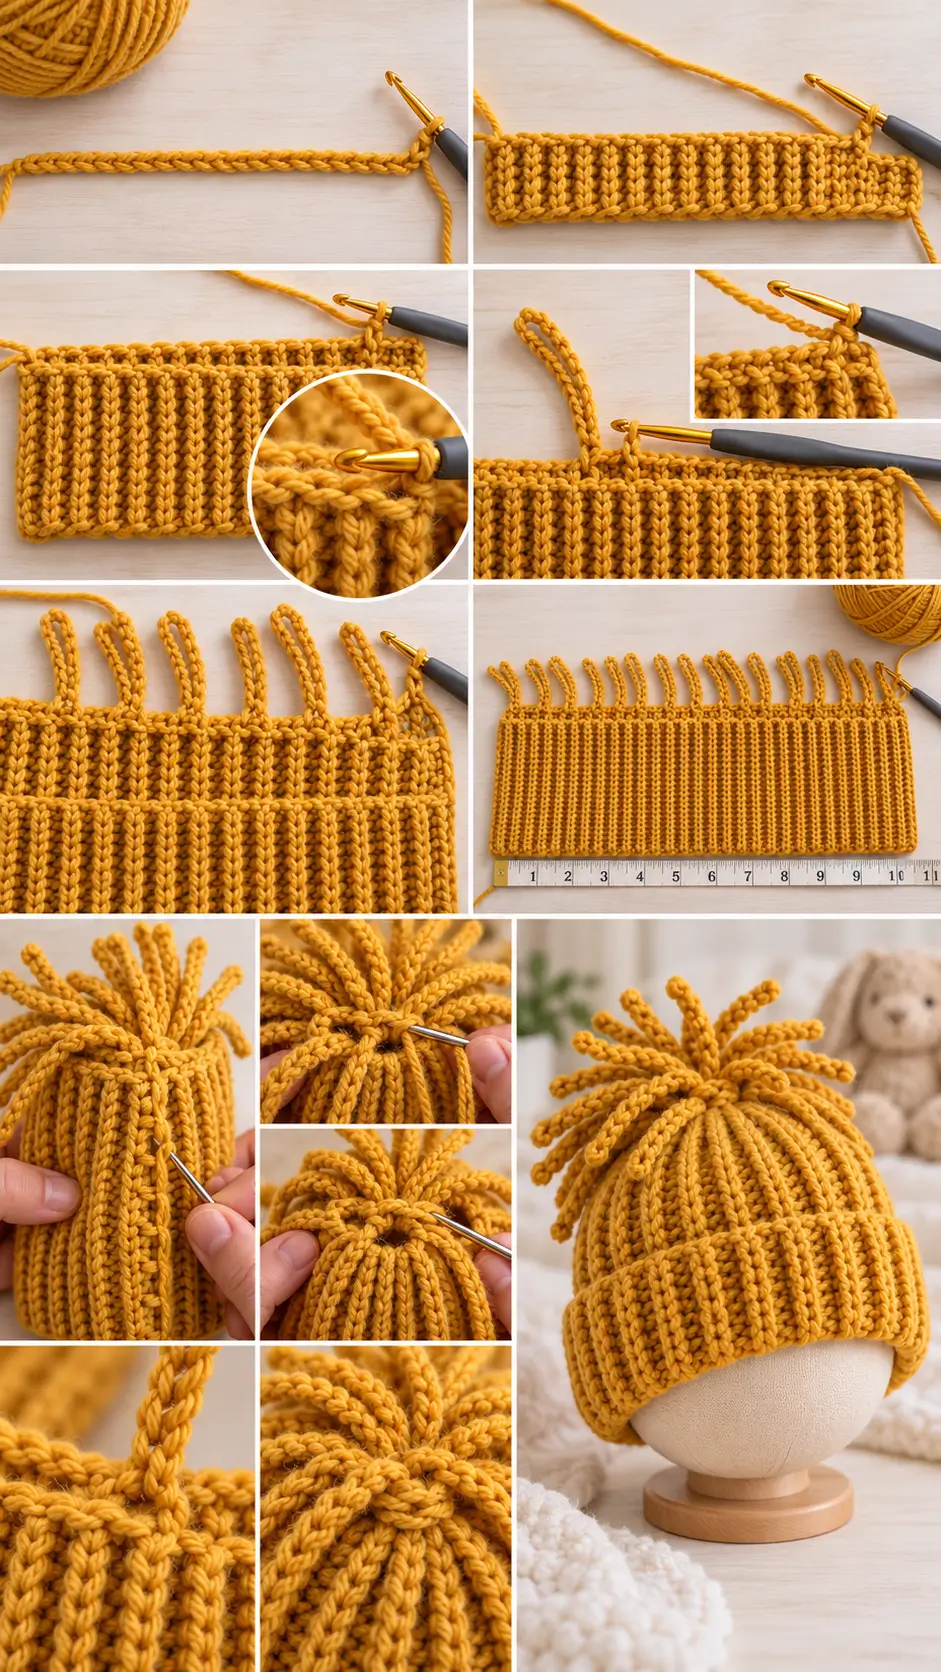
Three slip stitches are worked at the crown edge of each row section to make that edge tighter.
Every few rows, a long chain is added at the crown edge and crocheted back into. These become the decorative fringe strands.
Once the rectangle is wide enough to wrap around the head:
- join the two short ends
- gather the crown edge
- pull it closed
- wrap the yarn securely around the fringe base
- fold up the brim
Sample Size
This sample is designed for approximately:
6–12 months
The foundation chain determines the:
height of the hat
The number of rows determines the:
circumference
For other sizes, simply adjust those two measurements.
Important Sizing Note
The finished rectangle should be slightly smaller than the baby’s actual head circumference because the BLO ribbing stretches.
A good guideline is approximately:
1–2 inches / 2.5–5 cm of negative ease
depending on your yarn.
The hat also includes approximately:
2 inches / 5 cm
for the folded brim.
If you want a slouchier hat, add approximately:
1 extra inch / 2.5 cm
to the foundation length.
Special Stitch — Half Double Crochet
Yarn over.
Insert hook into the indicated stitch.
Yarn over and pull up a loop.
You should have:
3 loops
on the hook.
Yarn over.
Pull through all:
3 loops
Back Loop Only
Look at the top of the stitch.
You will see two loops:
- front loop
- back loop
Insert the hook only through the:
back loop
Working BLO creates the pronounced ribbing that allows the hat to stretch.
PART 1 — FOUNDATION
Ch:
36
Keep the chain loose.
The chain runs from:
brim edge → crown edge
If you need a taller hat, add chains.
If you need a shorter hat, remove chains.
Row 1
Beginning in the:
3rd chain from the hook
work:
1 hdc
Continue working hdc until you have:
31 hdc total
There should be:
3 chains remaining
Work:
1 sl st in each of the final 3 chains
You should now have:
- 31 hdc
- 3 sl st at the crown edge
Ch:
1
Turn.
Why the 3 Slip Stitches Matter
The 31 hdc form the stretchy hat body.
The final:
3 sl st
sit at the crown.
Because slip stitches are shorter than hdc, this section naturally draws the crown inward.
That makes the top much easier to gather later.
Always keep these:
3 crown stitches
as slip stitches.
Row 2
Working BLO:
Sl st in the first:
3 sl sts
Then work:
1 hdc BLO in each hdc across
Ch:
2
Turn.
Do not accidentally work hdc into the crown slip stitches.
The row should remain divided into:
31 hdc + 3 sl st
Row 3
Hdc BLO in each hdc across.
When you reach the crown edge:
Sl st BLO in each of the final:
3 sl sts
Now make the first fringe strand.
Ch:
12
Turn.
Do not fasten off.
Row 4 — Crochet Back Along the Fringe
Beginning in the:
3rd chain from the hook
work:
1 hdc in each chain
back toward the hat.
This creates one narrow crocheted fringe strand.
When you reach the hat:
Sl st BLO in each of the:
3 crown sl sts
Then:
Hdc BLO in each hdc across.
Ch:
2
Turn.
The first fringe strand is now attached directly to the crown edge.
Row 5
Hdc BLO in each hdc across.
At the crown:
Sl st BLO in each of the final:
3 sl sts
Ch:
1
Turn.
MAIN REPEAT
Repeat:
Rows 2–5
throughout the hat.
The four-row cycle is:
Row A
3 BLO sl st + BLO hdc across
Row B
BLO hdc across + 3 BLO sl st + ch 12 fringe
Row C
hdc back along fringe + 3 BLO sl st + BLO hdc across
Row D
BLO hdc across + 3 BLO sl st
Then repeat.
This spacing distributes the fringe strands around the crown without making the top excessively bulky.
Continue to the Correct Width
For the 6–12 month sample, work approximately:
41 rows
or continue until the rectangle stretches comfortably around the baby’s head.
Do not rely only on row count if your yarn or tension differs.
Instead:
- lay the rectangle flat
- gently stretch it horizontally
- wrap or measure it against the desired head circumference
- stop when the fit is snug but comfortable
Try to finish with your last row ending at the:
brim edge
This makes joining easier.
Check the Rectangle
Before joining, lay the piece flat.
You should clearly see:
One long edge
Regular hdc stitches — this becomes the brim.
Opposite long edge
Three-stitch sl-st section with multiple fringe strands — this becomes the crown.
Across the fabric
Strong vertical-looking BLO ribs.
The rectangle should stretch easily from side to side.
PART 2 — JOIN THE HAT
Fold the rectangle so the:
first row and final row
meet.
Make sure:
- fringe edge matches fringe edge
- brim edge matches brim edge
- ribbing is not twisted
Keep the working yarn attached.
Slip Stitch Join
Insert the hook through the appropriate loop of the final row and through the corresponding foundation edge.
Work:
sl st
to join the two edges.
Continue evenly from:
brim to crown
Do not pull the joining stitches too tightly.
The seam should stretch almost as well as the surrounding ribbing.
Alternative Invisible Join
If you prefer not to crochet the seam:
Fasten off with a long tail.
Thread the tail onto a tapestry needle.
Use mattress stitch to sew the short edges together.
Keep the seam flexible.
PART 3 — CLOSE THE CROWN
After joining, leave a:
long yarn tail
Thread it onto a tapestry needle.
The fringe strands should all be sticking out from the crown edge.
Do not sew through the fringe itself.
Instead, weave the needle through the fabric:
directly underneath the fringe
around the entire crown.
Move in and out through the sl-st edge.
Gather the Top
Once you have gone completely around:
pull the yarn firmly.
The crown should gather inward.
Continue pulling until the opening becomes very small.
Take another pass around the gathered area if necessary.
Secure with several firm stitches.
Wrap the Fringe Base
For a neat finish, wrap the yarn tail several times around:
the base of the fringe bundle
directly above the gathered crown.
Pull firmly enough to hold everything together.
Do not pull so aggressively that the yarn breaks.
Secure the tail.
Weave it through the inside of the hat.
Trim.
PART 4 — FINISH THE FRINGE
Arrange all fringe strands around the crown.
They should create a playful loose tassel effect.
You can leave them slightly uneven for a casual look.
Or trim them gently so they are approximately the same length.
Do not cut them extremely short.
The purpose of this design is to create a fun alternative to a pom-pom.
PART 5 — FOLD THE BRIM
Fold the lower edge upward approximately:
2 inches / 5 cm
The fold should naturally stay in place because of the ribbed fabric.
You do not need to sew the brim down.
For a shorter beanie:
fold the brim slightly higher.
For a slouchier look:
fold it less.
Finished Look
The completed hat should have:
- strong vertical ribbing
- stretchy sides
- approximately 2-inch folded brim
- snug crown
- integrated fringe top
- no separate pom-pom
- soft rounded beanie shape
- discreet vertical seam
How to Adjust the Hat for Other Sizes
This construction is extremely easy to resize.
You only need to change:
foundation-chain length
and:
number of rows
Adjusting the Height
The foundation chain determines the height.
Make a chain long enough to measure from:
lower folded brim edge
to:
top of crown
Remember to include approximately:
2 inches / 5 cm
for the folded brim.
If you want extra slouch:
add approximately:
1 inch / 2.5 cm
to the height.
Adjusting the Circumference
Work the four-row repeat until the rectangle reaches the desired circumference.
Because the ribbing stretches, make the unstretched rectangle slightly smaller than the actual head circumference.
Approximate Head Circumference Guide
Newborn
Head circumference:
13–14 inches / 33–35.5 cm
Make the rectangle slightly smaller than this measurement.
0–3 Months
Head circumference:
14–15 inches / 35.5–38 cm
3–6 Months
Head circumference:
15–16 inches / 38–40.5 cm
6–12 Months
Head circumference:
16–18 inches / 40.5–45.5 cm
Toddler
Head circumference:
18–20 inches / 45.5–51 cm
Always prioritize the actual head measurement when available.
If the Hat Is Too Loose
Remove several rows.
Because the ribbing stretches horizontally, even:
2–4 fewer rows
can noticeably change the fit.
Do not try to fix an oversized hat by making the seam extremely tight.
If the Hat Is Too Tight
Add more rows before joining.
Work complete repeat sections when possible so the fringe remains evenly spaced.
If the Hat Is Too Short
Increase the starting chain.
Remember:
the last:
3 working stitches
at the crown side remain slip stitches.
All additional height should be added to the hdc portion.
If the Hat Is Too Tall
Reduce the number of foundation chains.
Do not remove the three crown slip stitches.
If the Ribbing Is Not Visible
Make sure every body stitch is worked:
BLO
Working through both loops creates much flatter fabric.
The strong ribbed effect depends on repeatedly working only into the back loop.
If the Fringe Looks Too Sparse
Add fringe more frequently.
For example, you can make a fringe strand every:
2 rows
instead of every four rows.
Keep in mind that additional fringe also creates more bulk at the crown.
If the Fringe Looks Too Full
Make fringe only once every:
6 rows
or shorten the fringe chain.
For smaller baby sizes, shorter strands may look more proportional.
Shorter Fringe
Instead of:
ch 12
try:
ch 9 or ch 10
Then begin hdc in the third chain from the hook as usual.
Longer Fringe
For a more dramatic top:
ch 14–16
Keep all fringe strands the same chain length.
If the Crown Will Not Close
Check that you maintained:
3 sl sts
at the crown edge throughout the entire rectangle.
These shorter stitches help reduce bulk.
When gathering, make two passes through the crown edge before pulling firmly closed.
If the Seam Is Stiff
Your joining slip stitches may be too tight.
Undo the seam and remake it using relaxed tension.
The join should stretch with the ribbing.
Yarn Ideas
This hat looks beautiful in:
Mustard Yellow
for a cheerful baby hat.
Dusty Blue
for a classic winter look.
Cream
for a soft neutral.
Sage Green
for a modern nursery color.
Rust
for an autumn hat.
Dusty Rose
for a soft feminine version.
Charcoal Gray
for a simple everyday hat.
Make a Matching Set
The same ribbed texture works well for:
- baby scarf
- child scarf
- ribbed mittens
- cowl
- ear warmer
- adult beanie
Using the same yarn creates an easy coordinated winter gift set.
Final Pattern at a Glance
Foundation
Ch 36
Row 1
Starting in 3rd chain:
31 hdc
Then:
3 sl st
Ch 1 and turn.
Row 2
BLO:
3 sl st
Then:
hdc across
Ch 2.
Turn.
Row 3
BLO hdc across.
BLO sl st in final:
3 stitches
Then:
ch 12
Turn.
Row 4
Starting in 3rd chain:
hdc back along fringe chain.
Then:
3 BLO sl st
Then:
BLO hdc across
Ch 2.
Turn.
Row 5
BLO hdc across.
Then:
3 BLO sl st
Ch 1.
Turn.
Repeat
Repeat:
Rows 2–5
until approximately:
41 rows
for the sample size, or until the rectangle reaches the circumference you need.
Assembly
Fold rectangle.
Slip stitch short edges together.
Leave a long yarn tail.
Gather the crown directly beneath the fringe.
Pull tightly closed.
Secure.
Wrap the yarn around the base of the fringe.
Weave in all ends.
Fold the brim upward approximately:
2 inches / 5 cm
The finished hat should have a stretchy ribbed half-double-crochet body, a neat folded brim, and playful fringe strands emerging naturally from the gathered crown, giving you the fun look of a pom-pom without having to make or attach one separately.