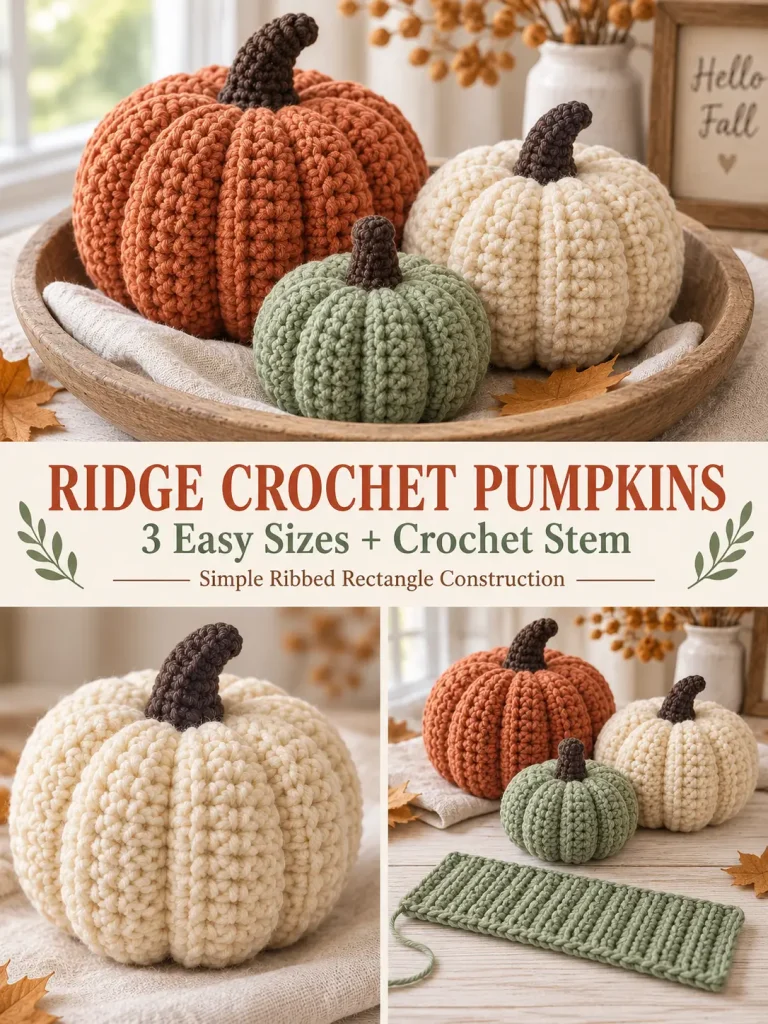
This easy crochet pumpkin is made from a simple ribbed rectangle, then seamed, stuffed, and gently shaped into pumpkin sections.
It is a great fall project because the construction is easy to remember, the finished result looks polished, and you can make several sizes using the same basic method.
For this original version, the pumpkin body is crocheted in back-loop-only single crochet to create clear vertical ridges. The stem is made separately with a smaller hook and then sewn on top.
You can make one pumpkin, or make a whole trio for a shelf, basket, coffee table, or fall centerpiece.
Pattern at a Glance
Skill level: Easy
Terminology: US crochet terms
Construction: Ribbed rectangle, seamed into a tube, stuffed, shaped with yarn wraps, stem sewn on top
Pumpkin body yarn: Aran / worsted-weight yarn
Stem yarn: Lightweight cotton or similar yarn
Hooks: 5 mm for pumpkin body, 3.5 mm for stem
Sizes
This pattern includes 3 sizes:
Small
Approximately 4 inches wide × 3.5 inches tall
Medium
Approximately 5 inches wide × 4.5 inches tall
Large
Approximately 6 inches wide × 5.5 inches tall
Sizes are approximate and may vary depending on yarn, hook, and tension.
Materials
You will need:
- Aran or worsted-weight yarn for the pumpkin body
- Lightweight cotton or smooth yarn for the stem
- 5 mm crochet hook
- 3.5 mm crochet hook
- Fiberfill stuffing
- Yarn needle
- Scissors
- Stitch markers, optional
Suggested Colors
For a soft fall look, try:
- muted pumpkin orange
- terracotta
- rust
- dusty gold
- sage
- cream
- taupe
For the stem, a brown or coffee shade works well.
Abbreviations
- ch = chain
- sc = single crochet
- sl st = slip stitch
- BLO = back loop only
- st = stitch
- sts = stitches
- rep = repeat
Notes
- The pumpkin body is worked in rows.
- All rows after Row 1 are worked in back loops only.
- The ribbing comes from working in BLO.
- The rectangle is folded and seamed along the short edges.
- Then both openings are closed, the pumpkin is stuffed, and the sections are shaped using yarn.
- The stem is worked separately and sewn on at the end.
Size Instructions
Choose one size and follow its counts throughout.
Small Pumpkin
- Chain: 15
- Stitch count per row: 14 sc
- Total rows: 24
Medium Pumpkin
- Chain: 19
- Stitch count per row: 18 sc
- Total rows: 30
Large Pumpkin
- Chain: 23
- Stitch count per row: 22 sc
- Total rows: 36
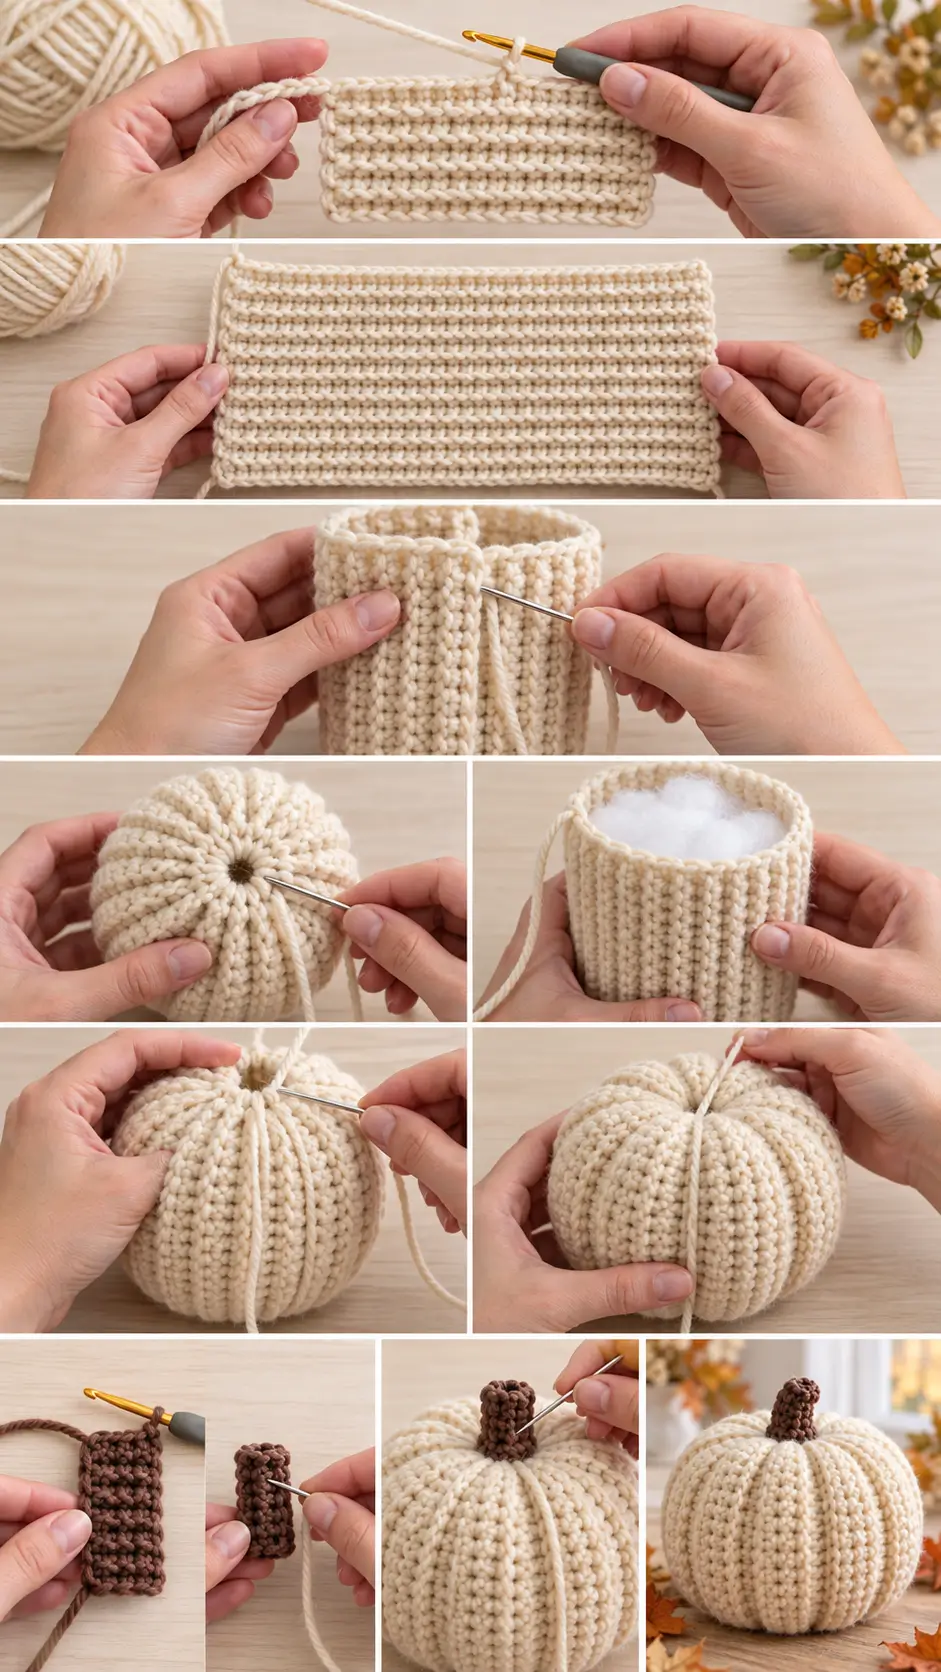
PART 1 — CROCHET THE PUMPKIN RECTANGLE
Using your pumpkin-color yarn and 5 mm hook, make the size you want.
Row 1
Small
Ch 15.
Sc in the second chain from the hook and in each chain across.
You will have 14 sc.
Medium
Ch 19.
Sc in the second chain from the hook and in each chain across.
You will have 18 sc.
Large
Ch 23.
Sc in the second chain from the hook and in each chain across.
You will have 22 sc.
Ch 1, turn.
Row 2
Sc in each stitch across in BLO.
Ch 1, turn.
Remaining Rows
Repeat Row 2 until you reach the total row count for your size:
- Small: 24 rows total
- Medium: 30 rows total
- Large: 36 rows total
Fasten off, leaving a long tail for seaming.
Check the Rectangle
You should now have a ribbed rectangle.
The ribbing should run across the shorter direction of the fabric, so that when the rectangle is turned into a tube, the ridges run vertically up and down the pumpkin.
PART 2 — SEAM THE BODY
Fold the rectangle in half so the short edges meet.
The ribbed lines should stay vertical.
Using the long yarn tail and a yarn needle, sew the two short edges together.
You can use:
- whip stitch
- mattress stitch
- slip stitch seam
Try to keep the seam neat and not too tight.
When finished, you should have a soft ribbed tube.
Secure the seam, but do not cut all yarn tails yet if you want to use one of them for closing an opening.
PART 3 — CLOSE THE BOTTOM
Thread a yarn needle with pumpkin-color yarn.
Working around one opening of the tube, weave the yarn in and out through the edge stitches.
Pull gently to gather the opening closed.
Important:
Do not yank too hard at first.
Pull gradually so the opening closes neatly.
Once the opening is nearly shut:
- push the corners inward if needed
- tighten again
- stitch across the center hole a few times if necessary
Secure well.
This becomes the bottom of the pumpkin.
PART 4 — STUFF THE PUMPKIN
Turn the piece so the seam looks neat on the outside.
Stuff the pumpkin firmly with fiberfill.
The shape should feel full and round, but not hard like a ball.
Try to fill:
- the lower corners
- the side areas
- the top area
so the pumpkin does not collapse later.
A slightly firm stuffing gives the best shape.
PART 5 — CLOSE THE TOP
Using pumpkin-color yarn and a yarn needle, weave in and out around the remaining opening.
Pull gradually to gather the top closed.
Before pulling it fully shut, check the stuffing one last time and add more if needed.
Then tighten the opening.
Stitch across the center a few times to secure the closure.
Do not cut the yarn yet if you want to use it while adjusting the top shape.
Fasten off securely once the top is fully closed.
PART 6 — SHAPE THE PUMPKIN RIDGES
This step creates the pumpkin sections.
Cut a long strand of matching pumpkin yarn.
Use more length than you think you need.
A good starting point is:
- Small: about 45 inches
- Medium: about 55 inches
- Large: about 65 inches
Thread the yarn onto a yarn needle.
Shaping Method
- Insert the needle through the center top of the pumpkin.
- Push it all the way through and bring it out from the center bottom.
- Pull the yarn through, but leave a 6-inch tail at the top.
- Bring the yarn up the outside of the pumpkin and lay it in a straight line over the surface.
- Insert the needle again through the center top and bring it back out the center bottom.
- Pull gently so the yarn wrap begins to indent the pumpkin.
- Repeat this process around the pumpkin, spacing the wraps evenly.
Aim for:
- 6 shaping wraps for Small
- 6 or 7 shaping wraps for Medium
- 8 shaping wraps for Large
Important Tension Tip
The shaping yarn should be snug enough to create sections, but not so tight that the pumpkin becomes squashed or lopsided.
After all wraps are in place:
- adjust the spacing with your fingers
- gently tighten one wrap at a time if needed
When you are happy with the shape, bring the working yarn back to the top center and tie it to the starting tail.
The knot will later be hidden under the stem.
PART 7 — MAKE THE STEM
Using brown yarn and a 3.5 mm hook:
Ch 6.
Stem Row 1
Sc in the second chain from the hook and in each chain across.
You will have:
5 sc
Ch 1, turn.
Stem Rows 2–7
Sc in each stitch across in BLO.
You will still have:
5 sc
Ch 1, turn.
After Row 7, fasten off, leaving a long tail.
Form the Stem
Fold the small stem rectangle so the short ends meet.
Sew the short ends together to form a tiny tube.
You can leave it hollow, or place a tiny bit of stuffing inside if you want a fuller stem.
Flatten the bottom edge slightly with your fingers.
PART 8 — ATTACH THE STEM
Place the stem directly over the top center of the pumpkin, covering the knot from the shaping yarn.
Sew the stem securely around its lower edge.
Make sure it sits upright and centered.
Weave in all remaining ends.
Optional Curved Stem Look
If you want the stem to lean slightly instead of standing perfectly upright, sew one side a little tighter than the other while attaching it.
That creates a gentle natural curve.
Finished Pumpkin
Your finished pumpkin should have:
- visible vertical ribbing
- a round stuffed shape
- clearly defined pumpkin sections
- a separate brown stem
- a soft handmade fall look
Make a Set of 3
These pumpkins look especially good in a grouped display.
A simple set could be:
- 1 Small
- 1 Medium
- 1 Large
You can use the same color for all 3, or choose 3 fall shades.
Good Color Combos
Classic Fall
- pumpkin orange body
- brown stem
Soft Neutral Fall
- cream body
- taupe body
- muted rust body
- brown stems
Modern Autumn
- terracotta
- dusty mustard
- sage
- espresso brown stems
How to Make the Pumpkin Taller
To make the pumpkin taller, increase the starting chain.
That increases the height of the rectangle and therefore the height of the finished pumpkin.
How to Make the Pumpkin Wider
To make the pumpkin wider or fuller, increase the number of rows.
That gives the tube a larger circumference.
Easy Custom Formula
If you want to improvise a different size:
- Choose a starting chain for the height.
- Work rows in BLO sc until the rectangle length looks about 1.5 to 1.75 times the height.
- Seam, stuff, and shape.
A shorter rectangle gives a squatter pumpkin.
A longer rectangle gives a rounder, plumper pumpkin.
What If My Pumpkin Looks Too Flat?
Possible causes:
- not enough stuffing
- too few rows
- shaping yarn pulled too tightly
Try:
- adding more stuffing
- making more rows next time
- loosening the shaping wraps slightly
What If My Pumpkin Looks Too Tall and Narrow?
Possible causes:
- too many chains
- not enough rows
Try:
- reducing the chain count
- increasing the number of rows
What If the Seam Looks Obvious?
That is usually caused by:
- a very tight seam
- mismatched edge stitches
- sewing through the wrong loops
For a cleaner finish, try mattress stitch or a looser whip stitch.
You can also rotate the seam toward the back when displaying the pumpkin.
What If the Top or Bottom Hole Won’t Close Neatly?
After gathering the opening, sew across the little center gap a few times.
You can also push the surrounding stitches inward with the yarn needle as you tighten.
This usually solves the problem.
What If the Shaping Wraps Slide Around?
After tightening them, adjust each wrap so the sections are evenly spaced.
If needed, take one tiny anchoring stitch at the top under the stem or at the bottom to hold a wrap in place.
Can I Use Chunky Yarn?
Yes, but the pumpkin will come out larger and softer-looking.
Use an appropriate hook size for the yarn, and expect the dimensions to change.
Can I Use Velvet or Chenille Yarn?
Yes, but the ribbing will look softer and slightly less defined.
You may also need to be more careful when tightening the shaping yarn because plush yarn can hide the sections.
Can I Add a Leaf or Vine?
Yes.
This pattern is written with a stem only, but you can always add:
- a small crochet leaf
- a twisted green vine
- a loop for hanging
if you want a more decorative finish.
Decorating Ideas
Use your finished pumpkins:
- in a dough bowl
- on a shelf
- in a basket
- as table décor
- on a mantel
- as part of a fall centerpiece
- in a nursery or reading nook for autumn styling
Frequently Asked Questions
Is this worked in the round?
No.
The pumpkin starts as a rectangle worked in rows.
What stitch is used for the body?
Single crochet worked in the back loop only.
Why does BLO help?
Working in the back loop creates the ribbed texture that makes the pumpkin look more dimensional.
Is this beginner-friendly?
Yes.
If you know how to:
- chain
- single crochet
- sew a simple seam
- stuff and shape a soft project
you should be able to make this pumpkin.
Do I have to make the stem with a smaller hook?
It is recommended because the smaller stem looks cleaner and more defined.
But if you prefer, you can use the same hook and simply accept a slightly larger stem.
Final Thoughts
This is one of those crochet projects that looks especially effective compared with how simple the construction really is.
You make a rectangle.
You seam it.
You stuff it.
Then one shaping step transforms it into a pumpkin.
That combination makes it a great fall pattern for:
- quick seasonal crochet
- market makes
- gift baskets
- home décor
- stash yarn projects
Make one in a classic pumpkin shade, or build a whole little patch in soft modern autumn colors.



