Introduction
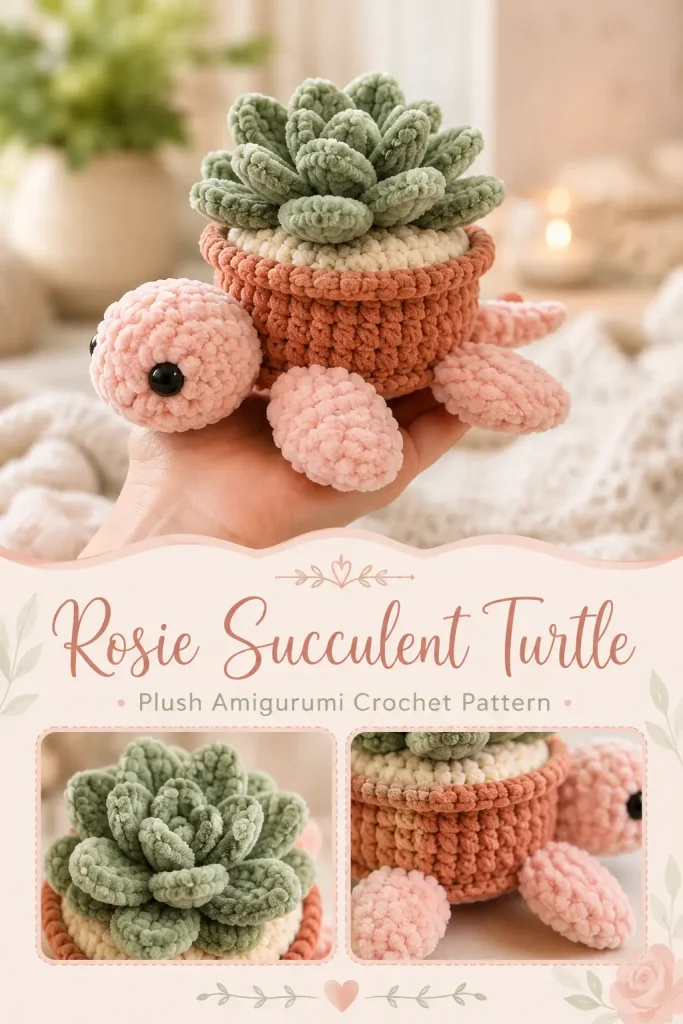
A crochet turtle with a succulent shell is one of those designs that instantly catches attention. It feels soft, playful, and a little unexpected, which makes it perfect for crochet lovers who enjoy plush animals with a creative twist.
This Rosie Succulent Turtle Amigurumi is an original pattern inspired by the idea in your screenshot: a plush turtle with a flowerpot-style shell and leafy succulent on top. The overall idea stays close enough to the working design style, but the construction, stitch counts, shaping, succulent leaves, pot shell, turtle body, and assembly are written fresh so the project is unique and buildable.
The finished turtle has a soft pink plush body, rounded head, four flippers, a tiny tail, a terracotta-style crochet pot shell, a cream “soil” rim, and a layered green succulent growing from the top.
Description
This amigurumi turtle is made in separate pieces and sewn together. The turtle body is soft and rounded, with a large head and paddle-shaped flippers. The shell is designed like a small flowerpot that sits on the turtle’s back, giving the plush a whimsical garden-inspired look.
The succulent is built from layered crochet leaves in dark sage green. The leaves are made in several sizes and sewn in a circular cluster so the top looks full and dimensional. A cream round sits inside the pot as the base for the plant, helping the succulent look neat and secure.
This plush crochet toy is best for confident beginners or intermediate crocheters who are comfortable with amigurumi rounds, sewing pieces together, and shaping small appliqué-style leaves.
Materials
- Super bulky chenille yarn in soft peach-pink for the turtle body
- Super bulky chenille yarn in warm terracotta or dusty clay for the pot shell
- Super bulky chenille yarn in cream or warm ivory for the inner soil/base ring
- Super bulky chenille yarn in dark sage green for the succulent leaves
- Small amount of black yarn for embroidered eyes, or 12 mm safety eyes
- 6 mm crochet hook
- Yarn needle
- Scissors
- Stitch marker
- Polyester fiberfill
- Pins for assembly
Finished Size
Approximate finished size with super bulky chenille yarn:
- Length from head to tail: 10–12 inches
- Width across flippers: 7–8 inches
- Height including succulent shell: 5–6 inches
Finished size may vary depending on yarn, hook size, stuffing, and tension.
Gauge
Gauge is not strict for this plush pattern.
Your stitches should be tight enough to hold stuffing.
If stuffing shows through, use a smaller hook.
If the plush feels too stiff, use a slightly larger hook.
Abbreviations
- MR: magic ring
- ch: chain
- sc: single crochet
- hdc: half double crochet
- dc: double crochet
- inc: increase, 2 sc in same stitch
- dec: invisible decrease
- sl st: slip stitch
- st: stitch
- sts: stitches
- BLO: back loop only
- FLO: front loop only
- FO: fasten off
Pattern Notes
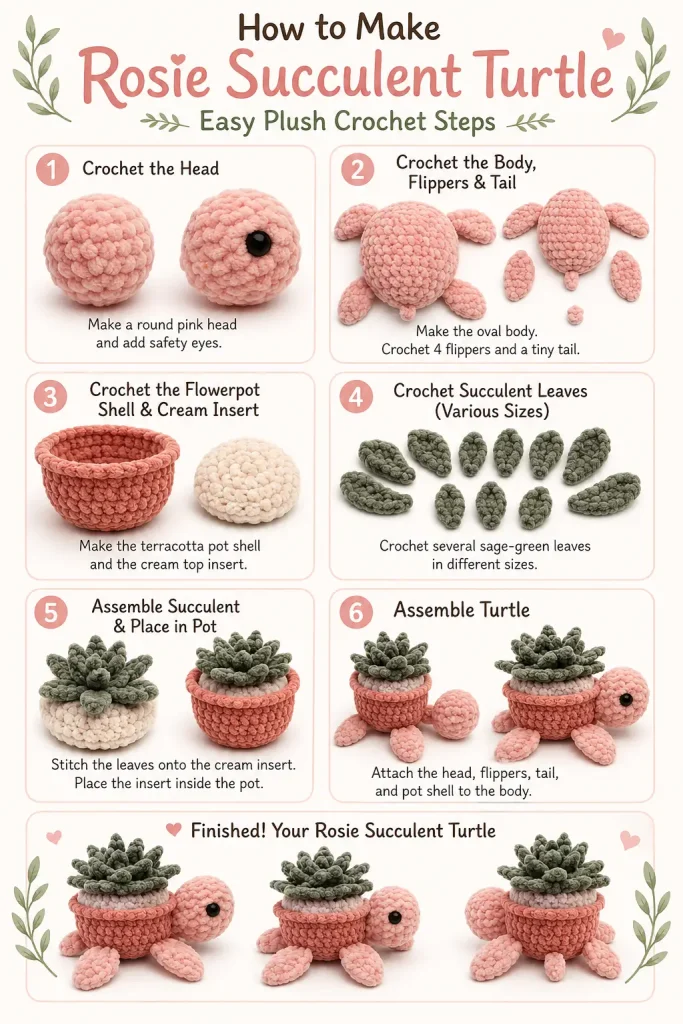
The turtle body, head, flippers, tail, pot shell, soil base, and succulent leaves are made separately.
The shell is lightly stuffed and sewn onto the back of the turtle.
The succulent leaves are sewn onto the cream base before the base is attached inside the pot shell.
Use pins before sewing so the turtle sits evenly.
For baby-safe toys, embroider the eyes instead of using plastic safety eyes.
Step-by-Step Instructions
Turtle Body
Use soft peach-pink yarn.
Round 1
Make a MR.
Work 6 sc into the ring. (6)
Round 2
Inc in each st around. (12)
Round 3
Repeat around: sc in next st, inc in next st. (18)
Round 4
Repeat around: sc in next 2 sts, inc in next st. (24)
Round 5
Repeat around: sc in next 3 sts, inc in next st. (30)
Round 6
Repeat around: sc in next 4 sts, inc in next st. (36)
Rounds 7–10
Sc in each st around. (36)
Round 11
Repeat around: sc in next 4 sts, dec. (30)
Round 12
Repeat around: sc in next 3 sts, dec. (24)
Begin stuffing the body.
Shape it into a soft oval, not a ball.
Round 13
Repeat around: sc in next 2 sts, dec. (18)
Add more stuffing if needed.
Round 14
Repeat around: sc in next st, dec. (12)
Round 15
Dec around. (6)
FO and close the opening.
Shape the body into an oval turtle base.
Head
Use soft peach-pink yarn.
Round 1
Make a MR.
Work 6 sc into the ring. (6)
Round 2
Inc in each st around. (12)
Round 3
Repeat around: sc in next st, inc in next st. (18)
Round 4
Repeat around: sc in next 2 sts, inc in next st. (24)
Rounds 5–8
Sc in each st around. (24)
If using safety eyes, place them between Rounds 6 and 7, about 6 stitches apart.
Round 9
Repeat around: sc in next 2 sts, dec. (18)
Begin stuffing the head firmly.
Round 10
Repeat around: sc in next st, dec. (12)
Round 11
Sc in each st around. (12)
FO, leaving a long tail for sewing.
This creates a short neck area for attaching to the body.
Front Flippers
Make 2 using soft peach-pink yarn.
Round 1
Make a MR.
Work 6 sc into the ring. (6)
Round 2
Inc in each st around. (12)
Round 3
Repeat around: sc in next st, inc in next st. (18)
Rounds 4–5
Sc in each st around. (18)
Round 6
Repeat around: sc in next st, dec. (12)
Do not overstuff.
Flatten the flipper.
Round 7
Sc through both layers across the opening. (6)
FO, leaving a long tail for sewing.
The front flippers should look like soft oval paddles.
Back Flippers
Make 2 using soft peach-pink yarn.
Round 1
Make a MR.
Work 6 sc into the ring. (6)
Round 2
Inc in each st around. (12)
Rounds 3–4
Sc in each st around. (12)
Flatten the opening.
Do not stuff.
Round 5
Sc through both layers across the opening. (6)
FO, leaving a long tail for sewing.
Tail
Use soft peach-pink yarn.
Round 1
Make a MR.
Work 5 sc into the ring. (5)
Round 2
Sc in each st around. (5)
Round 3
Repeat around: sc in next st, inc in next st.
You may end with one extra sc. (7)
Round 4
Sc in each st around. (7)
FO, leaving a long tail for sewing.
The tail should be small and rounded.
Pot Shell
Use warm terracotta yarn.
This piece creates the flowerpot-style shell that sits on the turtle’s back.
Round 1
Make a MR.
Work 6 sc into the ring. (6)
Round 2
Inc in each st around. (12)
Round 3
Repeat around: sc in next st, inc in next st. (18)
Round 4
Repeat around: sc in next 2 sts, inc in next st. (24)
Round 5
Repeat around: sc in next 3 sts, inc in next st. (30)
Round 6
Working in BLO, sc in each st around. (30)
This helps the pot sides turn upward.
Rounds 7–10
Sc in each st around. (30)
Round 11
Repeat around: sc in next 8 sts, dec. (27)
Round 12
Sc in each st around. (27)
FO, leaving a long tail for sewing.
Lightly stuff the pot shell so it holds its rounded pot shape.
Do not overstuff, or it may tilt on the turtle’s back.
Pot Rim
Use terracotta yarn.
Join yarn to any front loop left from Round 6 of the pot shell.
Rim Round 1
Ch 1.
Sc in each front loop around. (30)
Join with sl st.
Rim Round 2
Ch 1.
Hdc in each st around.
Join with sl st.
FO and weave in ends.
This creates a raised lower rim on the pot shell.
Cream Soil Base
Use cream yarn.
This round piece sits inside the top of the pot and holds the succulent leaves.
Round 1
Make a MR.
Work 6 sc into the ring. (6)
Round 2
Inc in each st around. (12)
Round 3
Repeat around: sc in next st, inc in next st. (18)
Round 4
Repeat around: sc in next 2 sts, inc in next st. (24)
Round 5
Sc in each st around. (24)
FO, leaving a long tail for sewing.
This piece should fit just inside the top opening of the pot shell.
Succulent Leaves
Use dark sage green yarn.
You will make three sizes of leaves so the succulent looks layered.
Large Leaves
Make 8.
Leaf
Ch 8.
Sc in 2nd ch from hook.
Hdc in next ch.
Dc in next 3 ch.
Hdc in next ch.
Sc in last ch.
Now work along the opposite side of the chain.
Sc in same last ch.
Hdc in next ch.
Dc in next 3 ch.
Hdc in next ch.
Sc in last ch.
Sl st to finish.
FO, leaving a long tail for sewing.
Medium Leaves
Make 8.
Leaf
Ch 6.
Sc in 2nd ch from hook.
Hdc in next ch.
Dc in next 2 ch.
Hdc in next ch.
Now work along the opposite side of the chain.
Hdc in same end stitch.
Dc in next 2 ch.
Hdc in next ch.
Sc in last ch.
Sl st to finish.
FO, leaving a long tail for sewing.
Small Center Leaves
Make 6.
Leaf
Ch 4.
Sc in 2nd ch from hook.
Hdc in next ch.
Sc in last ch.
Now work along the opposite side.
Hdc in next ch.
Sc in last ch.
Sl st to finish.
FO, leaving a long tail for sewing.
Building the Succulent
Place the cream soil base flat.
Arrange the 8 large leaves around the outside edge like a flower.
The pointed ends should face outward.
Pin them in place.
Sew the base ends of the leaves to the cream circle.
Next, place the 8 medium leaves in a second layer, slightly overlapping the large leaves.
Sew them down near the center.
Finally, place the 6 small leaves upright in the center.
Sew them tightly together so they form a little raised rosette.
The succulent should look full but not too heavy.
Optional Curled Leaf Detail
For a more upgraded look, gently fold a few leaf tips upward and sew a tiny hidden stitch near the base to hold the curve.
Do this only to some leaves so the succulent looks natural.
Face
If you did not use safety eyes, embroider two black eyes on the head between Rounds 6 and 7.
Optional: embroider a tiny curved smile using black yarn.
Optional: add two tiny blush stitches near the cheeks using pale pink yarn.
Keep the face simple and sweet.
Assembly
Pin every piece before sewing.
Attach the Head
Place the head at the front of the body.
The neck opening should sit against the body edge.
Sew around the neck several times until secure.
Angle the head slightly upward.
Attach the Front Flippers
Place one large flipper on each side of the body, slightly behind the head.
Angle them forward and outward.
Sew the flattened edge to the body.
Leave the rounded paddle ends free.
Attach the Back Flippers
Place the smaller flippers near the back sides of the body.
Angle them slightly backward.
Sew securely along the flattened edge.
Attach the Tail
Place the tail at the back center of the body, between the back flippers.
Sew firmly in place.
Attach the Pot Shell
Place the terracotta pot shell on top of the turtle body.
Center it between the head, flippers, and tail.
The pot should sit like a rounded shell on the back.
Pin it in place.
Sew around the bottom edge of the pot shell, attaching it firmly to the turtle body.
Add a little stuffing under the pot before closing the final inch if needed.
Do not overstuff.
Attach the Succulent Top
Place the finished cream soil base with succulent leaves inside the top opening of the pot shell.
Pin evenly.
Sew the cream base to the inner top edge of the pot.
Make sure the succulent is centered and secure.
Finishing
Weave in all yarn tails.
Check every sewn piece.
Make sure the pot shell does not wobble.
Make sure the succulent leaves are firmly attached.
Shape the head and body with your hands.
Gently arrange the leaves so they look layered.
Trim any fuzzy chenille ends carefully.
Size Adjustments
Smaller Turtle
Use worsted weight yarn and a 3.5 mm hook.
The same stitch counts will create a smaller desk-size turtle.
Larger Plush Turtle
Use jumbo chenille yarn and an 8 mm hook.
Add one extra increase round to the body and head if needed.
Taller Pot Shell
Add 1–2 extra straight rounds to the pot shell before fastening off.
Fuller Succulent
Add 4 extra medium leaves and 4 extra small leaves.
Flatter Succulent
Skip the small upright center leaves and sew all leaves flat.
Tips & Variations
Use peach-pink for the turtle body for a soft whimsical look.
Use sage green for the succulent leaves.
Use dusty clay or terracotta for the flowerpot shell.
Use cream yarn inside the pot to make the succulent stand out.
Use mint or lavender leaves for a fantasy succulent version.
Use brown yarn instead of cream for a soil-style center.
Make the pot shell in beige for a softer neutral look.
Use embroidered eyes for a baby-safe plush.
Use safety eyes only for older children or display plushies.
Do not make the succulent too heavy, or the turtle may tip forward.
FAQ
Is this succulent turtle beginner-friendly?
This pattern is best for confident beginners. The stitches are simple, but there are several pieces to sew and the succulent layers need careful placement.
Is this the exact pattern from the screenshot?
No. This is a new original pattern based on the visible idea: a plush turtle with a flowerpot succulent shell. The stitch counts, construction, shell style, succulent leaves, and assembly are original.
What yarn works best?
Super bulky chenille yarn gives the soft plush look. Worsted weight yarn can be used for a smaller version with more stitch definition.
How do I keep the succulent from flopping?
Sew each leaf securely at the base, and layer the leaves tightly around the center. Keep the plant base firmly attached to the pot opening.
Can I make this without the pot shell?
Yes. You can sew the succulent directly onto a regular turtle shell, but the flowerpot shell gives this design its unique garden-inspired look.
Conclusion
The Rosie Succulent Turtle Amigurumi is soft, playful, and full of handmade charm. The peach-pink turtle body, terracotta pot shell, cream base, and layered sage succulent make it feel cute, creative, and perfect for plush lovers who want something different.
This pattern includes every main part of the design: turtle body, head, flippers, tail, pot shell, rim, soil base, layered succulent leaves, face, assembly, and finishing. It is a cozy crochet project that works beautifully as a gift, market plush, nursery decor, or special amigurumi collection piece.



