Introduction
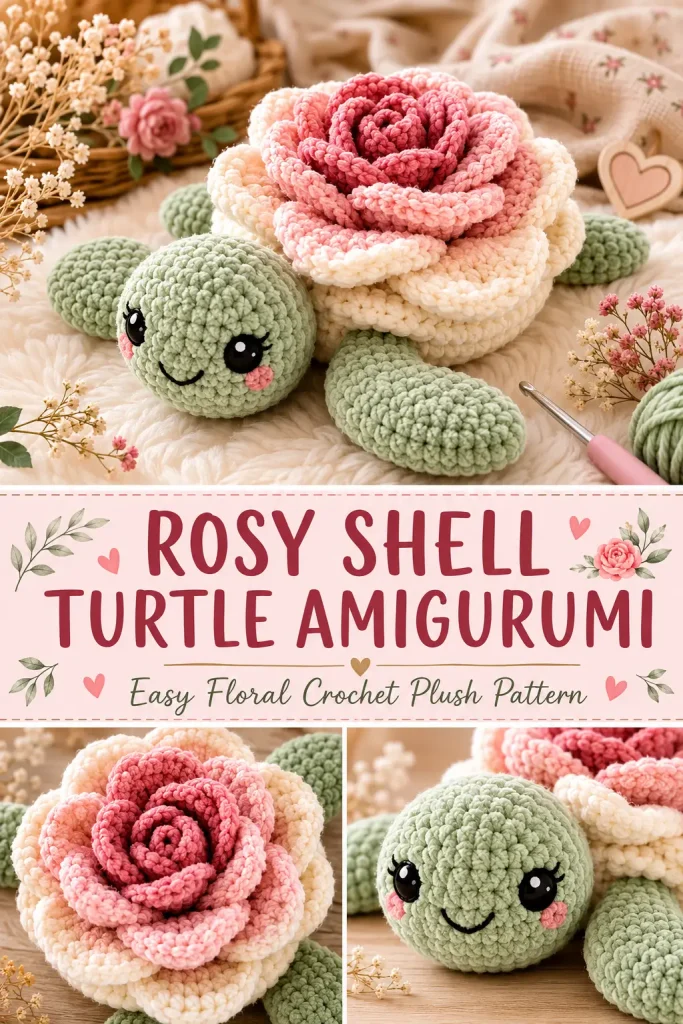
A crochet turtle with a rose shell is such a sweet handmade project because it feels soft, floral, and a little magical. It has the gentle shape of a turtle, but the shell becomes a layered crochet rose, making it perfect for baby gifts, nursery shelves, spring collections, and cute plush markets.
This Rosy Shell Turtle Amigurumi is an original crochet pattern inspired by the idea of a flower-shell turtle, but the construction, colors, stitch counts, and shaping are made unique for this design. The turtle has a soft sage green head and flippers, a warm ivory body, and a layered blush rose shell made from simple crochet strips.
The pattern is realistic to make with plush yarn. The shapes are simple, the rose is built from beginner-friendly curled strips, and the finished turtle looks detailed without being impossible to crochet.
Description
The finished turtle has a round ivory shell body with four soft green flippers, a small tail, and a rounded sage green head. On top of the shell sits a large layered rose made in three soft shades: warm ivory, pale blush, and dusty rose. The flower layers are sewn from the outside toward the center so the rose looks full and dimensional.
The texture is plush and cuddly when made with chenille yarn. The body is rounded and low like a turtle, while the flower shell adds a soft romantic look. This easy amigurumi pattern works beautifully as a handmade stuffed animal toy, nursery decoration, spring plush, baby shower gift, or cottagecore crochet project.
For a child-safe version, embroider the eyes instead of using plastic safety eyes.
Materials
- Super bulky chenille yarn in soft sage green for the head, flippers, and tail
- Super bulky chenille yarn in warm ivory for the turtle body and outer rose petals
- Super bulky chenille yarn in pale blush for the middle rose petals
- Super bulky chenille yarn in dusty rose for the inner rose petals
- Small amount of black yarn or embroidery thread for eyes, or 12 mm safety eyes
- 6 mm crochet hook
- Yarn needle
- Stitch marker
- Scissors
- Polyester fiberfill
- Pins for assembly
Finished Size
Approximate finished size using super bulky chenille yarn:
- Length from head to tail: 10–12 inches
- Width across flippers: 8–9 inches
- Height including rose shell: 5–6 inches
Finished size may vary depending on yarn thickness, hook size, and stuffing.
Gauge
Gauge is not critical for this plush, but your stitches should be tight enough to hold stuffing securely.
If stuffing shows through, use a smaller hook.
Abbreviations
- MR: magic ring
- ch: chain
- sc: single crochet
- hdc: half double crochet
- dc: double crochet
- inc: increase, 2 sc in the same stitch
- dec: invisible decrease
- sl st: slip stitch
- st: stitch
- sts: stitches
- FO: fasten off
Pattern Notes
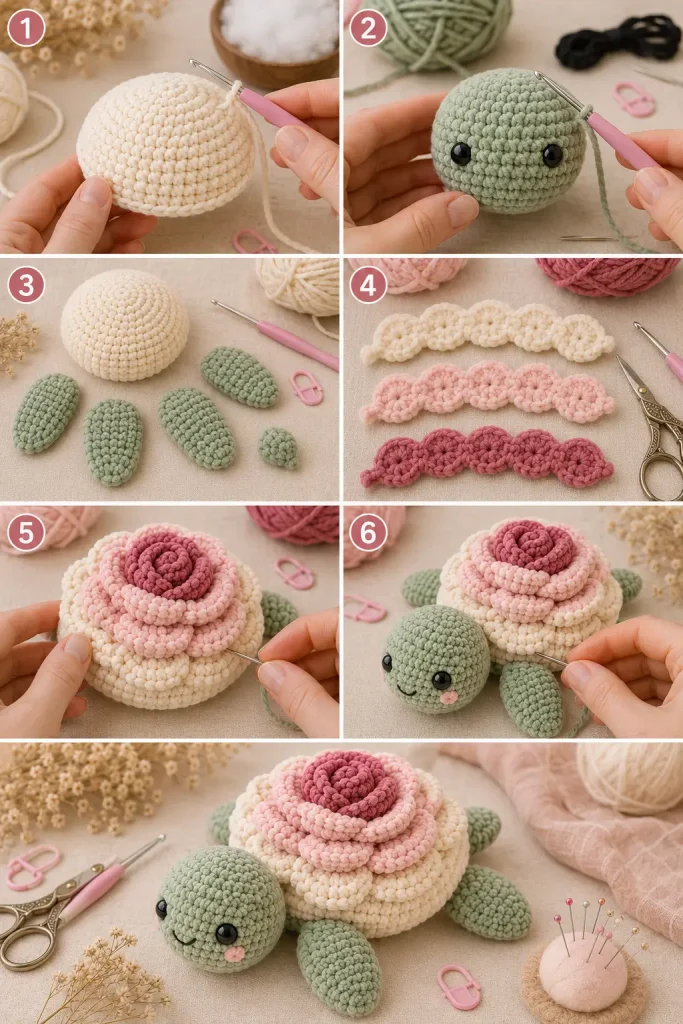
This turtle is worked in separate pieces and sewn together.
The body is made as a rounded shell base.
The rose shell is made from crochet petal strips that are curled and sewn onto the top of the body.
The head, flippers, and tail are made separately and sewn to the body.
Use a stitch marker to mark the first stitch of each round.
Stuff the body and head firmly, but keep the flippers lightly stuffed or unstuffed so they stay soft and flexible.
For young children, embroidered eyes are safer than safety eyes.
Step-by-Step Instructions
Shell Body
Use warm ivory yarn and a 6 mm hook.
Round 1
Make a MR and work 6 sc into the ring. (6)
Round 2
Inc in each st around. (12)
Round 3
Repeat around: sc in next st, inc in next st. (18)
Round 4
Repeat around: sc in next 2 sts, inc in next st. (24)
Round 5
Repeat around: sc in next 3 sts, inc in next st. (30)
Round 6
Repeat around: sc in next 4 sts, inc in next st. (36)
Rounds 7–10
Sc in each st around. (36)
Round 11
Repeat around: sc in next 4 sts, dec. (30)
Round 12
Repeat around: sc in next 3 sts, dec. (24)
Begin stuffing the body. Shape it into a low rounded dome.
Round 13
Repeat around: sc in next 2 sts, dec. (18)
Round 14
Repeat around: sc in next st, dec. (12)
Add more stuffing if needed.
Round 15
Dec around. (6)
FO and close the opening.
Gently flatten the bottom of the body with your hands so the turtle can sit nicely.
Head
Use soft sage green yarn and a 6 mm hook.
Round 1
Make a MR and work 6 sc into the ring. (6)
Round 2
Inc in each st around. (12)
Round 3
Repeat around: sc in next st, inc in next st. (18)
Round 4
Repeat around: sc in next 2 sts, inc in next st. (24)
Rounds 5–8
Sc in each st around. (24)
If using safety eyes, place them between Rounds 6 and 7, about 5 stitches apart.
Round 9
Repeat around: sc in next 2 sts, dec. (18)
Begin stuffing the head.
Round 10
Repeat around: sc in next st, dec. (12)
FO, leaving a long tail for sewing.
Do not close the opening completely. This makes it easier to sew the head to the front of the body.
Front Flippers
Make 2 using soft sage green yarn.
Round 1
Make a MR and work 6 sc into the ring. (6)
Round 2
Inc in each st around. (12)
Round 3
Repeat around: sc in next st, inc in next st. (18)
Rounds 4–5
Sc in each st around. (18)
Round 6
Repeat around: sc in next st, dec. (12)
Flatten the flipper.
Sc through both layers across the opening to close. (6)
FO, leaving a long tail for sewing.
Do not stuff heavily. The flippers should stay soft and slightly flat.
Back Flippers
Make 2 using soft sage green yarn.
Round 1
Make a MR and work 6 sc into the ring. (6)
Round 2
Inc in each st around. (12)
Rounds 3–4
Sc in each st around. (12)
Flatten the flipper.
Sc through both layers across the opening to close. (6)
FO, leaving a long tail for sewing.
Tail
Use soft sage green yarn.
Round 1
Make a MR and work 5 sc into the ring. (5)
Rounds 2–4
Sc in each st around. (5)
FO, leaving a long tail for sewing.
Do not stuff the tail.
Outer Rose Petal Strip
Use warm ivory yarn.
This will be the largest rose layer.
Row 1
Ch 61.
Sc in the 2nd ch from hook and in each ch across. (60)
Ch 1, turn.
Row 2
Repeat across:
Sl st in next st, skip next st, 5 dc in next st, skip next st.
You should have 15 large scalloped petals.
FO, leaving a long tail for sewing.
Middle Rose Petal Strip
Use pale blush yarn.
Row 1
Ch 49.
Sc in the 2nd ch from hook and in each ch across. (48)
Ch 1, turn.
Row 2
Repeat across:
Sl st in next st, skip next st, 5 dc in next st, skip next st.
You should have 12 medium scalloped petals.
FO, leaving a long tail for sewing.
Inner Rose Petal Strip
Use dusty rose yarn.
Row 1
Ch 37.
Sc in the 2nd ch from hook and in each ch across. (36)
Ch 1, turn.
Row 2
Repeat across:
Sl st in next st, skip next st, 4 dc in next st, skip next st.
You should have 9 smaller scalloped petals.
FO, leaving a long tail for sewing.
Rose Center Bud
Use dusty rose yarn.
Row 1
Ch 25.
Sc in the 2nd ch from hook and in each ch across. (24)
Ch 1, turn.
Row 2
Work 2 sc in each st across. (48)
FO, leaving a long tail.
The strip will curl naturally. Roll it tightly into a small rosebud and sew through the bottom layers to secure it.
Building the Rose Shell
Place the warm ivory outer petal strip on top of the shell body.
Start near the outer edge of the shell and curve the strip around in a loose spiral.
Pin it in place first.
Sew the bottom edge of the strip securely to the shell body, leaving the scalloped petals raised.
Next, place the pale blush middle petal strip inside the ivory layer.
Curve it into a smaller spiral and sew it down securely.
Place the dusty rose inner petal strip inside the blush layer.
Sew it down in the same way.
Finally, place the dusty rose center bud in the middle of the flower.
Sew the center bud firmly to the shell.
Shape the petals gently with your fingers so they look layered and full.
Face
If you did not use safety eyes, embroider two small black oval eyes on the front of the head between Rounds 6 and 7.
Optional: Add a tiny stitched smile with black embroidery thread.
Keep the face simple so the rose shell stays the main feature.
Assembly
Place the shell body flat with the rose facing upward.
Sew the head to the front of the body, slightly under the front edge of the shell.
Sew the two front flippers to the front sides of the body.
Sew the two back flippers to the back sides of the body.
Sew the tail to the back center of the body.
Check that the turtle sits evenly.
Weave in all remaining ends securely.
Gently shape the head, flippers, tail, and rose shell with your hands.
Finishing
Make sure the rose shell is firmly attached to the body.
Check every flipper and the head attachment.
Trim any visible yarn tails.
Lightly fluff the chenille petals with your fingers.
Do not over-brush chenille yarn, as it can shed.
Tips & Variations
Use sage green for a soft natural turtle look.
Use ivory, blush, and dusty rose for a romantic rose shell.
For a brighter spring version, use mint green with peach and coral petals.
For a cottagecore version, use olive green with cream, mauve, and terracotta petals.
For a simpler turtle, make only two rose layers instead of three.
For a fuller flower shell, add one extra petal strip using a longer starting chain.
If your rose strips feel too floppy, use a slightly smaller hook.
If your shell looks too tall, sew the rose layers flatter against the body.
For a child-safe plush, embroider the eyes and sew every piece firmly.
FAQ
Is this rose turtle beginner-friendly?
This pattern is best for confident beginners. The turtle pieces use simple amigurumi shapes, and the rose shell is made from easy crochet strips. The most important part is careful sewing and shaping.
What yarn works best for this plush turtle?
Super bulky chenille yarn gives the softest plush result. You can also use worsted weight yarn with a smaller hook for a smaller amigurumi turtle.
Can I make the rose shell smaller?
Yes. Use only the middle and inner rose strips, or reduce the starting chain length for each strip.
Can I make this turtle without safety eyes?
Yes. Embroidered eyes are a great option, especially for young children.
How do I keep the rose petals from falling flat?
Sew only the lower edge of each petal strip to the shell and leave the scalloped edges loose. Shape the petals gently after assembly.
Conclusion
The Rosy Shell Turtle Amigurumi is a soft, floral crochet plush with a sweet turtle shape and a beautiful layered rose shell. It is unique, giftable, and full of handmade charm while still being realistic to crochet.
Make it in soft sage, ivory, blush, and dusty rose for a gentle cottagecore look, or try brighter colors for a playful spring turtle. This easy amigurumi pattern is perfect for handmade gifts, nursery decor, plush collections, and anyone who loves cute crochet animals with a floral twist.



