Scallop Flap Crochet Wallet Pattern
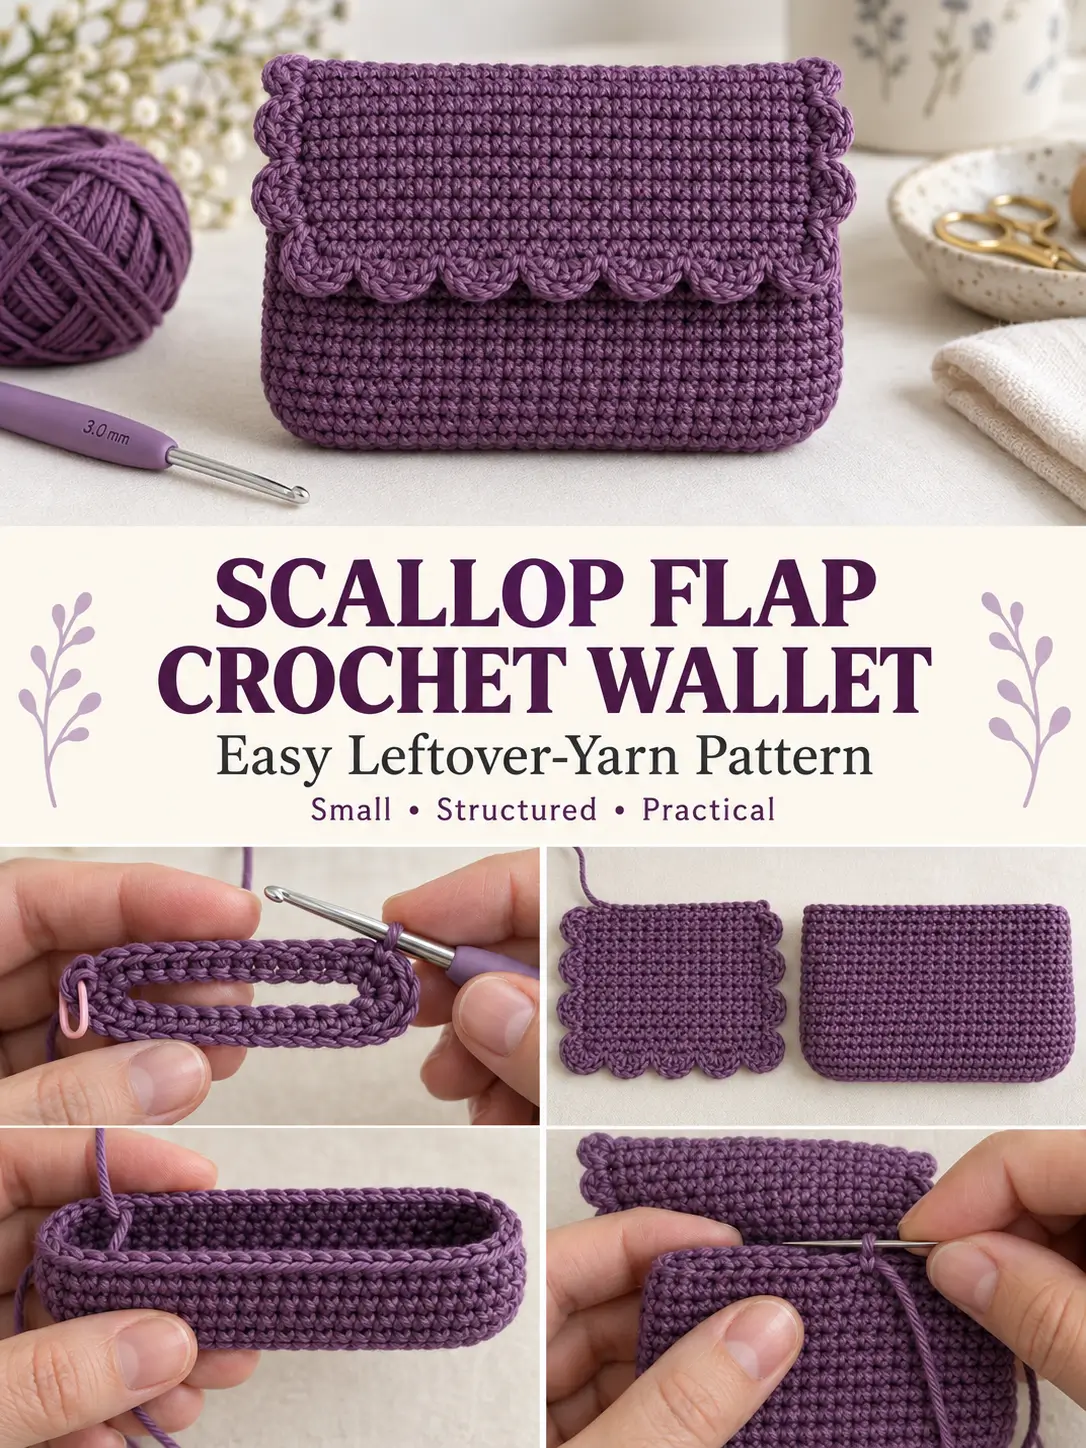
This small crochet wallet turns a modest amount of leftover cotton yarn into a practical little pouch for cards, coins, earbuds, stitch markers, or other small essentials.
The construction is deliberately simple. The main wallet begins with an oval base worked around both sides of a foundation chain, then continues upward in single crochet without seaming. A separate rectangular flap is crocheted flat and finished with a decorative shell edge before being sewn securely to the back of the pouch.
Using thin cotton or macramé-style cotton with a 3 mm hook gives the wallet enough structure to hold its shape while still keeping the fabric flexible.
Pattern at a Glance
Skill level: Advanced beginner
Terminology: US crochet terms
Construction: Seamless oval-bottom pouch + separately crocheted flap
Finished size: Approximately 4¼ inches wide × 3 inches high × ¾ inch deep
Flap: Approximately 3¼ inches wide × 2¾ inches long before edging
Yarn: Thin cotton or fine macramé cotton
Hook: 3 mm
Main stitch: Single crochet
Main body stitch count: 40 sts
Flap: 16 sts × 14 rows
Edging: Decorative 5-dc shells
Yarn required: Approximately 40–50 g
Materials
You will need:
- 40–50 g thin cotton or fine macramé cotton
- 3 mm crochet hook
- yarn needle
- scissors
- stitch marker
- measuring tape
Optional:
- small sew-on snap or magnetic snap
- small handmade label
- contrasting yarn for edging
A firm cotton yarn is ideal because it gives the little wallet more structure than a very soft acrylic yarn.
Suggested Yarn
Look for a smooth cotton that works comfortably with a 3 mm hook.
The yarn should be thin enough to create compact stitches without making the pouch stiff.
Good choices include:
- fine macramé cotton
- sport-weight cotton
- light DK cotton
- tightly spun cotton blend
If the yarn is substantially thicker, the finished wallet will be larger.
Suggested Colors
This little project works especially well in rich solid shades.
Try:
- plum
- lavender
- dusty rose
- burgundy
- sage
- cream
- mustard
- terracotta
- charcoal
Because the project uses only about 40–50 g, it is a useful way to use leftover yarn from larger projects.
Finished Measurements
With the recommended yarn and hook, the wallet measures approximately:
4¼ inches wide
3 inches high
¾ inch deep
The flap measures approximately:
3¼ inches wide × 2¾ inches long
before the decorative shell edging.
Exact dimensions depend on your yarn and tension.
Gauge
Approximately:
20 sc × 20 rows = 4 inches
Gauge does not need to be exact, but it affects whether the pouch comfortably holds standard cards.
If you want to use it as a card wallet, check that the finished interior width is at least approximately:
3½ inches
before attaching the flap.
Abbreviations
- ch = chain
- sc = single crochet
- dc = double crochet
- sl st = slip stitch
- BLO = back loop only
- st = stitch
- sts = stitches
- rep = repeat
Important Pattern Notes
The body is worked in joined rounds.
The beginning ch-1 does not count as a stitch.
Place a stitch marker in the first stitch of each round if needed.
The foundation chain is worked on both sides to form an oval.
After the base increases are complete, the stitch count remains:
40 stitches
throughout the body.
The flap is worked separately in flat rows.
The flap is slightly narrower than the wallet body so the decorative shell edge remains visible.
How the Wallet Is Constructed
There are three main parts:
- Crochet a small oval base.
- Continue upward in single crochet to create the pouch.
- Crochet a rectangular flap, add scalloped edging, and sew it to the back.
There are no side seams in the main wallet.
That makes the pouch sturdy and gives the bottom neat rounded corners.
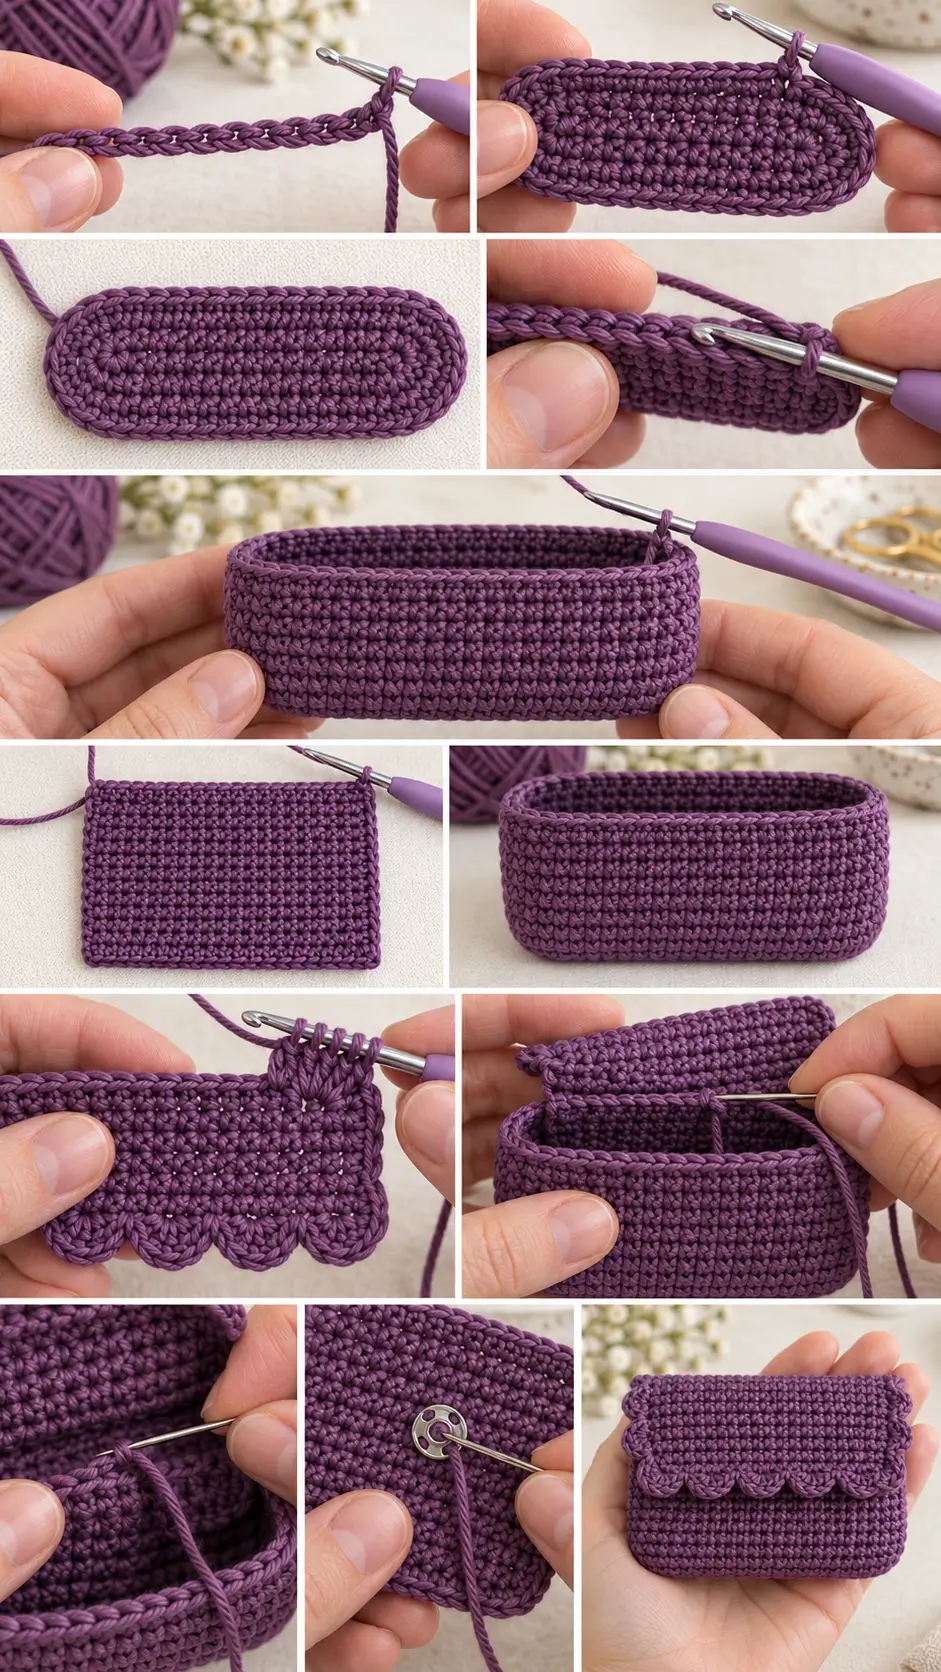
Part 1 — Crochet the Wallet Body
Using the 3 mm hook:
Ch 17.
Try to keep the foundation chain relaxed.
Round 1
Sc in the second chain from the hook.
Sc in each of the next 14 chains.
Work:
3 sc in the final chain.
Rotate the foundation chain so you can work along the unused loops on the opposite side.
Sc in the next 14 chains.
Work:
2 sc in the final remaining chain.
Join with sl st to the first sc.
34 sts
Checkpoint
The work should now resemble a narrow oval.
One end may appear slightly broader than the other at this stage. The next increase round will balance the shape.
Round 2 — Increase the Base
Ch 1.
Work:
2 sc in first st.
Sc in next 14 sts.
Work:
2 sc in each of next 3 sts.
Sc in next 14 sts.
Work:
2 sc in each of final 2 sts.
Join.
40 sts
The oval should now lie fairly flat.
Check the Base
Your base should have:
- two rounded ends
- two nearly straight sides
- no severe cupping
- no large ruffles
Minor curling is normal.
Round 3 — Create the Bottom Ridge
Ch 1.
Working in the BLO:
Sc in every stitch around.
Join.
40 sts
This round creates a subtle ridge where the flat base ends and the vertical wallet sides begin.
Rounds 4–15 — Build the Wallet
Ch 1.
Sc in every stitch around.
Join after each round.
40 sts each round
Continue through:
Round 15
The pouch should now measure approximately 3 inches high, depending on your gauge.
Important
Do not increase during these rounds.
The wallet sides should rise almost straight upward.
If your stitch count changes, the pouch may become wider or narrower toward the opening.
Count periodically to confirm:
40 sts
Round 16 — Opening Edge
Ch 1.
Sl st loosely in every stitch around.
Join.
Fasten off.
The slip-stitch round creates a firm, clean opening.
Do not work it tightly or the opening may pull inward.
Check the Main Pouch
Flatten the wallet gently.
It should measure approximately:
4–4¼ inches across
and:
about 3 inches high
The oval bottom gives it a little natural depth without requiring a separate gusset.
Part 2 — Crochet the Wallet Flap
Using the same yarn:
Ch 17.
Flap Row 1
Sc in second ch from hook.
Sc across.
16 sc
Ch 1.
Turn.
Rows 2–14
Sc in every stitch across.
16 sc
Ch 1 and turn after each row.
After completing Row 14:
Do not fasten off.
The flap should measure approximately:
3¼ inches wide × 2¾ inches long
depending on gauge.
Check the Flap Size
Lay the flap against the front of the pouch.
It should cover most of the front without extending significantly beyond the sides.
A little space should remain visible at each side of the flap.
Part 3 — Prepare the Flap Edge
The top edge of the flap will eventually be sewn to the back of the wallet.
Only the other three sides receive decorative edging.
After Row 14:
Ch 1.
Rotate the work.
First Side
Work approximately:
14 sc
evenly down the row ends.
Place roughly one sc into each row end.
Bottom Edge
Work:
16 sc
evenly across the unused foundation loops.
Second Side
Work approximately:
14 sc
evenly up the opposite row ends.
You should now have approximately:
44 sc
around the three free edges.
Do not crochet across the top attachment edge.
Fasten off.
Part 4 — Decorative Scallop Edge
Join yarn at the upper corner of one side edge.
The shell edging is worked around the:
- first side
- bottom
- second side
but not across the attachment edge.
Repeat:
Sl st in next st, skip next st, 5 dc in next st, skip next st.
Continue this sequence around the three free edges.
At each lower corner, adjust the spacing by one stitch if necessary so a shell sits comfortably around the curve.
Finish with a sl st near the opposite upper corner.
Fasten off.
What the Flap Should Look Like
The flap should now have:
- straight unedged attachment edge
- small scallops along both sides
- scallops across the lower edge
- slightly decorative rounded corners
The shells should lie reasonably flat rather than ruffling dramatically.
If the Shell Edge Ruffles
Your double crochet stitches may be too loose or your shells may be too close together.
Try:
- using only 4 dc per shell
- skipping an extra stitch occasionally
- using a 2.75 mm hook for the shell edging
If the Shell Edge Pulls Tight
Your shells may be spaced too far apart.
Reduce the number of skipped stitches slightly around the curved corners.
Part 5 — Attach the Flap
Lay the finished pouch flat with the back facing upward.
Place the straight, unedged top of the flap approximately:
½ inch below the wallet opening
on the back.
Center it carefully.
The flap should extend over the opening and fold naturally toward the front.
Sew the Flap
Thread a yarn needle with matching yarn.
Sew the straight upper edge of the flap securely to the pouch.
Use a backstitch or firm whipstitch.
Catch both:
- flap edge
- back layer of the wallet
Do not sew through to the front of the pouch.
Work across the entire 16-stitch flap edge.
Secure the yarn firmly and weave in the tail.
Check the Flap Position
Fold the flap forward.
It should:
- cover the wallet opening
- sit centered
- reach well down the front
- remain slightly narrower than the pouch
- display the scalloped edge clearly
If the flap twists toward one side, remove the seam and re-center it before continuing.
Optional Snap Closure
The flap can simply fold over naturally, but a small snap makes the wallet more secure for coins or cards.
A small sew-on snap is the easiest option.
Position the Snap
Fold the flap closed.
Mark where the center of the flap meets the pouch front.
Sew:
- one half of the snap to the inside of the flap
- the matching half to the wallet front
Take care not to distort the crochet fabric.
Use matching sewing thread for the neatest result.
Optional Yarn Loop Closure
If you prefer not to use hardware, make a small yarn loop.
At the center of the lower flap edge:
Join yarn.
Ch approximately:
6–8
depending on button size.
Sl st back into the same location.
Fasten off.
Sew a button securely to the wallet front.
For items intended for young children, avoid detachable buttons.
Optional Plain Flap
The scallops are decorative rather than structural.
For a simpler wallet, skip the shell round completely.
After working the sc border around three sides, fasten off and attach the flap.
This creates a clean minimalist finish.
Optional Contrasting Scallop Edge
Make the body and flap in one color, then use a second color for the shells.
Good combinations include:
- cream + rust
- lavender + plum
- sage + cream
- blush + burgundy
- navy + pale blue
Because the shells use very little yarn, this is an easy way to use tiny leftovers.
Finishing
Weave in every yarn tail thoroughly.
For a wallet that will receive regular use, weave each tail:
- through several stitches
- back in the opposite direction
- through another section
Then trim.
Pay extra attention to the flap attachment because it will experience repeated movement.
Light Blocking
Cotton generally responds well to light blocking.
Dampen the wallet gently.
Shape:
- body
- bottom
- flap
- scallops
Allow it to dry completely.
Do not stretch the opening.
Making the Wallet Wider
The width is controlled primarily by the foundation chain.
The written version begins with:
Ch 17.
For a slightly wider pouch:
Ch 19 or Ch 21
Then work the same oval-base concept:
- sc along the foundation
- several stitches in the final chain
- sc back along the other side
- increase evenly around both rounded ends
Once the base is wide enough, work the body straight without increases.
Card Wallet Size
For standard bank or credit cards, aim for an internal width of at least:
3½ inches
A finished outer width of approximately:
4–4¼ inches
gives the cards enough room without making the wallet bulky.
Always test a card before sewing on the flap.
Coin Purse Version
For a compact coin purse:
Start with approximately:
Ch 13–15
and work fewer body rounds.
Aim for approximately:
3½ inches wide × 2½ inches high.
Make the flap proportionally smaller.
Larger Accessory Pouch
For earbuds, cables, lipstick, or small crochet notions:
Start with:
Ch 21–25
and continue the body until it reaches approximately:
4 inches high.
Make a wider flap that covers approximately three-quarters of the front.
Crochet Hook Pouch
Make the foundation much longer and keep the pouch shallow.
For example, begin with approximately:
Ch 31–35
depending on your yarn and hook size.
The same oval-bottom construction can become a small travel pouch for crochet hooks.
One-Color Version
Making the entire wallet in one solid shade keeps the scalloped texture as the main decorative feature.
Rich colors work particularly well:
- plum
- forest green
- chocolate
- burgundy
- navy
- rust
Scrap-Yarn Version
Use:
Main Color
Body
Second Color
Flap
Third Color
Shell edging
Because each section is small, this project is excellent for partial cotton balls left from larger projects.
Stripe Version
For a striped body:
Change colors every:
2–3 rounds
after Round 3.
Keep the flap solid or use one of the stripe colors.
Carrying yarn upward inside the pouch can reduce the number of ends if the stripes are narrow.
Why Is My Base Cupping?
The most common causes are:
- missing increases
- tight tension
- hook too small
Check Round 2 carefully.
The base should contain:
40 stitches
after all increases.
If the oval still cups strongly, try a 3.25 mm hook.
Why Is My Base Ruffling?
Possible causes include:
- very loose tension
- yarn thinner than expected
- accidental extra increases
Check that Round 2 contains exactly:
40 stitches
and that Round 3 contains no increases.
Why Is My Wallet Getting Wider?
After Round 2, there should be no more increases.
Rounds 3–15 should always contain:
40 stitches
Make sure you are not accidentally crocheting into the joining slip stitch.
That can add one stitch every round.
Why Is My Wallet Getting Narrower?
You may be skipping:
- first stitch
- final stitch
after joining.
Place a marker in the first stitch of each round.
Count periodically.
Why Does the Opening Pull Inward?
The final slip-stitch round is probably too tight.
Undo it and work the slip stitches much more loosely.
You can also use a:
3.5 mm hook
for only the final round.
Why Does My Flap Curl?
A little curling is normal with dense cotton crochet.
Light blocking usually solves it.
If it curls heavily:
- use slightly looser tension
- use a 3.25 mm hook for the flap
- block before attaching
Why Doesn’t My Flap Sit in the Center?
Always center the flap before sewing.
Count the pouch stitches or visually mark the center back with a stitch marker.
Pin both flap corners before sewing the top edge.
Why Are My Scallops Uneven?
The side edges of the flap are worked into row ends rather than regular stitches, so spacing may require minor adjustment.
Concentrate on making the shells:
- evenly sized
- visually spaced
- symmetrical from left to right
It is more important for the edging to look balanced than to force a shell into an awkward location.
Can I Use Acrylic Yarn?
Yes, but acrylic will usually create a softer pouch.
If you want the wallet to remain structured, choose:
- cotton
- cotton blend
- firm acrylic
A fabric lining can also add structure.
Can I Use DK Yarn?
Yes.
A smooth DK cotton is an excellent choice.
Check your base width before continuing because not all DK yarns have the same thickness.
Can I Use Thicker Macramé Cord?
Yes, but the wallet will become much larger.
Try a hook recommended for the cord and reduce the starting chain if necessary.
Make a base first and measure it before continuing.
Optional Fabric Lining
A lining is useful if you plan to store:
- coins
- earrings
- stitch markers
- other tiny items
Measure the finished pouch before cutting fabric.
Cut two fabric rectangles slightly smaller than the front and back.
Sew them together around:
- sides
- bottom
Leave the top open.
Turn the fabric lining right side out.
Insert it into the crochet wallet.
Fold the upper raw edge inward and hand-sew it around the inside of the opening.
Keep the stitches hidden from the outside.
Can I Sell Finished Wallets?
Small cotton wallets are practical craft-fair projects because:
- they use little yarn
- they are quick to make
- colors are easy to customize
- they can be sold individually or as gift sets
If selling finished pieces, calculate your own material and labor costs rather than relying only on the small amount of yarn used.
Gift Set Ideas
Pair the wallet with another small crochet project such as:
- keychain
- coin pouch
- crochet flower
- sunglasses case
- card holder
- small makeup pouch
Using coordinating colors makes the pieces feel like one complete handmade set.
Final Thoughts
The wallet uses a very simple construction:
crochet around a foundation chain
→ increase to create the oval bottom
→ work straight upward for the pouch
→ make a flat rectangular flap
→ finish the flap with shells
→ sew it securely to the back
There are no complicated seams or shaping techniques, and the entire project uses only a small amount of cotton yarn.
That makes it an especially useful leftover-yarn project when you want to turn a partial ball into something small, structured, and practical.