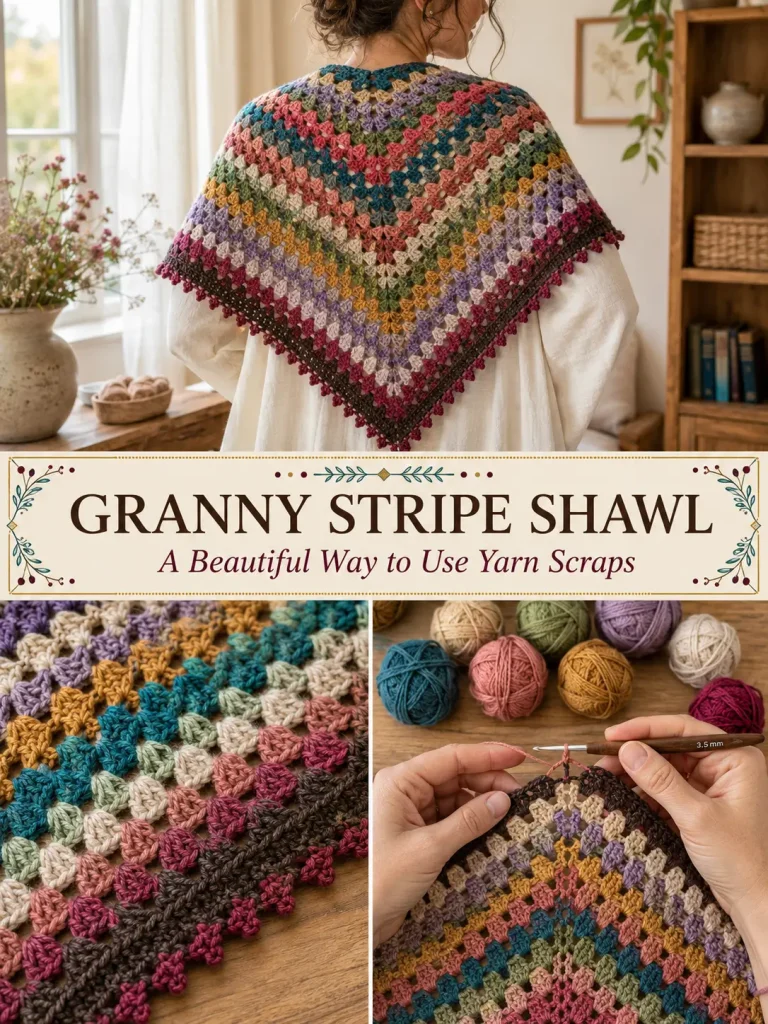
This colorful granny stripe shawl is one of my favorite ways to turn small leftover yarn balls into something that actually feels intentional.
Instead of trying to match every scrap perfectly, the shawl uses a dark neutral edge with rows of dusty rose, teal, sage, mustard, lavender, cream, berry, and soft coral.
The construction is simple once the first few rows are established.
You begin at the center top and work downward. Every new row adds granny clusters at the outer edges and around the center space, so the shawl becomes wider and deeper automatically.
There is:
- no sewing
- no separate motifs
- no complicated shaping
- no fixed number of rows
- no need for perfectly matching scraps
Finish when the shawl reaches the size you want, then add a neat espresso border and a contrasting berry picot edge.
Pattern at a Glance
Skill level: Confident beginner
Terminology: US crochet terms
Construction: Top-down, worked flat in rows
Shape: Wide triangle
Main stitch: 3-double-crochet granny clusters
Suggested yarn: Fingering / sock weight
Hook: 3.5 mm
Finished sample: Approximately 68–72 inches across and 23–25 inches deep after blocking
Yarn needed: Approximately 850–1,000 yards total, depending on size and gauge
Gauge is not critical because the shawl can be stopped at any size.
Color Palette
For this version, use a softer, coordinated scrap palette instead of a completely random rainbow.
Try:
- deep teal
- dusty rose
- muted coral
- moss green
- pale sage
- antique gold
- lavender
- berry
- soft blue
- oatmeal
- mushroom beige
For the border:
Espresso brown
For the final picot:
Deep berry
You can substitute any scraps you already have.
Materials
You will need:
- Fingering-weight yarn scraps in assorted colors
- Approximately 80–120 yards of espresso yarn for the first border
- Approximately 50–80 yards of berry yarn for the decorative edge
- 3.5 mm crochet hook
- Yarn needle
- Scissors
- Stitch markers, optional
- Blocking mats and pins, optional
Try to use yarns with reasonably similar thickness.
A slight difference between fingering-weight scraps is fine.
Abbreviations
- ch = chain
- dc = double crochet
- sc = single crochet
- sl st = slip stitch
- sp = space
- st = stitch
- sts = stitches
- rep = repeat
Granny Cluster
Throughout the shawl:
Granny cluster = 3 dc worked into the same space
The clusters are worked into the ch-1 spaces, not into individual double-crochet stitches.
Important Pattern Notes
The beginning:
ch 3 counts as one dc
The center of every row contains:
3 dc, ch 2, 3 dc
worked into the center ch-2 space.
The ch-2 space always marks the center point of the shawl.
Place a stitch marker in it if that helps.
Changing Colors
For the scrappy striped look, you can change color:
- every row
- every 2 rows
- randomly
For the sample version, I like changing color every row.
At the end of a row:
- Fasten off.
- Turn the shawl.
- Join the next color in the first stitch.
- Continue with the next row.
Leave tails approximately 5 inches long for secure weaving.
Sample Color Sequence
You can repeat this sequence or simply use whatever scraps you have:
- Dusty rose
- Sage
- Deep teal
- Oatmeal
- Berry
- Antique gold
- Lavender
- Moss
- Coral
- Soft blue
- Mushroom
- Plum
Then begin again with different combinations.
Avoid obsessing over perfect color placement.
The granny structure ties everything together.
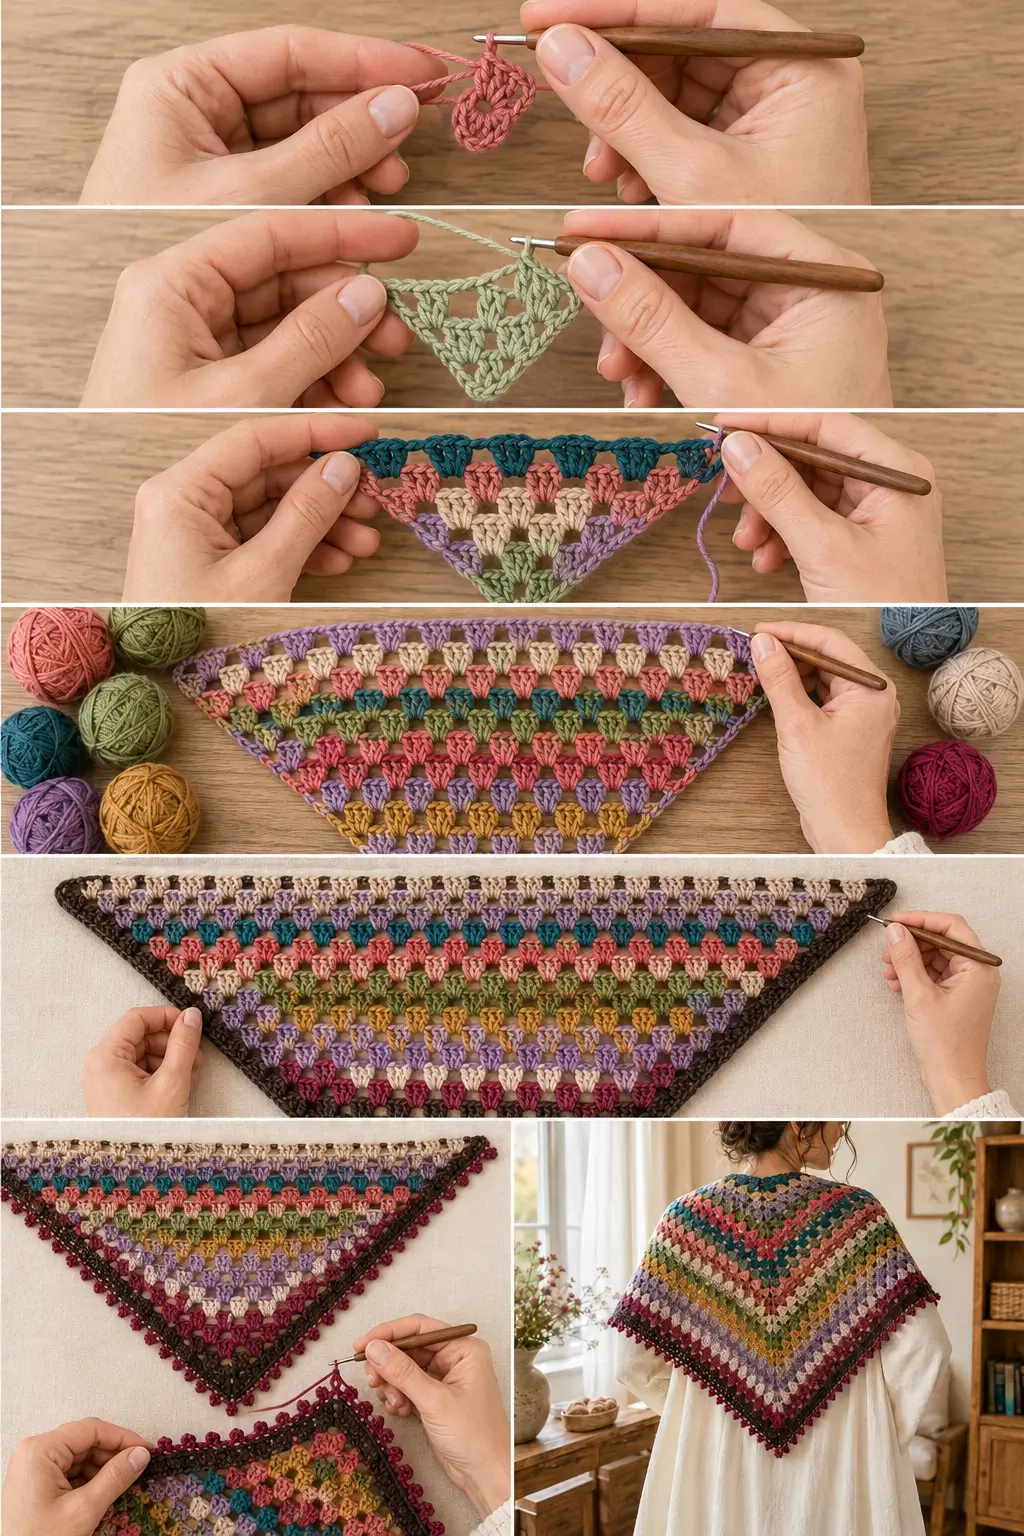
PART 1 — START THE SHAWL
Using your first scrap color, make a magic ring.
You can also:
Ch 4 and sl st into the first chain
to form a ring.
Row 1
Ch 3.
Work:
2 dc into the ring
Ch 2.
Work:
3 dc into the ring
You now have:
- 2 granny clusters
- 1 center ch-2 space
Turn.
Row 2
Join the next color if changing yarn.
Ch 3.
Work:
2 dc in the first stitch
This creates the first edge granny cluster.
Ch 1.
In the center ch-2 space work:
3 dc, ch 2, 3 dc
Ch 1.
Work:
3 dc in the top of the beginning ch 3 from the previous row
Turn.
You now have:
4 granny clusters
Row 3
Join the next color.
Ch 3.
Work:
2 dc in the first stitch
Ch 1.
Work:
3 dc in the next ch-1 space
Ch 1.
In the center ch-2 space work:
3 dc, ch 2, 3 dc
Ch 1.
Work:
3 dc in the next ch-1 space
Ch 1.
Work:
3 dc in the top of the beginning ch 3
Turn.
You now have:
6 granny clusters
Row 4
Join a new color.
Ch 3.
Work:
2 dc in the first stitch
Ch 1.
Work:
3 dc in each ch-1 space
with:
ch 1 between every granny cluster
until you reach the center.
In the center ch-2 space work:
3 dc, ch 2, 3 dc
Then continue across the second half:
ch 1, 3 dc in each ch-1 space
Finish with:
ch 1, 3 dc in the top of the beginning ch 3
Turn.
Main Shawl Repeat
From this point onward, every row follows the same construction.
Every New Row
Ch 3.
Work:
2 dc in first stitch
Then:
ch 1
Work:
3 dc in every ch-1 space
with:
ch 1 between clusters
until the center.
In the center ch-2 space work:
3 dc, ch 2, 3 dc
Continue across the second half:
ch 1, 3 dc in every ch-1 space
Finish with:
ch 1, 3 dc in the top of the beginning ch 3
Turn.
What Happens as You Crochet
Each row adds:
2 new granny clusters
That means the shawl grows wider automatically.
You never need to calculate separate side increases.
The center:
3 dc, ch 2, 3 dc
creates the point.
The outer edge clusters create the increasing wingspan.
How Many Rows Should You Make?
There is no required row count.
For a medium-large shawl in fingering yarn, start checking the size around:
45–50 rows
For a larger wrap, continue to:
55–65 rows
or more.
Stop when the shawl comfortably reaches from one hand to the other when draped around your shoulders.
Recommended Finished Size
For a versatile adult shawl, aim for approximately:
68–72 inches across the top
and:
23–25 inches from center top to bottom point
after blocking.
If you prefer something more scarf-like, stop earlier.
Small Neck Shawl
For a smaller version, stop around:
34–40 rows
depending on your yarn.
This makes a lightweight piece that can be wrapped around the neck rather than worn over the shoulders.
Large Wrap Version
Continue until approximately:
75–80 inches across
A larger shawl is especially nice with fingering yarn because the fabric remains light and drapey.
Using Tiny Yarn Scraps
You do not need enough yarn for an entire row.
If a scrap runs out partway across:
- Finish the current granny cluster.
- Change to another closely related color.
- Continue the row.
That creates a beautiful patchwork effect.
For example:
dusty rose → berry → plum
within one row can look intentional rather than accidental.
Gradient Alternative
If you love the scrappy look but hate weaving in ends, use:
- one long gradient yarn
- one self-striping yarn
- one advent-style mini-skein set
The granny construction stays exactly the same.
Keeping the Edges Straight
The outermost cluster is important.
Every row must begin with:
ch 3 + 2 dc in the first stitch
and finish with:
3 dc in the top of the previous turning chain
If you forget an outer cluster, one side of the shawl will start becoming shorter.
Find the Center Easily
As the shawl grows, the center can become harder to spot.
Place a removable stitch marker into the:
center ch-2 space
Move it upward after every row.
That prevents accidentally working a normal granny cluster into the center.
What If the Shawl Starts Cupping?
The most common causes are:
- ch-1 spaces worked too tightly
- center ch-2 too tight
- hook too small
Try making the center:
ch 3 instead of ch 2
if your personal tension is especially tight.
Do this consistently from that point onward.
What If the Shawl Ruffles?
Possible causes include:
- very loose chain spaces
- dramatically different yarn thicknesses
- hook too large for the yarn
A little movement usually disappears after blocking.
Strong ruffling means you should adjust your hook or tension.
What If One Side Is Longer?
Count the granny clusters on both sides of the center.
They should always match.
For example, if you have:
14 clusters before the center
you should also have:
14 clusters after the center
The two center clusters are created together inside the center ch-2 space.
PART 2 — FINISH THE MAIN SHAWL
When the shawl reaches the size you want, complete the final granny row.
Do not begin another partial color row.
Fasten off.
Weave in the scrap-yarn tails before beginning the border.
This is much easier than trying to hide them after the edging is complete.
PART 3 — ESPRESSO FOUNDATION BORDER
Use espresso-brown yarn.
This darker border helps visually contain all the different scrap colors.
Lay the shawl flat with the right side facing you.
Border Round 1
Join espresso yarn at one outer corner.
Ch 1.
We will work around all three sides of the shawl.
Across the First Lower Edge
Work:
1 sc in each dc
and:
1 sc in each ch-1 space
When you reach the center ch-2 point, work:
3 sc in the center space
Continue along the second lower edge in the same way.
Across the Top Edge
The top edge consists of the row ends.
Work approximately:
2 sc into each dc row end
across the top.
At the starting center ring, distribute the stitches smoothly so there is no large gap.
Continue until you return to the first corner.
Join with a sl st.
Check the Border
Lay the shawl flat.
If the top border ruffles:
you have added too many stitches along the row ends.
If it pulls inward:
you need slightly more.
Do not continue until the border lies reasonably flat.
Border Round 2
Ch 1.
Work:
1 sc in every stitch around
At each outer corner:
3 sc
At the bottom point:
3 sc in the center stitch
Join.
Fasten off espresso.
PART 4 — BERRY PICOT EDGE
The final decorative edging is worked only along the two lower diagonal edges.
Leave the long top neck edge plain.
This gives the shawl decoration without adding bulk where it rests around the neck.
Use deep berry yarn.
Picot Edge
Join berry at one outer corner.
Ch 1.
Sc in the first stitch.
Work:
sc in each of the next 3 sts
Then make one picot:
Ch 3
Sl st into the first chain just made.
Continue:
sc in next 4 sts, picot
Repeat along the first lower edge.
Bottom Point
When you reach the center point, work:
sc, picot, sc
into the center stitch.
This gives the bottom point a neat decorative finish.
Second Side
Continue:
sc in next 4 sts, picot
along the second diagonal edge.
Finish at the opposite outer corner.
Fasten off.
Finished Border
The completed shawl should now have:
- dark espresso frame
- colorful granny stripes
- deep berry picot detail along the lower edges
- clean undecorated top edge
The border gives the many scrap colors a more intentional finished look.
Blocking the Shawl
Blocking makes a significant difference with granny crochet.
Use a blocking method suitable for your yarn.
Shape the shawl into a symmetrical triangle.
Pin:
- both outer tips
- center bottom point
- top center
- several positions along each edge
Do not overstretch the granny spaces.
Allow the shawl to dry completely before removing it.
What Blocking Improves
Blocking helps:
- open the granny clusters
- straighten the top edge
- sharpen the bottom point
- even out slightly different scrap-yarn tensions
- improve overall drape
How to Wear It
This shape can be worn several ways.
Classic Shawl
Place the long edge across your shoulders with the point hanging down the back.
Front Triangle
Place the center point at the front and wrap both ends around your neck.
Loose Scarf
Fold or bunch the shawl and wrap it loosely around the neck.
Shoulder Wrap
Let the center point fall behind one shoulder and bring the two tips forward.
Make It More Neutral
If you want a quieter version, use only:
- oatmeal
- mushroom
- camel
- taupe
- charcoal
- muted sage
Keep the espresso border.
The granny stripes will still provide plenty of visual texture.
Make It Brighter
For a more colorful version, use:
- turquoise
- coral
- raspberry
- mustard
- lavender
- emerald
- sky blue
A neutral border will stop the colors from becoming overwhelming.
Use Advent Mini Skeins
This shawl is ideal for mini skeins.
Use one color per row and simply work through your mini-skein collection.
Because the rows become progressively longer, save your larger scraps for later rows.
Use the smallest scraps near the beginning of the shawl.
Smart Scrap Planning
The first rows need very little yarn.
The final rows need considerably more.
A good strategy is:
Beginning
Tiny scraps
Middle
Small leftover balls
Final section
Larger partial skeins
This helps prevent running out halfway across one of the longest rows.
Can I Use DK Yarn?
Yes.
Use approximately a:
4.5–5 mm hook
depending on your yarn.
The shawl will grow much faster.
You will probably need fewer rows to reach the same dimensions.
Can I Use Worsted Yarn?
Yes.
The finished shawl will be:
- warmer
- heavier
- thicker
Use an appropriate hook and stop when the actual measurements are right rather than following the suggested row range.
Can I Use Cotton?
Yes.
Cotton gives the granny clusters excellent definition and works especially well for a spring or summer shawl.
Choose a soft cotton or cotton blend if the shawl will sit directly against the neck.
How Much Yarn Do I Need?
For the fingering-weight sample size, have roughly:
850–1,000 yards total
available.
Scrap projects are difficult to estimate exactly because:
- yarn thickness varies
- shawl size can change
- tension varies
- border choices affect usage
Having extra yarn is better than stopping just before the final rows.
Do the Colors Need to Be the Same Fiber?
Not necessarily, but they should have compatible care requirements.
Mixing:
- superwash wool
- wool blends
- sock yarn
is usually straightforward.
If mixing very different fibers, wash the shawl gently because each yarn may react differently.
Can I Add Tassels?
Yes.
Add one tassel to:
- each outer corner
- the center point
Keep them relatively lightweight so they do not distort the delicate fingering-weight shawl.
For the cleaner version shown here, I would leave them off.
Can Beginners Make This?
Yes, if you already know:
- chain
- double crochet
- working into chain spaces
After the first three rows, almost the entire shawl is the same repeated structure.
The increasing happens automatically because of the edge and center clusters.
Frequently Asked Questions
Is this made from separate granny squares?
No.
The entire shawl is crocheted as one piece.
Is it worked from the bottom up?
No.
It begins at the center top and grows outward and downward.
How does the shawl increase?
Every row creates:
- an edge cluster at the beginning
- two clusters in the center space
- an edge cluster at the end
This produces two additional granny clusters per row.
Do I crochet into the double crochets?
Most of the granny clusters are worked into:
ch-1 spaces
rather than individual dc stitches.
Only the outer edge clusters use the edge stitch/turning chain.
How many rows do I need?
There is no fixed number.
Stop when the shawl reaches the size you want.
Do I need to change color every row?
No.
You can work:
- one-row stripes
- two-row stripes
- wide color bands
- a single solid color
- gradient yarn
The construction remains unchanged.
Can I make it from leftover sock yarn?
Yes.
That is one of the best yarn types for this project.
Is gauge important?
Not for fit.
Gauge affects:
- finished dimensions
- yarn usage
- drape
The most important thing is producing a soft fabric that you enjoy wearing.
Final Thoughts
This is the kind of project that makes tiny leftover yarn balls useful again.
A few yards of dusty rose become one row.
That little bit of sage becomes another.
The forgotten lavender from an old pair of socks suddenly has a purpose.
And once all those colors are separated by the same granny-stitch rhythm, they stop looking random.
They become a shawl.
The linked design uses the broad idea of a top-down scrappy granny-cluster shawl, but the construction, sizing, color plan, and picot-border treatment above are newly written rather than reproducing the paid pattern. (ravelry.com)



