Sculpted Wave Crochet Hobo Bag With a Soft Slouchy Shape
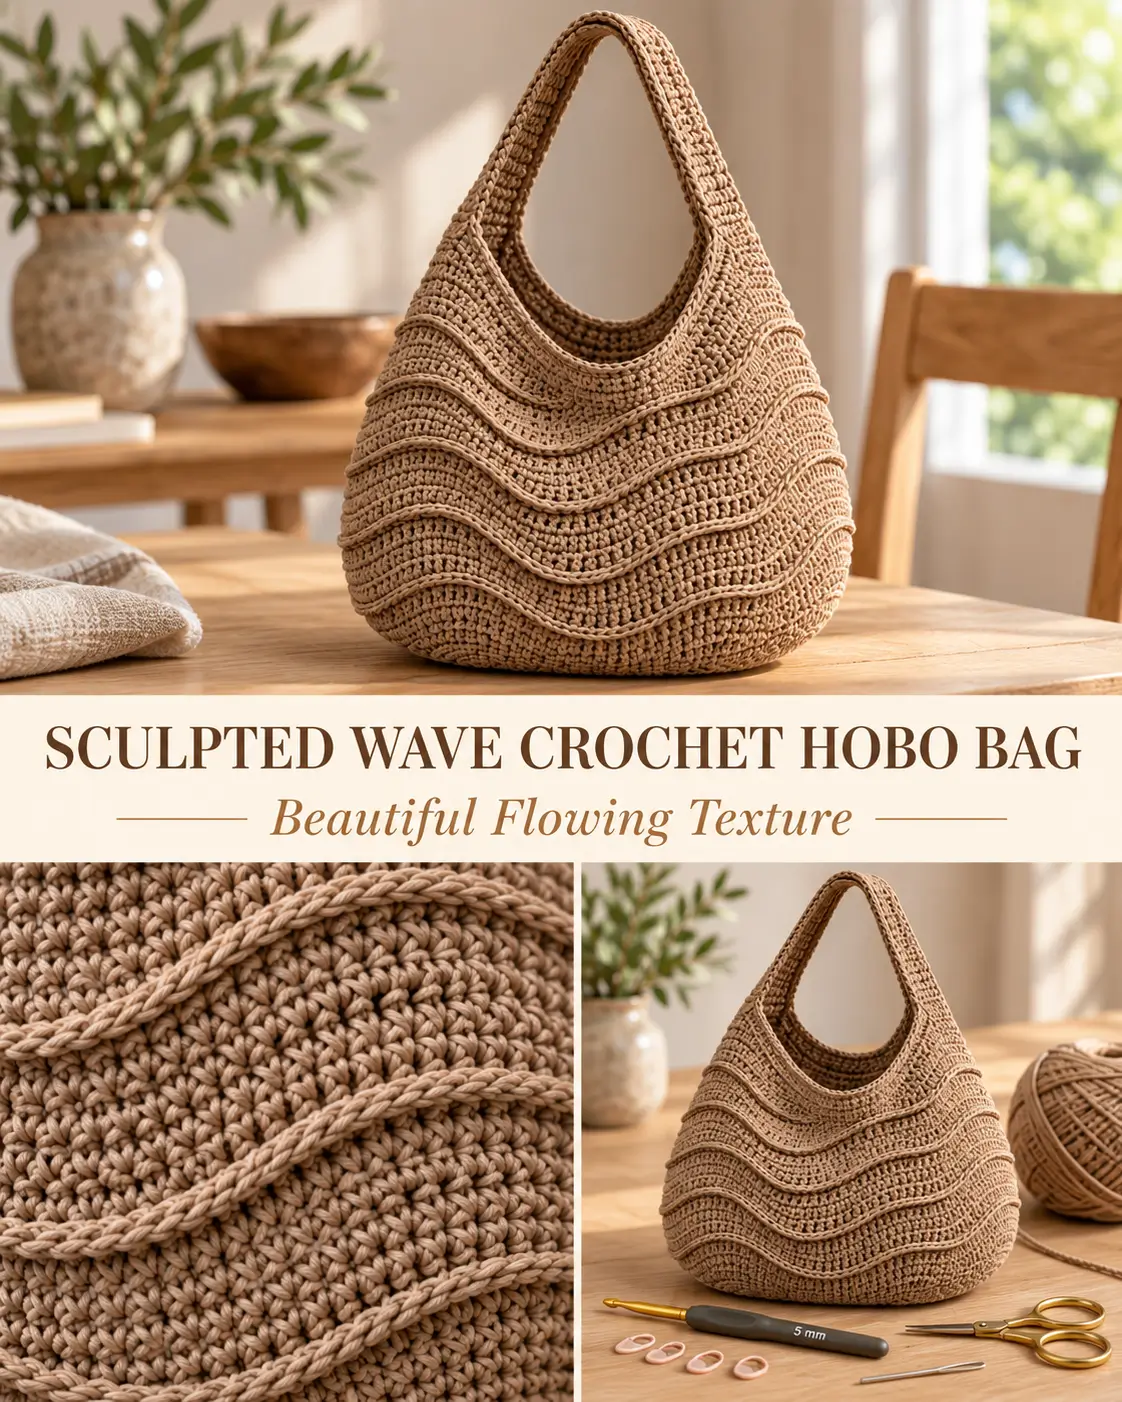
This sculpted crochet hobo bag gets its character from the fabric itself. Instead of crocheting a plain tote and decorating it afterward, the body is shaped with broad flowing waves created by changing stitch heights, while loop-only rounds leave raised ridges that make those curves stand out.
The finished bag is compact, softly rounded, and designed to collapse naturally into a relaxed hobo silhouette when carried. The target body size is approximately 26 cm wide × 22 cm high / 10¼ × 8¾ inches, with a single broad shoulder strap flowing cleanly from the upper sides. Pasted markdown
The important visual details are the rounded bottom, wide curved wave bands, narrow upper opening, and one integrated shoulder strap. The waves should look fluid and horizontal—not like sharp chevrons, cables, or bobbles. Pasted markdown
Finished Size
Approximately:
10¼ inches / 26 cm wide
8¾ inches / 22 cm high
The shoulder strap length can be adjusted to fit your preferred shoulder drop.
This is a compact hobo bag rather than a large tote.
Materials
- Smooth chain-style cotton, tube cotton, or fine macramé-style crochet yarn
- Approximately 2 mm yarn thickness
- 5 mm crochet hook
- 2–4 locking stitch markers
- Yarn needle
- Scissors
- Measuring tape
- Optional magnetic snap
- Optional fabric lining
- Optional cotton reinforcement tape for the shoulder strap
Have approximately:
300–350 g of yarn available
for a compact bag of this size.
The reference construction uses approximately 2 mm smooth chain-style yarn with a 5 mm hook, which helps create a fabric that is firm enough to hold relief ridges but flexible enough to slouch. Pasted markdown
Skill Level
Intermediate
You should be comfortable with:
- chain
- slip stitch
- single crochet
- half double crochet
- increases
- decreases
- working in continuous or joined rounds
- back-loop-only crochet
- front-loop-only crochet
- reading the shape of your fabric
The bag is not difficult because of one complicated stitch. The main challenge is keeping the wave placement balanced.
Abbreviations
This pattern uses US crochet terminology.
ch — chain
sl st — slip stitch
sc — single crochet
hdc — half double crochet
BLO — back loop only
FLO — front loop only
inc — increase
dec — decrease
st / sts — stitch / stitches
Before You Begin
This bag is built as one rounded body rather than from two flat rectangles.
The construction has five important areas:
- narrow oval base
- softly rounded lower body
- flowing raised wave texture
- gently tapered upper opening
- one broad shoulder strap
The body should remain smooth and continuous, with no boxy gusset corners.
Gauge and Fabric Check
Exact stitch gauge is less important than the firmness of the finished fabric.
Before beginning the bag, crochet a small swatch using your yarn and 5 mm hook.
Your fabric should:
- bend easily
- feel dense
- hold a visible raised ridge
- not stretch open dramatically
- not feel stiff like a basket
If the fabric is very loose and develops large gaps, try a slightly smaller hook.
If it is painfully stiff and the waves refuse to drape, move up slightly in hook size.
The correct fabric should sit between those extremes. Pasted markdown
Understanding the Wave
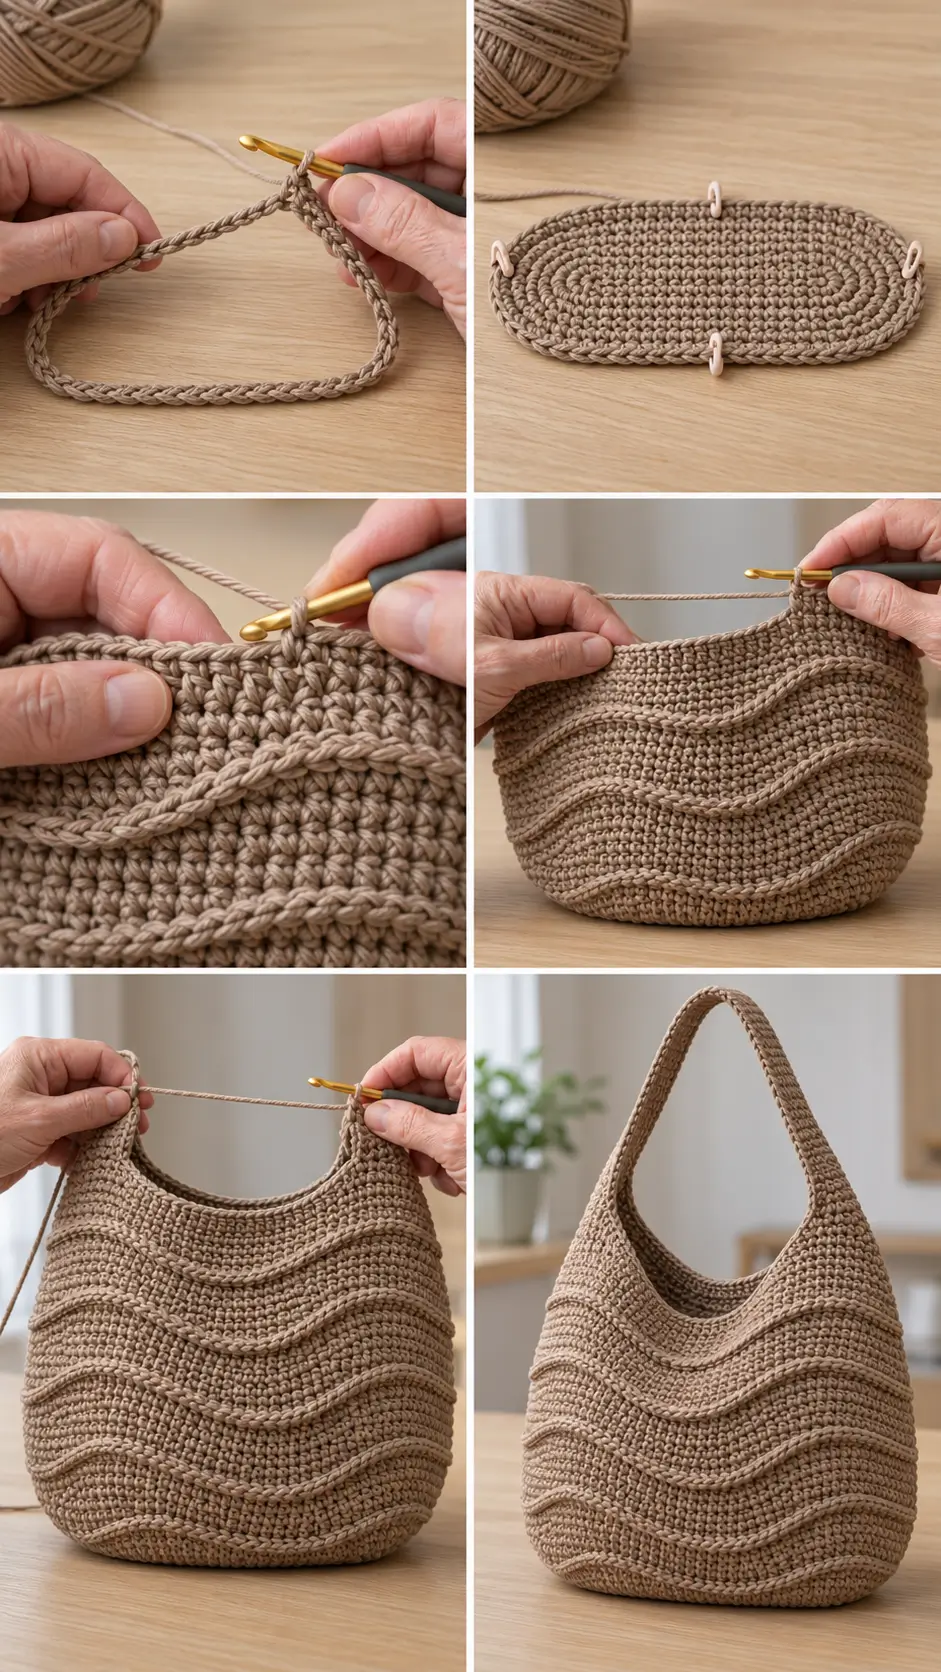
The sculpted effect comes from changing stitch height gradually.
Think of one broad wave as:
low → medium → tall → medium → low
For this bag, a useful progression is:
sl st → sc → hdc → sc → sl st
The low slip-stitch areas contract slightly.
The single crochet sections sit higher.
The half double crochet section becomes the crest of the wave.
Then the stitch heights decrease again.
Working a following round through one loop only leaves a visible ridge that outlines the curve. Pasted markdown
Important Wave Rule
The waves must be broad and flowing.
Do not switch from slip stitch to half double crochet over only a few stitches.
That creates a sharp zigzag.
Instead, divide the front of the bag into generous sections so the height change happens gradually.
The same shaping must be mirrored across the back.
STEP 1 — Crochet the Narrow Oval Base
Begin with a foundation chain long enough to create the center length of the bag.
Because yarn thickness and tension vary, it is safer to size this by measurement rather than force a universal chain count.
For a finished body around 26 cm wide, begin with a relatively short, narrow foundation. Remember that the oval will grow at both ends.
The original construction principle begins from a narrow chain and works around both sides to establish the base. Pasted markdown
Base Round 1
Work sc along one side of the foundation chain.
In the final chain, work enough sc into the same chain to turn smoothly around the end.
Continue working sc along the unused loops on the opposite side of the foundation.
At the second end, add matching increases.
Do not turn.
You now have a narrow oval.
STEP 2 — Grow the Oval
Continue crocheting around the base.
Place your increases mainly at the two rounded ends.
Keep the long sides relatively straight.
Continue until the base looks like a slender oval rather than a wide flat handbag bottom.
The finished base should have:
- long straight-ish center sections
- softly rounded ends
- no sharp corners
- no square gusset shape
Do not make the base excessively wide.
A narrow base is important because it allows the upper bag to collapse inward and create the hobo silhouette. Pasted markdown
STEP 3 — Mark the Bag
Once the base has enough depth, place four markers.
Mark:
Marker 1 — first side
Marker 2 — center front
Marker 3 — opposite side
Marker 4 — center back
These markers will help you keep the wave design symmetrical.
The front and back should mirror one another throughout the main body. Pasted markdown
STEP 4 — Establish the Lower Body
Begin working upward.
At this point, stop increasing aggressively.
If the lower body needs a little more fullness, place occasional increases near the curved side sections.
Do not scatter increases randomly across the front.
The bag should gradually move from a flat oval into a shallow bowl.
Continue until the sides begin standing upward naturally.
STEP 5 — Create the First Wave Round
Look only at the front half of the bag between the two side markers.
Divide that front section visually into five broad zones.
Work:
Zone A
sl st
Zone B
sc
Zone C
hdc
Zone D
sc
Zone E
sl st
Then mirror the same low-to-high-to-low progression across the back half.
The highest point of the wave should sit approximately around the middle of the section.
The change between stitch heights must be gradual enough to form a curve rather than a point. Pasted markdown
How Wide Should Each Zone Be?
The exact stitch count depends on your finished circumference.
Instead of forcing a fixed number, divide each half of the bag into approximately five visually balanced sections.
For example, if one half contained 40 stitches, you could begin by thinking in sections around:
8 / 8 / 8 / 8 / 8
Then make small adjustments if necessary to center the crest.
The exact numbers matter less than maintaining:
low → medium → high → medium → low
and mirroring it on the opposite side.
STEP 6 — Add the Relief Ridge
On the following round, work primarily in:
BLO
Working through the back loop leaves the unused front loop exposed.
That exposed line becomes a narrow ridge following the contour of the wave underneath.
This ridge is essential to the visual design.
Without it, the stitch-height changes still shape the fabric, but the wave will not look nearly as sculptural. Pasted markdown
Keep the stitches relaxed.
A tight BLO round can pull the wave inward too sharply.
STEP 7 — Shift the Next Wave
For the next shaped wave round, do not place the highest section directly over the previous crest.
Shift it slightly sideways.
For example, begin the transition from:
sl st → sc → hdc
a few stitches earlier than before.
On the following wave, you can shift it slightly in the opposite direction.
The result should look like the raised ridge is traveling gently across the bag.
It should not look like stacked horizontal bands.
The front and back must remain mirrored. Pasted markdown
Main Wave Repeat
Continue alternating:
shaped wave round
then:
BLO ridge round
then:
shifted shaped wave round
then:
BLO ridge round
Repeat this sequence as the bag grows upward.
The wave placement can move slightly from round to round, but the overall flow must remain smooth.
How the Correct Texture Should Look
The surface should develop:
- broad flowing horizontal curves
- raised narrow relief lines
- smooth transitions in stitch height
- no abrupt zigzags
- no cable columns
- no bobbles
- no puff stitches
The body itself remains relatively dense.
The ridges should look as though they are sculpted out of the same fabric.
STEP 8 — Grow the Main Body
Continue working the wave-and-ridge sequence upward.
As the bag approaches its widest section:
stop increasing
The circumference should remain stable.
At this stage, you are adding height rather than width.
Periodically put the bag down and inspect it from a distance.
Check that:
- the left and right sides match
- the front and back waves remain balanced
- the center markers have not drifted
- the ridges flow smoothly
- you have not accidentally increased or decreased
These checks are more important than making every individual wave absolutely identical. Pasted markdown
STEP 9 — Form the Hobo Taper
When the body reaches approximately the upper third, begin narrowing the opening slightly.
Place gentle decreases near the side sections.
Avoid placing decreases randomly across the center front.
Work only a small number of decreases in any one round.
Then work another round without decreases.
Repeat gradually as needed.
The goal is to make the mouth of the bag narrower while preserving the front wave pattern.
Several subtle decrease rounds create a cleaner silhouette than one dramatic decrease round. Pasted markdown
Check the Shape
The bag should now have:
- rounded bottom
- fuller lower-middle body
- slightly narrowing upper third
- inward-curving opening
- soft slouchy profile
It should not resemble a straight-sided bucket bag.
STEP 10 — Reach the Final Body Height
Continue until the body measures approximately:
22 cm / 8¾ inches high
Measure from the bottom center to the upper edge while the bag is standing naturally.
Do not stretch it while measuring.
STEP 11 — Stabilize the Opening
Once the body is the correct height, stop the wave pattern.
Work one or more firm rounds around the entire opening using:
sc
or:
sl st
These final rounds should be flatter than the body.
Their job is to stop the bag opening from stretching excessively during use. Pasted markdown
Do not pull these stitches so tightly that the opening puckers.
STEP 12 — Mark the Strap Position
Lay the bag flat.
Locate the two upper side sections.
The strap should emerge from these areas rather than from the center front and back.
Make sure both attachment points are symmetrical.
Use stitch markers to mark the same number of stitches on both sides.
STEP 13 — Crochet the Shoulder Strap
The finished bag uses one broad shoulder strap.
It should look like a natural continuation of the crochet body rather than a thin cord added afterward.
Join yarn at the first marked side section.
Work a band of dense:
sc
across the marked width.
Turn.
Continue working rows of sc until the strap reaches your preferred length.
For a comfortable shoulder strap, keep the band broad enough that it does not cut into the shoulder.
The pattern source recommends building a wider dense sc strap and securing it firmly to the opposite side. Pasted markdown
Strap Length
The exact strap length depends on how you want the bag to sit.
Before joining the second end:
Hold the bag against your body.
Check the drop.
Remember that cotton may relax slightly when the bag is loaded.
It is usually better to make the strap a little shorter than dramatically too long.
STEP 14 — Attach the Strap
Align the free end of the strap with the opposite marked side section.
Check that the strap is not twisted.
Use the crochet hook or yarn needle to attach it very securely.
Work through multiple stitches rather than anchoring the strap at only one or two points.
The connection should distribute the weight across the entire strap width.
Optional Strap Reinforcement
If you plan to carry heavier items, add reinforcement tape.
Cut cotton twill tape slightly shorter than the finished strap.
Sew it to the underside of the crochet strap with matching sewing thread.
Keep the stitches small and discreet.
This greatly reduces stretching in smooth chain-style cotton yarn. Pasted markdown
Optional Magnetic Closure
A magnetic snap can be added to the top opening.
For the cleanest finish, install the snap into a fabric lining rather than directly through the crochet.
This helps prevent the closure from pulling or distorting the yarn.
Optional Fabric Lining
A lining is especially useful if the bag will carry:
- keys
- pens
- makeup
- small electronics
- anything that could catch on crochet stitches
Cut fabric slightly smaller than the finished bag body.
Sew it into a rounded pouch shape.
If using a magnetic snap, install it before placing the lining inside the crochet bag.
Turn the lining seam allowance inward.
Hand-sew the lining just below the stabilized top edge. Pasted markdown
Finishing
Weave all yarn ends into dense areas of the fabric.
Do not trim a yarn tail directly beside a high-stress point such as:
- strap attachment
- side decrease
- upper opening
Instead, weave it in for several inches and change direction at least once.
Shape the Wave Ridges
Use your fingers to gently manipulate each ridge.
Follow the natural curve and smooth any section that appears irregular.
Do not flatten the ridges.
The wave should remain dimensional.
The finishing guidance specifically emphasizes manually adjusting the relief lines so the curves read smoothly. Pasted markdown
Blocking
Avoid aggressive blocking.
Heavy blocking can flatten the dimensional texture that gives the bag its character.
If needed:
Lightly dampen the bag.
Shape the bottom.
Smooth the sides.
Arrange the waves.
Shape the opening.
Allow the bag to dry naturally.
Do not stretch it flat.
Troubleshooting
The Waves Look Like Zigzags
Your stitch-height sections are probably too short.
Make each:
sl st / sc / hdc / sc / sl st
zone broader.
The changes should happen gradually.
The Waves Look Like Straight Horizontal Stripes
You may be stacking the high point directly above the previous one.
Shift each new shaped wave slightly sideways.
The crests should travel across the bag.
The Wave Ridge Is Barely Visible
Make sure the next round is worked through one loop only.
Using:
BLO
leaves the unused front loops visible and creates the relief line.
The Bag Is Becoming Square
Check the base.
It should be a narrow oval rather than a broad rectangle.
Also make sure you are not adding sharp increases at four corner positions.
This bag should have rounded sides and no square gusset corners.
The Bag Is Becoming Too Wide
Stop increasing once the lower body has reached the desired fullness.
The central body should grow primarily in height.
The Opening Is Too Wide
Add another subtle decrease round near the side sections.
Do not place a large number of decreases across the front.
The Opening Is Too Tight
You have probably decreased too aggressively or worked the stabilizing rounds too tightly.
Undo the last round if necessary and work it again with relaxed tension.
The Slip-Stitch Sections Pucker
Slip stitches naturally contract.
Keep them noticeably relaxed.
Do not pull the working yarn tight after completing each stitch.
This is particularly important where slip stitches transition into taller sections. Pasted markdown
The Wave Pattern Is Drifting Sideways
Check your markers.
A misplaced increase or decrease can gradually move the entire pattern.
Always keep track of:
- first side
- center front
- opposite side
- center back
Reposition markers only if the actual bag shape requires it.
Yarn Suggestions
The wave texture works best with smooth yarn.
Good choices include:
- smooth tube cotton
- chain-style cotton
- fine macramé cord
- smooth firm cotton blend
Avoid very fuzzy yarn because it hides the relief ridges.
Smooth yarn lets the shadows along the curves remain visible. Pasted markdown
Color Ideas
The sculpted texture is strong enough that the bag works beautifully in one solid color.
Try:
Warm camel
for the earthy neutral version.
Oatmeal
for a soft minimalist look.
Chocolate brown
for an autumn handbag.
Olive green
for an organic modern style.
Deep burgundy
for a richer statement bag.
Charcoal
for a contemporary version.
One solid color usually shows the flowing ridges more clearly than busy variegated yarn. Pasted markdown
How to Make a Larger Bag
Keep the same construction principles.
Make the oval base slightly longer.
Continue the lower-body growth until the circumference is larger.
Make each wave zone proportionally wider.
Add additional body height before beginning the taper.
Do not simply add stitches to one side.
Everything should remain symmetrical around the four markers.
How to Make the Bag More Slouchy
Use a slightly lighter, softer cotton.
Keep the base narrow.
Avoid over-stiffening the body.
Use fewer firm top-edge rounds.
The finished body will collapse more naturally when carried.
How to Make the Bag More Structured
Use firmer chain cotton.
Work with slightly tighter tension.
Add a full fabric lining.
Reinforce the shoulder strap.
Keep the top stabilizing rounds firm.
Pattern at a Glance
Base
Make a narrow foundation chain.
Sc along one side.
Increase around the end.
Sc along the opposite side.
Increase around the second end.
Continue until you have a:
slender oval base
Lower Body
Work upward.
Use occasional balanced side increases only if needed.
Mark:
side / front center / side / back center
Wave Round
Across each half of the bag work broad zones of:
sl st → sc → hdc → sc → sl st
Mirror the opposite side.
Ridge Round
Work mainly:
BLO
to expose the unused front loops and emphasize the wave.
Following Wave
Shift the high point slightly sideways.
Mirror the placement on the back.
Main Body
Repeat:
wave round → ridge round → shifted wave round → ridge round
until the body reaches its full lower width.
Continue upward without increasing.
Upper Taper
Work occasional balanced decreases near the two side sections.
Continue gradually until the upper opening curves inward.
Final Body Height
Approximately:
22 cm / 8¾ inches
Top Edge
Work one or more firm rounds of:
sc or sl st
Strap
Make one broad dense sc strap from one upper side.
Continue to desired length.
Secure firmly to opposite upper side.
Final Shape
The completed bag should have:
- approximately 26 cm / 10¼ inches width
- approximately 22 cm / 8¾ inches body height
- one solid camel/taupe color
- smooth approximately 2 mm yarn
- broad flowing wave ridges
- loop-only relief lines
- softly rounded bottom
- gently tapered hobo opening
- one broad shoulder strap
- no square corners
- no cables
- no bobbles
- no chevrons
The finished bag gets its character from the way low, medium, and taller crochet stitches bend the fabric into broad curves, while the raised loop-only ridges make those waves stand clearly away from the body. Pasted markdown