Seven-Point Layered Star Crochet Blanket
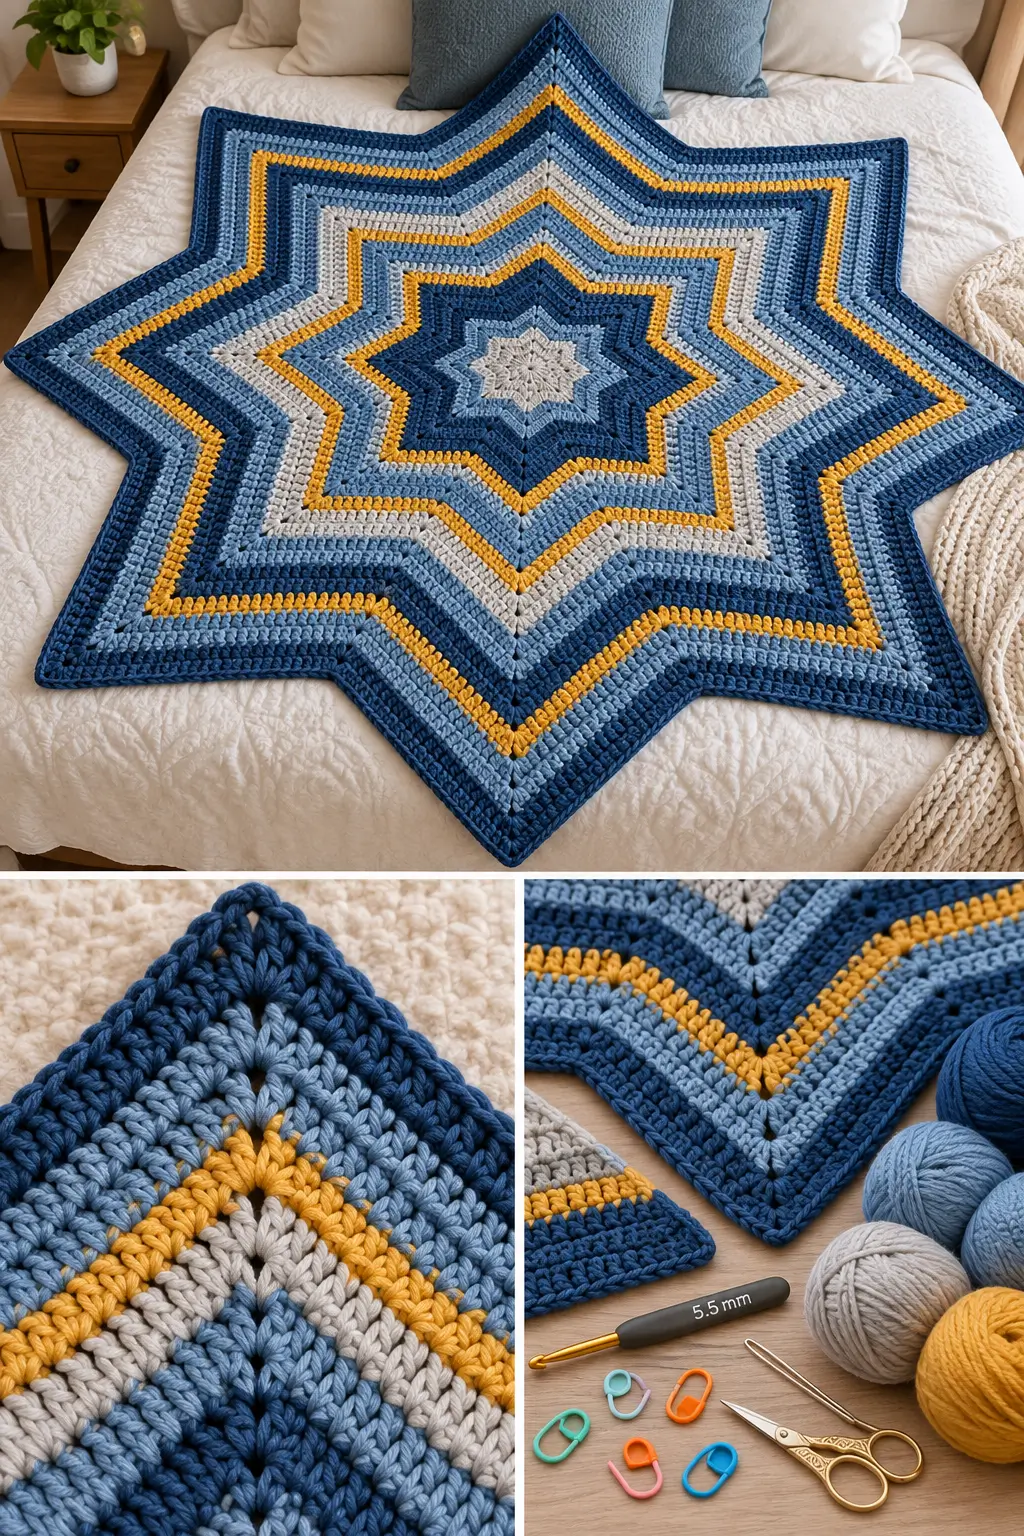
This seven-point crochet star blanket is worked from the center outward in one continuous growing shape. Deep denim blue, steel blue, heather gray, and mustard gold create layered rings that emphasize every point and valley of the star.
The construction is easier than the finished blanket looks. Every round follows the same basic shaping rule:
- increase strongly at each of the 7 points
- decrease at each of the 7 valleys
- work one double crochet in the remaining stitches
Once the first few rounds establish the star, the markers tell you exactly where every increase and decrease belongs.
The finished blanket measures approximately 48–52 inches across at its widest point, making it a comfortable lap blanket, baby play blanket, decorative throw, or dramatic layered bed accent.
Finished Size
Approximately:
48–52 inches / 122–132 cm across at the widest point
Size will vary slightly with yarn, hook, and tension.
The blanket contains:
7 points
and is worked for:
44 rounds total
The last two rounds create a simple dark-blue outer finish.
Materials
- Medium weight #4 yarn
- 5.5 mm crochet hook
- Yarn needle
- Scissors
- 14 removable stitch markers
- Measuring tape
Approximate total yarn:
2,200–2,600 yards / 2,010–2,380 meters
Suggested color amounts:
- Deep Denim Blue: 850–950 yards
- Steel Blue: 550–650 yards
- Heather Gray: 450–550 yards
- Mustard Gold: 250–350 yards
Keep extra yarn available if you plan to make the blanket larger.
Color Palette
Use four colors:
Color A — Deep Denim Blue
Color B — Steel Blue
Color C — Heather Gray
Color D — Mustard Gold
The mustard is used in narrower accent bands while the blues and gray form the larger sections.
Skill Level
Intermediate beginner
You should know how to make:
- magic ring
- chain
- double crochet
- slip stitch
- working joined rounds
- working several stitches into one stitch
- skipping stitches
- changing colors
No motifs are sewn together.
Abbreviations
This pattern uses US crochet terminology.
ch — chain
dc — double crochet
sl st — slip stitch
st / sts — stitch / stitches
rnd — round
Gauge
Approximately:
13 dc × 7 rows = 4 inches / 10 cm
Exact gauge is not essential, but it affects the finished size.
If your fabric is stiff, move up to a 6 mm hook.
If your stitches are very loose, try a 5 mm hook.
How the Star Is Shaped
There are two important locations around the blanket:
Points
Each point is shaped by working:
5 dc in the marked point stitch
The center stitch of those 5 dc becomes the point stitch for the following round.
Always place the point marker into the:
3rd dc of the 5-dc increase
Valleys
Each valley is marked in the space between two sections.
At every valley, you will skip:
1 stitch immediately before the valley marker
and:
1 stitch immediately after the valley marker
This removes 2 stitches at every valley and creates the inward V shape.
Why the Blanket Stays Flat
Each point adds four extra stitches because 5 dc are worked where one stitch would normally be worked.
Seven points therefore add:
28 stitches
Each of the seven valleys removes:
2 stitches
for a total reduction of:
14 stitches
Net increase per round:
14 stitches
That steady increase allows the seven-point star to expand without turning into a tube or dramatically ruffling.
Marker Setup
You will eventually use:
7 point markers
and:
7 valley markers
Use one different-colored marker for the first point. This is your start point.
The other six point markers can match.
Use another marker color for the seven valleys.
Keeping the start point easy to recognize makes joining each round much simpler.
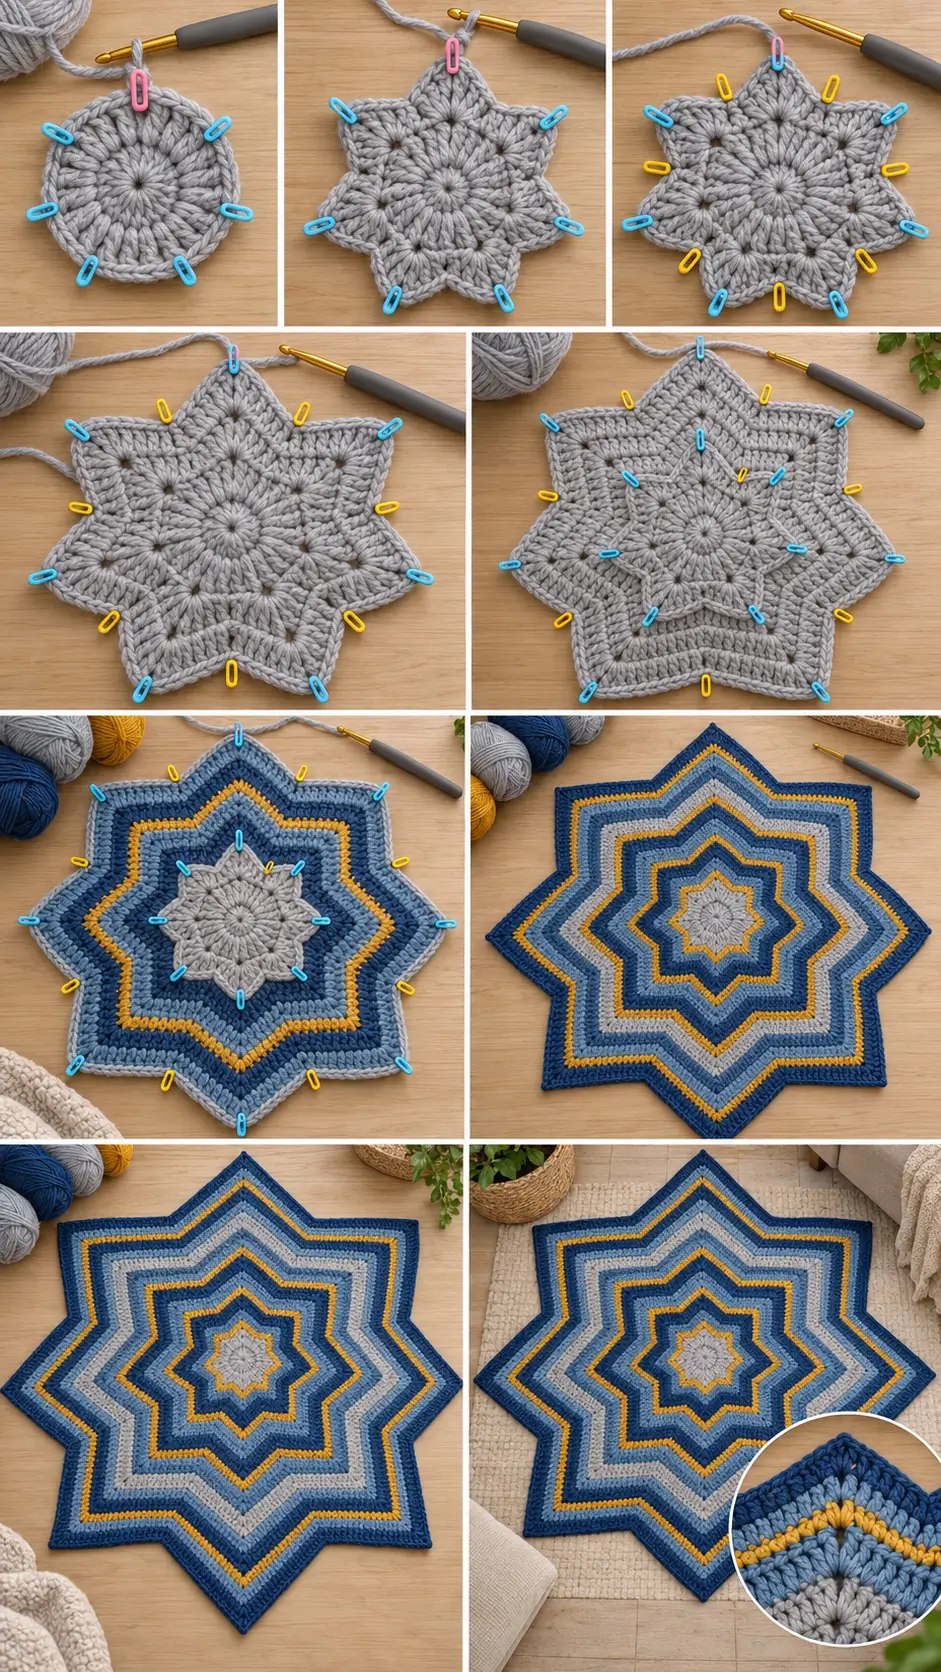
Round 1 — Center
With Color C — Heather Gray, make a magic ring.
Ch 2.
The ch-2 does not count as a stitch.
Work:
21 dc into the magic ring
Pull the ring tightly closed.
Join with a sl st to the first dc.
21 dc
Mark the Seven Points
Beginning with the first dc, place a point marker in every third stitch.
Your markers will be in stitches:
1, 4, 7, 10, 13, 16, 19
You now have:
7 marked point stitches
with:
2 ordinary stitches between every point
Use a different marker in Stitch 1 so you know which point is the beginning of the round.
Round 2 — Form the Seven Points
Stay with Heather Gray.
Ch 2.
The ch-2 does not count.
In the first marked point stitch work:
5 dc
Remove the old point marker.
Place it into the:
3rd dc of the 5-dc group
Skip the next:
2 stitches
In the next marked point stitch work:
5 dc
Move that point marker into the third dc of the new 5-dc group.
Skip the next 2 stitches.
Continue:
5 dc in marked point, skip 2
around.
After the seventh point, skip the final 2 stitches.
Join with a sl st to the first dc.
35 dc
The shape should now resemble a small seven-petal flower or star.
Add the Valley Markers
Look between each pair of 5-dc point groups.
There will be a visible gap where you skipped 2 stitches.
Place a valley marker directly into each of these gaps.
You should now have:
- 7 point markers
- 7 valley markers
Do not place the valley marker into a crochet stitch.
Clip it into the space between the two point sections.
Move to the Starting Point
Your first 5-dc group contains:
dc 1, dc 2, marked dc 3, dc 4, dc 5
After joining the round, slip stitch through the next stitches until your hook reaches the marked center dc of the starting point.
This keeps the round join running neatly along one point instead of wandering across the blanket.
Round 3
Ch 2.
In the marked starting point stitch work:
5 dc
Move the point marker into the third dc of these 5 stitches.
Now work:
1 dc in each stitch
until only 1 stitch remains before the valley marker.
Skip that stitch.
Move past the valley marker.
Skip the first stitch after the valley marker.
Leave the valley marker in the new gap.
Continue working:
1 dc in each stitch
until you reach the next marked point.
In the marked point stitch:
5 dc
Move the point marker into the third dc.
Continue around using the same sequence:
5 dc at point → dc along side → skip 1 before valley + skip 1 after valley → dc along next side
Repeat around all seven points and valleys.
Join to the first dc.
49 dc
Round 4 and Every Following Star Round
From this point onward, the construction stays the same.
At every marked point:
5 dc in the marked stitch
Move the point marker into the:
3rd dc
of the increase.
Between the point and valley:
dc in every stitch
until 1 stitch remains before the valley marker.
At the valley:
skip 1 stitch before the marker
and:
skip 1 stitch after the marker
Keep the marker in the new valley gap.
Then:
dc in every stitch
until the next point.
Repeat around.
Join to the first dc.
Before beginning the next round, slip stitch forward to the marked center stitch of the starting point.
Stitch Counts
The blanket increases by:
14 stitches every round
Your stitch counts will be:
Round 1 — 21 dc
Round 2 — 35 dc
Round 3 — 49 dc
Round 4 — 63 dc
Round 5 — 77 dc
Round 6 — 91 dc
Round 7 — 105 dc
Round 8 — 119 dc
You do not need to count the entire blanket on every large round.
Instead, check:
- 7 points
- 7 valleys
- 5 dc at every point
- exactly 2 stitches skipped at every valley
If those remain correct, the stitch count will continue growing correctly.
Color Plan
Follow this color sequence for the layered blue, gray, and mustard design.
Rounds 1–3
Heather Gray
These rounds establish the center.
Rounds 4–7
Deep Denim Blue
Work four complete star rounds.
Round 8
Mustard Gold
One narrow mustard accent round.
Rounds 9–11
Steel Blue
Rounds 12–13
Heather Gray
Round 14
Mustard Gold
Rounds 15–18
Deep Denim Blue
Rounds 19–21
Steel Blue
Round 22
Mustard Gold
Rounds 23–25
Heather Gray
Rounds 26–30
Deep Denim Blue
Round 31
Mustard Gold
Rounds 32–35
Steel Blue
Rounds 36–38
Heather Gray
Round 39
Mustard Gold
Rounds 40–42
Deep Denim Blue
The main star body is now complete.
Changing Colors
Complete the current round and join with a slip stitch.
Fasten off the old color.
Join the new color in the marked starting point stitch.
Ch 2.
Work the normal:
5 dc point increase
into that stitch.
Continue the round normally.
Joining every new color at the same point keeps color changes concentrated along one line and makes the rest of the star look cleaner.
Round 43 — Steel Blue Outer Round
Join Steel Blue at the starting point.
Continue the standard star shaping:
At each point:
5 dc in marked stitch
At each valley:
skip the stitch before and after the valley
Dc in every other stitch.
Join.
Round 44 — Deep Denim Final Round
Join Deep Denim Blue.
Repeat the same star shaping one final time.
This dark outer round frames all seven points and gives the blanket a finished edge without hiding the star shape.
Join.
Fasten off.
Keeping the Points Sharp
The most important rule is:
Always put the point marker into the middle stitch of the 5-dc increase.
The increase is:
dc 1
dc 2
dc 3 — MARK THIS ONE
dc 4
dc 5
If you accidentally mark the second or fourth stitch, the point will slowly begin leaning sideways.
Keeping the Valleys Deep
The valley decrease must remove:
one stitch from each side of the valley
Do not simply skip two stitches from one side.
Correct valley:
work to 1 stitch before marker → skip it → cross marker → skip first stitch after marker
Then continue crocheting.
This keeps both sides of the star balanced.
Checking the Shape While You Work
After every 5–6 rounds, lay the blanket completely flat.
A correct star should have:
- seven equal points
- seven equal valleys
- straight-looking sides between points and valleys
- no severe cupping
- no large ruffles
Small waves usually relax as the blanket becomes larger.
If the Blanket Starts Cupping
Cupping means the blanket is trying to form a bowl.
First check that you are actually working:
5 dc at every point
If you accidentally worked only 3 dc at one or more points, the blanket will not receive enough increases.
Also check the valley.
Skip only:
2 stitches total per valley
Do not skip three or four.
If your stitch counts are correct but your personal tension is very tight, move up one hook size.
If the Blanket Starts Ruffling
Check that each valley removes:
2 stitches
If you forgot a valley decrease, that section receives too many stitches.
Also make sure you are not accidentally working:
6 or more dc
into a point.
Every point should contain exactly:
5 dc
If One Point Looks Smaller
Compare the marker placement.
All seven point markers should sit in the center stitch of the previous round’s 5-dc increase.
If one marker was moved incorrectly, undo the affected round back to that point and correct it.
It is much easier to fix one round than several rounds later.
If a Valley Starts Moving Sideways
Make sure the valley marker remains in the same V-shaped indentation.
On every round:
skip the stitch immediately before it,
and:
skip the stitch immediately after it.
Do not move the valley marker into a nearby stitch.
The marker belongs in the gap.
How to Make a Smaller Baby Star Blanket
For a smaller blanket, stop after approximately:
28–32 rounds
depending on your gauge.
Finish with one additional Deep Denim round.
A baby-sized version will usually measure approximately:
34–40 inches across
depending on yarn and tension.
How to Make a Larger Throw
Continue past Round 44 using the same shaping rule.
Every extra round:
- adds stitches at all 7 points
- keeps all 7 valleys
- increases the overall diameter
Continue your preferred color sequence until the blanket reaches the size you want.
Each additional round will usually add approximately:
1–1¼ inches / 2.5–3 cm
to the blanket’s overall width.
Always finish after a complete round.
Larger Color Repeat
If extending the blanket, continue with:
Heather Gray — 2 or 3 rounds
Mustard Gold — 1 round
Deep Denim — 3 or 4 rounds
Steel Blue — 2 or 3 rounds
Then repeat.
Keeping mustard to single accent rounds prevents the gold from overpowering the cooler blue and gray sections.
Weaving In the Ends
Thread each yarn end onto a yarn needle.
Weave through several stitches on the wrong side of the same-colored section.
Change direction.
Pass through several more stitches.
Do not weave directly across an open valley where the tail could become visible.
Trim the yarn only after the tail feels secure.
Blocking the Blanket
Blocking helps the seven points and valleys become more defined.
Check the care instructions for your yarn first.
Lay the blanket flat.
Arrange all:
7 points
evenly around the center.
Gently pull each point outward.
Push each valley inward so all seven indentations have similar depth.
Measure from the center to each point if necessary.
Allow the blanket to dry completely in shape.
Do not stretch one point farther than the others.
Final Pattern at a Glance
Round 1
21 dc in magic ring.
Mark every third stitch as a point.
21 sts
Round 2
5 dc in marked point, skip next 2 sts.
Repeat 7 times.
Mark the center dc of every 5-dc group.
Place valley markers between the groups.
35 sts
Round 3 and Beyond
At every point:
5 dc in marked point stitch
Move marker to middle dc.
Along each side:
dc in every stitch
At every valley:
skip 1 stitch before marker
skip 1 stitch after marker
Continue around.
Every round increases by:
14 stitches
Follow the blue, gray, and mustard color plan through Round 42.
Finish with:
Round 43 — Steel Blue
Round 44 — Deep Denim Blue
using the same point-and-valley shaping.
The finished blanket forms a bold seven-point layered crochet star approximately 48–52 inches across, with narrow mustard accents running between wider bands of denim blue, steel blue, and heather gray.