Introduction
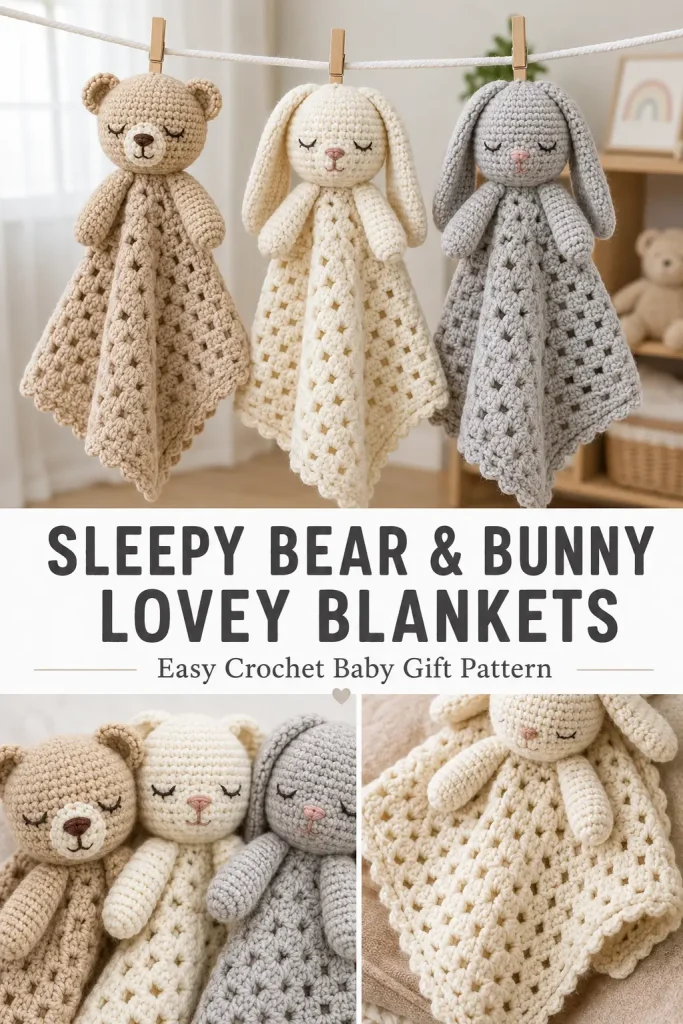
A crochet lovey blanket is one of the sweetest handmade baby gifts because it feels soft, comforting, and personal. It is part tiny blanket, part cuddly toy, and it makes a beautiful keepsake for baby showers, nursery baskets, newborn photos, and cozy bedtime routines.
This Sleepy Bear and Bunny Lovey Blanket is an original crochet pattern inspired by classic baby comforters. The design uses one simple square blanket base with a soft amigurumi animal head attached in the center. You can make the bear version with rounded ears or the bunny version with long floppy ears.
The finished lovey is gentle, giftable, and practical. It does not use plastic eyes or hard pieces, so the face is embroidered for a soft baby-friendly finish.
Description
This crochet baby lovey has a small granny-style blanket body with a plush animal head sewn securely to the center. The blanket drapes softly from the head, giving it that cozy comforter shape babies love to hold.
The bear version has small rounded ears and a sleepy embroidered face. The bunny version has long soft ears and the same peaceful expression. Both versions include simple arms sewn under the head so the lovey feels cuddly without being complicated.
You can make it in soft neutrals like cream, oatmeal, beige, taupe, gray, or white. The finished look is calm, modern, and nursery-friendly, making it a beautiful handmade baby gift.
Materials
- Worsted weight baby yarn or soft DK yarn in your main animal color
- Matching yarn for the blanket body
- Small amount of black or dark brown yarn for embroidered face
- 4 mm crochet hook
- Yarn needle
- Stitch marker
- Scissors
- Polyester fiberfill for the head and arms
- Measuring tape
Finished Size
Approximate finished size:
- Blanket width: 14–16 inches across, depending on yarn and number of rounds
- Head height: about 3.5–4 inches
- Full lovey length: about 16–18 inches from top of head to blanket point
Finished size may vary depending on yarn, hook size, and tension.
Gauge
Gauge is not critical for this lovey, but stitches should be tight enough that stuffing does not show through the head and arms.
If your amigurumi stitches have gaps, use a smaller hook for the head, ears, and arms.
Abbreviations
- MR: magic ring
- ch: chain
- sc: single crochet
- dc: double crochet
- inc: increase, 2 stitches in the same stitch
- dec: invisible decrease
- sl st: slip stitch
- st: stitch
- sts: stitches
- sp: space
- FO: fasten off
Pattern Notes
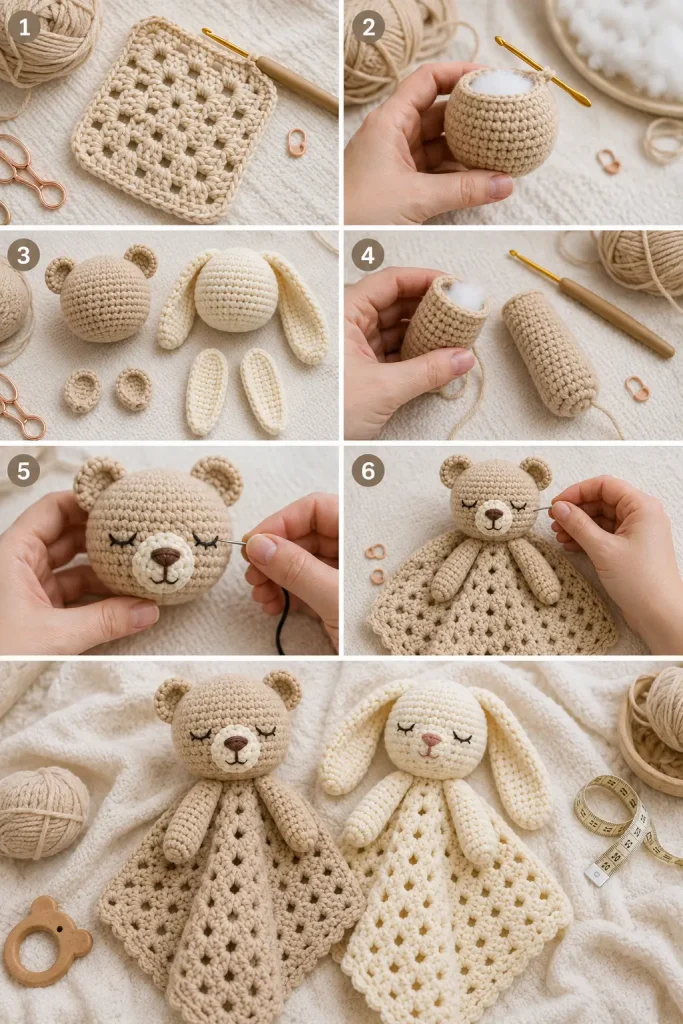
The blanket is made first as a simple granny square.
The animal head is worked separately in continuous rounds.
The bear ears or bunny ears are made separately and sewn to the head.
The arms are made separately and sewn under the head.
The head is sewn securely to the center of the blanket.
Use embroidered eyes instead of safety eyes for a baby lovey.
For baby items, sew every piece firmly and avoid buttons, beads, ribbons, or loose decorations.
Step-by-Step Instructions
Lovey Blanket Base
Use main blanket color and 4 mm hook.
Round 1
Make a MR.
Ch 3, work 2 dc into the ring, ch 2.
Repeat 3 times: 3 dc into the ring, ch 2.
Join with sl st to the top of beginning ch 3.
Pull ring closed.
You should have 4 clusters and 4 corner spaces.
Round 2
Sl st into the next corner ch-2 sp.
Ch 3, 2 dc, ch 2, 3 dc in the same corner sp.
In each remaining corner ch-2 sp, work: 3 dc, ch 2, 3 dc.
Join with sl st to top of beginning ch 3.
Round 3
Sl st into the next corner ch-2 sp.
Ch 3, 2 dc, ch 2, 3 dc in the same corner sp.
Ch 1.
Work 3 dc in the space between the next two corner groups, ch 1.
In the next corner ch-2 sp, work: 3 dc, ch 2, 3 dc, ch 1.
Repeat around.
Join with sl st to top of beginning ch 3.
Rounds 4–10
Continue working in the same granny square pattern.
In each corner ch-2 space, work: 3 dc, ch 2, 3 dc.
In each ch-1 space along the sides, work: 3 dc, ch 1.
Join each round with sl st.
After Round 10, check the size. The blanket should measure about 14–16 inches across.
For a larger lovey, add 1–2 more rounds.
Blanket Border
Round 11
Ch 1.
Sc evenly around the entire blanket.
Work 3 sc in each corner ch-2 space.
Join with sl st to first sc.
Round 12
Ch 1.
Sc in each st around.
Work 3 sc in the center stitch of each corner.
Join with sl st.
FO and weave in ends.
Animal Head
Use animal head color and 4 mm hook.
Work in continuous rounds. Use a stitch marker.
Round 1
Make a MR and work 6 sc into the ring. (6)
Round 2
Inc in each st around. (12)
Round 3
Repeat around: sc in next st, inc in next st. (18)
Round 4
Repeat around: sc in next 2 sts, inc in next st. (24)
Round 5
Repeat around: sc in next 3 sts, inc in next st. (30)
Round 6
Repeat around: sc in next 4 sts, inc in next st. (36)
Rounds 7–12
Sc in each st around. (36)
Round 13
Repeat around: sc in next 4 sts, dec. (30)
Round 14
Repeat around: sc in next 3 sts, dec. (24)
Round 15
Repeat around: sc in next 2 sts, dec. (18)
Stuff the head firmly but keep it soft.
FO, leaving a long tail for sewing.
Do not close the opening. The opening will be sewn flat to the center of the blanket.
Bear Ears
Make 2 for the bear version.
Use animal head color.
Round 1
Make a MR and work 6 sc into the ring. (6)
Round 2
Inc in each st around. (12)
Round 3
Repeat around: sc in next st, inc in next st. (18)
Round 4
Sc in each st around. (18)
FO, leaving a long tail for sewing.
Flatten each ear into a soft half-circle shape. Do not stuff.
Bunny Ears
Make 2 for the bunny version.
Use animal head color.
Round 1
Make a MR and work 6 sc into the ring. (6)
Round 2
Repeat around: sc in next st, inc in next st. (9)
Round 3
Repeat around: sc in next 2 sts, inc in next st. (12)
Rounds 4–13
Sc in each st around. (12)
Round 14
Repeat around: sc in next 2 sts, dec. (9)
Rounds 15–16
Sc in each st around. (9)
FO, leaving a long tail for sewing.
Do not stuff the ears.
Flatten each ear gently before attaching.
Arms
Make 2.
Use animal head color.
Round 1
Make a MR and work 6 sc into the ring. (6)
Round 2
Inc in each st around. (12)
Rounds 3–10
Sc in each st around. (12)
Stuff the lower half very lightly.
Flatten the top opening.
Sc through both layers across to close.
FO, leaving a long tail for sewing.
Face Embroidery
Use black or dark brown yarn.
Place the face on the front of the head between Rounds 8 and 11.
Embroider two sleepy eyes using short curved stitches.
Place the eyes about 5–6 stitches apart.
Embroider a small vertical nose line in the center.
For the bunny, add a small “X” shape for the nose and mouth if desired.
For the bear, add a short vertical line and a tiny curved mouth.
Keep the face soft, simple, and secure.
Assembly
Place the finished blanket flat with the center facing up.
Position the head opening over the exact center of the blanket.
Pin the head in place.
Using the long yarn tail from the head, sew around the head opening several times to attach it securely to the blanket center.
Sew the arms to the blanket just below the head, one on each side.
For the bear version, sew the rounded ears to the upper sides of the head.
For the bunny version, sew the long ears to the top of the head, slightly angled outward.
Weave in all ends securely.
Gently shape the head, ears, arms, and blanket with your hands.
Optional Hanging or Gift Tag Loop
Use the same yarn color.
Join yarn to one top corner of the blanket.
Ch 12.
Sl st into the same corner to form a small loop.
FO and weave in ends.
This loop can be used for display or gifting, but skip it if making the lovey for a baby to use.
Tips & Variations
Use soft washable baby yarn for the best baby gift result.
Use cream or white for a classic bunny lovey.
Use oatmeal, beige, or taupe for a teddy bear lovey.
Use gray for a modern neutral nursery style.
Use a 3.5 mm hook for the head and arms if your stitches are loose.
Make the blanket larger by adding extra granny square rounds.
Make the blanket smaller by stopping after Round 8.
For a thicker blanket, make two granny squares and crochet them together around the border.
For a very young baby, avoid long loops, ribbons, buttons, and safety eyes.
If gifting, include care instructions so the lovey can be washed gently.
FAQ
Is this baby lovey beginner-friendly?
Yes. The blanket is a simple granny square, and the animal pieces use basic amigurumi shapes. The most important part is sewing everything securely.
Can I make both bear and bunny versions from the same pattern?
Yes. The blanket, head, and arms are the same. The only difference is the ear shape.
What yarn works best for a crochet lovey?
Soft washable baby yarn, cotton-blend yarn, or soft acrylic yarn works well. Choose something gentle against baby skin.
Can I use safety eyes?
For baby items, embroidered eyes are the safest choice. Avoid plastic safety eyes for loveys intended for babies or toddlers.
Can I make the blanket bigger?
Yes. Continue adding granny square rounds until the blanket is the size you want. Keep the head centered when assembling.
Conclusion
The Sleepy Bear and Bunny Lovey Blanket is a soft, sweet crochet baby gift that feels cozy, handmade, and timeless. With one simple blanket base and two animal options, you can make a classic teddy bear lovey or a gentle bunny comforter using the same easy construction.
It is perfect for baby showers, nursery keepsakes, newborn gifts, and handmade market tables. Choose soft neutral yarn, embroider a sleepy face, and enjoy creating a little comfort blanket that feels full of warmth and love.




Such an adorable “lovey”! Would you happen to have a YouTube tutorial for it? I am a beginner-Ish crocheter . I do better by watching videos.