Introduction
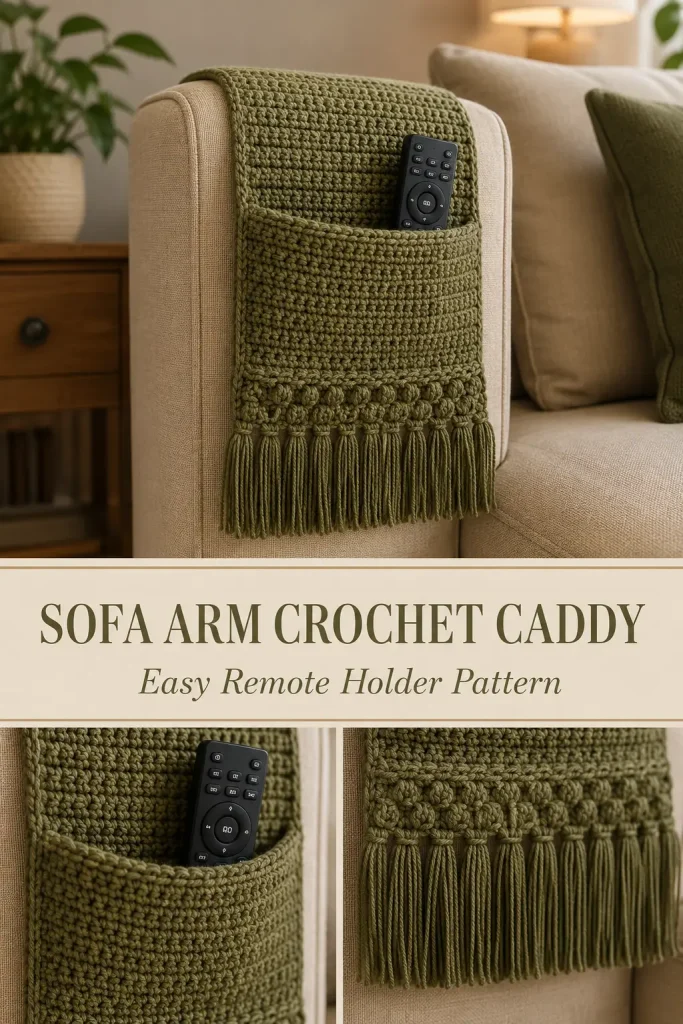
A crochet sofa arm caddy is one of those clever handmade projects that feels useful the moment you finish it. It keeps the remote, phone, glasses, notebook, or small essentials close by, while also adding cozy texture to a plain couch arm.
This Sofa Arm Crochet Remote Caddy is an original crochet pattern inspired by the design idea in the screenshot: a textured olive green organizer that drapes over the sofa arm, with a deep front pocket, decorative macrame-style lower texture, and long fringe at the bottom.
The pattern is designed to be practical and buildable. It includes the main drape panel, pocket section, side shaping, front decorative panel, fringe, and finishing so the caddy hangs neatly and holds a remote without collapsing.
Description
This crochet sofa organizer is made as a long rectangular panel that folds over the arm of a couch. The top section sits across the sofa arm, while the front section hangs down with a pocket for storage.
The upper fabric uses a thick textured stitch so it grips the couch arm better. The lower pocket is sewn onto the front panel and finished with a raised decorative band and long fringe, giving it a boho home decor look.
The design works beautifully in olive green, sage, cream, charcoal, taupe, terracotta, or beige. Cotton or cotton-blend yarn is best because it gives structure, but sturdy acrylic can also work if you want a softer finish.
Materials
- Worsted weight cotton or cotton-blend yarn in olive green
- 5 mm crochet hook
- Yarn needle
- Scissors
- Measuring tape
- Stitch markers or pins
- Optional: wooden beads for fringe
- Optional: non-slip rug grip fabric for the underside
Finished Size
Approximate finished size:
- Full panel length: 32 inches
- Panel width: 9 inches
- Front hanging section: about 17 inches
- Pocket height: about 7 inches
- Fringe length: about 6 inches
You can adjust the length depending on your sofa arm size.
Gauge
Approximate gauge:
- 14 stitches = 4 inches
- 12 rows = 4 inches in textured stitch
Gauge is not strict, but the fabric should be firm enough to hold shape.
If your fabric is too floppy, use a smaller hook.
If it is too stiff, use a larger hook.
Abbreviations
- ch: chain
- sc: single crochet
- hdc: half double crochet
- dc: double crochet
- sl st: slip stitch
- BLO: back loop only
- st: stitch
- sts: stitches
- sp: space
- FO: fasten off
Special Stitch
Textured Linen Stitch
Sc in next st, ch 1, skip next st.
On the next row, work sc into each ch-1 space, ch 1 over each sc.
This creates a woven, sturdy texture.
Pattern Notes
The main panel is worked flat in rows.
The pocket is made separately and sewn onto the front section.
The lower decorative band is added after the pocket is attached.
The fringe is attached to the bottom edge.
The panel should be long enough to drape over the sofa arm, with weight on the inside of the arm to help hold it in place.
For more grip, you can sew non-slip fabric to the underside.
Step-by-Step Instructions
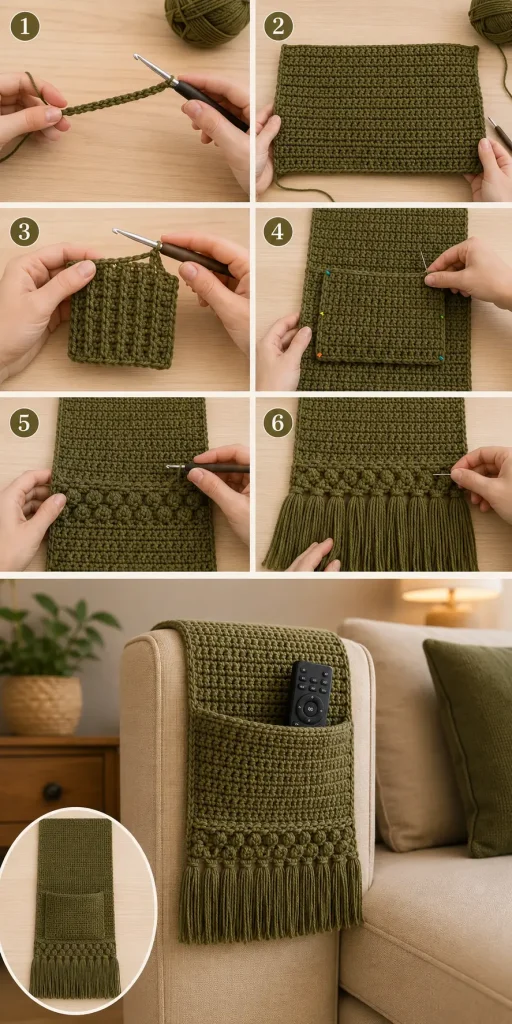
Main Sofa Arm Panel
Use olive green yarn and a 5 mm hook.
Foundation Chain
Ch 34.
Row 1
Sc in 2nd ch from hook.
Ch 1, skip next ch.
Repeat across: sc in next ch, ch 1, skip next ch.
Sc in last ch if needed.
Ch 1, turn.
Row 2
Sc in first st.
Ch 1.
Sc in next ch-1 sp.
Repeat across: ch 1, sc in next ch-1 sp.
Sc in last st.
Ch 1, turn.
Rows 3–78
Repeat Row 2 until the panel measures about 32 inches long.
Do not fasten off.
This long panel will drape over the sofa arm.
Main Panel Border
Ch 1.
Sc evenly around all four sides of the panel.
Work 3 sc in each corner.
Join with sl st to first sc.
FO and weave in ends.
The border keeps the panel edges neat and stronger.
Marking the Fold
Lay the panel over your sofa arm.
Adjust it so about 15 inches rests over the inside of the sofa arm and about 17 inches hangs down the outside.
Mark the fold line with stitch markers.
This fold line helps you place the pocket correctly on the hanging front section.
Pocket Panel
The pocket should be strong enough to hold a remote.
Use olive green yarn.
Foundation Chain
Ch 32.
Row 1
Hdc in 2nd ch from hook and in each ch across.
Ch 1, turn. (31)
Row 2
Hdc in BLO of each st across.
Ch 1, turn. (31)
Row 3
Hdc in each st across.
Ch 1, turn. (31)
Rows 4–20
Repeat Row 2 and Row 3.
FO, leaving a long tail for sewing.
The pocket should measure about 8.5 inches wide and 7 inches tall.
Pocket Top Edge
Join yarn to one top corner of the pocket.
Ch 1.
Sc evenly across the top edge.
Ch 1, turn.
Sc in each st across.
FO and weave in ends.
This makes the pocket opening firmer.
Attaching the Pocket
Lay the main panel flat with the front hanging section facing up.
Place the pocket on the lower half of the front section.
Leave about 1.5 inches between the bottom of the pocket and the bottom edge of the main panel.
Pin the pocket in place.
Sew down the left side, across the bottom, and up the right side.
Do not sew the top closed.
For extra strength, sew a second line of stitches along the pocket sides.
Optional Pocket Divider
If you want two smaller pockets, add a center seam.
Find the center of the pocket.
Using matching yarn and a yarn needle, sew a vertical line from the bottom of the pocket to the top edge.
This creates two compartments for a remote and phone.
For one large remote pocket, skip this step.
Decorative Raised Band
This band sits below the pocket and above the fringe, similar to the textured lower section in the screenshot.
Join olive green yarn near the lower front edge, about 1 inch below the pocket.
Work across the width of the main panel.
Row 1
Ch 1.
Sc evenly across the front panel.
Ch 1, turn.
Row 2
Repeat across: sc in next st, ch 1, skip next st.
Ch 1, turn.
Row 3
Sc in first st.
Work 2 dc in each ch-1 sp across.
Sc in last st.
Ch 1, turn.
Row 4
Sc in each st across.
FO and weave in ends.
This creates a raised decorative texture before the fringe.
Bottom Fringe
Cut strands of olive green yarn about 14 inches long.
Use 3 strands for each fringe group.
Attach fringe along the bottom edge of the caddy.
How to Attach Fringe
Fold 3 strands in half.
Insert hook through a bottom-edge stitch.
Pull the folded loop through.
Pull the loose ends through the loop.
Tighten gently.
Repeat every 2 stitches across the bottom edge.
Trim fringe evenly to about 6 inches.
Optional Bead Detail
For a more boho look, slide a wooden bead onto some fringe groups before tightening the knot.
Use beads only if the caddy is decorative and not near small children or pets.
Non-Slip Backing Option
If your sofa fabric is slippery, add non-slip backing.
Cut a strip of non-slip rug grip fabric slightly smaller than the inside section of the caddy.
Hand sew it to the underside of the part that rests on the sofa arm.
This helps the organizer stay in place.
Finishing
Weave in all ends securely.
Place the caddy over the sofa arm.
Adjust the fold so the pocket hangs straight.
Put a remote inside the pocket and check the balance.
If the caddy slides, add non-slip backing or make the inside resting section longer.
Trim the fringe evenly.
Size Adjustments
Wider Sofa Arm
Add more chains to the foundation chain.
Start with any even number of chains.
Narrow Sofa Arm
Use fewer foundation chains.
The panel should be slightly narrower than the top of the sofa arm so it sits neatly.
Longer Inside Grip Section
Add more rows to the main panel.
A longer inside section gives more weight and helps the caddy stay in place.
Deeper Pocket
Add more rows to the pocket panel.
For a phone pocket, keep the pocket slightly taller.
Tips & Variations
Use olive green for the earthy modern look from the screenshot.
Use cream or beige for a soft neutral living room style.
Use charcoal for a modern minimalist sofa.
Use terracotta for a warm boho home decor version.
Use cotton yarn for the strongest pocket structure.
Use a smaller hook if your pocket stretches too much.
Add a second pocket if you want room for glasses or a phone.
Skip the fringe for a cleaner modern organizer.
Add fringe only to the front edge for the closest boho style.
FAQ
Is this sofa arm caddy beginner-friendly?
Yes. This pattern is beginner-friendly if you can work flat rows, basic stitches, sew pieces together, and attach fringe.
Is this the exact pattern from the screenshot?
No. This is a new original pattern inspired by the visible idea in the screenshot: a crochet sofa arm organizer with a pocket, textured front, and fringe. The stitch counts, construction, and details are original.
What yarn is best?
Cotton or cotton-blend yarn is best because it creates a sturdy fabric that holds the remote better. Acrylic can work but may stretch more.
How do I stop it from sliding off the sofa arm?
Make the inside section longer, use cotton yarn, and add non-slip rug grip fabric underneath if needed.
Can I make it with more pockets?
Yes. Make the main pocket wider or sew vertical divider lines to create separate sections.
Conclusion
The Sofa Arm Crochet Remote Caddy is practical, cozy, and stylish. It gives you a handmade place to store your remote while adding texture and warmth to your living room.
The olive green color, sturdy pocket, raised decorative band, and long fringe give it a modern boho feel, while the simple construction keeps it realistic to crochet. Make one for your sofa, reading chair, bedroom chair, or as a useful handmade housewarming gift.



