Spiral Christmas Tree Ornaments (Free Crochet Pattern)
Published: November 13, 2026
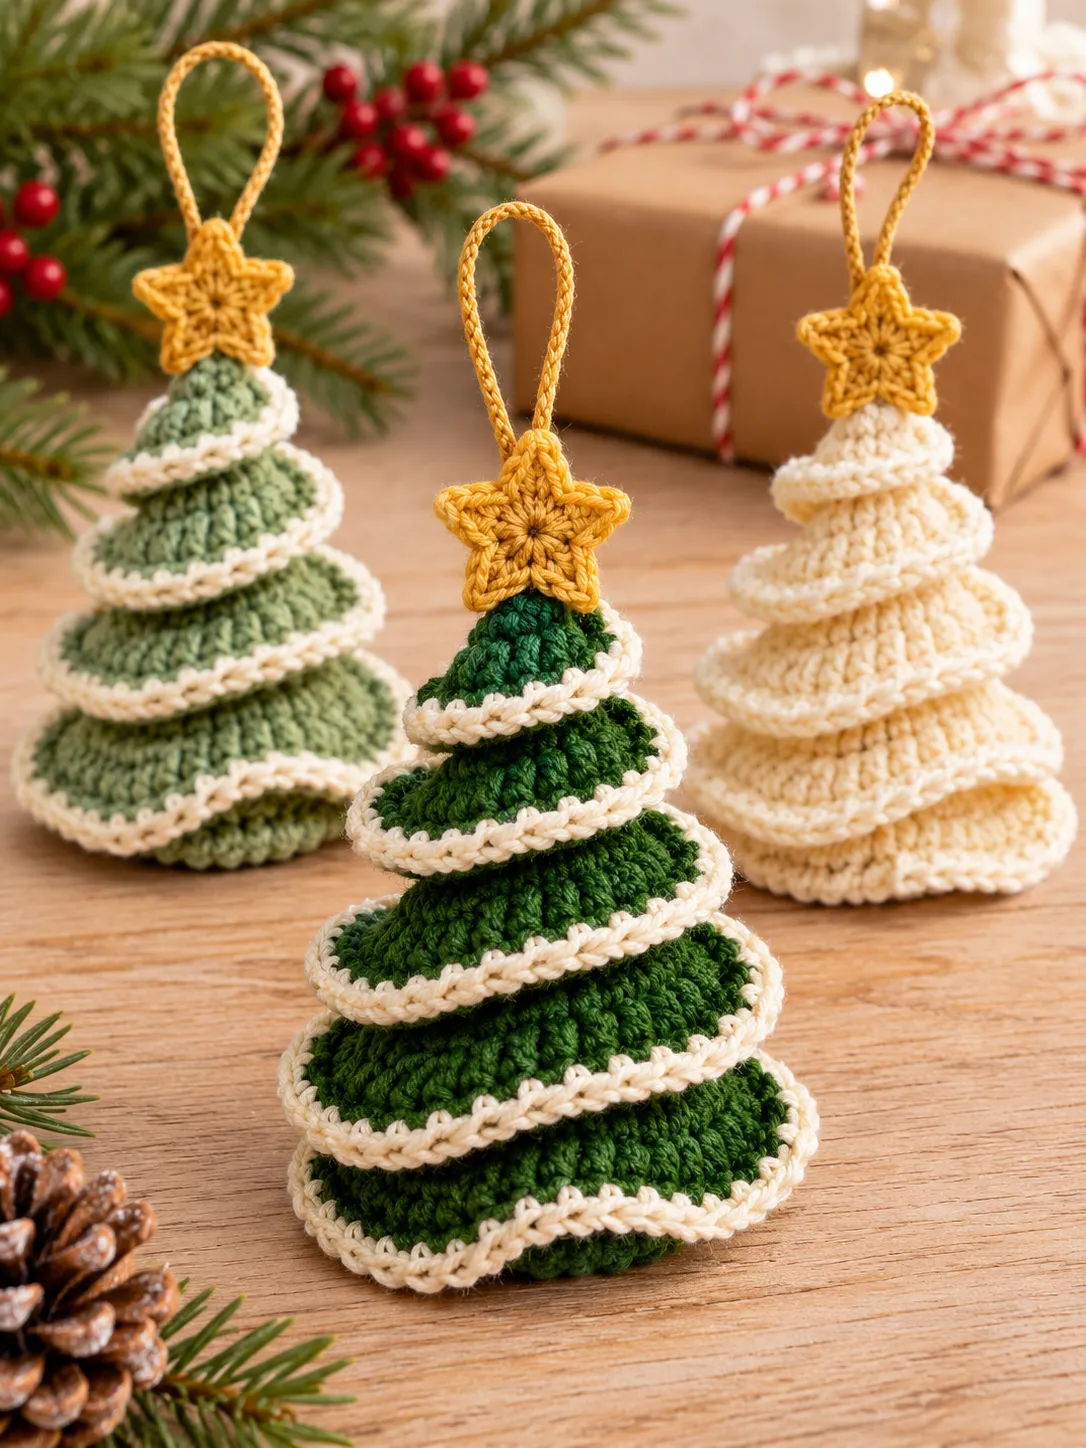
These adorable spiral Christmas tree ornaments are a lovely way to add a handmade touch to holiday decorating. With their curling branches, tiny crochet stars, and festive colors, they look especially charming tied to Christmas presents or hanging from a holiday tree.
The best part is that you don’t need complicated shaping or advanced stitches. Each tree starts with one long crochet strip, which becomes a textured spiral before being gathered into a miniature Christmas tree. A contrasting edging makes the branches stand out, while a golden star finishes the top.
This beginner-friendly free crochet pattern is perfect for using small amounts of leftover yarn. Make a classic forest-green tree, a soft sage version, or a snowy cream ornament. You can crochet several in one afternoon and turn them into personalized gift toppers, Christmas decorations, or thoughtful handmade stocking stuffers.
Introduction / Description
This original Yarnimals design uses a ruffled crochet strip arranged around a hanging cord to make five gradually smaller spiral tiers.
The ornament features:
- Five cascading spiral sections.
- A contrasting cream-colored edge.
- A miniature crocheted star.
- A built-in hanging loop.
- No stuffing or wire required.
Skill level: Confident beginner
Crochet terminology: US terms
Construction: Flat strip, gathered and secured into a spiral
Approximate working time: 45–90 minutes per ornament
Materials
- Main yarn: DK weight (#3) cotton yarn, approximately 20–25 yd (18–23 m), in forest green.
- Edging: DK cotton yarn in warm cream, approximately 5 yd (4.5 m).
- Star and hanging loop: DK cotton yarn in golden yellow, approximately 4 yd (3.7 m).
- Alternative colors: Sage green, ivory, dusty blue, or deep burgundy.
- Crochet hook: 3.5 mm (US E/4).
- Tapestry needle.
- Scissors.
- Six removable stitch markers or small yarn markers.
- Optional fabric stiffener for a firmer ornament.
Finished Size
Approximate finished dimensions:
- Height: 4–5 inches (10–13 cm), including the star but excluding the hanging loop.
- Width: 2.5–3.5 inches (6–9 cm) across the lowest spiral tier.
Actual size depends on yarn weight, hook size, tension, and how loosely you arrange the spiral.
Gauge
Gauge is not critical.
For a firm ornament, crochet with even, slightly snug stitches. If your work feels unusually stiff or difficult to shape, use a slightly larger hook.
The finished strip should be flexible enough to form rounded loops without pulling the crocheted stitches apart.
Abbreviations
MR: Magic ring
ch: Chain
sc: Single crochet
hdc: Half double crochet
inc: Increase (2 sc in the same stitch)
sl st: Slip stitch
st: Stitch
sts: Stitches
FO: Fasten off
RS: Right side
WS: Wrong side
Parentheses at the end of each row give the completed stitch total. Turning chains are not included unless stated.
Pattern Notes
- The tree is made from one continuous crochet strip.
- The increases create a ruffled edge, while the foundation-chain edge stays shorter.
- The ruffled strip is arranged into five gradually smaller spiral tiers.
- The star is crocheted separately and secured at the top.
- Work through both loops unless instructed otherwise.
- Do not pull the central gathering cord too tightly; the tiers need space to spread naturally.
- All stitch counts below are for this original design.
Step-by-Step Instructions
Part 1 — Crochet the Green Spiral Strip
Using forest-green DK cotton yarn and a 3.5 mm hook:
Foundation: Ch 43. (43 chains)
Row 1: Starting in the second ch from the hook, work 1 sc in each ch across. Ch 1 and turn. (42)
Row 2: Work 2 hdc in each st across. Ch 1 and turn. (84)
Row 3: Repeat [1 sc in the next st, 2 sc in the following st] 42 times. (126)
FO and weave in the working end.
Your crochet strip will have a straight inner foundation edge and a longer, naturally ruffled outer edge. Do not flatten or stretch the ruffles.
Part 2 — Add the Cream Edging
Join cream yarn to the first stitch of Row 3.
Edging Row 1: Work 1 loose sl st into each stitch across the outside edge. (126)
FO and weave in the ends.
The cream edging should remain visible along the outside of the curling green branches.
Part 3 — Form the Christmas Tree Spiral
Lay the strip on the table with its original foundation-chain edge facing inward.
Starting at one end of that foundation edge, count and mark stitches 1, 13, 23, 31, 37, and 42.
The distances between the marked stitches are 12, 10, 8, 6, and 5 stitches. These sections form the five tiers from largest to smallest.
- Cut approximately 18 inches (46 cm) of matching green yarn and thread it through a tapestry needle.
- Pass the needle through the marked foundation-edge stitches, starting at stitch 1.
- Bring the marked points toward a central vertical line, leaving space between them rather than pulling them tightly together.
- Arrange the longest section into the lowest, broadest curve.
- Arrange each successively shorter section above it, rotating the curves slightly around the central line to form a continuous cascading spiral.
- Add small securing stitches through the inner edge at each marked point to keep the tiers in position.
The cream edging should face outward, following the spiral from the top toward the base. Adjust the lower curves until the ornament resembles a miniature Christmas tree.
Part 4 — Crochet the Golden Star
Using golden-yellow yarn:
Round 1: Work 10 sc into a MR. Join with a sl st to the first sc. (10)
Round 2: Repeat the following sequence five times: Ch 3. Starting in the second ch from the hook, work 1 sl st, then 1 sc in the next ch. Work 1 sl st into each of the next 2 stitches of Round 1. After five repeats, all 10 base stitches have been used. (5 points)
FO, leaving a 10-inch (25 cm) tail for attaching the star.
Gently spread the five points with your fingers.
Part 5 — Add the Hanging Loop
Join golden-yellow yarn behind the top point of the star.
Loop: Ch 18, then sl st into the same attachment point to close the loop. (18 chains)
FO and weave in the short end.
Use the longer star tail to secure the star at the top of the gathered spiral tree. Make sure the hanging loop sits directly above the tree’s center so the ornament hangs upright.
Part 6 — Finishing and Shaping
- Lay the ornament on a clean towel.
- Gently spread the five spiral tiers.
- Check that the lower tier is the widest and the top tier is the narrowest.
- Adjust the cream edging so it faces outward.
- If necessary, lightly dampen the cotton yarn and pin the ornament into its preferred shape.
- Allow it to dry completely before hanging.
Avoid pressing the entire ornament flat. Its three-dimensional shape is part of the design.
Color Ideas
Classic Christmas: Forest green branches, cream edging, golden star.
Vintage Christmas: Muted sage green, ivory edging, antique gold star.
Snowy Winter: Warm-white branches, cream edging, pale golden star.
Modern Holiday: Dusty blue branches, white edging, silver-gray star.
Traditional Red: Deep burgundy branches, cream edging, mustard-gold star.
Use the same stitch counts for every version.
Tips & Variations
- Keep the spiral soft. Cotton yarn gives good stitch definition without making the branches too bulky. Avoid pulling the gathering cord tightly.
- Make matching gift toppers. Tie the hanging loop around a ribbon on a wrapped Christmas present. The ornament can later be reused on a Christmas tree.
- Try different sizes. Changing yarn weight and hook size changes the finished ornament’s dimensions. Keep the original stitch counts for the same proportions.
- Add gentle structure. A little fabric stiffener can help the spiral maintain its shape. Test it on leftover yarn first.
Frequently Asked Questions
- Is this crochet Christmas tree suitable for beginners? Yes. The basic strip uses chains, single crochet, and half double crochet. Arranging the spiral and making the star require a little extra patience.
- Do I need wire to make the tree stand upright? No. The central gathering cord and securing stitches hold the spiral tiers together. The ornament is designed to hang rather than stand unsupported.
- Can I make these with acrylic yarn? Yes. DK acrylic yarn can work, although it may create a softer ornament than cotton.
- How can I make the ornament smaller? Use a thinner yarn with an appropriately smaller hook. This changes the dimensions while preserving the stitch counts and overall construction.
- Can these Christmas tree ornaments be washed? Hand-wash gently according to the yarn label. Reshape the spiral while damp and allow it to dry completely.
Conclusion / Final Thoughts
These spiral Christmas tree ornaments are a beautiful way to turn a little yarn into something festive and personal. Their curling branches, delicate edging, and tiny crochet stars make them lovely for Christmas trees, gift wrapping, and handmade holiday decorations.
Save this free crochet pattern for your Christmas crafting list, and make a whole collection in your favorite holiday colors!