Staggered Raised Brick Crochet Baby Blanket
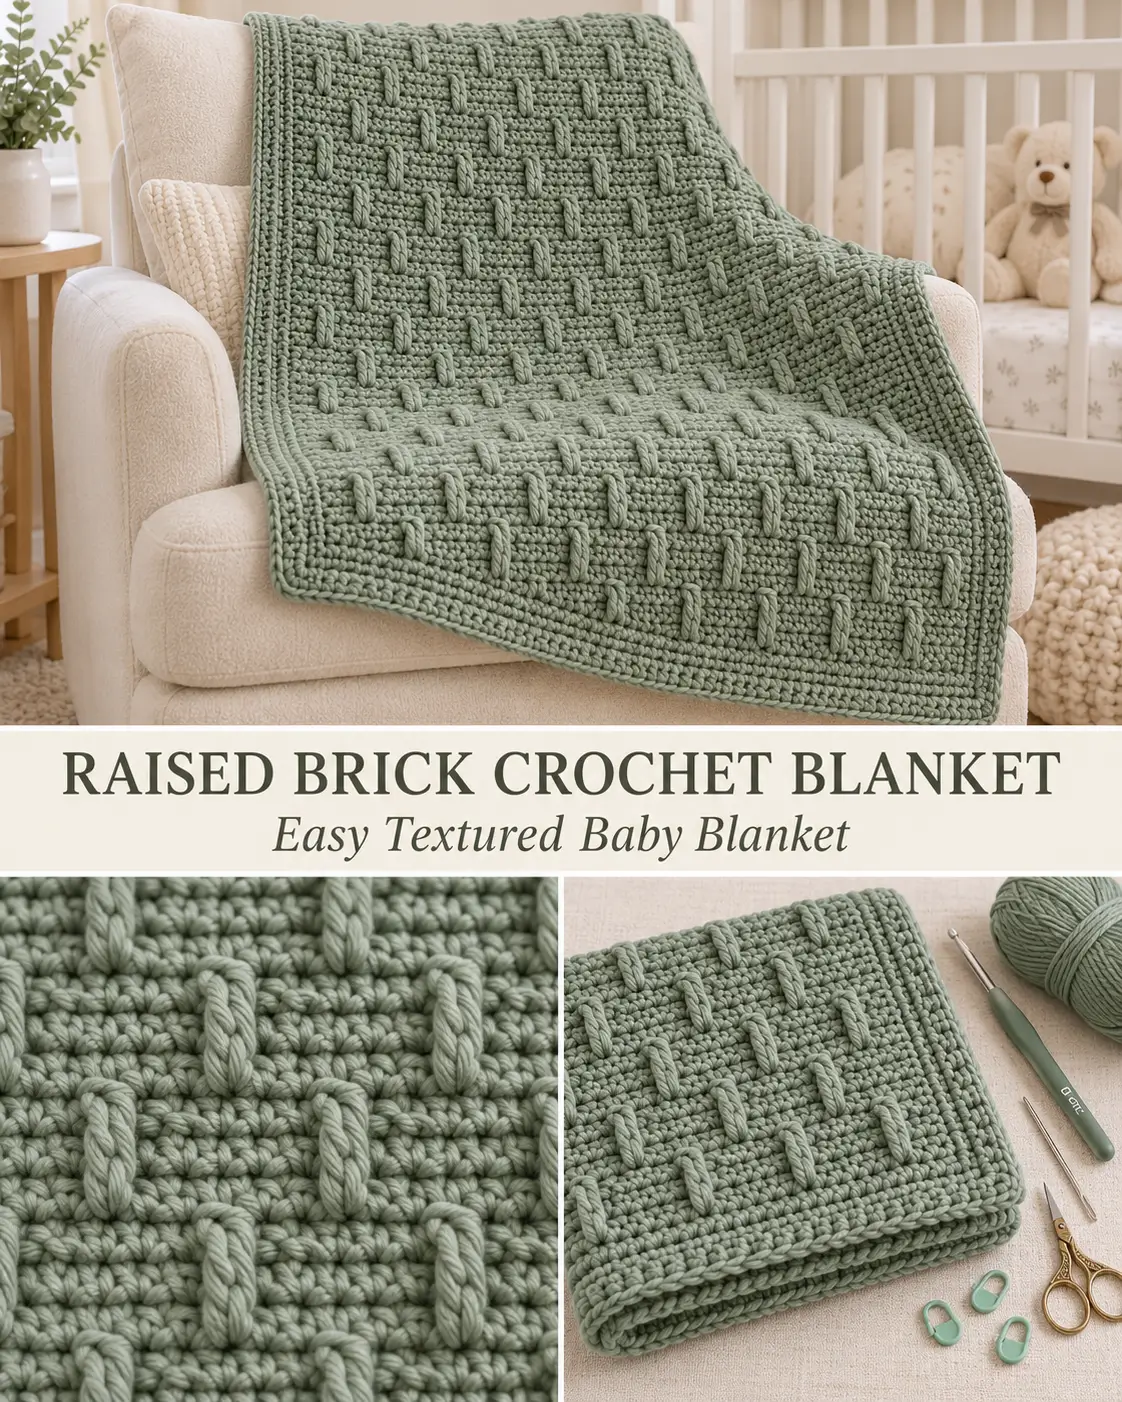
This textured crochet baby blanket uses a simple repeating pattern of long raised stitches over a dense single-crochet background to create the woven brick appearance shown across the fabric.
The texture is formed by working elongated front-post double crochets around stitches two rows below. The raised bars alternate position every second texture row, so the little vertical blocks appear staggered instead of lining up in straight columns.
Worked in a muted sage green, the finished blanket has a modern woven look without requiring separate motifs, complicated cables, or sewing.
Finished Size
Approximately:
36 inches / 91 cm wide
by:
40 inches / 102 cm long
including the border.
The pattern is easy to resize using a:
multiple of 4 + 3 stitches
Materials
- Medium weight #4 yarn
- Approximately 1,350–1,550 yards / 1,235–1,420 meters
- 5 mm crochet hook
- Yarn needle
- Scissors
- Stitch markers
- Measuring tape
For the look shown here, use:
muted sage green / eucalyptus green
Choose a smooth yarn with good stitch definition so the raised brick texture remains visible.
Skill Level
Confident beginner
You should know how to make:
- chain
- single crochet
- double crochet
- front-post stitches
- working into rows below
- working evenly around a blanket edge
Abbreviations
This pattern uses US crochet terminology.
ch — chain
sc — single crochet
dc — double crochet
sl st — slip stitch
st / sts — stitch / stitches
BLO — back loop only
LFPdc — long front-post double crochet worked two rows below
Special Stitch — Long Front-Post Double Crochet Two Rows Below
The elongated raised stitches create the little vertical bars.
Yarn over.
Look directly below the next unworked stitch of the current row.
Find the corresponding stitch two rows below.
Insert the hook from front to back and then back to front around the post of that stitch.
Yarn over.
Pull up a long loop until it reaches the height of your current row.
You should have:
3 loops on the hook
Yarn over and pull through 2 loops.
Yarn over and pull through the final 2 loops.
One LFPdc is complete.
The stitch directly behind the LFPdc on the current row is skipped.
This keeps the stitch count unchanged.
Important Tip for the Raised Stitches
Do not make the long loop too short.
The LFPdc must travel over the row between your hook and the post below.
Pull the loop all the way up to the current row height before completing the double crochet.
If the raised stitch is too short, the fabric will pucker.
Gauge
Approximately:
13 stitches = 4 inches / 10 cm
in the established textured pattern.
Approximately:
11–12 rows = 4 inches / 10 cm
Make a swatch containing several complete pattern repeats before measuring.
The relief stitches may make the fabric slightly narrower than plain single crochet.
Pattern Multiple
The stitch pattern uses:
multiple of 4 + 3
For the baby blanket:
115 working stitches
Begin with:
116 chains
Foundation
Ch:
116
Keep the foundation chain relaxed.
If your chains are usually tight, make the foundation with a 5.5 mm hook and switch to the 5 mm hook for Row 1.
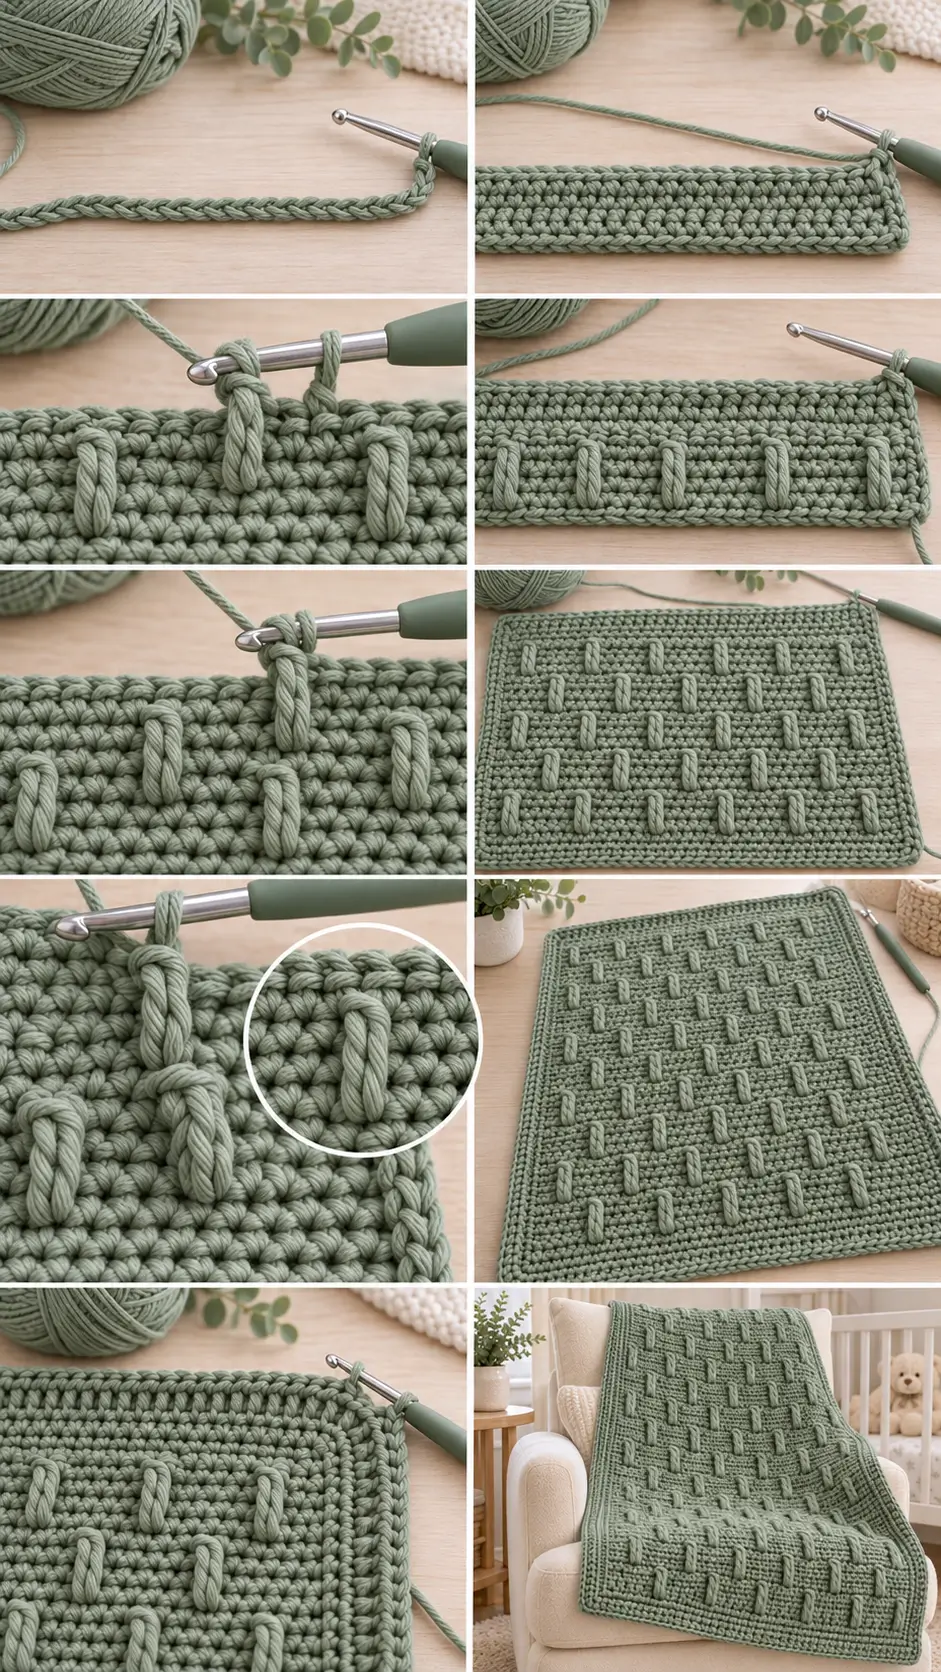
Row 1
Beginning in the second chain from the hook:
Sc in every chain across.
115 sc
Ch 1.
Turn.
Row 2
Sc in every stitch across.
115 sc
Ch 1.
Turn.
You now have the two plain rows needed before the first raised stitches.
Row 3 — First Raised Brick Row
Sc in the first:
2 stitches
Now begin the repeat.
Look directly below the next unworked stitch.
Work:
1 LFPdc around the corresponding stitch two rows below
Skip the stitch directly behind the LFPdc on the current row.
Then work:
1 sc in each of the next 3 stitches
Repeat:
LFPdc, skip 1 current-row st, sc in next 3
across until:
1 stitch remains
Sc in the final stitch.
You should still have:
115 stitches
Ch 1.
Turn.
Row 4 — Plain Row
Sc in every stitch across.
Work into the top of each LFPdc just as you would an ordinary stitch.
115 sc
Ch 1.
Turn.
Row 5 — Offset Raised Brick Row
The raised stitches are now shifted by two stitches so they sit between the previous raised bars.
Sc in the first:
4 stitches
Then repeat:
LFPdc around the corresponding stitch two rows below
Skip the current-row stitch directly behind it.
Sc in the next:
3 stitches
Continue:
LFPdc, skip 1, sc in next 3
until:
3 stitches remain
Sc in the final 3 stitches.
115 stitches
Ch 1.
Turn.
Row 6 — Plain Row
Sc in every stitch across.
115 sc
Ch 1.
Turn.
Main Pattern Repeat
Repeat:
Rows 3–6
for the remainder of the blanket.
That four-row repeat creates the staggered woven texture.
The sequence is:
Texture Row A
Raised bars beginning after 2 sc.
Plain Row
Texture Row B
Raised bars beginning after 4 sc.
Plain Row
Then repeat.
How the Brick Texture Develops
After several repeats, the fabric should show short raised vertical bars arranged like bricks.
One texture row places the bars in positions such as:
● — — — ● — — — ●
The next textured row shifts them sideways:
— — ● — — — ● — —
The plain single-crochet rows between them create the dense background.
This combination produces:
- staggered raised blocks
- subtle woven appearance
- very small openings
- warm dense fabric
- strong stitch definition
Keep the Long Stitches Aligned
Every LFPdc should be worked around the post that sits directly below the stitch you are skipping.
Do not angle several stitches sideways.
The long stitch should travel vertically upward.
Only the placement of the complete repeat changes between Rows 3 and 5.
Continue the Blanket Body
Continue repeating Rows 3–6 until the blanket body measures approximately:
38 inches / 96.5 cm long
Finish after:
Row 4 or Row 6
so the final body row is a plain single-crochet row.
This gives you a clean edge for the border.
Do not fasten off.
Check the Blanket Before Adding the Border
Lay the fabric flat.
The body should have:
- straight sides
- consistent width
- evenly spaced raised bars
- staggered brick pattern
- no strong puckering
- no large holes
A little texture-related waviness usually relaxes after the border and blocking.
Border Round 1
Ch 1.
Do not turn.
Work along the top edge:
1 sc in every stitch
At the first corner work:
3 sc
Now work down the long side.
Because the body rows are relatively short, begin with approximately:
3 sc for every 4 row ends
Spread the stitches evenly.
At the next corner:
3 sc
Across the foundation edge:
Work:
1 sc in each foundation stitch
At the next corner:
3 sc
Work evenly up the second long side.
At the final corner:
3 sc
Join with a sl st to the first sc.
Check the Border Placement
Lay the blanket flat before continuing.
If the sides:
ruffle outward, remove a few stitches.
If the border:
pulls inward, add a few stitches along the long edges.
The exact side count depends on your personal row height.
Flatness is more important than forcing a specific number.
Border Round 2 — Subtle Raised Ridge
Ch 2.
The ch-2 does not count as a stitch.
Work:
1 hdc BLO in every stitch around
At each corner, locate the middle stitch of the previous 3-sc corner.
Work:
3 hdc BLO in that stitch
Continue around.
Join with a sl st.
The unused front loops create a subtle raised line around the blanket.
Border Round 3
Ch 1.
Sc in every stitch around.
At each corner:
Work:
3 sc in the center corner stitch
Continue around.
Join.
Fasten off.
Weaving In the Ends
Cut the yarn, leaving approximately:
8 inches / 20 cm
Thread the yarn onto a yarn needle.
Weave through several stitches on the wrong side.
Change direction.
Weave through another group of stitches.
Trim the excess yarn.
Repeat for the foundation tail and any joined yarn.
Blocking
Light blocking helps straighten the raised brick pattern.
Follow the care instructions for your yarn.
Lay the blanket flat.
Smooth all four edges.
Gently straighten the corners.
Do not press or flatten the raised stitches.
Allow the blanket to dry completely.
How the Finished Texture Should Feel
The front should feel noticeably more textured than the back.
The raised stitches should form:
- short vertical bars
- regular staggered spacing
- shallow relief
- compact brick-like rows
The fabric between the bars should remain soft and dense.
The blanket should not feel stiff like a basket or mat.
If the Blanket Starts Puckering
The most common cause is an LFPdc that is too short.
When pulling the yarn through the post two rows below:
bring the loop fully up to the current row height
before finishing the dc.
Do not tighten it afterward.
If the Raised Bars Look Loose
The opposite problem happens when the long loop is pulled excessively high.
Pull the loop only high enough to reach the current working row comfortably.
It should lie against the surface without sagging.
If the Texture Starts Moving Sideways
Check your beginning stitches.
Row 3 must begin with:
2 sc
Row 5 must begin with:
4 sc
If you accidentally begin both texture rows in the same position, the bars will stack instead of staggering.
If Your Stitch Count Changes
Every body row must contain:
115 stitches
Remember:
The LFPdc counts as one stitch.
After making it, you must:
skip the current-row stitch directly behind it
Then continue with the next 3 sc.
If you forget the skip, the blanket will gradually become wider.
If the Blanket Becomes Narrower
Check that you have not:
- skipped the stitch behind the LFPdc twice
- missed an edge stitch
- forgotten the final sc stitches
- accidentally worked two long stitches over the same section
Using stitch markers in the first and last stitch can make the edges easier to track.
If You Cannot Identify the Stitch Two Rows Below
Look straight down from the next current-row stitch.
You will see:
- the stitch directly below in the previous row
- the stitch directly beneath that in the second row below
Work around the post of the second stitch.
Do not insert into its top loops.
The hook goes:
front → around post → back to front
Making a Smaller Stroller Blanket
Use:
91 working stitches
because:
91 = 4 × 22 + 3
Begin with:
ch 92
Work the same pattern until approximately:
32–34 inches / 81–86 cm long
Then add the border.
Main Baby Blanket
Use:
115 working stitches
Begin with:
ch 116
Work until approximately:
38 inches / 96.5 cm before the border
Finished size:
approximately:
36 × 40 inches / 91 × 102 cm
Larger Toddler Blanket
Use:
139 working stitches
because:
139 = 4 × 34 + 3
Begin with:
ch 140
Continue until approximately:
46–48 inches / 117–122 cm long
before adding the border.
Throw Blanket Version
Use:
151 working stitches
because:
151 = 4 × 37 + 3
Begin with:
ch 152
Work until approximately:
54–58 inches / 137–147 cm long
before adding the border.
Increase yarn quantity accordingly.
Yarn Ideas
This stitch is especially effective in solid or lightly heathered colors.
Try:
Sage Green
for the soft botanical look.
Cream
for a classic textured baby blanket.
Dusty Blue
for a calm nursery palette.
Warm Oatmeal
for neutral home decor.
Terracotta
for a richer modern throw.
Soft Gray
for a contemporary minimalist look.
Highly variegated yarn can hide the staggered raised bars, so subtle or solid colors work best.
Optional Two-Color Version
For more visible brick rows, alternate two related colors.
For example:
Rows 1–2: light sage
Rows 3–4: darker sage
Rows 5–6: light sage
Continue alternating every two rows.
Keep the raised-stitch placement exactly the same.
This creates a striped woven effect without changing the construction.
Final Pattern at a Glance
Foundation
Ch:
116
Row 1
Sc in second chain and across.
115 sc
Row 2
Sc across.
115 sc
Row 3
Sc in first 2.
Repeat:
LFPdc around corresponding post 2 rows below, skip current-row stitch behind it, sc in next 3
until 1 stitch remains.
Sc in last stitch.
Row 4
Sc across.
Row 5
Sc in first 4.
Repeat:
LFPdc around corresponding post 2 rows below, skip current-row stitch behind it, sc in next 3
until 3 stitches remain.
Sc in last 3.
Row 6
Sc across.
Repeat
Repeat:
Rows 3–6
until the blanket body measures approximately:
38 inches / 96.5 cm
Finish after a plain sc row.
Border
Round 1
Sc evenly around.
Work:
3 sc in every corner
Round 2
Hdc BLO around.
Work:
3 hdc BLO in every corner
Round 3
Sc around.
Work:
3 sc in every corner
Fasten off and weave in the ends.
The finished blanket has a dense sage-green background covered with alternating rows of short raised vertical bars, creating a simple staggered brick texture that looks detailed while relying on one repeatable relief-stitch technique.