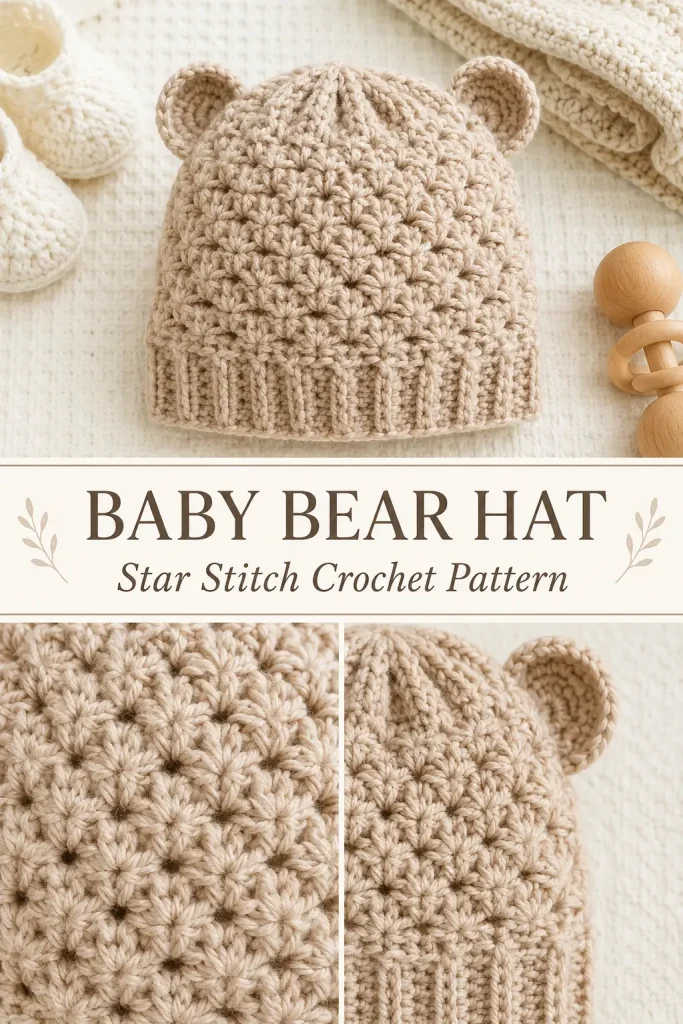
This star stitch baby bear hat is soft, textured, and adorable for little handmade outfits. The raised star stitch gives the hat a beautiful cozy surface, while the rounded bear ears make it extra sweet for baby gifts, newborn photos, winter outfits, and craft fair makes.
This version is worked as a star stitch panel, then seamed into a hat shape with a gathered crown, ribbed brim, and two small bear ears. It is a lovely project if you enjoy textured crochet but want a simple construction that feels easier than shaping a full hat in complex rounds.
Description
This crochet baby bear hat has a full star stitch body, a stretchy ribbed crochet brim, and two rounded bear ears sewn near the top. The texture is soft, raised, and slightly floral, giving the hat a cozy handmade look. You can make it in warm beige, cream, dusty blue, sage, blush pink, oatmeal, cocoa brown, or any soft baby yarn color. The finished hat is cute, practical, and perfect as a handmade crochet baby gift.
Materials
- DK or light worsted baby yarn
- 5.0 mm crochet hook for the hat body
- 4.5 mm crochet hook for the brim and ears
- Yarn needle
- Scissors
- Stitch markers
- Measuring tape
Abbreviations
- ch = chain
- sc = single crochet
- hdc = half double crochet
- dc = double crochet
- sl st = slip stitch
- st = stitch
- sts = stitches
- yo = yarn over
- blo = back loop only
- rep = repeat
Pattern Notes
- This pattern uses US crochet terms.
- The hat body is worked flat in star stitch rows.
- The short edges are seamed together to form a tube.
- One edge is gathered closed for the crown.
- A ribbed brim is worked around the bottom.
- Bear ears are made separately and sewn on.
- The pattern is written for a baby size, approximately 0–6 months.
- To resize, make the starting chain longer or shorter for height, and work more or fewer rows for circumference.
Finished Size
Approximate size for 0–6 months:
- Hat circumference: 14–15 inches around
- Hat height: 5.5–6 inches from crown to brim
Baby sizing can vary, so measure when possible.
Special Stitch: Star Stitch
Beginning Star: Insert hook into 2nd ch from hook, yo and pull up a loop. Insert hook into next ch, yo and pull up a loop. Insert hook into next ch or stitch, yo and pull up a loop. Insert hook into next stitch, yo and pull up a loop. Insert hook into next stitch, yo and pull up a loop. You should have 6 loops on the hook. Yo and pull through all 6 loops. Ch 1 to close the star.
Next Star: Insert hook into the center eye of the previous star, yo and pull up a loop. Insert hook into the side strand of the previous star, yo and pull up a loop. Insert hook into the same stitch used by the last loop of the previous star, yo and pull up a loop. Insert hook into each of the next 2 stitches, pulling up one loop from each. You should have 6 loops on the hook. Yo and pull through all loops. Ch 1 to close.
Step-by-Step Instructions
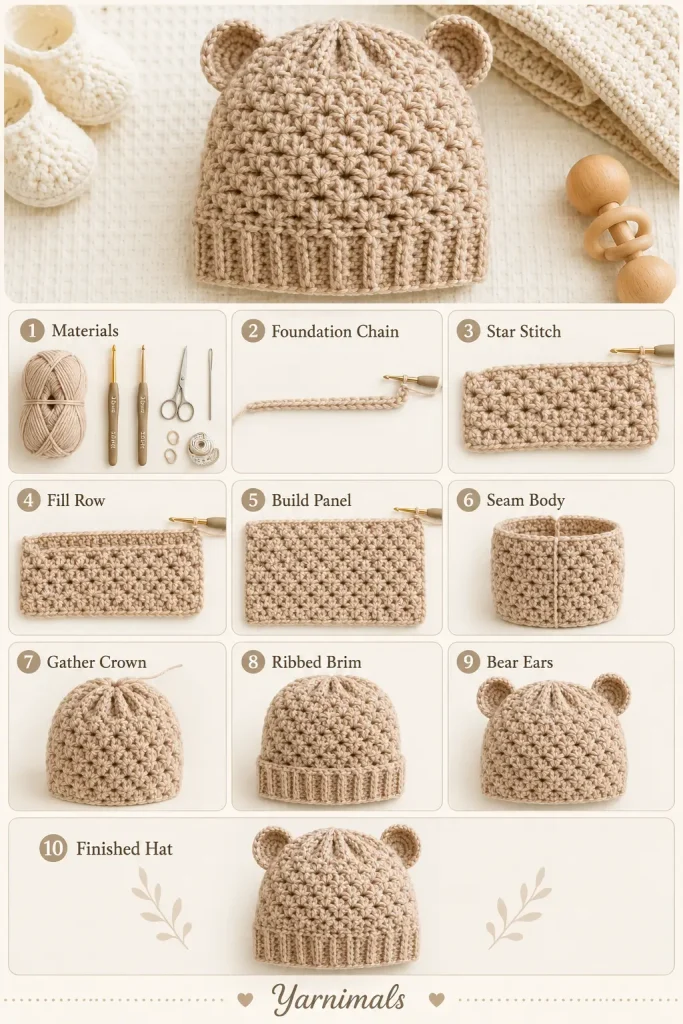
Hat Body Panel
With the 5.0 mm hook, ch 29.
This chain creates the height of the hat body before the brim. For a taller hat, add 2 or 4 chains.
Row 1: Star Stitch Row
Work a Beginning Star across the first group of chains.
Continue working Next Star stitches across the row.
When you reach the end, dc in the final chain to create a neat edge.
Ch 2, turn.
Row 2: Fill Row
Work 2 hdc into the center eye of each star across.
Hdc into the final edge stitch.
Ch 3, turn.
Row 3: Star Stitch Row
Work a Beginning Star using the turning chain and first stitches of the row.
Continue working Next Star stitches across.
Dc in the final stitch.
Ch 2, turn.
Row 4: Fill Row
Work 2 hdc into each star eye across.
Hdc into the final edge stitch.
Ch 3, turn.
Continue the Panel
Repeat Rows 3 and 4 until the panel measures about 14–15 inches wide when gently stretched.
End after a fill row.
Do not make the panel too loose, because the hat will stretch with wear.
Fasten off, leaving a long tail for seaming.
Seam the Hat Body
Fold the panel in half with the right sides together.
Use the long yarn tail and a yarn needle to sew the first and last rows together.
Turn the hat right side out.
The seam will sit at the back of the hat.
Gather the Crown
Thread a long piece of yarn onto your yarn needle.
Weave the yarn in and out around the top edge of the hat.
Pull gently to gather the crown closed.
Once the top is closed, stitch across the opening several times to secure it.
Knot firmly and weave in the end inside the hat.
Shape the crown gently with your hands.
Ribbed Brim
Join yarn at the bottom edge of the hat.
Use the 4.5 mm hook.
Brim Round 1
Ch 2.
Work dc evenly around the bottom edge of the hat.
Join with sl st to the first dc.
Brim Round 2
Ch 2.
Work fpdc around the first stitch.
Work bpdc around the next stitch.
Repeat from fpdc, bpdc around.
Join with sl st.
Brim Round 3
Repeat Round 2.
For a deeper brim, add one more ribbing round.
Fasten off and weave in the end.
Bear Ears
Make 2 ears.
With the 4.5 mm hook, make a magic ring.
Round 1
Ch 1.
Work 6 sc into the ring.
Pull the ring closed.
Join with sl st.
6 sc
Round 2
Ch 1.
Work 2 sc in each st around.
Join with sl st.
12 sc
Round 3
Ch 1.
Work 1 sc in first st, 2 sc in next st.
Repeat around.
Join with sl st.
18 sc
Round 4
Ch 1.
Sc in each st around.
Join with sl st.
18 sc
Round 5
Ch 1.
Sc in first 8 sts.
Sl st in next st.
Leave the remaining stitches unworked so the bottom edge stays slightly open for sewing.
Fasten off, leaving a long tail.
Fold the bottom of the ear slightly inward to create a soft rounded bear-ear shape.
Repeat for the second ear.
Attach the Ears
Lay the hat flat with the back seam centered.
Place one ear on each side of the crown, slightly above the middle of the hat.
Pin or hold the ears in place.
Use the long yarn tails to sew each ear securely to the hat.
Stitch through the bottom edge of the ear several times.
Check that both ears are even before weaving in the ends.
Finishing
Weave in all loose ends.
Gently shape the star stitch texture with your fingers.
Check the brim stretch.
Make sure both ears are firmly attached.
Do not press the star stitch flat, because the raised texture is the main feature of the hat.
Tips & Variations
Use beige or warm brown yarn for a classic teddy bear look.
Use cream or oatmeal yarn for a soft neutral baby hat.
Use blush pink, dusty blue, sage green, or lavender for a sweet nursery color palette.
For a newborn size, make the body panel slightly shorter and stop when the width measures about 13–14 inches.
For a larger baby size, make the body panel wider before seaming.
If the star stitches look too tight, use a slightly larger hook for the body.
If the brim feels loose, use a smaller hook for the ribbing.
For a matching set, make a star stitch baby blanket or small scarf in the same yarn.
FAQ
Is this crochet baby bear hat beginner-friendly?
It is best for confident beginners. You should know how to chain, half double crochet, double crochet, and sew pieces together. The star stitch may take a little practice, but it becomes easy after a few rows.
Can I make this hat without bear ears?
Yes. You can leave off the ears for a simple textured baby beanie.
What yarn is best for this hat?
Soft baby yarn, DK yarn, or light worsted yarn works well. Choose a washable yarn that feels gentle against baby skin.
Can I resize the hat?
Yes. Make the starting chain longer for a taller hat, shorter for a smaller hat, and work more or fewer rows to adjust the circumference.
Conclusion
This star stitch baby bear crochet hat is a sweet handmade project with cozy texture and adorable details. The star stitch body gives the hat a beautiful raised look, while the ribbed brim and little bear ears make it practical and cute.
Make it in soft neutral teddy bear colors or choose your favorite baby yarn shade for a thoughtful handmade gift.



