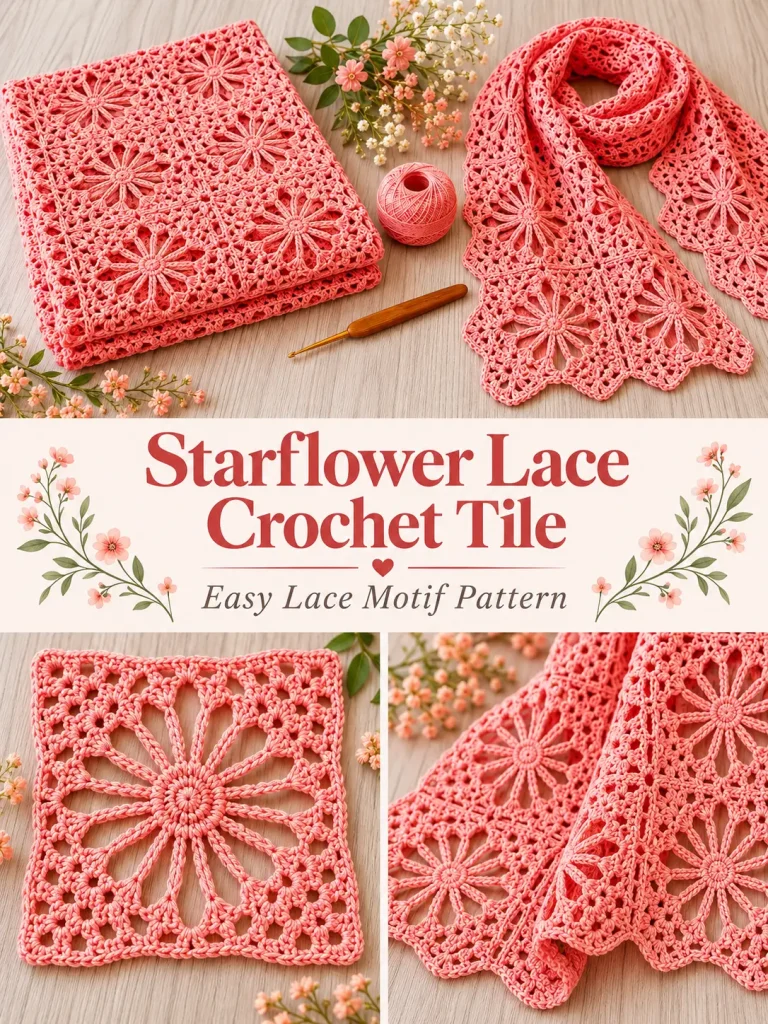
This delicate crochet tile combines a large open 8-petal starflower with airy chain spaces and a clean square frame. When the motifs are joined together, the flower centers repeat across the fabric and create the intricate lace effect that makes this style work beautifully for scarves, wraps, cardigans, table runners, pillow covers, bags, and lightweight blankets.
This version uses an original 8-petal square construction with four open side fans and four corner arches, so every motif can be made separately, blocked to the same size, and joined into almost any shape.
The sample is worked in a warm coral-pink cotton, but the texture is equally beautiful in ivory, champagne, dusty rose, sage, or soft beige.
Pattern at a Glance
Skill level: Intermediate
Terminology: US crochet terms
Construction: Individual square lace tiles
Yarn: Fingering / Category 1 cotton or size 3 crochet thread
Hook: 2.5 mm
Finished tile: Approximately 4½ inches square after blocking
Flower: 8 large petals
Final edge: 12 single crochet stitches along each side between corners
Joining: Slip stitch, whip stitch, or join-as-you-go
Blocking: Strongly recommended
Materials
You will need:
- fingering-weight cotton or size 3 crochet thread
- 2.5 mm crochet hook
- yarn needle
- scissors
- stitch markers
- blocking mats and rustproof pins
For a larger, softer motif, you can use sport-weight cotton with a 3–3.5 mm hook.
Yarn Amount
Approximate amounts will vary with yarn and tension.
One Tile
Approximately 25–30 yards
Narrow Scarf — 28 Tiles
Approximately 750–850 yards
Table Runner — 30 Tiles
Approximately 800–950 yards
Baby-Size Decorative Blanket — 63 Tiles
Approximately 1,700–1,900 yards
Throw — 120 Tiles
Approximately 3,200–3,600 yards
Always allow extra yarn for joining and the outer border.
Suggested Colors
For the coral version:
Main Color: Warm Coral / Salmon Pink
Other beautiful options include:
- warm ivory
- antique cream
- champagne
- dusty peach
- muted rose
- pale sage
- light taupe
- soft lavender
- dusty blue
A solid color makes the lace structure easiest to see.
Abbreviations
- ch = chain
- sc = single crochet
- hdc = half double crochet
- dc = double crochet
- tr = treble crochet
- sl st = slip stitch
- st = stitch
- sts = stitches
- sp = space
- rnd = round
- rep = repeat
- MR = magic ring
Important Notes
The tile is worked in joined rounds.
Do not turn unless instructed.
The flower is created first as a circle.
Round 4 connects the petal tips with alternating arches.
Rounds 5 and 6 transform the flower into a square with clearly defined corners.
Keep your chain spaces relaxed. Tight chains can cause the motif to cup instead of lying flat.
STARFLOWER LACE TILE
Make as many motifs as your chosen project requires.
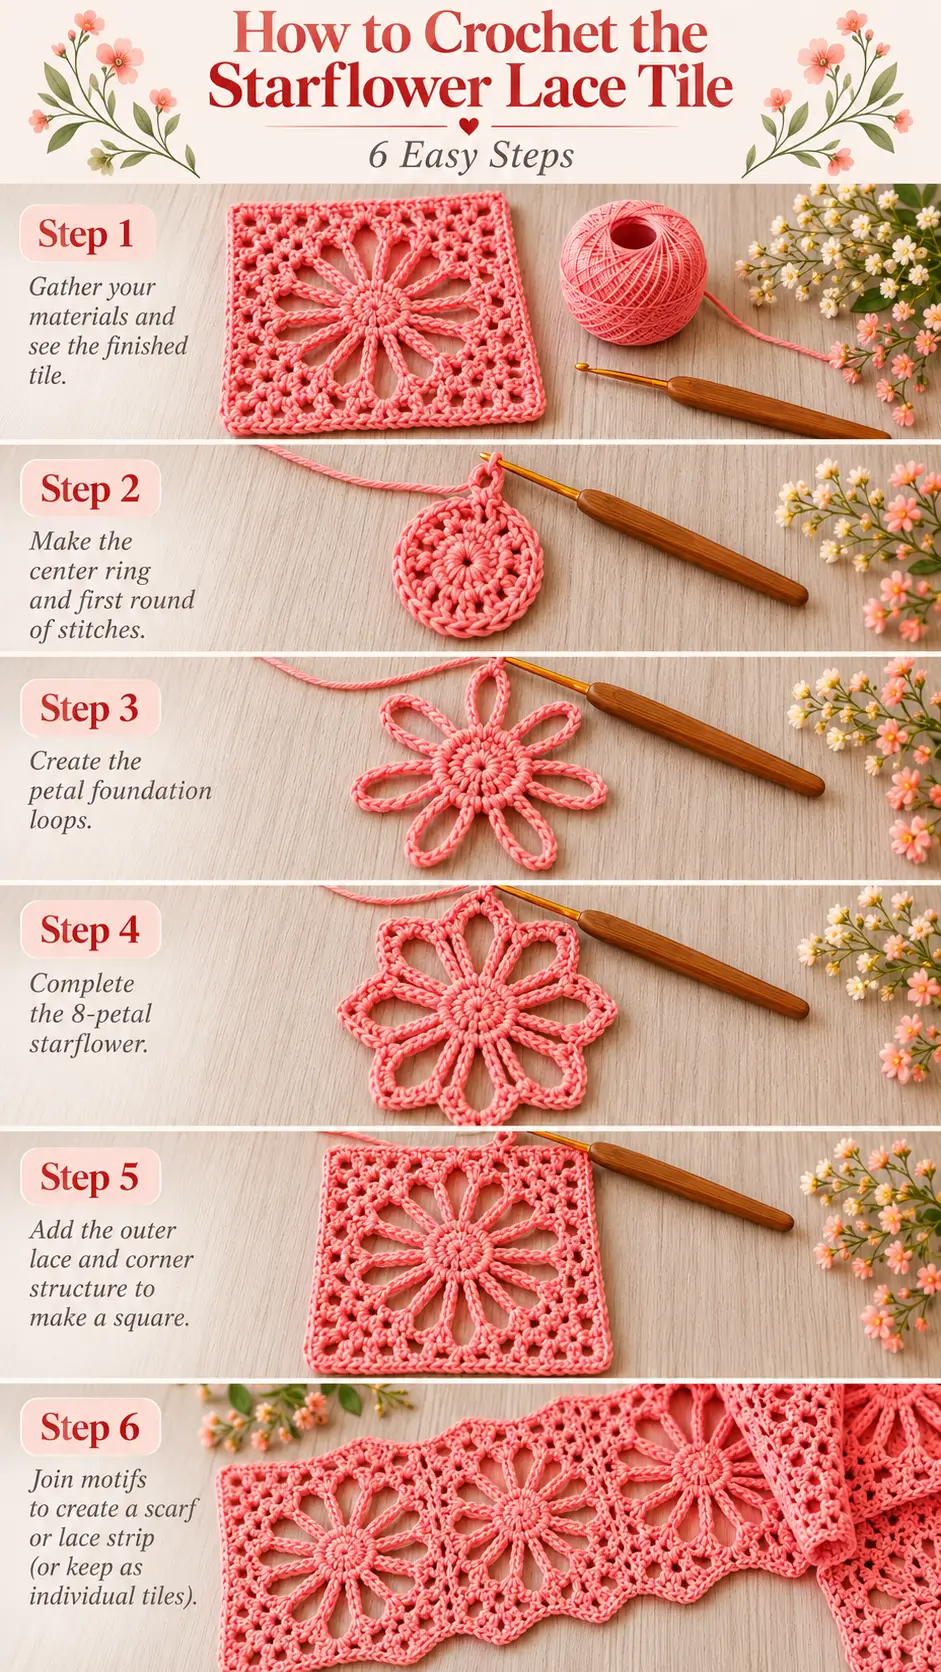
Round 1 — Center Ring
Make a magic ring.
Ch 1.
Work:
16 sc into the ring
Pull the center tightly closed.
Join with sl st to the first sc.
16 sc
Round 2 — Petal Foundations
Ch 1.
Sc in the same stitch.
Ch 7.
Skip the next stitch.
Sc in the next stitch.
Continue around:
ch 7, skip 1 st, sc in next st
You should finish with:
- 8 sc anchor stitches
- 8 ch-7 spaces
Join with sl st to the first sc.
Round 3 — Eight Starflower Petals
Sl st into the first ch-7 space.
In the same space work:
sc, hdc, 2 dc, 3 tr, 2 dc, hdc, sc
One petal complete.
Repeat the same sequence in every remaining ch-7 space:
sc, hdc, 2 dc, 3 tr, 2 dc, hdc, sc
Join with sl st to the first sc.
You should now have:
8 large petals
Each petal contains a group of 3 treble crochet stitches at its tip.
The middle treble crochet of those 3 stitches will be used in the next round.
Round 4 — Connect the Flower
Slip stitch across the first petal until you reach the:
middle treble crochet of the 3-tr group
Ch 1.
Sc in that middle tr.
Now work:
Ch 5, sc in the middle tr of the next petal.
Then:
Ch 7, sc in the middle tr of the next petal.
Continue around in this exact sequence:
- ch 5, sc in next petal
- ch 7, sc in next petal
- ch 5, sc in next petal
- ch 7, sc in next petal
- ch 5, sc in next petal
- ch 7, sc in next petal
- ch 5, sc in next petal
- ch 7
Join the final ch-7 to the first sc with a sl st.
You should now have:
- 4 ch-5 spaces
- 4 ch-7 spaces
The ch-5 spaces will become the centers of the four sides.
The ch-7 spaces will become the four corners.
Round 5 — Square the Flower
Sl st into the first ch-5 space.
Ch 3.
The ch-3 counts as the first dc.
In the same ch-5 space work:
1 dc, ch 2, 2 dc
This creates one side fan.
In the next ch-7 corner space work:
3 dc, ch 4, 3 dc
Now continue around:
In every ch-5 side space:
2 dc, ch 2, 2 dc
In every ch-7 corner space:
3 dc, ch 4, 3 dc
Join with sl st to the top of the beginning ch-3.
You should have:
- 4 side fans
- 4 corner fans
- 4 ch-2 side spaces
- 4 ch-4 corner spaces
The motif should now clearly look square.
Round 6 — Final Tile Edge
Fasten off and rejoin yarn in any ch-4 corner space.
Ch 1.
In the same corner work:
sc, ch 3, sc
Now work across the first side.
You will encounter:
- 3 dc
- 2 dc
- ch-2 space
- 2 dc
- 3 dc
Work:
1 sc in each dc
and:
2 sc in the ch-2 space
This gives:
12 sc across the side
In the next corner space work:
sc, ch 3, sc
Repeat around all four sides.
Join with sl st to the first sc.
Fasten off.
Finished Stitch Count
Each completed tile has:
- 12 sc along each straight side
- 4 ch-3 corner spaces
This regular edge makes joining the motifs much easier.
Finished Tile Size
After blocking, one motif should measure approximately:
4½ inches square
Your size may vary slightly depending on:
- yarn
- hook
- tension
- blocking
The most important thing is that every tile in the project measures the same.
Blocking the Tiles
Blocking makes a major difference with this lace pattern.
Lightly wet the finished motif.
Gently squeeze out excess water without twisting.
Place it on a blocking mat.
Pin the four corner ch-3 spaces so the tile measures approximately:
4½ × 4½ inches
Straighten each side.
Adjust the eight petals so they are evenly spaced.
Allow the tile to dry completely.
What the Finished Tile Should Look Like
A correctly completed motif should have:
- small closed center
- 8 large pointed petals
- four smaller side arches
- four larger corner arches
- open lace between flower and frame
- clear square shape
- straight final edges
The flower should remain the dominant feature.
Joining the Tiles
The simplest joining method is a flat whip-stitch seam.
Place two blocked tiles with:
wrong sides together
and right sides facing outward.
Align:
- corner space to corner space
- all 12 side stitches
Using matching yarn and a yarn needle, whip stitch through corresponding loops across the entire side.
Keep the seam relaxed.
Visible Slip-Stitch Join
For a slightly more defined tiled appearance, use a crochet hook.
Place two tiles wrong sides together.
Join yarn through both corner spaces.
Slip stitch through:
- one stitch from Tile A
- corresponding stitch from Tile B
Continue across all:
12 stitches
Finish through the opposite corner spaces.
Fasten off.
Join-As-You-Go Option
You can also join motifs while working Round 6 of each new tile.
Instead of working a ch-3 corner alone, work:
ch 1, sl st into corresponding corner of completed tile, ch 1
Along a side, replace each sc attachment point as needed by:
sl st through the corresponding stitch of the neighboring motif
Use this method only after you are comfortable keeping the motifs aligned.
Making and blocking every tile first gives you more control over the finished layout.
Narrow Crochet Scarf
For a graceful lace scarf, make:
28 motifs
Arrange:
2 tiles across × 14 tiles long
Approximate finished size before border:
9 inches wide × 63 inches long
Join all motifs.
Add the optional border below.
This size works beautifully in coral, champagne, or ivory cotton.
Wider Wrap
Make:
54 motifs
Arrange:
6 tiles across × 9 tiles long
Approximate size:
27 × 40½ inches
For a longer wrap, increase the number of rows.
Table Runner
Make:
30 motifs
Arrange:
3 tiles across × 10 tiles long
Approximate size:
13½ × 45 inches
Use mercerized cotton for a crisp decorative finish.
Decorative Baby Blanket
Make:
63 motifs
Arrange:
7 tiles across × 9 tiles long
Approximate size before border:
31½ × 40½ inches
Because this is an open lace design, use it as a decorative or supervised-use baby blanket rather than loose unattended sleep bedding.
Crochet Throw
Make:
120 motifs
Arrange:
10 tiles across × 12 tiles long
Approximate size before border:
45 × 54 inches
Add more rows for a larger couch blanket.
Pillow Cover
For a decorative cushion approximately 18 inches square:
Make:
4 tiles across × 4 tiles high
for:
16 tiles per panel
Make one floral front panel.
For the back, either:
- make another 16-tile lace panel
- or crochet a solid fabric panel
A fabric lining behind the lace will help the flower design stand out.
Crochet Bag
For a small lace handbag:
Make:
3 tiles across × 2 tiles high
for the front.
Make another:
3 × 2 panel
for the back.
That means:
12 tiles total
Add a solid crochet gusset around the sides and bottom.
A fabric lining is strongly recommended because the tile pattern contains open spaces.
Optional Outer Border
After all motifs are joined, add a simple border around the entire project.
Use the same yarn.
Border Round 1
Join yarn at any outer corner.
Ch 1.
Sc evenly around the entire project.
Along tile edges:
1 sc in each stitch
At an outer corner:
3 sc
At an inward joining point:
Work only enough stitches to keep the fabric flat.
Join with sl st.
Border Round 2
Ch 1.
Hdc in every stitch around.
At each outer corner:
3 hdc
Join.
Border Round 3 — Delicate Picot Edge
Ch 1.
Sc in first 3 stitches.
Make a picot:
ch 3, sl st into the first chain
Repeat:
sc in next 3 sts, picot
around.
Adjust slightly around corners if necessary so the edge remains flat.
Join and fasten off.
Optional Scalloped Border
For a softer scarf or wrap edge, replace the picot round with:
Skip 1 stitch.
Work:
5 dc in next stitch
Skip 1 stitch.
Sl st in next stitch.
Repeat around.
At corners, adjust the spacing slightly so one complete shell sits near each corner.
How to Make the Lace More Open
Use:
- a hook 0.5 mm larger
- relaxed chains
- a slightly thinner yarn
For example, fingering cotton with a:
3 mm hook
will produce more open petals and larger negative spaces.
How to Make the Fabric Firmer
For bags, pillow covers, or table runners:
- use mercerized cotton
- reduce hook size by 0.25–0.5 mm
- block only lightly
This creates a crisper tile.
What If the Petals Curl?
First check your tension.
The 3 treble stitches at the top of every petal need enough height.
If they are pulled too tightly, the petal may curl inward.
Try:
- pulling the treble loops slightly taller
- moving up one hook size
- wet blocking the finished motif
What If the Flower Looks Too Round?
Round 4 and Round 5 create the square structure.
Make sure you have exactly:
- 4 ch-5 spaces
- 4 ch-7 spaces
The ch-7 spaces must become the four corners.
If you accidentally use all the same chain length, the motif will remain more circular.
What If My Tile Cups?
Cupping usually means the outer rounds are too tight.
Check:
- ch-7 corner arches
- ch-4 corner spaces
- hook size
- tension
Moving up by:
0.25–0.5 mm
often fixes the problem.
What If My Tile Ruffles?
If the edges ripple, your outer rounds may be too loose.
Try:
- reducing hook size
- tightening the chain spaces slightly
- checking that Round 6 contains exactly 12 sc per side
Do not add extra stitches along the final edge.
What If My Eight Petals Are Uneven?
Round 2 must contain exactly:
8 ch-7 petal spaces
Each Round 3 petal must contain exactly:
sc, hdc, 2 dc, 3 tr, 2 dc, hdc, sc
If one petal has an extra stitch, the flower can lean toward one side.
How to Count the Petal Top
Every petal has:
3 treble crochet stitches
at its highest point.
Use the:
second / middle treble
when attaching Round 4.
Using a different stitch on some petals can make the chain framework uneven.
Can I Use Thicker Yarn?
Yes.
DK Yarn
Try:
3.5–4 mm hook
The motif may measure approximately:
5½–6 inches
Worsted Yarn
Try:
4.5–5 mm hook
The motif may become:
6½–7 inches
Always make one complete tile and measure it before calculating your project.
Can I Use Multiple Colors?
Yes.
One attractive option is:
Rounds 1–3
Flower color
Rounds 4–6
Neutral color
For example:
- dusty rose + cream
- mustard + charcoal
- sage + ivory
- plum + oatmeal
- terracotta + warm beige
This makes each flower stand out even more.
Can I Make Every Tile a Different Color?
Absolutely.
For a scrappy version, make the flower rounds in different colors and use one consistent color for the outer rounds.
That single joining color helps turn a collection of different scraps into one coordinated project.
Why This Tile Works for So Many Projects
The flower itself is decorative, but the final edge is practical.
Every side ends with exactly:
12 single crochet stitches
between the corner spaces.
That makes it easy to:
- sew motifs together
- crochet motifs together
- add straps
- attach a lining
- build a border
- enlarge the project in any direction
You can make one tile for a coaster-sized decorative piece or join dozens into a full lace throw.
Finishing
After assembling your project:
- weave in all ends securely
- wet block the complete piece
- straighten all joined seams
- open the petal points with your fingers
- shape the outer border
- allow the project to dry completely
Cotton lace often looks dramatically more polished after its final blocking.
Final Thoughts
The most interesting part of this tile is the transformation between the early rounds and the finished motif.
It begins as a simple circle.
Eight chain spaces become eight long flower petals.
Those petals are connected with alternating arches.
Then four larger spaces establish the corners and suddenly turn the flower into a square tile.
Once several squares are joined together, the open spaces from neighboring motifs begin forming a second geometric pattern between the flowers.
That is what makes this kind of crochet lace so effective: one small motif creates both the flower you see immediately and the larger repeating pattern that appears only after the tiles are joined.



