Sunny Mandala Crochet Market Bag With Long Handles
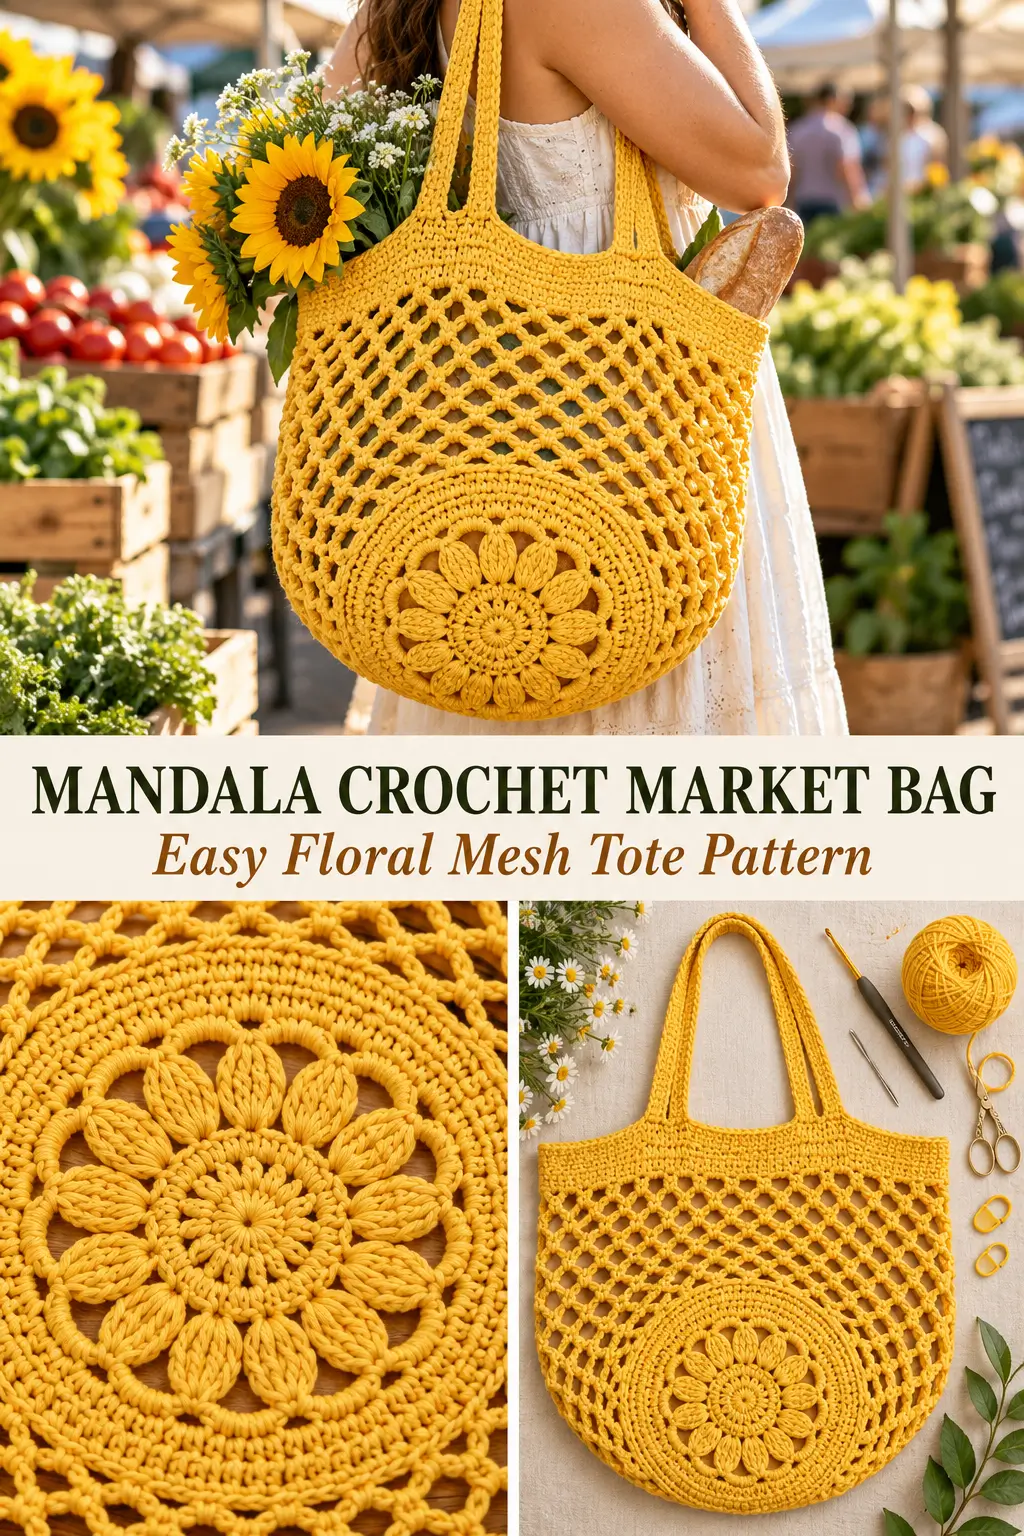
This bright yellow crochet market bag combines a decorative floral mandala base with an open mesh body and sturdy built-in handles.
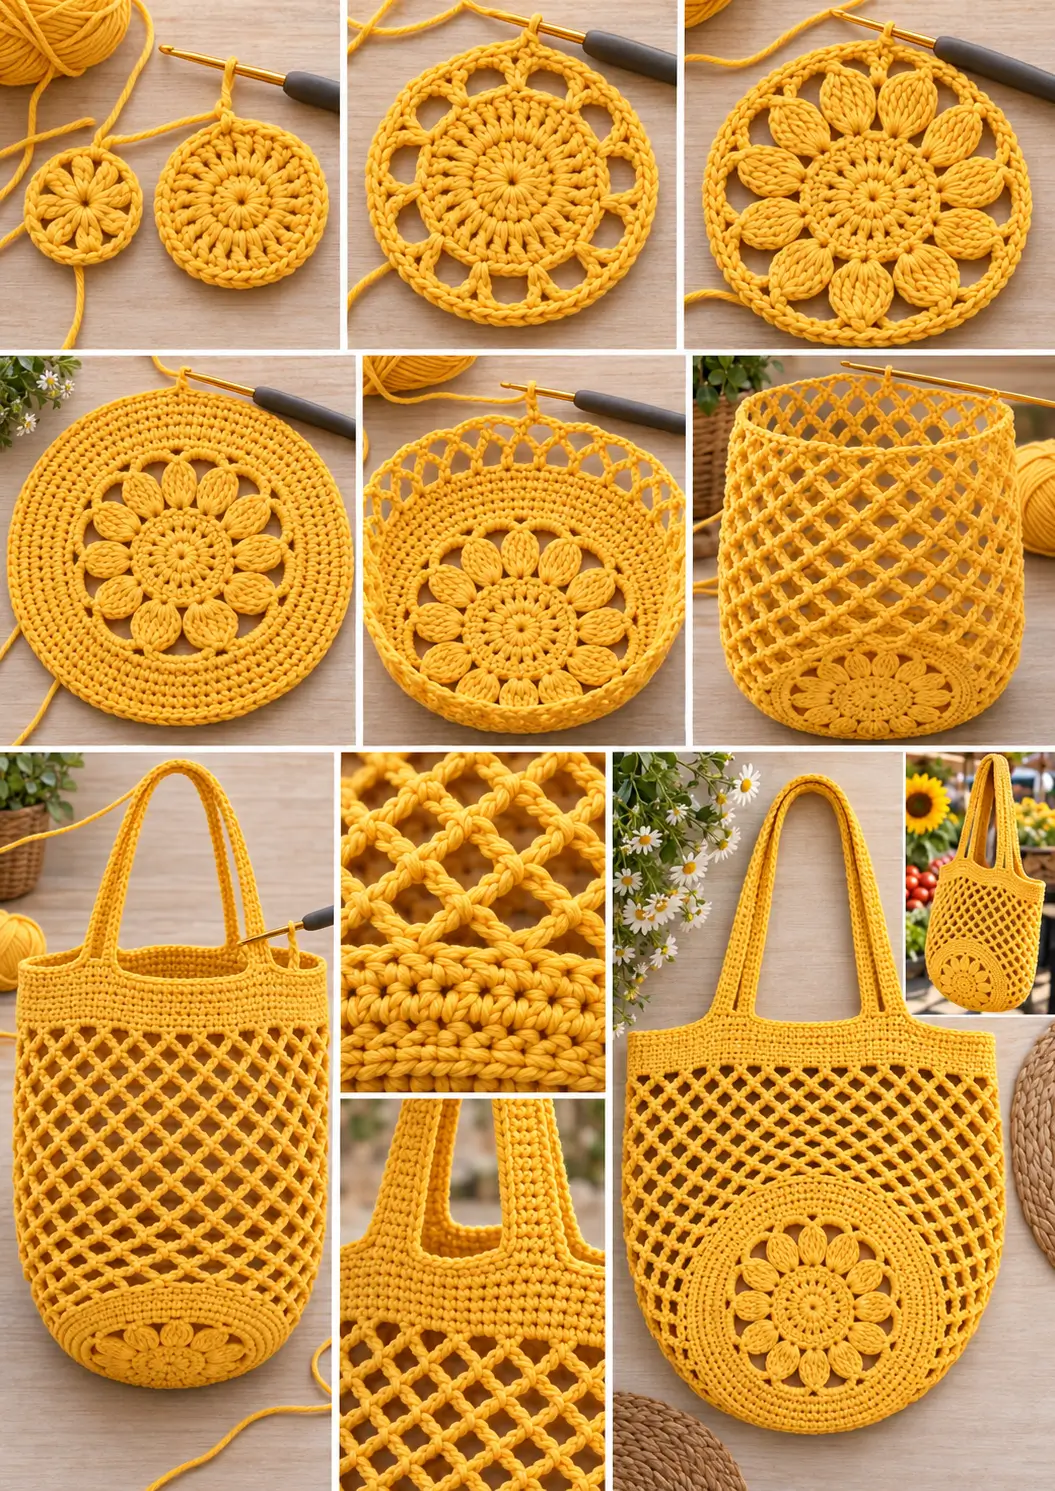
The bag begins at the center of the circular bottom and is worked outward in joined rounds. A raised flower-like motif creates the decorative base, then the fabric gradually opens into a stretchy mesh that can expand when the bag is filled. The final solid rounds strengthen the upper edge before two long handles are crocheted directly into the bag.
There are no separate panels to sew together and no separate handles to attach.
The finished bag is lightweight, reusable, washable, and roomy enough for produce, yarn, flowers, books, or everyday shopping.
Finished Size
Approximately:
12½ inches / 32 cm tall from the center bottom to the upper edge, not including handles
Approximately:
15–16 inches / 38–41 cm wide when laid flat
Circular decorative base:
approximately 8 inches / 20 cm diameter
Handle drop:
approximately 10–11 inches / 25–28 cm
The mesh stretches considerably when the bag is filled.
Materials
- DK / light #3 cotton yarn
- Approximately 300–350 yards / 275–320 meters
- 4 mm crochet hook
- Yarn needle
- Scissors
- Stitch markers, optional
Use a clear sunny shade such as:
mustard yellow, golden yellow, lemon yellow, or warm sunflower yellow
Cotton yarn is especially suitable because it creates a strong bag that can be washed repeatedly.
Skill Level
Easy Intermediate
You should know how to make:
- magic ring
- chain
- single crochet
- half double crochet
- double crochet
- slip stitch
- increases
- chain spaces
- working joined rounds
Abbreviations
This pattern uses US crochet terminology.
MR — magic ring
ch — chain
sc — single crochet
hdc — half double crochet
dc — double crochet
sl st — slip stitch
st / sts — stitch / stitches
sp / sps — space / spaces
inc — 2 stitches in the same stitch
Turning chains do not count as stitches unless specifically stated.
Construction Overview
The bag is worked in five sections:
- Floral center
- Decorative circular base
- Open mesh body
- Solid upper band
- Long built-in handles
The entire project is crocheted as one continuous piece.
Floral Mandala Base
Round 1
Make a magic ring.
Ch 3.
Work:
12 dc into the MR
Pull the ring tightly closed.
Join with a sl st to the first dc.
12 dc
Round 2
Ch 2.
Work:
2 dc in every stitch around
Join with a sl st to the first dc.
24 dc
Round 3 — Create the Petal Openings
Ch 1.
Sc in the same stitch.
Ch 5.
Skip the next stitch.
Sc in the next stitch.
Continue:
ch 5, skip 1 st, sc in next st
around.
After the final ch-5, join with a sl st to the first sc.
You should have:
12 sc
and:
12 ch-5 spaces
These chain arches form the foundation for the flower petals.
Round 4 — Flower Petals
Sl st into the first ch-5 space.
Ch 2.
In the same ch-5 space work:
5 dc
Sc in the next sc.
In the next ch-5 space work:
5 dc
Sc in the next sc.
Continue around:
5 dc in each ch-5 space, sc in each sc between petals
Join with a sl st to the first dc.
You should have:
- 12 flower petals
- 5 dc in each petal
- 1 sc between each petal
72 stitches total
The center should now look like a circular flower with twelve rounded petals.
Round 5 — Stabilize the Flower
Ch 1.
Sc in the same stitch.
Sc in every stitch around.
Work through the tops of all dc and all sc.
Join with a sl st to the first sc.
72 sc
This round locks the flower into a flatter circular shape.
Round 6 — First Base Increase
Ch 1.
Sc in the same stitch.
Work:
1 sc in each of the next 4 sts
Then:
2 sc in the next st
Repeat:
5 sc, inc
around.
Join.
84 sc
Round 7 — Second Base Increase
Ch 2.
Hdc in the same stitch.
Work:
1 hdc in each of the next 5 sts
Then:
2 hdc in the next st
Repeat:
6 hdc, inc
around.
Join with a sl st to the first hdc.
96 hdc
The decorative base should now measure approximately:
7½–8 inches / 19–20 cm across
Lay it flat before continuing.
It should remain circular without heavy ruffling or cupping.
First Mesh Round
The bag now changes from the decorative base to the open stretchy body.
Round 8
Ch 1.
Sc in the same stitch.
Ch 5.
Skip the next stitch.
Sc in the following stitch.
Continue:
ch 5, skip 1 st, sc in next st
around.
After the final ch-5, join with a sl st to the first sc.
You should have:
48 ch-5 spaces
Mesh Body
From this point onward, you will work into the chain spaces rather than individual stitches.
The same number of mesh openings is maintained throughout the body.
Round 9
Sl st into the first ch-5 space.
Ch 1.
Sc in the same ch-5 space.
Ch 5.
Sc in the next ch-5 space.
Continue:
ch 5, sc in next ch-5 sp
around.
After the final ch-5, join with a sl st to the first sc.
48 ch-5 spaces
Rounds 10–22
Repeat Round 9.
For every round:
sc in next ch-5 space, ch 5
Continue around.
Maintain:
48 mesh openings
The body will gradually become a flexible tube of open crochet mesh.
Do not add increases.
How the Mesh Should Look
The chain loops should stack slightly diagonally rather than forming perfectly vertical columns.
This creates the soft diamond-shaped netting visible across the bag.
Keep the ch-5 loops relaxed.
If you crochet the chains too tightly, the bag will not stretch properly.
Check the Bag Height
After Round 22, lay the bag flat.
Measure from the center of the bottom to the top edge.
It should measure approximately:
10½–11½ inches / 27–29 cm
before the solid upper section.
If you want a deeper market bag, add additional mesh rounds now.
Each additional round should still contain:
48 ch-5 spaces
Begin Closing the Mesh
The opening now needs to return to solid stitches so the handles have a strong foundation.
Round 23
Sl st into the first ch-5 space.
Ch 1.
Work:
2 sc in the same ch-5 space
Work:
2 sc in every remaining ch-5 space
around.
Join with a sl st to the first sc.
96 sc
The top edge should now return to a solid stitch count.
Round 24
Ch 1.
Sc in the same stitch.
Sc in every stitch around.
Join.
96 sc
Round 25
Ch 1.
Sc in every stitch around.
Join.
96 sc
You now have a firm upper band approximately three rounds deep.
Long Handle Round
The two handles are formed directly from the bag.
They are positioned opposite one another.
Round 26
Ch 1.
Sc in the first:
24 stitches
Ch:
70
Skip the next:
24 stitches
Sc in the next:
24 stitches
Ch:
70
Skip the final:
24 stitches
Join with a sl st to the first sc.
You now have:
- 24 solid stitches on one side
- first long handle
- 24 solid stitches on the opposite side
- second long handle
Both handles should be the same length.
Check the Handle Length
Before continuing, hold the bag by both chain loops.
The handles should comfortably fit over your hand, forearm, or shoulder.
If you prefer shorter handles, use approximately:
55–60 chains
For longer shoulder handles, use:
75–80 chains
If you change the number of chains, use the same number for both handles.
Round 27 — Reinforce the Handles
Ch 1.
Sc in each of the first:
24 body stitches
Work:
1 sc in each of the 70 handle chains
Sc in each of the next:
24 body stitches
Work:
1 sc in each of the 70 chains of the second handle
Join with a sl st to the first sc.
Your working round now travels completely around both handle loops and the remaining body sections.
Round 28
Ch 1.
Sc in every stitch around the entire upper edge and both handles.
Join with a sl st.
Keep the stitches relaxed around the curved tops of the handles.
Round 29
Ch 1.
Sc in every stitch around.
Join.
This third reinforcing round gives the straps a flatter, stronger finish.
Final Handle Round
Round 30
Sl st loosely in every stitch around.
Do not pull the slip stitches tightly.
A tight final round can make the handles curl or shorten.
Join.
Fasten off.
Finishing
Cut the yarn, leaving a tail approximately:
6 inches / 15 cm
Thread the tail onto a yarn needle.
Weave through several nearby stitches.
Change direction and weave through several more stitches.
Trim the excess.
Weave in the center tail securely through the back of the floral motif.
Shaping the Finished Bag
The bag may look smaller before it is used.
That is normal.
Gently pull the mesh downward with your hands.
Stretch the sides slightly outward.
Straighten both handles.
The netting will relax naturally once the bag is filled.
There is no need to aggressively block the bag.
Why Cotton Yarn Works Well
Cotton creates:
- excellent stitch definition in the flower
- strong handles
- good durability
- washable fabric
- natural stretch without excessive fuzz
- enough firmness to support groceries or yarn
Avoid very soft plush yarn because it can obscure the decorative center and make the straps stretch excessively.
If the Flower Center Will Not Lie Flat
Check your stitch counts.
You should have:
Round 1 — 12 dc
Round 2 — 24 dc
Round 3 — 12 chain spaces
Round 4 — 12 petals
Round 5 — 72 sc
Round 6 — 84 sc
Round 7 — 96 hdc
A small amount of movement is normal.
Heavy ruffling usually means extra stitches were added.
Cupping usually means an increase was missed.
If the Mesh Is Too Tight
The mesh body depends on relaxed chains.
Do not tighten your chain stitches to match your single crochet tension.
If necessary, pull each chain loop slightly longer.
You can also use a:
4.5 mm hook
for the mesh rounds and return to the 4 mm hook for the upper band and handles.
If the Mesh Has Large Uneven Holes
Count the chain stitches carefully.
Every mesh loop should contain:
5 chains
Every mesh round should contain:
48 spaces
Accidentally making ch 4 or ch 6 will become noticeable after several rounds.
If the Top Edge Is Too Loose
After Round 23, the opening should contain:
96 sc
If the opening feels too wide, work four evenly spaced decreases during Round 24.
That gives:
92 stitches
If you change the top count, reposition the handles so both remain centered opposite each other.
For the standard version, keep all:
96 stitches
If the Handles Stretch Too Much
Cotton straps naturally relax slightly with use.
For firmer handles:
- crochet the reinforcing rounds tightly
- use a 3.5 mm hook for Rounds 27–30
- add one extra sc round
- keep the final slip-stitch round relaxed enough that it does not curl
Do not shorten one handle independently of the other.
Making a Smaller Market Bag
Stop the mesh section after approximately:
Rounds 16–18
Then work the closing and upper-band rounds normally.
This creates a smaller bag suitable for:
- yarn
- books
- small produce trips
- beach accessories
- everyday carry
Making a Deeper Market Bag
Continue the mesh repeat beyond Round 22.
Add as many rounds as needed.
Every additional round is:
sc in each ch-5 space, ch 5
with:
48 spaces per round
When the bag reaches your preferred depth, continue with Round 23.
Making Short Hand-Carry Handles
Instead of ch 70, make:
ch 45–50
for each handle.
Keep everything else unchanged.
Short handles create a traditional hand-carried market tote.
Making Shoulder Handles
Use:
ch 75–80
for each handle.
Remember that cotton stretches with use, so avoid making the initial straps excessively long.
Color Ideas
The open floral construction works beautifully in:
Sunflower Yellow
Bright and cheerful with strong stitch definition.
Natural Cream
Creates a classic reusable market-bag look.
Sage Green
Soft and botanical.
Terracotta
Warm and earthy.
Ocean Blue
Fresh and summery.
A single solid color keeps the mandala design easy to see.
Using the Bag for Yarn
This bag also works well as a project tote.
The solid decorative base supports yarn balls while the mesh sides allow you to see what is inside.
Use it for:
- yarn cakes
- crochet hooks
- small blankets
- garments in progress
- granny squares
- pattern notebooks
Final Pattern at a Glance
Round 1
12 dc in MR.
12 sts
Round 2
2 dc in each stitch.
24 sts
Round 3
Sc, ch 5, skip 1.
12 ch-5 spaces
Round 4
5 dc in each ch-5 space with sc between petals.
12 petals / 72 sts total
Round 5
Sc around.
72 sts
Round 6
5 sc, inc.
84 sts
Round 7
6 hdc, inc.
96 sts
Round 8
Sc, ch 5, skip 1.
48 mesh spaces
Rounds 9–22
Sc in next ch-5 sp, ch 5.
48 spaces
Round 23
2 sc in every ch-5 space.
96 sc
Rounds 24–25
Sc around.
96 sts
Round 26 — Handles
24 sc, ch 70, skip 24, 24 sc, ch 70, skip 24.
Round 27
Sc across body stitches and every handle chain.
Rounds 28–29
Sc around entire upper edge and handles.
Round 30
Sl st loosely around.
Fasten off and weave in all ends.
The finished bag has a decorative floral mandala base, stretchy yellow mesh body, solid reinforced upper edge, and two long built-in handles, creating a lightweight reusable market tote that is both practical and visually detailed.