Textured Basketweave Crochet Blanket Pattern With Raised Blocks
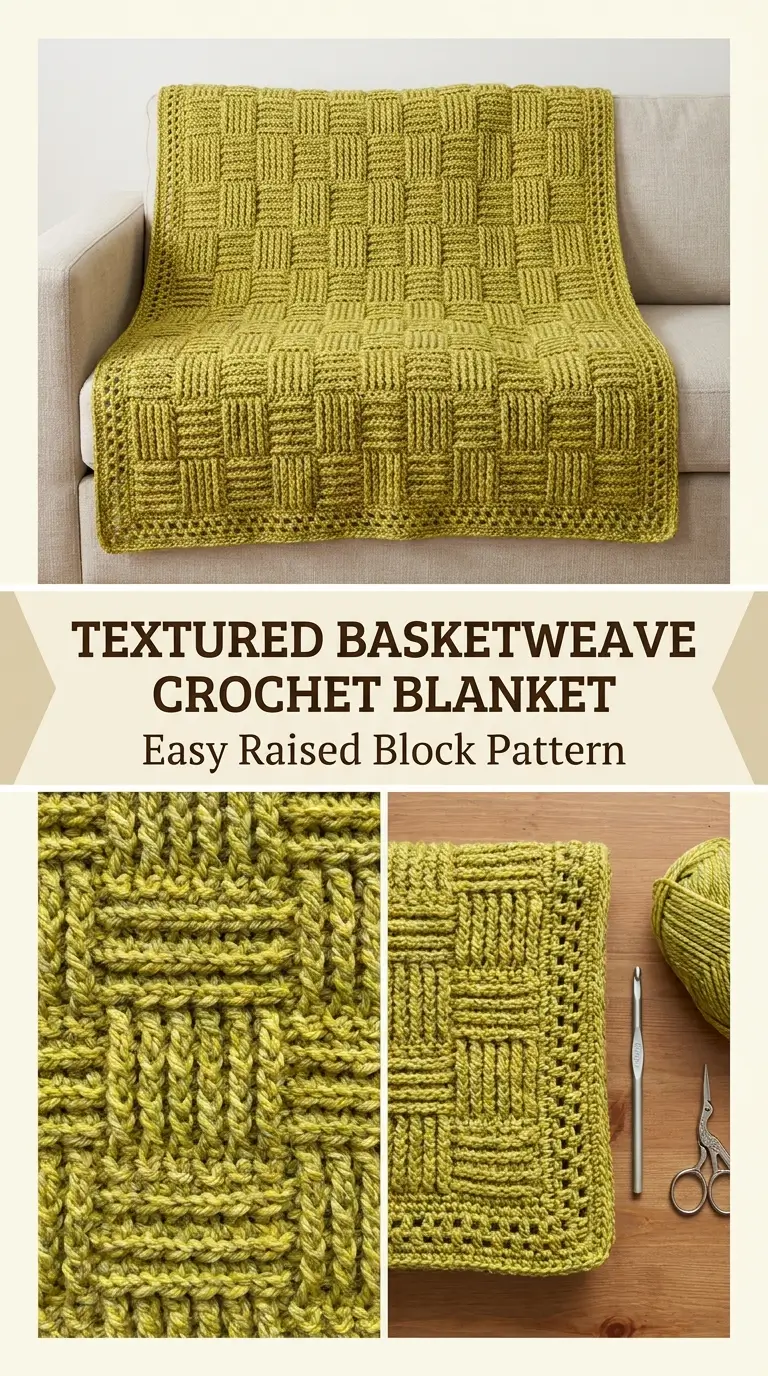
This textured crochet blanket is worked entirely in rows, but the finished fabric looks almost as though large woven blocks have been fitted together.
The effect comes from alternating groups of front post double crochet and back post double crochet. Each group is 9 stitches wide, and the same texture is maintained for 6 rows before the direction is reversed. That simple change creates the large checkerboard-style raised blocks.
The blanket body is finished with a single crochet row, then surrounded by a decorative border made from single crochet and chain spaces.
The sample blanket is worked in one soft yellow-green shade, which makes the raised texture especially easy to see.
Finished Size
The blanket body measures approximately:
67 cm wide × 50 cm long
or about
26½ × 19¾ inches
The decorative border adds approximately 3 cm / 1¼ inches around the outside.
The finished blanket will measure approximately:
73 × 56 cm
or about
28¾ × 22 inches
Your measurements may vary slightly depending on your yarn and tension.
Materials
- Medium-weight yarn
- Approximately 8 balls for a blanket similar to the sample
- 5 mm crochet hook
- Stitch markers
- Yarn needle
- Scissors
- Measuring tape
The sample uses a soft melange-style yarn in a yellow-green shade.
If you substitute another yarn, make a small swatch first. The exact yarn brand is less important than creating a fabric you like with clearly defined post stitches.
Skill Level
Confident beginner to intermediate
You should be comfortable with:
- chain stitches
- single crochet
- half double crochet
- double crochet
- front post double crochet
- back post double crochet
- slip stitch
Once you understand the two post stitches, the blanket becomes a very repetitive project.
Abbreviations
This pattern uses US crochet terminology.
ch — chain
sc — single crochet
hdc — half double crochet
dc — double crochet
FPdc — front post double crochet
BPdc — back post double crochet
sl st — slip stitch
st — stitch
sts — stitches
Before You Begin
The main blanket pattern is based on groups of:
9 stitches
The starting chain follows:
multiple of 9 + 2
For the sample size, begin with:
101 chains
The 99 center stitches are divided into:
11 groups of 9 stitches
The two remaining stitch positions form the outside edges.
Each large textured block is worked for:
6 rows
After those six rows, the front-post and back-post sections are reversed.
The sample has:
9 block sections vertically
That means you will work a total of:
54 textured rows
before finishing the body.
How the Raised Block Pattern Works
Across the blanket, you will alternate:
9 FPdc
then
9 BPdc
and repeat.
The blanket is turned after every row.
Because turning the fabric changes which side of the post is facing you, the next row uses the opposite post stitch to keep each block visually raised or recessed on the same side of the finished blanket.
For example:
One row begins:
9 FPdc, 9 BPdc
After turning, the next row begins:
9 BPdc, 9 FPdc
You continue this arrangement for 6 rows.
Then you reverse the blocks.
The sections that were raised become recessed, and the sections that were recessed become raised.
That is what creates the large woven checkerboard pattern.
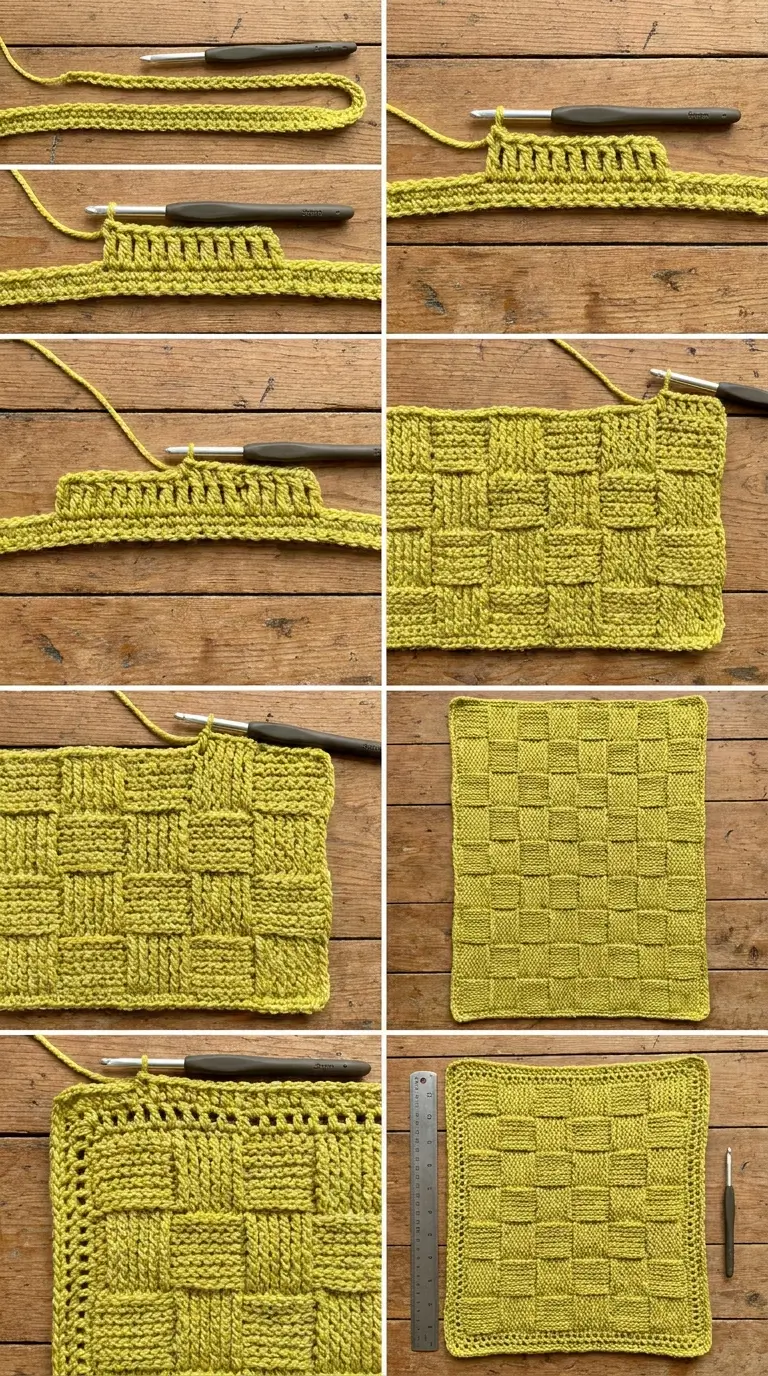
Front Post Double Crochet
Yarn over.
Insert your hook from the front of the fabric, around the post of the stitch below, and back out to the front.
The post should sit in front of the hook.
Yarn over and pull up a loop.
You should have 3 loops on your hook.
Yarn over and pull through 2 loops.
Yarn over and pull through the remaining 2 loops.
One FPdc is complete.
Back Post Double Crochet
Yarn over.
Insert your hook from the back of the fabric, around the post of the stitch below, and back to the rear.
The post should sit behind the hook.
Yarn over and pull up a loop.
You should have 3 loops on your hook.
Yarn over and pull through 2 loops.
Yarn over and pull through the remaining 2 loops.
One BPdc is complete.
Foundation Chain
Ch 101.
Ch 1 for turning.
Turn.
Row 1 — Single Crochet Foundation
Sc in the first foundation chain.
Place a stitch marker in this first stitch.
Sc in every remaining foundation chain across.
You should have:
101 sc
Turn.
This plain single crochet row gives the post stitches a stable row of posts to work around.
First 6-Row Block Section
Row 2
Ch 2.
The ch-2 forms the first edge position of the row.
Place a stitch marker in the top of the ch-2.
Turn.
Do not work a post stitch around the stitch directly below the ch-2.
Beginning around the next stitch post, work:
9 FPdc
Then work:
9 BPdc
Continue alternating groups of:
9 FPdc, 9 BPdc
across the row.
Because there are 11 groups, your final group will be:
9 FPdc
One edge stitch remains.
Hdc in the final stitch.
Turn.
Row 3
Ch 2.
Place a marker in the top of the ch-2.
Turn.
Work:
9 BPdc
around the next 9 posts.
Then:
9 FPdc
around the next 9 posts.
Continue alternating:
9 BPdc, 9 FPdc
across.
Your final 9-stitch group will be:
9 BPdc
Hdc in the marked edge stitch at the end of the row.
Turn.
Row 4
Ch 2 and turn.
Work:
9 FPdc, 9 BPdc
alternating in groups of 9 across.
Finish with:
9 FPdc
Hdc in the final edge stitch.
Turn.
Row 5
Ch 2 and turn.
Work:
9 BPdc, 9 FPdc
alternating in groups of 9 across.
Finish with:
9 BPdc
Hdc in the final edge stitch.
Turn.
Row 6
Repeat Row 4.
Row 7
Repeat Row 5.
You have now completed the first 6 textured rows.
The raised sections should form rectangular blocks approximately as wide as they are tall.
In the sample, one block section measures roughly:
6.5 cm × 6.5 cm
A small difference is completely normal.
Second 6-Row Block Section
Now reverse the pattern.
Instead of continuing the same raised blocks, you will make the previously raised sections recede and bring the neighboring sections forward.
Row 8
Ch 2.
Mark the top of the ch-2.
Turn.
Begin with:
9 BPdc
Then:
9 FPdc
Continue alternating these 9-stitch groups across.
Finish with:
9 BPdc
Hdc in the final edge stitch.
Turn.
Row 9
Ch 2 and turn.
Begin with:
9 FPdc
Then:
9 BPdc
Continue alternating across.
Finish with:
9 FPdc
Hdc in the final edge stitch.
Turn.
Row 10
Repeat Row 8.
Row 11
Repeat Row 9.
Row 12
Repeat Row 8.
Row 13
Repeat Row 9.
The second large block section is now complete.
You should clearly see the checkerboard effect beginning to develop.
Continue the Blanket
Continue alternating these two 6-row sections.
Section A
Work for 6 rows with the first visible block beginning in the first texture direction.
Section B
Work for 6 rows with the texture reversed.
Continue:
Section A
Section B
Section A
Section B
until you have completed a total of:
9 large block sections
Each section contains 6 rows.
So the body contains:
9 × 6 = 54 textured rows
The blanket should now measure approximately:
67 cm wide × 50 cm long
before the decorative border.
Easy Row Tracking
To prevent losing your place, count the blanket in groups of six rows rather than trying to remember the total row number.
Use this sequence:
Block 1 — 6 rows
Block 2 — 6 rows, reversed
Block 3 — 6 rows
Block 4 — 6 rows, reversed
Block 5 — 6 rows
Block 6 — 6 rows, reversed
Block 7 — 6 rows
Block 8 — 6 rows, reversed
Block 9 — 6 rows
A removable stitch marker at the beginning of every new 6-row section can make this much easier.
Final Row of the Blanket Body
After completing the ninth block section, finish the body with one plain single crochet row.
Ch 1.
Turn.
Sc in the first stitch.
Place a marker in that stitch.
This time, do not work around the posts.
Work into the normal top loops of each stitch.
Sc in every stitch across.
This creates a clean upper edge that matches the single crochet foundation at the bottom.
Adding a New Ball of Yarn
If you run out of yarn in the middle of a row, change yarn while finishing a stitch.
Begin the stitch with the old yarn.
When you reach the final yarn-over of the stitch, drop the old strand.
Yarn over with the new yarn.
Complete the stitch with the new yarn.
Continue crocheting normally.
Leave both yarn tails long enough to weave in securely later.
Avoid tying a large knot inside the blanket because it can create a noticeable hard spot in the fabric.
Border Round 1 — Single Crochet Setup Round
The first border round creates an even foundation for the decorative edging.
Continue with the same yarn.
Ch 1.
Work 1 sc in the first stitch.
Place a marker in this stitch. This is the beginning of the round and also part of the first corner.
Across the First Edge
Work:
1 sc in each stitch
across the top edge.
When you reach the final corner stitch, work:
3 sc in the same stitch
Place a marker in the second sc of those three stitches.
That middle stitch is the corner stitch.
Working Down the Side
The side edge is made from alternating row ends.
Some rows end with an hdc.
The opposite rows begin with a ch-2.
To distribute the border stitches evenly, work:
2 sc around an hdc row end
then:
1 sc around the next ch-2 row end
Continue repeating:
2 sc, 1 sc, 2 sc, 1 sc
down the side.
Work around the row-end posts rather than trying to force the hook into tiny individual loops.
Keep your stitches relaxed.
The edge should lie flat rather than pulling inward.
Bottom Corner
When you reach the foundation corner, work:
3 sc in the corner stitch
Place a marker in the second sc.
Across the Foundation Edge
Work:
1 sc in each foundation stitch
across.
At the next corner, work:
3 sc in the corner stitch
Mark the second sc.
Second Side
Work up the second side exactly as you worked the first.
Around the alternating row ends, work:
2 sc around an hdc edge
and:
1 sc around a ch-2 edge
Continue to the starting corner.
The first sc of the round is already sitting in that corner.
Work 2 additional sc into the same corner stitch so that the starting corner also contains 3 sc total.
Join with a sl st to the first sc.
Check the Border Before Continuing
Lay the blanket flat.
If the border is pulling tightly around the blanket, your side stitches may be too tight.
If the edge is noticeably ruffling, too many stitches may have been added along the sides.
Correcting the setup round now will make the remaining border much easier.
Border Round 2 — Single Crochet and Chain Spaces
Ch 1.
Sc in the same stitch.
Mark this stitch as the beginning of the round.
Ch 1.
Skip the next stitch.
Sc in the following stitch.
Continue:
ch 1, skip 1 stitch, sc in next stitch
along the edge.
This creates the first row of small open spaces.
Border Corners
When you reach a marked corner stitch, work:
3 sc in the corner stitch
Place the marker into the middle sc of the three.
Then continue the alternating chain-and-single-crochet pattern along the next side.
Depending on the number of stitches along an edge, the repeat may meet a corner with either a single crochet or a chain immediately before it.
That is fine.
Do not force the repeat by adding or removing stitches.
The important part is to work:
3 sc in every marked corner stitch.
Continue around all four sides.
Join with a sl st at the beginning of the round.
Border Round 3
The decorative pattern now shifts by one position.
The goal is to place:
a sc into each ch-1 space
and:
a ch-1 above each sc
from the previous round.
Ch 1 to begin the round.
If necessary, make the first pattern chain so the new row is offset from the previous one.
Work a sc into the next ch-1 space.
Then:
ch 1
Sc into the next ch-1 space.
Continue this alternating pattern around the edge.
At every marked corner, work:
3 sc into the corner stitch
Move the marker into the middle sc.
Then continue the mesh pattern along the next side.
Join at the end of the round.
Border Rounds 4–6
Continue in the same way.
Each new round should alternate with the round below:
sc in the previous ch-1 space
then:
ch 1 over the previous sc
Repeat around.
At every corner:
3 sc in the marked corner stitch
Move the marker to the center stitch of the new corner increase.
Complete a total of:
5 decorative rounds
after the original solid single crochet setup round.
The border should measure approximately:
3 cm / 1¼ inches
when finished.
Fasten Off
After completing the final border round, join with a slip stitch.
Cut the yarn, leaving a tail long enough to weave in.
Pull the tail completely through the final loop.
Weaving In the Ends
Thread each yarn tail onto a yarn needle.
Weave the tail into the wrong side of the fabric.
For ends inside the textured blanket body, hide the yarn behind the horizontal strands between the raised post stitches.
Weave in one direction for several centimeters.
Change direction.
Weave through several more stitches.
Trim the remaining yarn.
Repeat until all ends have been secured.
Making the Blanket Wider
The width can be adjusted using:
a multiple of 9 + 2 stitches
For this version, use an odd number of 9-stitch groups so the first and last textured blocks match.
For example:
83 chains
9 × 9 + 2
101 chains
9 × 11 + 2
119 chains
9 × 13 + 2
The 101-chain version creates the approximately 67 cm-wide sample.
Always remember that changing the width will also change the amount of yarn required.
Making the Blanket Longer
To increase the length, add complete:
6-row block sections
Every new section should reverse the texture of the section immediately below it.
Avoid stopping in the middle of a six-row section if you want complete square-looking blocks.
When the blanket reaches the length you want, finish the current 6-row section before adding the final single crochet row.
Keeping the Raised Blocks Square
The sample uses:
9 stitches wide × 6 rows high
for each textured block.
With the sample yarn and hook, this creates blocks approximately:
6.5 cm wide × 6.5 cm high
Your stitch tension may produce slightly different measurements.
If the difference is small, keep the 9-stitch × 6-row repeat rather than changing the number of rows. Consistent repeats are more important than making every block exactly 6.5 cm.
Keeping the Width Even
Post stitches can become tight very easily.
When making FPdc or BPdc, pull the first loop up to the height of the current row before completing the stitch.
Do not tighten the stitch firmly around the post below.
After every few rows, gently spread the blanket flat and check that the sides remain straight.
Keeping the Edges Straight
Every textured row uses the same edge structure:
ch 2 at the beginning
and:
hdc at the opposite edge
Place a stitch marker in the turning chain so you can easily find the correct ending stitch on the following row.
This prevents accidentally losing or adding stitches.
If You Lose Your Place
Look at the texture instead of guessing.
Within a 6-row section, the same large blocks should continue projecting in the same direction.
If a block has been raised for only three or four rows, continue the texture rather than reversing it.
Only reverse the entire 9-stitch block arrangement after completing all:
6 rows
of that section.
Using a row counter or moving a stitch marker after each completed row can make the pattern much easier to follow.
Final Pattern Summary
Begin with:
101 chains
Work:
1 row of single crochet
Then work the textured body using:
11 groups of 9 post stitches
alternating between:
9 FPdc
and:
9 BPdc
Turn after every row and use the opposite post stitch on the return row so the same blocks continue facing the same direction.
After:
6 rows
reverse the entire block arrangement.
Continue until you have:
9 complete textured sections
or:
54 post-stitch rows
Finish the body with:
1 row of single crochet
Work one single crochet setup round around the entire blanket, using:
3 sc in every corner
Then work:
5 decorative rounds
of alternating single crochet and chain-1 spaces.
The finished blanket measures approximately:
73 × 56 cm / 28¾ × 22 inches
including the border.