Textured Crochet Baby Blanket With a Built-In Border
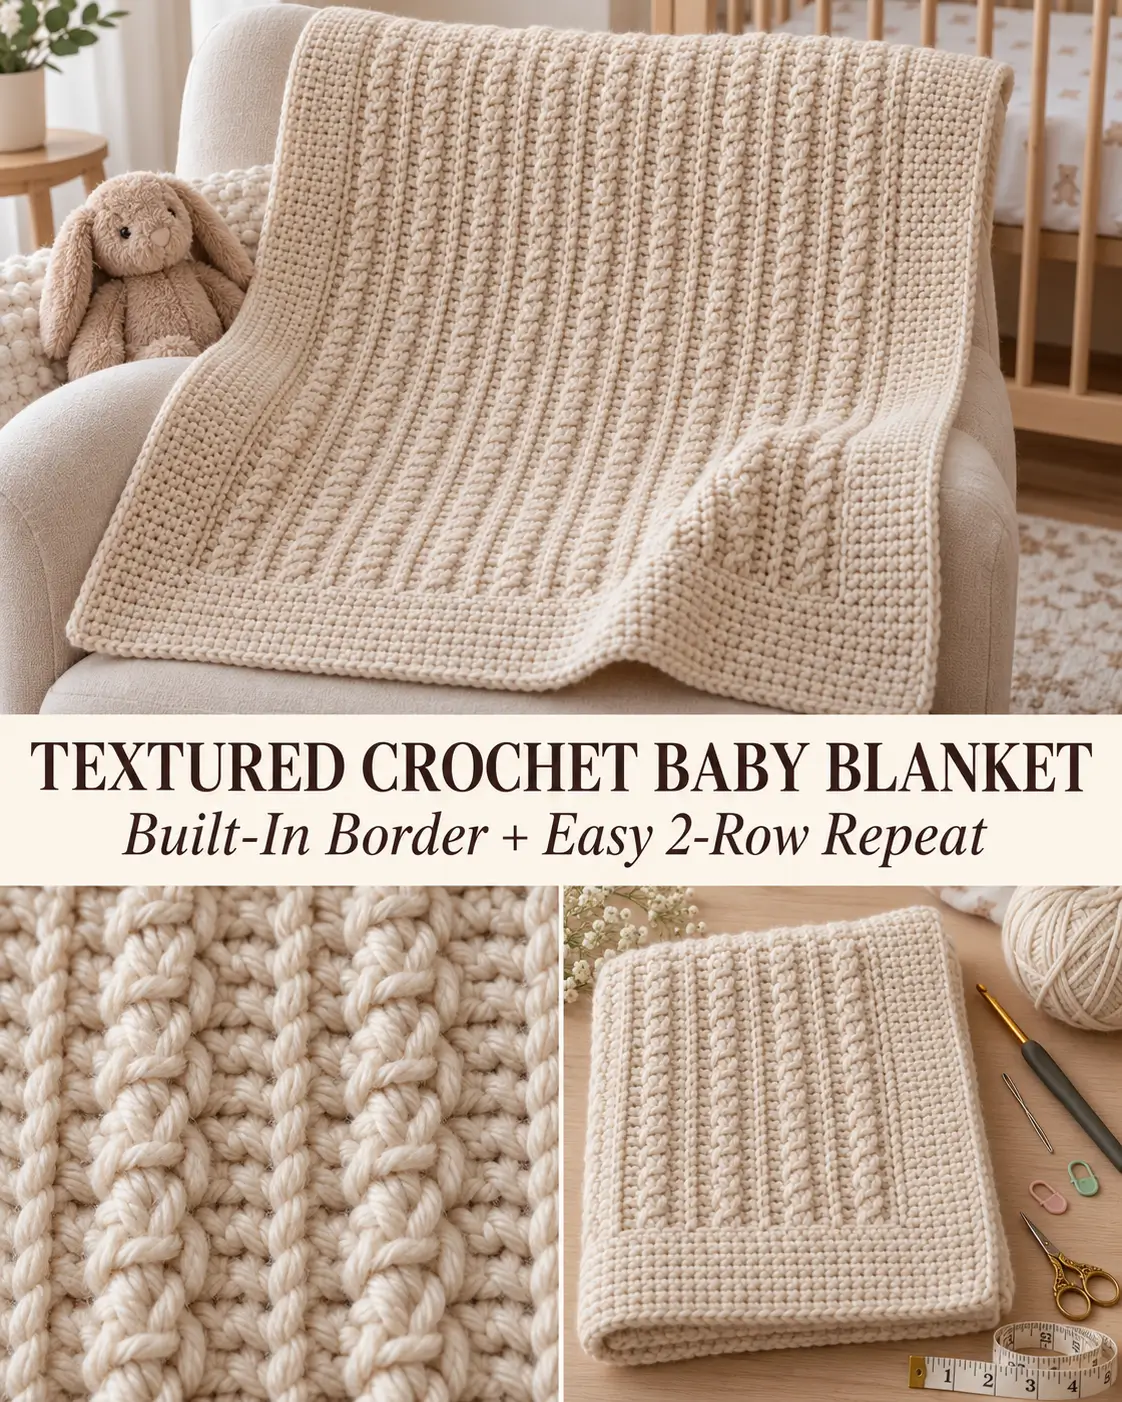
This beautifully textured crochet baby blanket is worked flat in one piece, with the border built directly into every row. There is no separate edging to crochet afterward.
The center of the blanket alternates tall treble crochet stitches with half double crochet stitches. On the return row, each tall treble post is wrapped with a back-post half double crochet. This pulls the tall stitches into strong raised lines and gives the two sides of the blanket noticeably different textures.
The wide bands of plain half double crochet at the beginning, end, top, and bottom form a simple built-in frame around the textured center.
The inspiration pattern uses this same general idea—a two-row textured repeat, tall stitches that make the post placement easy to see, and a built-in border rather than a separately added edging.
Finished Size
Approximately:
34 × 40 inches / 86 × 102 cm
The exact finished measurement depends on your yarn, hook, and tension.
Materials
- Heavy worsted / Aran weight #4 yarn
- Approximately 1,050–1,200 yards / 960–1,100 meters
- 6 mm / J crochet hook
- Yarn needle
- Scissors
- Stitch markers
- Measuring tape
Choose a smooth solid yarn if you want the raised texture to stand out clearly.
Good colors include:
- warm cream
- oatmeal
- soft gray
- dusty blue
- sage green
- muted beige
A 6 mm hook and heavier worsted/Aran yarn also match the general yarn scale used for the inspiration blanket.
Skill Level
Easy / confident beginner
You should know how to make:
- chain
- half double crochet
- treble crochet
- back post half double crochet
- working back and forth in rows
Abbreviations
US crochet terminology:
ch — chain
hdc — half double crochet
tr — treble crochet
BPhdc — back post half double crochet
st / sts — stitch / stitches
rep — repeat
Pattern Structure
The blanket has three sections across every textured row:
8 hdc border stitches
then:
79 textured center stitches
then:
8 hdc border stitches
Total:
95 working stitches
The center section has an odd number of stitches so it can begin and end with a tall treble stitch.
The visual rhythm is:
tr, hdc, tr, hdc, tr…
Then on the next row:
BPhdc around each tr, ordinary hdc in each short hdc
This keeps the texture aligned vertically.
Turning Chain
At the beginning of every row:
ch 2
The ch-2 does not count as a stitch.
Always work the first hdc into the first actual stitch.
Special Stitch — Treble Crochet
Yarn over:
twice
Insert hook into the indicated stitch.
Yarn over and pull up a loop.
You should have:
4 loops on the hook
Yarn over.
Pull through 2 loops.
Yarn over.
Pull through 2 loops.
Yarn over.
Pull through the final 2 loops.
One treble crochet is complete.
The treble stitches should stand clearly above the neighboring hdc stitches.
Special Stitch — Back Post Half Double Crochet
Yarn over.
Looking at the treble stitch from the previous row, insert your hook:
from the back → around the front of the post → back out to the back
The post of the treble should sit in front of your hook.
Yarn over.
Pull up a loop.
You should have:
3 loops on the hook
Yarn over.
Pull through all 3 loops.
One BPhdc is complete.
Because the previous treble is tall, the post is easy to find.
Foundation Chain
Ch:
97
Keep the chain relaxed.
A foundation that is too tight can cause the lower border to curve inward.
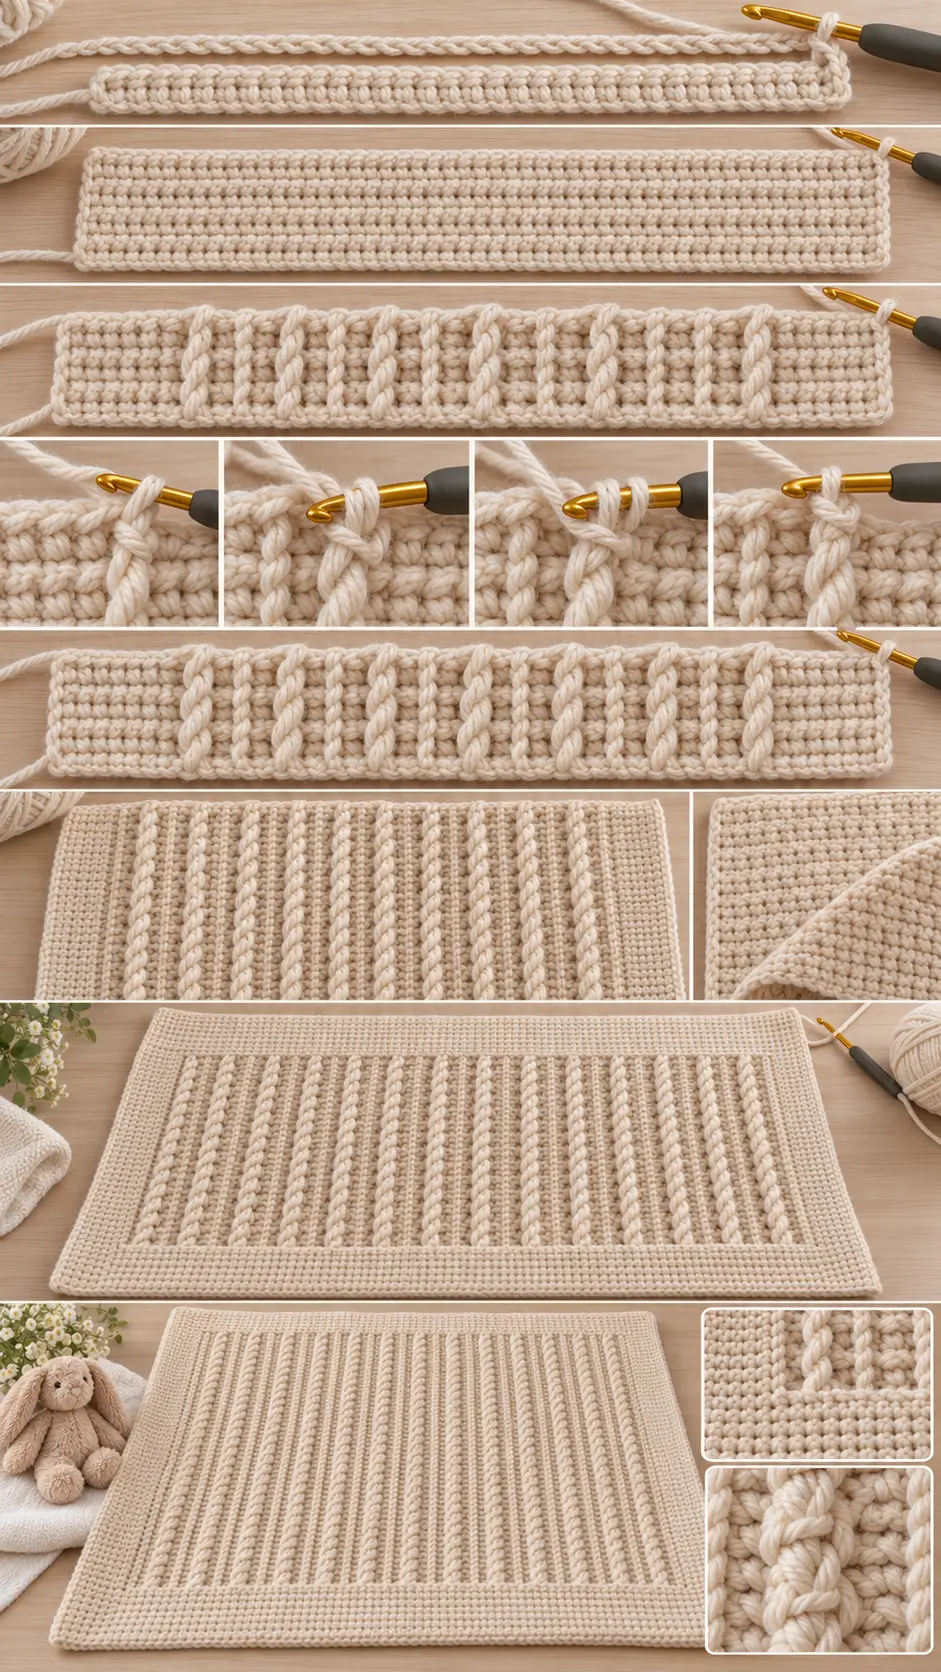
Row 1 — Foundation Row
Turn the foundation chain over so the small back bumps are facing you.
Beginning in the:
3rd chain from the hook
work:
1 hdc in each back bump across
You should have:
95 hdc
Ch 2.
Turn.
Working into the back bumps creates a clean lower edge.
Rows 2–8 — Bottom Border
Work:
1 hdc in every stitch across
95 hdc
Ch 2.
Turn.
Repeat until you have completed:
8 solid hdc rows total including Row 1
This creates the lower built-in border.
The fabric should be dense and flat with no texture yet.
Row 9 — First Textured Row
Hdc in the first:
8 stitches
Now begin the center texture.
Work:
tr in next stitch
hdc in next stitch
Repeat:
tr, hdc
across the center section until:
1 center stitch remains
Work:
tr in that final center stitch
You have worked:
79 center stitches
Finish with:
hdc in the final 8 stitches
Total:
95 stitches
Ch 2.
Turn.
How Row 9 Should Look
The blanket should have:
8 short hdc
followed by:
tall tr, short hdc, tall tr, short hdc
repeated across,
then:
8 short hdc
The center will look slightly uneven in height at this stage.
That is correct.
The next row creates the raised texture.
Row 10 — Post-Stitch Row
Hdc in the first:
8 stitches
Look at the first tall treble from the previous row.
Work:
1 BPhdc around the post of that treble
Then:
1 ordinary hdc in the next hdc
Repeat:
BPhdc around next tr
hdc in next hdc
across.
When you reach the final tall treble:
work:
1 BPhdc around its post
Finish with:
hdc in the final 8 stitches
Total:
95 stitches
Ch 2.
Turn.
What Row 10 Does
The BPhdc wraps around the tall treble posts rather than being worked into their top loops.
This makes the tall columns bend outward on the opposite face of the fabric and produces the pronounced raised texture.
Do not work an extra stitch into the top of a treble after making the post stitch.
The BPhdc replaces the stitch normally worked in that position.
Main 2-Row Repeat
Repeat:
Rows 9 and 10
for the main body.
Continue until you have completed:
68 textured rows
after the bottom border.
This gives:
34 repeats
of the two-row texture.
Checking the Pattern
Every Row 9 should contain:
8 hdc + 79 alternating textured stitches + 8 hdc
Every Row 10 should contain:
8 hdc + alternating BPhdc/hdc across the same 79 positions + 8 hdc
Every row must finish with:
95 stitches
The Front and Back Will Look Different
This stitch creates two attractive surfaces.
One side shows:
- stronger raised columns
- deep post-stitch definition
- pronounced vertical texture
The reverse shows:
- softer ridges
- a flatter woven appearance
- subtle alternating height changes
This reversible effect is one of the best features of this style of blanket; the inspiration pattern likewise emphasizes that its two sides have different but attractive textures.
Top Border
Once the textured section reaches the desired length, stop after completing a Row 10.
Now work:
8 rows of plain hdc
Top Border Row 1
Ch 2.
Hdc in every stitch across.
95 hdc
Turn.
Top Border Rows 2–8
Repeat:
hdc across
for a total of:
8 solid rows
Fasten off after the final row.
The top and bottom borders should now match.
Why There Is No Separate Border
The first and last:
8 hdc rows
create the horizontal border.
The first and last:
8 hdc stitches of every textured row
create the side borders.
Together, these sections form a complete rectangular frame while you crochet the blanket.
You do not need to work a separate border afterward.
That built-in-border construction is also a defining feature of the linked blanket design.
Finishing
Cut the yarn leaving approximately:
8 inches / 20 cm
Thread the tail onto a yarn needle.
Weave through several stitches on the wrong side.
Change direction.
Weave through another section.
Trim the excess.
Repeat for every yarn join.
Blocking
This blanket should need only light blocking if your stitch tension is consistent.
Lay it flat.
Straighten:
- top edge
- bottom edge
- both sides
- all four corners
Gently smooth the raised texture with your fingers.
Do not stretch the post stitches flat.
If your yarn contains wool or alpaca, follow its washing and blocking instructions carefully.
The source also recommends only light blocking and following the yarn manufacturer’s care directions, particularly when using natural fibers.
If the Blanket Gets Wider
Count every row.
The stitch count must remain:
95
A common mistake is working:
BPhdc around a treble
and then also crocheting into the top of that same treble.
Do not do both.
The post stitch represents that stitch position.
If the Blanket Gets Narrower
Make sure you are not accidentally skipping the ordinary hdc between treble posts.
The center repeat is always:
Textured Row
tr, hdc
Post Row
BPhdc, hdc
No stitch positions disappear.
If the Raised Texture Is Not Visible
Check your post stitch.
The hook must pass:
around the post of the treble
rather than through the top loops.
The treble should sit in front of the hook while making the BPhdc.
If You Cannot Find the Treble Posts
Look for the visibly taller stitches from the previous row.
Each treble sits between two shorter hdc stitches.
Because the treble is significantly taller, its post should be much easier to see than a post stitch worked around ordinary short stitches.
If the Post Stitches Pull Too Tightly
When pulling up the loop for the BPhdc:
bring it comfortably to the height of the current row.
Do not cinch the treble post tightly.
The blanket should remain soft and flexible.
If the Center Looks Wavy
A slight difference in height before the return row is normal.
After several repeats, the post stitches settle the fabric into its regular texture.
If the fabric is strongly ruffling, your treble stitches may be too loose.
If the Side Border Looks Uneven
Place stitch markers after:
stitch 8
and before:
the final 8 stitches
This clearly separates:
left border → textured center → right border
Move the markers upward every few rows.
Making a Smaller Stroller Blanket
For approximately:
28–30 inches wide
reduce the number of center texture repeats while keeping:
8 hdc border stitches on each side
The center must always contain an:
odd number of stitches
so it begins and ends with tr.
For example:
63 center stitches
plus:
16 border stitches
gives:
79 working stitches
Foundation:
ch 81
Then follow the same pattern.
Making a Larger Blanket
Add texture stitches in pairs.
For example:
99 center stitches
plus:
16 border stitches
gives:
115 working stitches
Foundation:
ch 117
The center still begins and ends with a treble because 99 is odd.
Continue the same two-row repeat.
Adjusting the Built-In Border
For a narrower border:
use:
6 hdc
at each side and:
6 solid rows
at the beginning and end.
For a wider border:
use:
10 hdc
at each side and:
10 solid rows
at the beginning and end.
Keep the same border width on all four sides for a balanced frame.
Color Ideas
This pattern works especially well in one solid color because shadows reveal the raised texture.
Try:
Warm Cream
for a classic heirloom blanket.
Oatmeal
for modern neutral decor.
Dusty Blue
for a calming nursery.
Soft Sage
for a botanical look.
Pale Gray
for a contemporary version.
Muted Rose
for a softer feminine blanket.
Stripe Variation
For subtle stripes, change color only on:
Row 9
and keep that color for:
Row 10
This makes every two-row texture repeat one complete color band.
Do not change yarn halfway through a post-stitch pair if you want clean horizontal striping.
Final Pattern at a Glance
Foundation
Ch 97
Row 1
Hdc in back bump of 3rd chain and across.
95 hdc
Rows 2–8
Hdc across.
These rows form the bottom border.
Row 9
8 hdc
Across center:
tr, hdc
repeat, ending with:
tr
Then:
8 hdc
Row 10
8 hdc
Across center:
BPhdc around tr, hdc in next hdc
repeat, ending with:
BPhdc
Then:
8 hdc
Main Body
Repeat:
Rows 9–10
until you have approximately:
68 textured rows
or until the blanket reaches your preferred length.
Top Border
Work:
8 rows hdc across
Fasten off.
Weave in all ends.
Lightly block.
The completed blanket should have a wide plain half-double-crochet frame surrounding a deeply textured center of alternating raised post columns, with the border created automatically while the blanket is crocheted rather than added afterward.