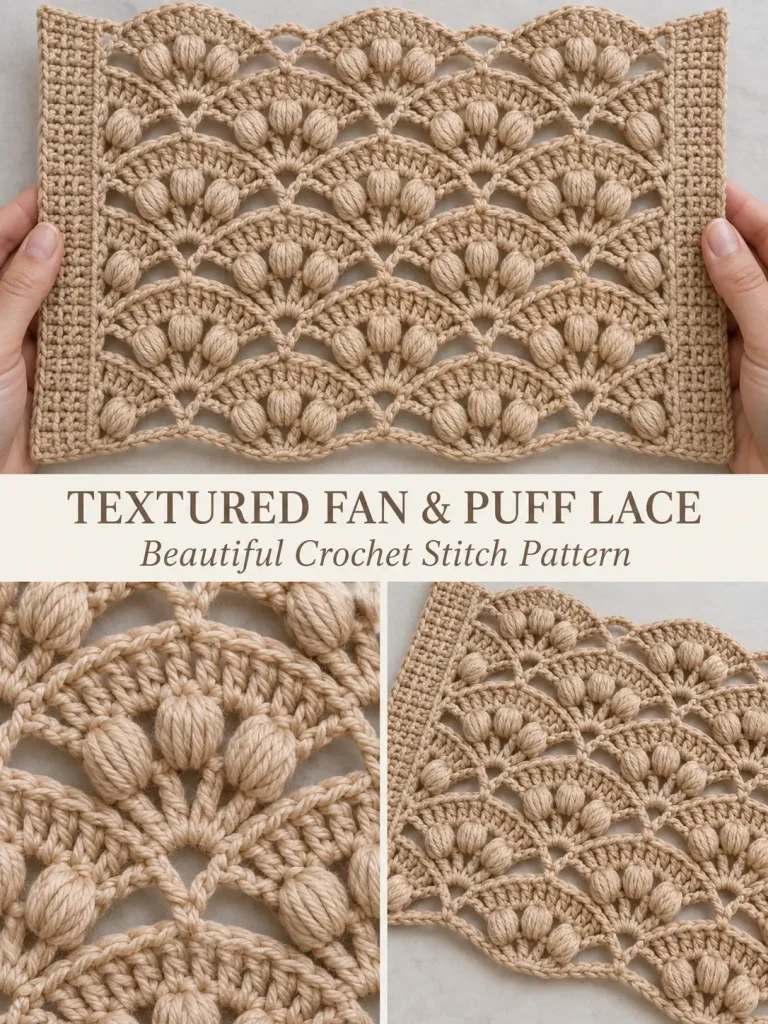
This striking crochet lace pattern combines open mesh sections, curved fan motifs, and raised puff stitches to create a richly textured fabric that looks far more complicated than it is.
The stitch works beautifully for:
- lightweight cardigans
- crochet vests
- baby blankets
- decorative cushions
- scarves and wraps
- purses and small bags
- table runners
- decorative panels
The original demonstration uses a repeating foundation based on multiples of 14 plus 5 stitches, with five double-crochet stitches forming the side borders.
Skill Level
Intermediate
The individual stitches are simple, but the placement of the fans, mesh spaces, and puff stitches requires careful counting.
Materials
- Fine or light yarn
- 2 mm crochet hook for a delicate lace version
- Yarn needle
- Scissors
- Stitch markers
For a softer, airy fabric, an Angora- or mohair-style yarn works especially well. For learning the stitch, use a smooth cotton yarn in a light color so the stitch placement is easier to see.
Abbreviations — US Terms
ch – chain
sc – single crochet
dc – double crochet
sl st – slip stitch
st(s) – stitch(es)
sp – space
V-st – V-stitch
puff – puff stitch
Special Stitches
V-Stitch
Work:
1 dc, ch 2, 1 dc
into the same stitch or space.
5-Loop Puff
Yarn over, insert your hook into the indicated space, pull up a long loop.
Repeat until you have drawn up 5 elongated loops from the same space.
Yarn over and pull through the gathered loops.
Chain 1 to secure.
Keep all puff loops approximately the same height so the raised motifs look even.
Foundation
Chain a multiple of:
14 + 5
Examples:
- 33 chains
- 47 chains
- 61 chains
- 75 chains
The additional 5 stitches create the side section of the pattern.
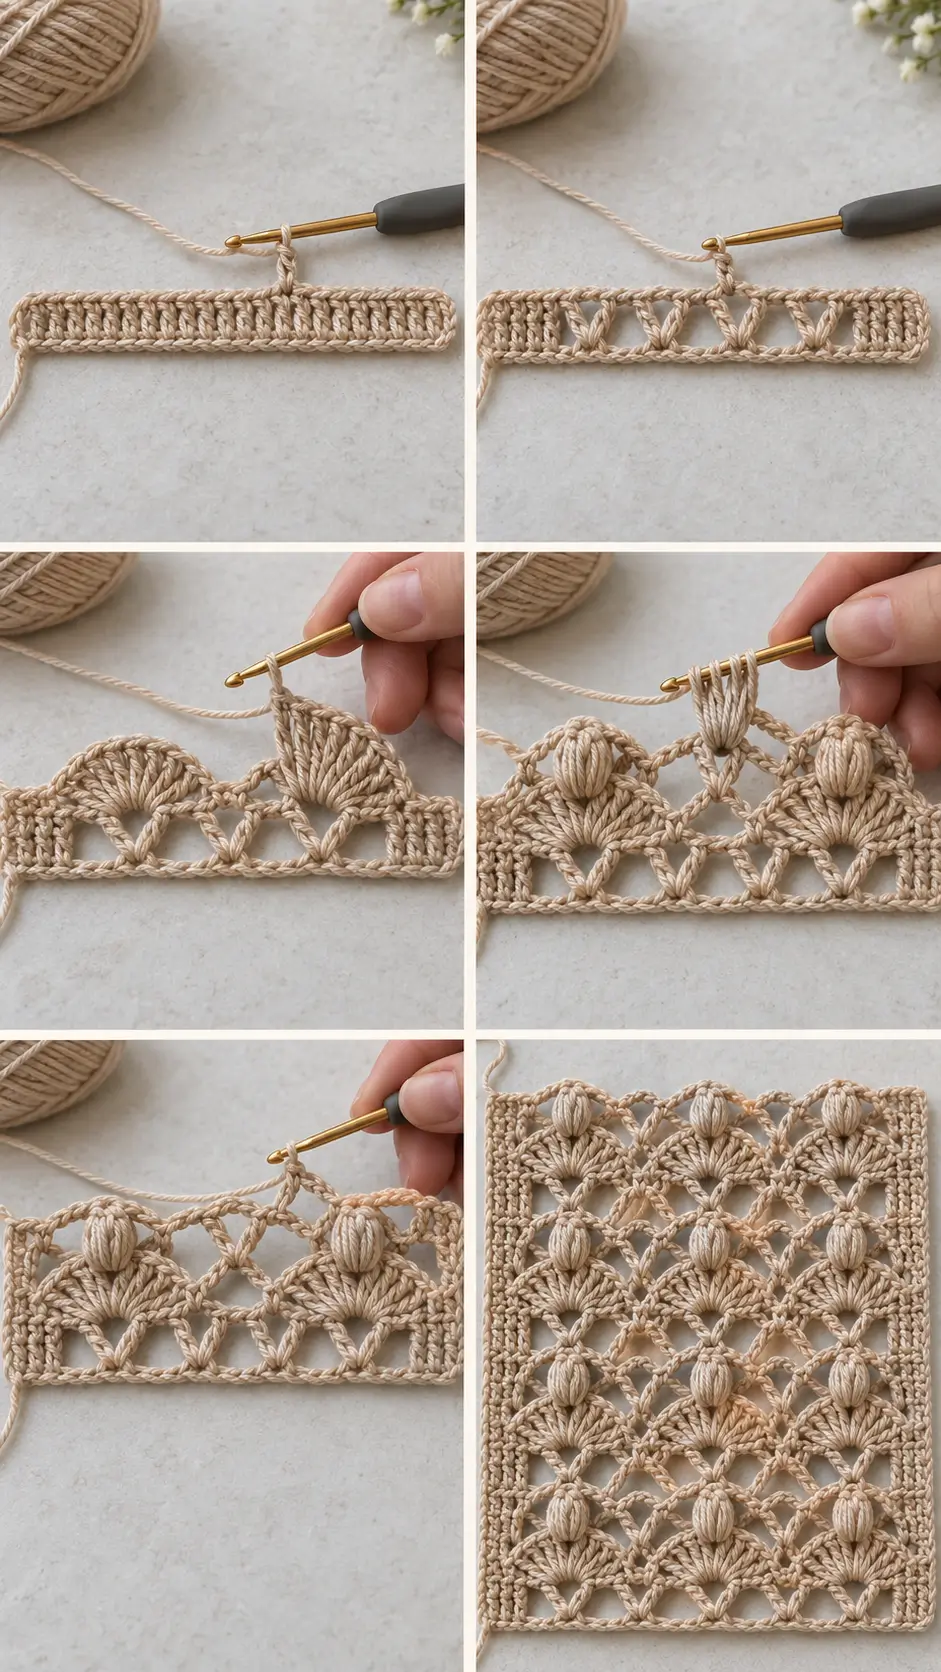
Row 1 — Solid Foundation
Beginning in the appropriate chain for a double crochet, work double crochet across the entire foundation chain.
Keep your tension even.
Turn.
Row 2 — Mesh and V-Stitch Setup
Chain 2.
Work double crochet across the first stitches until you have a 5-dc side section.
Chain 3.
Skip the next group of stitches until you reach the position for the first V-stitch.
Work:
1 dc, ch 2, 1 dc
in the same stitch.
Chain 3.
Skip the next section and secure with a single crochet.
Chain 3.
Skip the next section.
Work another:
1 dc, ch 2, 1 dc
in the same stitch.
Continue establishing alternating chain spaces and V-stitches across the row.
Finish with a matching 5-dc side section.
Turn.
The fabric should now contain open mesh spaces with clearly defined V-shaped anchors.
Row 3 — Large Fan Motifs
Chain 2.
Work the 5-dc side section.
Chain 3.
Turn or angle the fabric slightly so you can work around the side of the first V-stitch.
Around the first leg of the V-stitch, work:
6 dc
Then work:
3 dc
into the center area of the V.
Around the second leg of the same V-stitch, work:
6 dc
This creates one large rounded fan.
Chain 3.
Secure into the neighboring chain space with a single crochet.
Chain 3.
Repeat the same fan construction around the next V-stitch:
- 6 dc around first leg
- 3 dc in center
- 6 dc around second leg
Continue across.
Finish with the 5-dc side section.
Turn.
Row 4 — Puff Stitch Decoration
Chain 2.
Work the 5-dc side section.
Chain 3.
Work the first puff stitch into the curved fan section.
Chain 3.
Work another puff into the next designated area of the fan.
Chain 3.
Work a third puff.
Continue spacing the puff stitches across the top of the fan so they create a raised decorative row.
Between motif sections, use chain spaces and single crochet stitches to keep the lace open.
Repeat across.
Finish with the 5-dc side section.
Turn.
Row 5 — Chain Arches
Chain 2.
Work the 5-dc side section.
Chain 3.
Single crochet into the first available chain space.
Chain 3.
Single crochet into the next chain space.
Continue working:
ch 3, sc in next space
across the puff section.
These small arches create the open lace network above the raised stitches.
When you reach the next motif section, continue the same chain-3 construction.
Finish with the 5-dc side section.
Turn.
Row 6 — Second Mesh Setup
Chain 2.
Work the 5-dc edge.
The motif now shifts so the next large fans sit between the previous fans.
Chain 3.
Work a V-stitch into the central chain space:
1 dc, ch 2, 1 dc
Chain 3.
Secure into the next appropriate chain arch with a single crochet.
Chain 3.
Continue across, placing V-stitches in the center areas between the previous motifs.
Finish with the 5-dc side section.
Turn.
Row 7 — Offset Fan Row
Work the side section as before.
Chain 3.
Around the first leg of the new V-stitch, work:
6 dc
Work:
3 dc
into the center.
Work:
6 dc
around the second leg.
Chain 3 and secure into the adjacent mesh space.
Repeat across.
Because these fans are offset from the previous row, the fabric begins developing the overlapping scale-like appearance.
Row 8 — Puff Row
Repeat the puff-stitch construction over each new fan.
Keep the puff stitches elongated and even.
Use chain-3 spaces between each raised puff.
Row 9 — Chain Arch Row
Work chain-3 arches across the puff motifs:
ch 3, sc in next available space
Continue evenly across.
Row 10 — Return to Mesh Setup
Work the V-stitch mesh arrangement again.
At this point, the pattern begins repeating.
Pattern Repeat
Repeat the main sequence:
Mesh/V-stitch row → Fan row → Puff row → Chain-arch row
Alternate the placement of the fan motifs so each new group sits between the motifs below.
This creates the layered, almost scalloped texture.
Keeping the Side Edges Straight
Maintain approximately 5 double crochet stitches at each side edge throughout the pattern.
These solid edge stitches help keep the lace section stable and make the fabric easier to seam if you use it for garments or bags.
How the Motif Is Built
Each full motif contains three main visual layers.
Layer 1 — V-Stitch Foundation
The V-stitch creates the anchor.
Layer 2 — Curved Fan
Work approximately:
6 dc + 3 center dc + 6 dc
around the V structure.
Layer 3 — Raised Puffs
Puff stitches are worked over the fan to create the dimensional texture.
The surrounding chain arches connect the motifs without making the fabric heavy.
Yarn Choice
For an elegant garment or shawl, use a soft lightweight yarn with some halo.
Good choices include:
- mohair blends
- Angora-style yarn
- lightweight acrylic
- fine wool blends
For practice, smooth cotton is easier because every stitch remains visible.
Crochet Hook Size
A 2 mm hook creates a delicate version when paired with fine yarn, as demonstrated in the source material.
If you use thicker yarn, increase the hook size accordingly.
The important goal is to maintain an open but controlled lace structure.
Easy Project Ideas for This Stitch
Textured Crochet Vest
Use the stitch for the front and back panels and keep the edges simple.
Lightweight Cardigan
The open spaces make the stitch especially attractive for layering pieces.
Baby Blanket
Use a soft washable yarn and add a simple solid border.
Decorative Pillow
Crochet one textured front panel and pair it with a simpler solid back.
Crochet Purse
Use the stitch as a decorative outer panel and add a fabric lining for strength.
Table Runner
A long narrow panel shows the repeating fan pattern beautifully.
Beginner Tips
Use stitch markers to identify the center of each V-stitch.
Count your chain spaces carefully.
Keep the 6-dc fan sections consistent.
Make your puff loops the same height.
Check each row before moving to the next one.
Use a light-colored practice yarn until you understand where each motif begins.
Do not make the chain spaces too tight.
Keep the side double-crochet sections firm so the edges remain straight.
Resizing the Pattern
To make the fabric wider, add another 14 stitches to the starting chain.
Continue adding multiples of 14 while keeping the additional 5-stitch edge allowance.
For a narrower sample, remove one 14-stitch repeat.
Always crochet a small swatch first because the finished width depends heavily on yarn thickness and tension.
Textured Crochet Fan and Puff Lace
This pattern gets its dramatic appearance from the combination of simple open mesh, large rounded crochet fans, and raised puff stitches.
Once the repeating sequence becomes familiar, the stitch is much easier to follow than the finished fabric suggests.
The alternating fan placement gives the fabric movement and depth, while the puff stitches create the dimensional detail that makes this crochet pattern stand out.



