Three-Color Interlocking Block Crochet Blanket
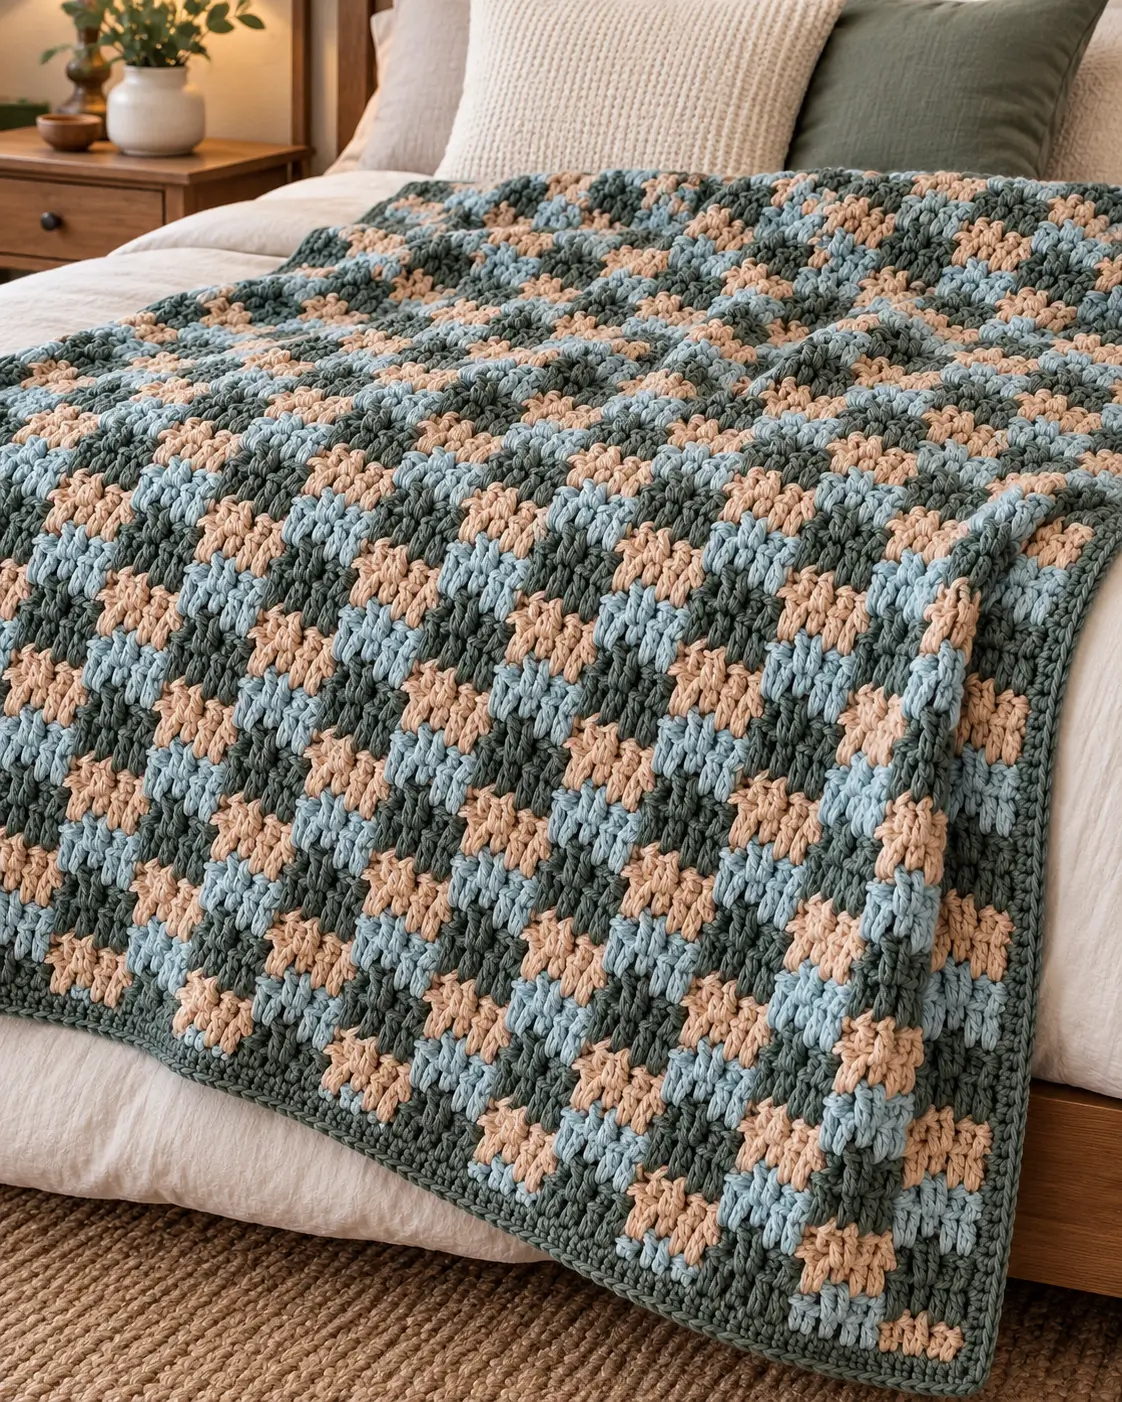
This three-color crochet blanket uses an interlocking block stitch to create a dense plaid-like pattern with no separate squares to join.
The design alternates pale blue, warm sand, and deep eucalyptus green in repeating rows. Groups of double crochet stitches are worked through the spaces of the previous row and into stitches two rows below, allowing the colors to visually lock together.
The result is a warm, durable blanket with a geometric pattern that looks attractive from both sides.
The blanket is worked as one large rectangle, so there is no sewing or motif assembly.
Finished Size
Approximately:
42 inches wide × 52 inches long
or:
107 × 132 cm
The size is easy to adjust by changing the foundation chain or adding more pattern rows.
Materials
- Medium weight #4 yarn
- Approximately 700–800 yards of each color
- 5 mm crochet hook
- Yarn needle
- Scissors
- Stitch markers, optional
Use three colors:
Color A — Pale Blue
A soft dusty blue or blue-agave shade.
Color B — Sand
A warm light beige or natural sand shade.
Color C — Eucalyptus
A deep muted sage/eucalyptus green.
Keep these three colors repeating in the same order throughout the blanket.
Skill Level
Confident beginner to intermediate
You should know how to make:
- chain stitches
- single crochet
- double crochet
- slip stitches
- color changes
The stitch looks complicated at first, but after the first few rows the construction becomes very repetitive.
Abbreviations
This pattern uses US crochet terminology.
ch — chain
sc — single crochet
dc — double crochet
sl st — slip stitch
st / sts — stitch / stitches
sp — space
A — pale blue
B — sand
C — eucalyptus green
Important Pattern Notes
The stitch multiple is:
multiple of 6 + 5
For the blanket size given here, begin with:
149 chains
because:
144 + 5 = 149
Do not cut the yarn after every row.
Each color is reused every third row, so leave the unused colors attached at the side and pick them up again when needed.
The color sequence is always:
A → B → C → A → B → C
The stitch pattern alternates between two main row constructions after the setup rows.
Understanding the Interlocking Structure
The blanket is not made from ordinary color stripes.
One row creates groups of:
3 double crochet stitches
separated by:
chain-3 spaces
The following row places new double crochet groups through those spaces and into the stitches two rows below.
This causes the three colors to weave visually through one another.
When inserting the hook two rows below, pass the hook through the open chain space of the row directly beneath your hook.
Do not crochet around the chain space itself.
You are reaching through it to work into the actual stitches underneath.
Foundation Chain
With Color A — pale blue:
Ch 149.
Keep the foundation chain relaxed.
If your chains tend to be tight, make the foundation using a 5.5 mm hook and then return to the 5 mm hook for the blanket.
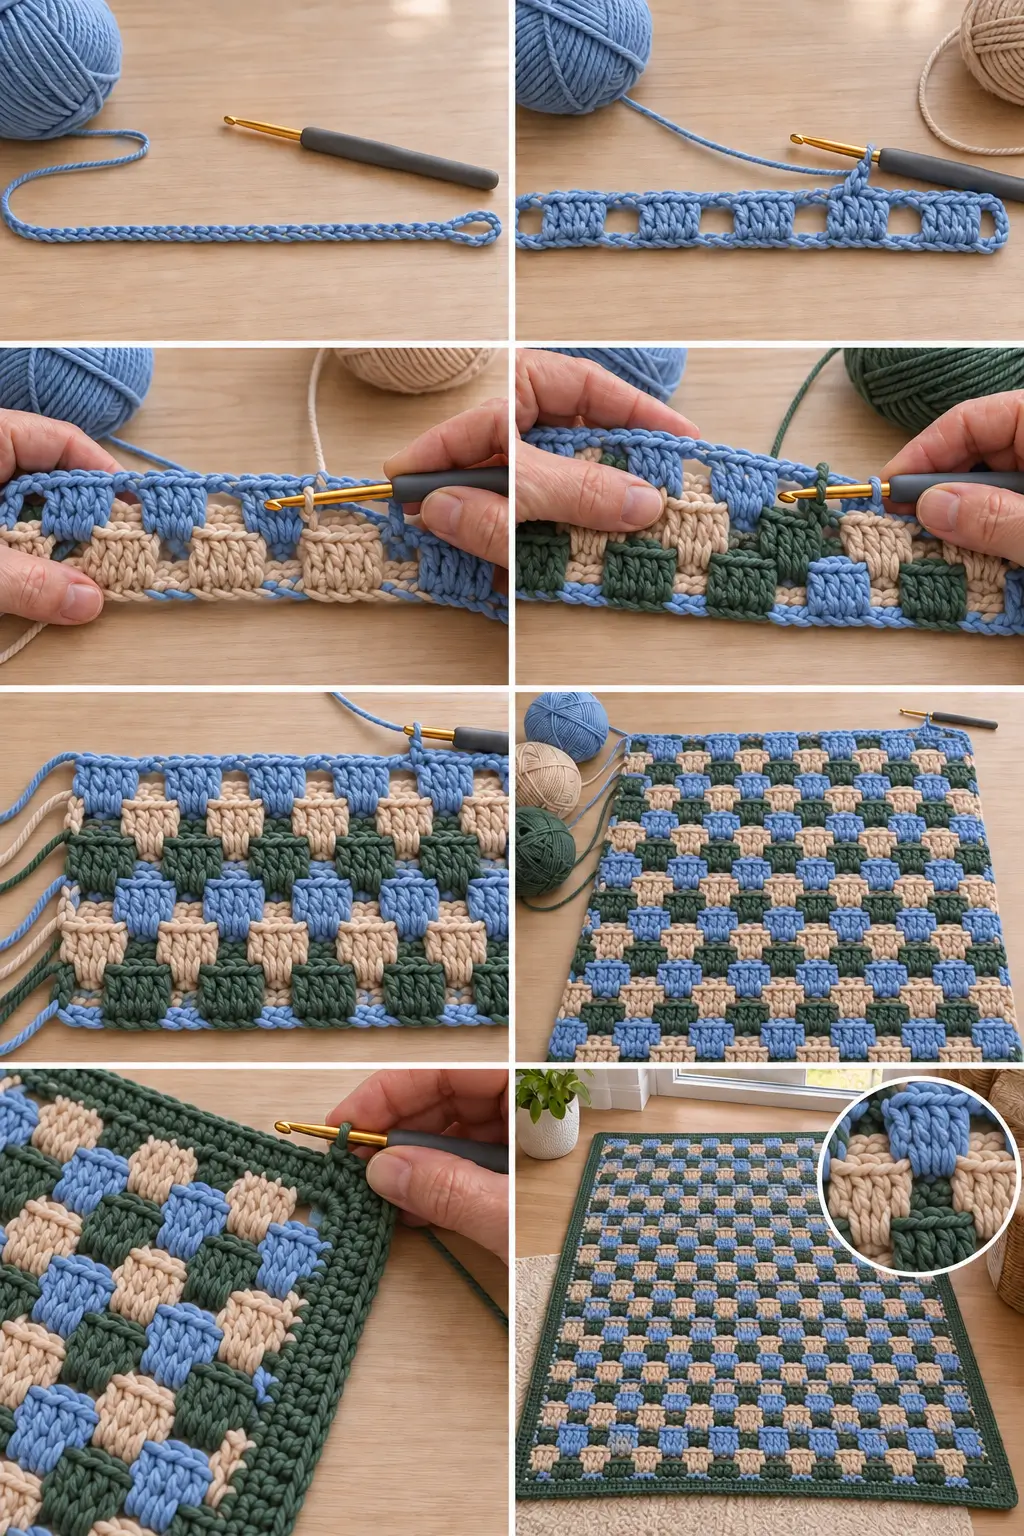
Row 1 — Pale Blue
Beginning in the 4th chain from the hook, work:
Dc in that chain.
Dc in the next chain.
You now have the turning chain plus 2 dc forming the first edge group.
Ch 3.
Skip the next 3 foundation chains.
Dc in each of the next 3 chains.
Repeat:
ch 3, skip 3 chains, dc in next 3 chains
across the entire foundation.
The row should finish with:
3 dc
Do not cut Color A.
At the end of the row, change to Color B — sand.
How to Change Colors
Before beginning the next row, use the new yarn to make the first chain.
Pull the previous color gently to tighten the join.
Leave the old color hanging at the side of the work.
Do not cut it.
You will pick it up again three rows later.
Keep all side strands relaxed so the edge does not pucker.
Row 2 — Sand
With Color B:
Ch 3.
Turn.
The first section of Row 1 contains the turning chain and 2 dc.
Skip over that first 3-stitch section.
Look through the first ch-3 opening.
You will see the 3 unused foundation chains directly underneath it.
Work:
1 dc into each of those 3 foundation chains
Bring each loop up slightly taller than normal so the stitches comfortably reach the current row.
Ch 3.
Skip the next 3 dc from Row 1.
Through the next ch-3 space, work:
3 dc into the next 3 unused foundation chains
Continue across:
ch 3, skip the next 3 dc of Row 1, work 3 dc into the 3 foundation chains underneath the next opening
After working the final group of 3 dc:
Ch 3.
Sl st into the top of the turning chain at the opposite edge.
Change to:
Color C — eucalyptus green
Do not cut Color B.
Row 3 — Eucalyptus Green
Ch 3.
Turn.
This row begins the regular repeat.
Look through the first open section of Row 2.
Work:
1 dc into each of the first 2 dc from Row 1
These stitches are two rows below.
You will now have the turning ch-3 plus 2 dc forming the first 3-stitch group.
Ch 3.
Skip the next 3 dc of Row 2.
Through the next opening, work:
3 dc into the next 3 dc two rows below
Repeat across:
ch 3, skip 3 dc from the previous row, work 3 dc into the next 3 dc two rows below
Continue until the end.
The row should finish with:
3 dc
Change to:
Color A — pale blue
Row 4 — Pale Blue
Ch 3.
Turn.
Skip over the first 3 dc of the previous row.
Through the open space, work:
3 dc into the corresponding 3 dc two rows below
Ch 3.
Skip the next 3 dc of the previous row.
Through the next opening, work:
3 dc into the next 3 dc two rows below
Repeat across:
3 dc two rows below, ch 3
After the final group of 3 dc:
Ch 3.
Sl st into the top of the turning chain at the opposite edge.
Change to:
Color B — sand
Row 5 — Sand
Repeat the construction of Row 3.
Ch 3 and turn.
Work 2 dc into the first 2 available dc two rows below.
Then repeat:
ch 3, skip 3 dc of the previous row, 3 dc into the next 3 dc two rows below
across.
Finish with 3 dc.
Change to:
Color C — eucalyptus green
Row 6 — Eucalyptus Green
Repeat the construction of Row 4.
Ch 3 and turn.
Work groups of:
3 dc into the stitches two rows below
with:
ch 3
between each group.
Finish with:
ch 3, sl st into the turning chain
Change back to:
Color A — pale blue
Main Blanket Repeat
From this point onward, alternate:
Row 3-style row
then:
Row 4-style row
while continuing the color sequence:
A → B → C → A → B → C
The easiest way to remember the construction is:
Row 3-Style Rows
Begin with:
ch 3 + 2 dc worked two rows below
Then repeat:
ch 3, 3 dc two rows below
Finish with:
3 dc
Row 4-Style Rows
Begin with:
ch 3
Then repeat:
3 dc two rows below, ch 3
Finish with:
sl st into the turning chain
How to Know Where to Put the Double Crochets
Every group of 3 dc should sit inside an open space from the previous row.
Look through that opening.
Directly underneath, two rows below, you should see a group of 3 stitches.
Work your new:
3 dc
into those 3 stitches.
This is what locks the rows together.
If you accidentally work into the chain space itself, the fabric will become much more open and the interlocking effect will disappear.
Keep the Loops Tall Enough
When reaching two rows below, the new double crochet must travel farther than a normal dc.
After inserting the hook into the stitch two rows below:
Yarn over.
Pull the loop up to the height of your current row.
Then complete the dc normally.
If you keep this loop too short, the blanket may become tight and puckered.
Continue to the Desired Length
Continue alternating the two row types and rotating the three colors until the blanket measures approximately:
51 inches / 130 cm
before the final closing row.
For this blanket, always stop after completing a Row 4-style row.
That makes the final straightening row much easier.
Final Closing Row
The normal interlocking rows contain chain-3 spaces.
This final row closes those openings so the top of the blanket has a straight finished edge.
Switch to the next color in your normal sequence.
Ch 1.
Turn.
Sc in each of the first 3 dc from the previous row.
You will now be above an open ch-3 section.
Through that opening, work:
3 dc into the 3 dc two rows below
Now work:
1 sc in each of the next 3 dc from the previous row
Continue alternating:
3 dc worked two rows below
then:
3 sc worked into the current row
across the blanket.
Finish with:
3 sc
Fasten off.
The upper edge should now be solid instead of containing open chain spaces.
Check the Blanket Before Adding the Border
Lay the blanket flat.
Check that:
- the three colors repeat consistently
- the sides are reasonably straight
- the interlocking groups remain aligned
- the fabric is not pulling inward
- the final edge is closed
- the blanket measures approximately 42 × 52 inches
A little movement at the sides is normal and will be tidied by the border.
Simple Eucalyptus Border
Use Color C — eucalyptus green for a clean frame around the three-color blanket.
The border should remain simple so the interlocking block pattern stays the main feature.
Border Round 1
Join Color C in any corner.
Ch 1.
Work sc evenly around the entire blanket.
Across the top
Work approximately:
1 sc in each stitch
Along each long side
Work approximately:
2 sc around each row end
Do not force the stitches tightly.
Spread the fabric out every few inches to make sure the border lies flat.
Across the foundation edge
Work:
1 sc into each foundation chain
At every corner work:
3 sc in the same corner space
Join with a sl st to the first sc.
Border Round 2
Ch 1.
Sc in every stitch around.
At each corner:
Work 3 sc into the center corner stitch from the previous round.
Continue around.
Join with a sl st.
Fasten off.
Weaving In the Ends
Most of the color changes should remain attached along the side rather than producing separate yarn ends.
For the ends you do have:
Thread the yarn onto a yarn needle.
Weave it through several stitches of the same color.
Change direction.
Weave through several additional stitches.
Trim the excess.
The eucalyptus border will also hide much of the carried yarn along the side edges.
Color Sequence Checklist
Keep this sequence beside you while crocheting:
Row 1 — Pale Blue
Row 2 — Sand
Row 3 — Eucalyptus
Row 4 — Pale Blue
Row 5 — Sand
Row 6 — Eucalyptus
Then continue:
Pale Blue → Sand → Eucalyptus
for the entire blanket.
Do not reverse the color order halfway through.
The consistent rotation is what gives the finished blanket its balanced three-color pattern.
How to Make the Blanket Wider
The foundation must always be:
a multiple of 6 + 5
Some possible foundation chains are:
101 chains
113 chains
125 chains
137 chains
149 chains
161 chains
173 chains
185 chains
For the approximately 42-inch-wide blanket:
Use:
149 chains
If making a different size, crochet a short swatch first because yarn thickness and tension can change the width significantly.
How to Make the Blanket Longer
The length is very easy to change.
Simply continue alternating the two pattern rows.
For the cleanest finish, stop after a:
Row 4-style row
Then work the final closing row.
Always maintain the same three-color rotation.
Baby Blanket Size
For a smaller baby blanket, aim for approximately:
32 × 38 inches
Use a foundation chain that follows:
multiple of 6 + 5
and comes close to 32 inches with your gauge.
Continue the interlocking pattern until the body is approximately 37 inches long.
Work the closing row and border.
Lap Blanket Size
For approximately:
42 × 52 inches
use the full pattern given here:
149 foundation chains
Continue to approximately:
51 inches
Then add the closing row and border.
Larger Throw Size
For a larger throw, aim for approximately:
50 × 60 inches
Increase the foundation using the same:
multiple of 6 + 5
rule.
Continue the body until approximately 59 inches long before finishing.
Remember that a larger version will require substantially more yarn.
If the Pattern Starts Looking Like Stripes
Check where you are placing the double crochet groups.
The dc groups must be worked into the stitches:
two rows below
through the chain spaces.
If you work directly into the previous row, the colors will stack like ordinary stripes instead of interlocking.
If You See Large Holes
Make sure every ch-3 opening receives a group of:
3 dc worked into the row underneath
on the following appropriate row.
The chain spaces are part of the construction, but they should become visually filled by the interlocking stitches.
The completed blanket should feel dense rather than lacy.
If the Sides Pull Inward
The unused yarn may be too tight along the edge.
Whenever you change colors, leave the inactive strand relaxed.
Do not pull it tightly upward.
Before continuing several rows, gently stretch the side edge vertically so the carried strands have enough slack.
The border will cover these strands later.
If the Double Crochets Look Too Short
Remember that these stitches travel through the row below and into stitches two rows down.
Pull the initial loop up slightly higher before completing the dc.
All 3 stitches in a group should reach the current row comfortably without pulling the lower section upward.
If You Lose Your Place
Look at the edge.
If the previous row finishes with a regular group of:
3 dc
your next row should usually be the Row 4-style construction.
If the previous row finishes with:
ch 3 and a sl st into the turning chain
your next row should be the Row 3-style construction.
Then check the color sequence:
pale blue → sand → eucalyptus
and continue with whichever color comes next.
Final Pattern Summary
With pale blue:
Ch 149.
Row 1
Dc in 4th ch and next ch.
Ch 3, skip 3, dc in next 3.
Repeat across.
Change to sand.
Row 2
Ch 3, turn.
Work groups of 3 dc into the skipped foundation chains beneath the ch-3 spaces, placing ch 3 between groups.
Finish with ch 3 and sl st to turning chain.
Change to eucalyptus.
Row 3
Ch 3, turn.
Dc in first 2 available dc two rows below.
Ch 3, skip 3 dc of previous row, 3 dc in next 3 dc two rows below.
Repeat across.
Change to pale blue.
Row 4
Ch 3, turn.
Work 3 dc in next 3 dc two rows below, ch 3.
Repeat across.
Finish with sl st into turning chain.
Continue alternating the Row 3 and Row 4 constructions while rotating:
pale blue → sand → eucalyptus
Continue until the blanket is approximately 51 inches long.
Finish after a Row 4-style row.
Work the closing row by alternating:
3 sc in the previous row
with:
3 dc worked two rows below
across.
Finish with a simple two-round eucalyptus single-crochet border.
The completed blanket measures approximately:
42 × 52 inches / 107 × 132 cm
and features the same pale blue, warm sand, and eucalyptus-green interlocking block pattern throughout.