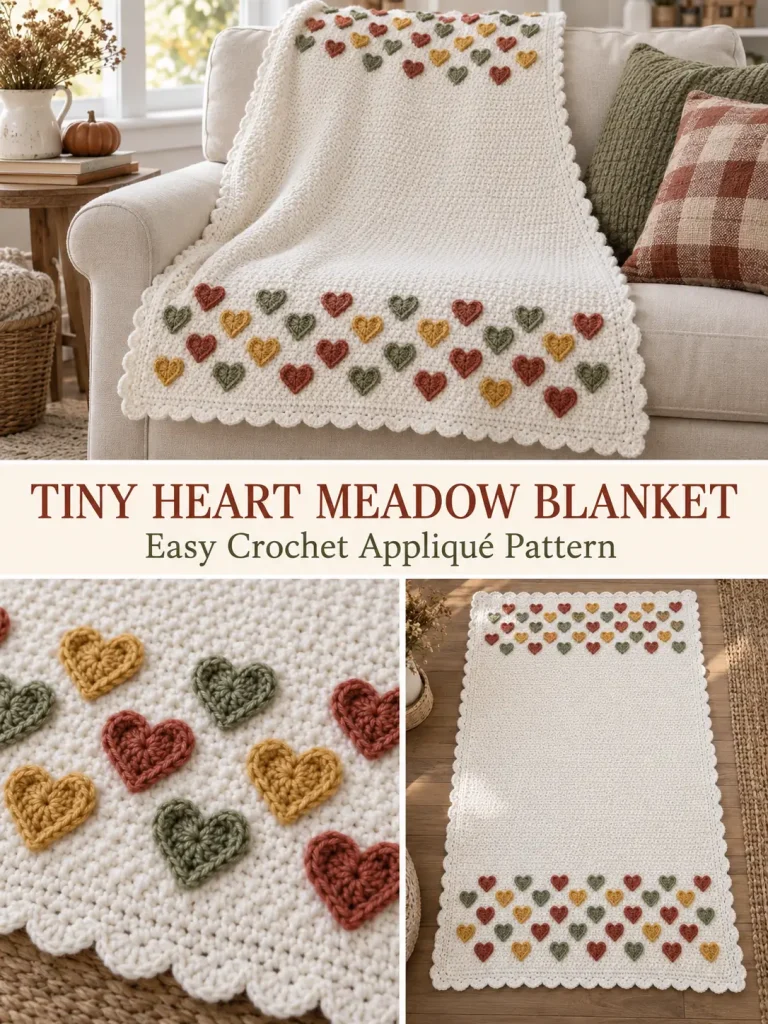
Tiny pops of rust, golden yellow, and sage green turn a simple white crochet blanket into something much more special.
The main blanket is worked in one piece using an easy textured stitch. Small crochet hearts are then arranged in staggered rows across both ends, leaving a generous white section through the center. A scalloped white border finishes the blanket without competing with the colorful heart bands.
The result works beautifully as a baby blanket, nursery throw, lap blanket, or handmade gift.
Skill Level
Confident Beginner
The blanket body uses a simple two-stitch repeat. The mini hearts are small motifs made with basic tall stitches, and the finishing requires careful measuring and sewing so the heart rows stay straight.
Finished Size
Approximately:
34 inches wide × 48 inches long
The white blanket body before the border measures approximately:
32 × 46 inches
The pattern can easily be resized.
Materials
- DK / light #3 yarn in white or soft cream
- Approximately 1,600–1,800 yards white
- DK / light #3 yarn in rust
- DK / light #3 yarn in golden yellow
- DK / light #3 yarn in sage green
- Approximately 50–75 yards of each accent color
- 4 mm crochet hook for the blanket
- 3.5 mm crochet hook for the hearts
- Yarn needle
- Scissors
- Stitch markers
- Measuring tape
- Blocking mats and pins, optional
A soft washable yarn is especially useful if the blanket will be used for a baby or child.
Abbreviations — US Terms
ch – chain
sl st – slip stitch
sc – single crochet
dc – double crochet
tr – treble crochet
st(s) – stitch(es)
Gauge
In the textured blanket stitch:
16 sts × 14 rows = approximately 4 inches
Gauge does not need to be perfect, but it affects the finished measurements and heart placement.
Make a small swatch before beginning if you want to match the suggested size.
Special Stitch Pattern
The white body uses a simple alternating single crochet and double crochet texture.
This is sometimes called a lemon-peel-style texture.
Across every row work:
sc in one stitch, dc in the next stitch
Because the blanket has an even number of stitches, each new row begins with a sc and ends with a dc.
This causes the sc stitches to sit above dc stitches and the dc stitches above sc stitches, creating a subtle pebbled surface.
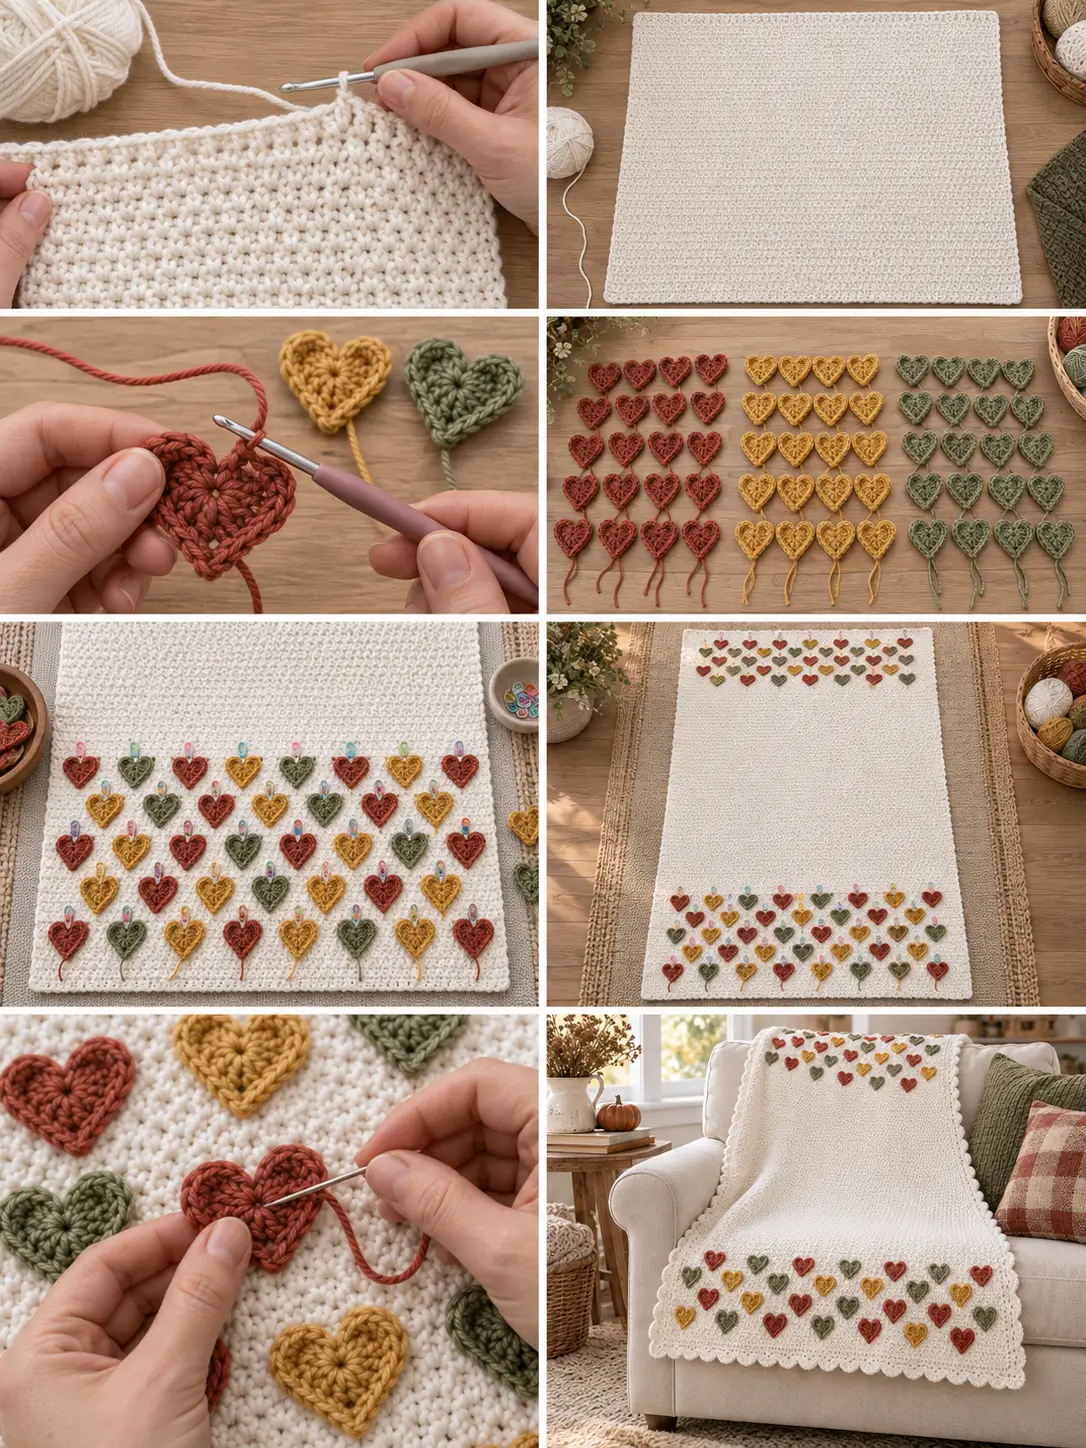
PART 1 — Crochet the White Blanket Body
Using the 4 mm hook and white yarn:
Foundation
Chain 129.
Row 1
Sc in the second chain from the hook.
Dc in the next chain.
Repeat:
sc in next ch, dc in next ch
across.
You should have:
128 stitches
Ch 1 and turn.
The turning chain does not count as a stitch.
Row 2
Sc in the first stitch.
Dc in the next stitch.
Repeat:
sc in next st, dc in next st
across.
You should again have:
128 stitches
Ch 1 and turn.
Rows 3–160
Repeat Row 2.
Maintain exactly 128 stitches in every row.
After Row 160, the body should measure approximately:
32 inches wide × 45–46 inches long
Do not fasten off if you plan to begin the border immediately after attaching the hearts.
Otherwise, fasten off and weave in the tail.
PART 2 — Crochet the Mini Hearts
The colorful hearts are made separately and sewn onto the completed blanket.
This gives us precise control over their placement and keeps this pattern construction distinct from an integrated colorwork heart stitch.
Use the 3.5 mm crochet hook for the hearts.
Mini Heart
Make a magic ring.
Into the ring work:
ch 2, 3 tr, 3 dc, ch 1, 1 tr, ch 1, 3 dc, 3 tr, ch 2, sl st into the ring
Pull the magic ring closed firmly.
Fasten off, leaving a tail approximately 8 inches long for sewing.
What the Heart Should Look Like
The two groups of treble and double crochet form the rounded upper lobes.
The single treble stitch in the center creates the lower point.
Gently shape the heart with your fingers after tightening the center.
Each heart should measure approximately:
1¼–1½ inches wide
depending on your yarn and tension.
PART 3 — Make the Hearts
The blanket uses 76 mini hearts.
You will make two identical decorative heart bands.
Each band contains five staggered rows:
- Row A: 8 hearts
- Row B: 7 hearts
- Row A: 8 hearts
- Row B: 7 hearts
- Row A: 8 hearts
That equals:
38 hearts per end
and:
76 hearts total
Divide the colors approximately evenly.
A good starting quantity is:
- 26 rust hearts
- 25 golden yellow hearts
- 25 sage hearts
The exact color distribution does not have to be mathematically perfect.
The important part is to avoid placing too many hearts of the same color directly beside one another.
PART 4 — Plan the First Heart Band
Lay the blanket flat with the foundation edge at the bottom.
Count stitches from left to right.
Heart Row 1
Center this row approximately over Blanket Row 12.
Place 8 hearts centered approximately over stitches:
8, 24, 40, 56, 72, 88, 104, 120
Suggested colors:
Rust – Gold – Sage – Rust – Gold – Sage – Rust – Gold
Do not sew them yet.
Use removable stitch markers to hold them temporarily.
Heart Row 2
Center this row approximately over Blanket Row 24.
This row is offset from Row 1.
Place 7 hearts centered approximately over stitches:
16, 32, 48, 64, 80, 96, 112
Suggested colors:
Gold – Sage – Rust – Gold – Sage – Rust – Gold
Heart Row 3
Center over approximately Blanket Row 36.
Return to the 8-heart arrangement:
8, 24, 40, 56, 72, 88, 104, 120
Suggested colors:
Sage – Rust – Gold – Sage – Rust – Gold – Sage – Rust
Heart Row 4
Center over approximately Blanket Row 48.
Use the offset 7-heart arrangement:
16, 32, 48, 64, 80, 96, 112
Suggested colors:
Rust – Gold – Sage – Rust – Gold – Sage – Rust
Heart Row 5
Center over approximately Blanket Row 60.
Use the 8-heart arrangement:
8, 24, 40, 56, 72, 88, 104, 120
Suggested colors:
Gold – Sage – Rust – Gold – Sage – Rust – Gold – Sage
PART 5 — Plan the Opposite Heart Band
The upper end mirrors the lower end.
Place heart rows approximately over:
- Blanket Row 108
- Blanket Row 120
- Blanket Row 132
- Blanket Row 144
- Blanket Row 156
Use the same alternating layouts.
Rows 108, 132 and 156
Place 8 hearts over:
8, 24, 40, 56, 72, 88, 104, 120
Rows 120 and 144
Place 7 hearts over:
16, 32, 48, 64, 80, 96, 112
Rotate rust, gold, and sage through the rows so neighboring hearts remain varied.
Check the Entire Layout Before Sewing
This step is important.
Lay the blanket completely flat and temporarily pin or mark all 76 hearts.
Check that:
- rows are straight
- alternating rows are clearly staggered
- spacing looks even
- colors are balanced
- the lower and upper bands are approximately the same depth
- there is a large uninterrupted white section through the center
Take a photo once you are happy with the arrangement.
That gives you a reference while sewing.
PART 6 — Sew the Hearts to the Blanket
Thread the long tail from a heart onto a yarn needle.
Position the heart with its point facing downward.
Pass the yarn through the blanket directly behind the center of the heart.
Make several small stitches through the back loops of the heart and the surface of the blanket.
Work around the outer edge, but do not pull tightly.
The heart should remain slightly raised rather than being flattened against the blanket.
Pay particular attention to:
- the center point
- the dip between the two lobes
- both upper lobes
Fasten securely on the wrong side.
Weave the yarn tail through several stitches.
Repeat for every heart.
Keep the Hearts Dimensional
Avoid sewing through every visible stitch.
A few secure attachment points are enough.
This allows the edges of the motif to remain slightly raised and gives the blanket more texture.
PART 7 — White Foundation Border
Use the 4 mm hook and white yarn.
The border is worked around the completed blanket.
Border Round 1
Attach white yarn at the upper-right corner.
Ch 1.
Across the top edge:
Work 1 sc in each of the 128 stitches.
At the corner:
ch 2
Down the first long edge:
Work approximately 3 sc evenly across every 4 row ends.
Because the blanket has 160 rows, this gives approximately:
120 sc along the side
Ch 2 at the next corner.
Across the foundation edge:
Work 128 sc evenly across.
Ch 2.
Along the second long side:
Work approximately 120 sc, using the same 3-sc-over-4-rows spacing.
Ch 2.
Join with a sl st to the first sc.
Check the Border
Lay the blanket flat.
The border should not ripple or pull inward.
If necessary, make small adjustments to your side-edge spacing before continuing.
PART 8 — Scalloped Border
The stitch counts have been chosen so the scallops can be spaced evenly.
Border Round 2
Sl st into the first sc if necessary.
Across each straight side repeat:
sl st in next sc, skip next sc, 5 dc in next sc, skip next sc
Repeat across the side.
At each ch-2 corner space work:
7 dc
Then continue the scallop repeat along the next side.
Join with a sl st when you reach the beginning.
Fasten off.
The 5-dc fans create small rounded scallops while the 7-dc corner fans give the blanket enough room to turn neatly.
PART 9 — Final Blocking
Weave in every remaining yarn end.
Wash or lightly dampen the blanket according to the yarn manufacturer’s care instructions.
Lay it flat.
Straighten the four sides and gently shape each scallop.
Adjust any hearts that have folded during handling.
Allow the blanket to dry completely.
How to Make the Blanket Wider
The textured body requires an even number of stitches.
To increase the width, add foundation chains in pairs.
For example:
129 chains = 128 working stitches
For a wider version you might use:
145 chains = 144 working stitches
Keep the sc/dc alternating repeat across every row.
When placing the hearts, redistribute them evenly across the wider fabric.
How to Make the Blanket Longer
Simply work additional textured rows before fastening off.
For a longer center section, increase the distance between the two heart bands.
For example, keep the first heart band in the same position but move the upper band farther toward the opposite end.
Make a Smaller Baby Blanket
For a smaller blanket, try approximately:
112 working stitches
and shorten the body to your preferred length.
Use fewer hearts across each decorative row.
A possible arrangement is:
- 7 hearts
- 6 hearts
- 7 hearts
- 6 hearts
- 7 hearts
Again, alternate the rows so the motifs appear staggered.
Why the Staggered Layout Works
If every heart were placed directly above the one below it, the design would look more like rigid stripes.
Offsetting every second row gives the hearts a softer scattered appearance.
It also allows the white background to remain visible around every motif.
That contrast is what makes the tiny colored hearts stand out.
Color Ideas
The three-color approach is easy to adapt.
Autumn Meadow
Rust + mustard + sage
Soft Baby Girl
Blush + dusty rose + sage
Coastal
Navy + pale blue + seafoam
Spring
Lavender + butter yellow + mint
Christmas
Muted red + forest green + gold
Neutral
Camel + taupe + soft brown
You can also use leftover DK yarn for the hearts while keeping the entire background neutral.
Best Yarn for This Blanket
A smooth DK yarn works particularly well because the small hearts need enough stitch definition to remain recognizable.
For a baby blanket, look for yarn that is:
- soft
- washable
- comfortable against the skin
- resistant to excessive stretching
Very fuzzy yarn can make the small heart shape harder to see.
Tips for Making Consistent Hearts
Use the Smaller Hook
Making the hearts with a slightly smaller hook helps them stay compact and defined.
Tighten Every Magic Ring Firmly
A loose center can create a visible hole in the middle of the heart.
Keep the Treble Stitches Even
The treble stitches form the upper lobes.
If one side is much looser, the heart can look lopsided.
Shape Before Sewing
Use your fingers to open both lobes and sharpen the lower point.
Make a Few Hearts at a Time
Rather than making all 76 immediately, crochet five or six first and check their scale against the blanket.
Common Problems
Heart Looks Round Instead of Heart-Shaped
Make sure the single center treble stitch is positioned between the two ch-1 spaces.
That stitch helps form the pointed bottom.
Also pull the magic ring closed firmly.
Heart Rows Look Crooked
Use the actual blanket rows as guides instead of measuring only with a ruler.
Place every heart center along the same crochet row.
Hearts Are Too Large
Use a smaller hook.
You can also switch to a slightly lighter accent yarn.
Hearts Curl Up
Light blocking usually fixes this.
You can also add one or two tiny sewing stitches near the outer curves.
Blanket Edges Ripple
Reduce the number of single crochets worked along the long sides.
Border Pulls In
Add a few more evenly spaced single crochets to the foundation border before working the scallops.
Optional Variation — Hearts at One End Only
For a simpler modern version, work just one five-row heart band along the lower end.
Leave the rest of the blanket completely white.
This also reduces the number of mini hearts from 76 to 38.
Optional Variation — Full Heart Blanket
For a much more colorful version, continue the staggered heart arrangement through the entire length.
Keep approximately 12 blanket rows between heart rows.
Alternate:
8 hearts → 7 hearts → 8 hearts → 7 hearts
until you reach the opposite end.
Tiny Heart Meadow Crochet Blanket
The strength of this design comes from contrast.
The white textured background keeps the blanket calm and practical, while the tiny rust, gold, and sage hearts add just enough color to make the ends feel special.
Because the hearts are made separately, you can lay out the complete design before committing to any color arrangement, change the palette whenever you want, or even use leftover yarn from other projects.
The result is an original heart-themed blanket that captures the charming visual idea of scattered colorful hearts without reproducing the paid designer’s proprietary heart-stitch construction.



