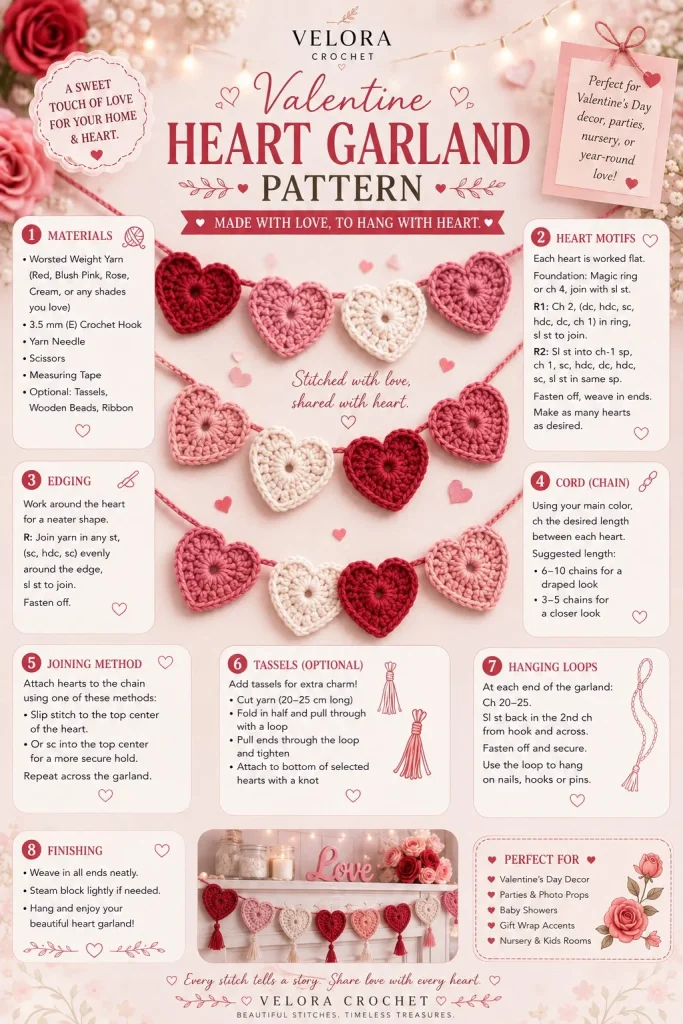
Creating a delightful Valentine Crochet Heart Garland can add a touch of warmth and handmade charm to your seasonal decor. This project features a series of adorable crochet hearts strung together, making it perfect for draping along mantles, doorframes, or even as table decor. Adding neat edging and optional tassels or bows brings an extra romantic flair, making it a perfect piece to celebrate love. Let’s dive into the details of this crochet pattern so you can make your very own!
Materials
- Worsted weight yarn in your choice of colors
- Crochet hook (size H/8 or 5mm)
- Scissors
- Tapestry needle
- Optional: Yarn for tassels or bows
Abbreviations
- MR: magic ring
- ch: chain
- sc: single crochet
- hdc: half double crochet
- dc: double crochet
- inc: increase
- dec: decrease
- sl st: slip stitch
Heart Motifs
To begin, you’ll create small heart motifs that will form the centerpiece of your garland. Start with a magic ring to keep your work close and tidy.
- Round 1: 6 sc into the MR. Tighten the ring and join with a sl st to the first sc.
- Round 2: Ch 1, (1 inc in the next sc, 1 sc in the next sc) repeated for a total of 6 times. Join with a sl st to the first sc.
- Round 3: Ch 1, (1 inc in the next sc, 3 sc in the next sc) repeated for a total of 6 times. Join with a sl st to the first sc and fasten off.
You’ll want to create multiple hearts depending on the desired length of your garland.
Edging
To give your hearts a neat finish, you can add an edging using a contrasting color:
- Edging: Attach yarn at the bottom point of the heart with a slip stitch.
- Work a round of sc around the heart, ensuring to place 3 sc in each of the top points to create a scalloped look.
This simple edging helps define the hearts beautifully.
Cord
Next, you’ll create the cord to string your hearts together:
- Cording: Ch the desired length. A 3 ft chord is usually sufficient for several hearts spaced nicely.
- For added durability, sc back along the chain to create a firm cord.
Joining Method
To attach your hearts to the cord:
- Lay out your hearts in the desired order.
- Using the tapestry needle, thread the cord through the top of each heart. You can space them as closely or as widely apart as you like.
Tassels (Optional)
If you’d like to add a finishing touch, consider making some tassels:
- Cut lengths of yarn and bundle them together.
- Tie a piece of yarn around the top to hold them together.
- Attach to either end of your garland or in between hearts for added flair.
Hanging Loops
To enable easy hanging, create loops at the ends of your cord:
- Ch 20 at each end of the cord and fasten off.
- This gives you something to use to drape over hooks or nails.
Finishing
Once everything is securely joined and arranged, give your garland a gentle stretch to help even out the shapes. You can also block the hearts if desired, to ensure they lay flat and look perfect.
Tips for the Best Result
- For even tension throughout your work, consider checking your gauge, especially if you’re using a new stitch or technique.
- Lay out your hearts and adjust spacing before securing them to the cord; this helps visualize the final look.
- Use vibrant colors for a fun pop or soft pastels for a romantic, subtle feel, letting your personal style shine through.
This Valentine Crochet Heart Garland makes a delightful addition to your home decor and can even be gifted to someone special. Feel free to explore color combinations or make additional motifs to extend your garland for larger spaces. If you’re looking for more crochet inspiration, check out this easy crochet tutorial for a cozy blanket! Enjoy your handmade creation this Valentine’s Day!



