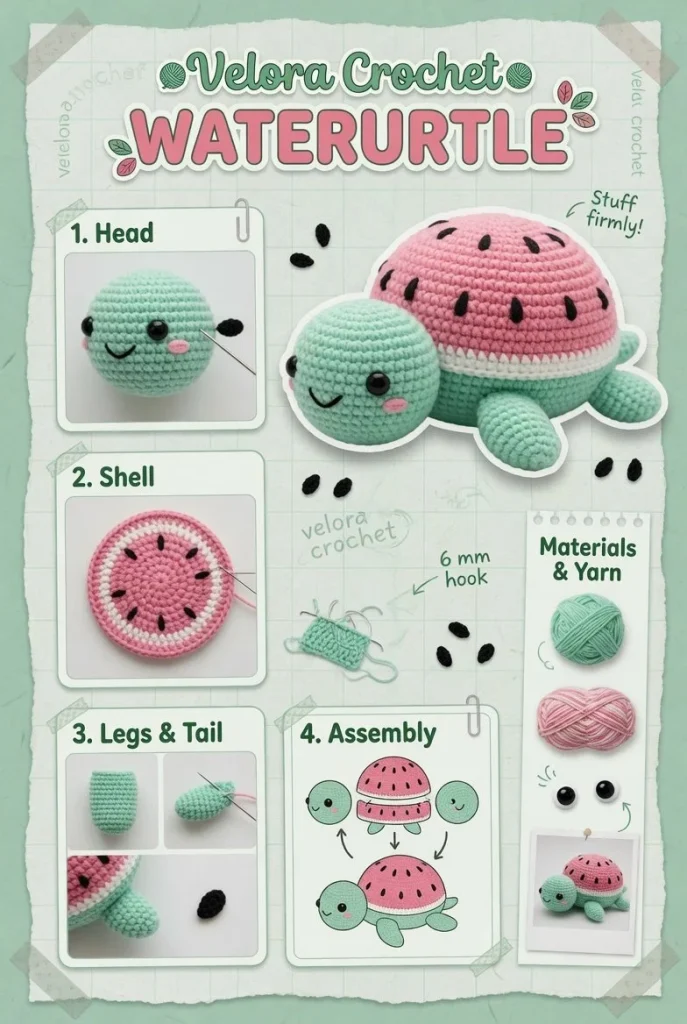
Creating a charming plush toy can be a delightful experience, especially when it’s as cute as this small watermelon-themed turtle. With its mint green body and a pastel pink striped shell, this handmade crochet project is perfect for summer gifts or playful decorations. Let’s dive into this crochet pattern and discover how to bring this little turtle to life!
Materials
- Soft chenille yarn in mint green, pastel pink, and white
- Black embroidery thread for seed details
- 3.5mm (E) crochet hook
- Fiberfill or other stuffing
- Yarn needle
- Scissors
- Stitch marker
Abbreviations
- MR: magic ring
- ch: chain
- sc: single crochet
- hdc: half double crochet
- dc: double crochet
- inc: increase
- dec: decrease
- sl st: slip stitch
Instructions
Head
- Start with a magic ring (MR).
- Round 1: 6 sc in MR (6)
- Round 2: inc in each stitch around (12)
- Round 3: sc in next st, inc; repeat around (18)
- Rounds 4-6: sc in each stitch around (18)
- Round 7: sc in next st, dec; repeat around (12)
- Stuff the head and finish with a sl st.
Body
- Start with a new MR.
- Round 1: 6 sc in MR (6)
- Round 2: inc in each stitch around (12)
- Round 3: sc in next st, inc; repeat around (18)
- Round 4: sc in next 2 sts, inc; repeat around (24)
- Rounds 5-8: sc in each stitch around (24)
- Round 9: sc in next 2 sts, dec; repeat around (18)
- Stuff and secure with a sl st.
Shell
- Use a pink yarn for the shell.
- Start with a new MR.
- Round 1: 6 sc in MR (6)
- Round 2: inc in each stitch around (12)
- Round 3: sc in next st, inc; repeat around (18)
- Round 4: sc in next 2 sts, inc; repeat around (24)
- Round 5: sc in next 3 sts, inc; repeat around (30)
- Switch to white yarn.
- Rounds 6-8: sc in each stitch around, alternating between pink and white stripes.
- Round 9: dec around until closed.
{image_template}
Flippers
- Make four flippers with mint green yarn.
- Start with a MR.
- Round 1: 6 sc in MR (6)
- Round 2: inc in each stitch around (12)
- Rounds 3-4: sc in each stitch around.
- Finish off and leave a long tail for sewing.
Tail
- Create a tail similar to the flippers.
- Make 6 sc in a MR and follow the same increase process.
- Make the tail slightly longer than flippers if desired.
Seed Details
- Use black embroidery thread to create seed shapes on the shell.
- Embroider small black dots randomly across the pink stripes for a realistic watermelon effect.
Face Details
- Stitch black beads or use embroidery to create eyes on the head.
- Optionally add a smile with embroidery thread.
Assembly
- Attach the head to the body using a yarn needle and securely sew them together.
- Sew flippers and tail to the bottom of the body, ensuring they are evenly spaced.
- Attach the shell to the back of the body securely, making sure it sits evenly.
Tips for the Best Result
- When stuffing, be sure not to overstuff the turtle. A soft finish gives it a cuddly appeal.
- Use stitch markers to keep track of your rounds, especially during the shell.
- For the best appearance, keep your tension consistent throughout the project.
Creating this adorable watermelon-themed turtle is not just a rewarding DIY crochet project; it’s a lovely way to express your creativity and skill. Consider making more than one for gifts or using different color combinations to suit various tastes. Happy crocheting!



