White Floral Lace Crochet Shawl With 6-Petal Flower Motifs
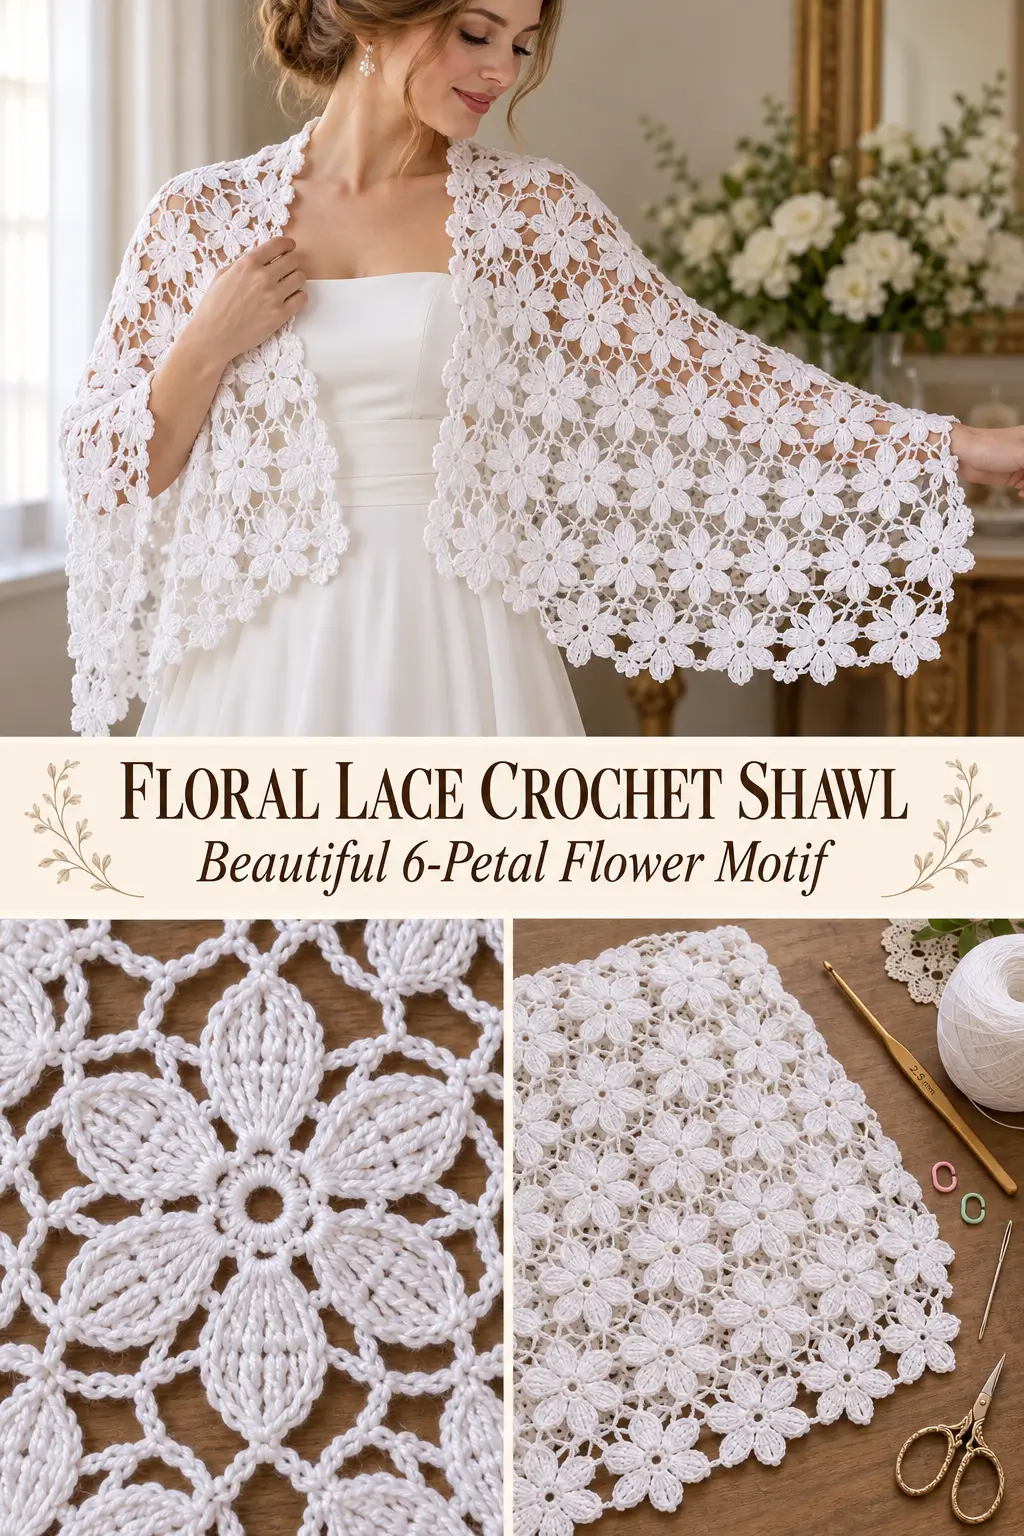
This delicate crochet shawl is built from small six-petal flowers connected with airy chain mesh, creating the appearance of dozens of white blossoms floating across fine lace.
Each motif begins with a small open center, followed by six elongated petals. A final round of chain arches surrounds every flower and provides the joining points that connect the motifs into a lightweight floral fabric.
The motifs are arranged in staggered rows, which creates the diagonal flower placement and open diamond-shaped spaces between blossoms.
Worked entirely in white, the finished shawl has an elegant bridal look and works beautifully as a wedding wrap, evening shawl, summer stole, or special handmade gift.
Finished Size
Approximately:
60–62 inches / 152–157 cm long
by:
20–21 inches / 51–53 cm deep
The main shawl uses:
7 staggered motif rows
with alternating rows of:
20 motifs
and:
19 motifs
Total motifs:
137 flowers
The shawl is easy to resize by adding or removing motifs.
Materials
- Fingering weight #1 cotton or cotton-bamboo yarn
- Approximately 1,300–1,500 yards / 1,190–1,370 meters
- 2.5 mm crochet hook
- Yarn needle
- Sharp scissors
- Blocking mats
- Rust-resistant blocking pins
- Stitch markers, optional
For the light lace appearance, use:
pure white, soft white, ivory, or bridal cream
A smooth mercerized cotton gives the petals especially crisp definition.
Skill Level
Intermediate beginner
You should know how to make:
- magic ring
- chain
- slip stitch
- single crochet
- half double crochet
- double crochet
- treble crochet
- working into chain spaces
- joining crochet motifs
Abbreviations
This pattern uses US crochet terminology.
MR — magic ring
ch — chain
sl st — slip stitch
sc — single crochet
hdc — half double crochet
dc — double crochet
tr — treble crochet
st / sts — stitch / stitches
sp / sps — space / spaces
Motif Size
One finished and lightly blocked flower motif should measure approximately:
2¾–3 inches / 7–7.5 cm across
Make one test flower first.
The exact measurement is less important than keeping all motifs the same size.
Understanding the Motif
Every flower has four rounds:
Round 1
Creates the small center ring.
Round 2
Creates six chain loops for the petals.
Round 3
Fills those loops to make six elongated petals.
Round 4
Adds six open joining arches around the flower.
Those outer arches are what connect the flowers together while preserving the airy lace spaces between them.
FLOWER MOTIF — MAKE 137
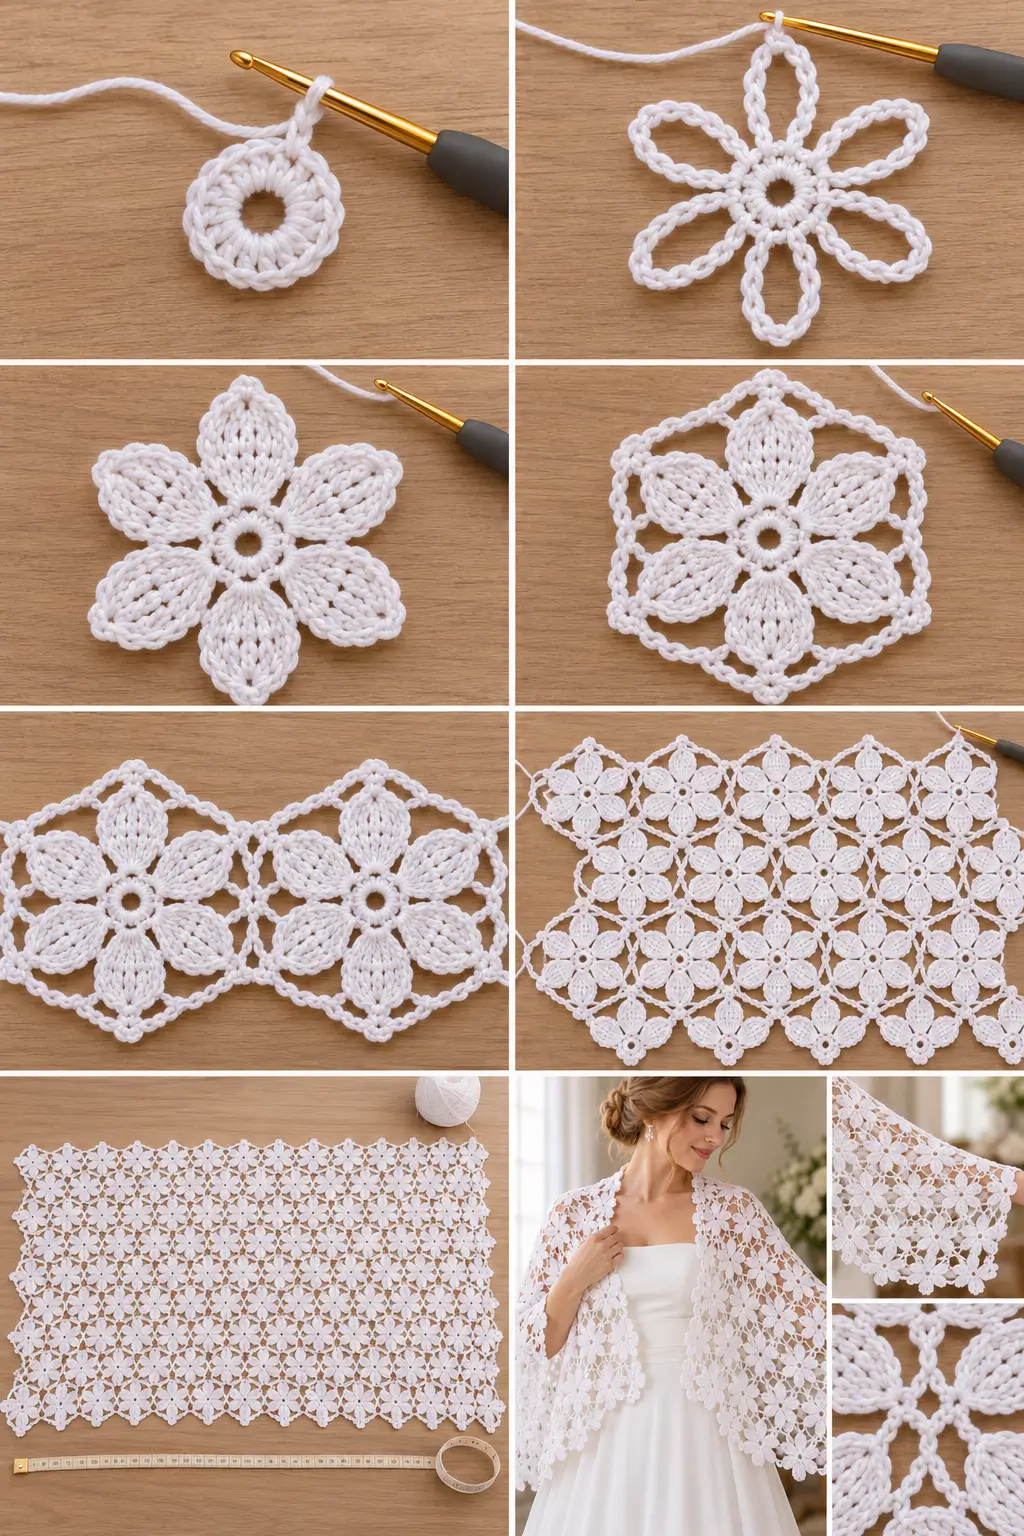
Round 1 — Flower Center
Make a magic ring.
Ch 1.
Work:
12 sc into the MR
Pull the ring until a small center opening remains.
Do not close the opening completely.
Join with a sl st to the first sc.
12 sc
The small opening is intentional and remains visible in the finished flower.
Round 2 — Petal Loops
Ch 1.
Sc in the same stitch.
Ch:
7
Skip the next stitch.
Sc in the next stitch.
Repeat:
ch 7, skip 1 st, sc in next st
around.
Join with a sl st to the first sc.
You should have:
6 sc anchors
and:
6 ch-7 loops
These loops become the six flower petals.
Round 3 — Six Elongated Petals
Sl st into the first ch-7 loop.
In that loop work:
1 sc
1 hdc
1 dc
3 tr
1 dc
1 hdc
1 sc
You have created one rounded petal.
The middle treble of the group of three is the petal tip.
Now move directly into the next ch-7 loop and repeat:
sc, hdc, dc, 3 tr, dc, hdc, sc
Continue around all six loops.
Join with a sl st into the first sc.
You should now have:
6 identical petals
Check the Petal Shape
Each petal should have:
- narrow base
- gradually increasing stitch height
- rounded upper section
- one clearly identifiable middle treble stitch
- matching taper on the opposite side
If the petals feel stiff, loosen the treble stitches slightly.
Round 4 — Joining Mesh
Sl st across the first petal until you reach the middle treble stitch at its tip.
Ch 1.
Sc in the tip stitch.
Ch:
5
Sc in the middle treble of the next petal.
Ch 5.
Continue:
sc in next petal tip, ch 5
around.
Join with a sl st to the first sc.
You should have:
6 sc
and:
6 ch-5 outer arches
Fasten off.
These six arches create the lace framework surrounding the flower.
Finished Motif Check
A completed motif should have:
- small open center
- exactly 6 elongated petals
- exactly 6 outer ch-5 arches
- soft six-sided shape
- no cupping
- no heavy ruffling
Lightly stretch it with your fingers.
Do not fully block every motif individually unless your tension varies noticeably.
Make the Two Flower Colors?
For the shawl shown here, use:
white for every motif
Do not alternate colors.
The repeated white flowers and white mesh are what create the continuous lace appearance.
Label the Six Joining Arches
Before assembling the shawl, place one motif flat.
Rotate it so one outer ch-5 arch sits directly on the left and another sits directly on the right.
Number the arches clockwise:
Arch 1 — upper left
Arch 2 — upper right
Arch 3 — right
Arch 4 — lower right
Arch 5 — lower left
Arch 6 — left
Use these positions when assembling the staggered rows.
Shawl Layout
The shawl uses:
Row 1
20 motifs
Row 2
19 motifs
Row 3
20 motifs
Row 4
19 motifs
Row 5
20 motifs
Row 6
19 motifs
Row 7
20 motifs
Total:
137 motifs
The 19-motif rows are centered between the 20-motif rows.
This creates the staggered floral layout.
Assemble Row 1
Lay:
20 motifs
in a horizontal line.
Keep all motifs oriented the same way.
For every neighboring pair:
Join:
Arch 3 of the left motif
to:
Arch 6 of the right motif
How to Join Two Arches
Thread approximately 10 inches / 25 cm of white yarn onto a yarn needle.
Locate the:
third chain
of each ch-5 arch.
Bring those two center chains together.
Pass the needle through both center chains.
Make:
2 small whip stitches
Do not pull tightly.
The arches should touch while remaining soft and open.
Secure the yarn on the wrong side.
Weave in both tails.
Repeat between every pair in the row.
The motifs should remain flat rather than overlapping.
Row 2 — First Offset Row
Arrange:
19 motifs
below Row 1.
Each Row 2 motif should sit between two flowers from Row 1.
For each Row 2 motif:
Join its:
Arch 1
to:
Arch 4 of the flower above-left
Then join its:
Arch 2
to:
Arch 5 of the flower above-right
Also join neighboring motifs within Row 2:
Arch 3 to Arch 6
exactly as you did in Row 1.
The flowers should now form an open staggered lattice.
Row 3
Use:
20 motifs
Return to the original horizontal alignment.
The center motifs will sit between two motifs from Row 2.
For each interior motif, join:
Arch 1
to the appropriate lower-right arch of the flower above-left,
and:
Arch 2
to the lower-left arch of the flower above-right.
At the far left and far right edges, each outside motif will have only one upper-row connection.
Join neighboring motifs horizontally:
Arch 3 to Arch 6
Rows 4–7
Continue alternating:
19 motifs
then:
20 motifs
using the same joining system.
The completed arrangement is:
20
19
20
19
20
19
20
The flowers should form repeating diagonal lines in both directions.
Check the Lace Before Continuing
Lay the entire shawl flat.
Look for:
- straight overall length
- centered offset rows
- consistent open spaces
- flowers facing the same direction
- no twisted motifs
- no tightly pulled joins
The mesh between the flowers should remain open.
Do not tighten the joining stitches enough to make the flowers touch petal-to-petal.
Optional Join-As-You-Go Method
Once you understand the layout, you can join later motifs while crocheting Round 4 instead of sewing them afterward.
When you reach an arch that must join a neighboring motif, replace:
ch 5
with:
ch 2
Sl st into the center chain of the corresponding neighbor’s ch-5 arch.
Ch 2.
Continue to the next petal tip.
This creates:
ch 2, join, ch 2
instead of a plain ch-5 arch.
Use the same joining positions described in the layout.
This method reduces the number of yarn ends.
Top and Bottom Edges
The upper and lower edges naturally form soft flower scallops.
This is intentional.
You can leave the shawl exactly like this after blocking for the most delicate appearance.
For a slightly more finished edge, add the optional edging below.
Optional Lace Edging
Join white yarn in any exposed ch-5 arch along the outside edge.
Ch 1.
In the same arch work:
1 sc
Ch:
3
Make a picot:
Sl st into the first chain of the ch-3.
Ch:
3
Sc in the next exposed outer arch.
Repeat:
ch 3, picot, ch 3, sc in next exposed arch
around the entire outside edge.
At each outer corner, work:
sc, ch 3, picot, ch 3, sc
into the same corner arch.
Continue around.
Join and fasten off.
This produces a very light decorative outline without covering the flower petals.
Weaving In the Ends
Thread each yarn tail onto a yarn needle.
Weave through several stitches on the wrong side of the nearest petal or mesh arch.
Change direction.
Weave through several more stitches.
Trim carefully.
Avoid weaving tails across open chain spaces where they could remain visible.
Blocking the Shawl
Blocking is especially important for this project.
It opens the lace and makes the flower rows look even.
Soak or lightly wet the shawl according to the yarn care instructions.
Gently remove excess water.
Do not wring.
Lay the shawl flat on blocking mats.
Begin at the four corners.
Pin the shawl to approximately:
60–62 inches long
and:
20–21 inches deep
Shape the Flowers During Blocking
Use your fingers to spread every six-petal flower.
Each petal should be clearly separated.
Gently open the ch-5 mesh arches.
Straighten the diagonal motif rows.
Pin only where necessary.
Do not stretch the flower centers until they become distorted.
Allow the shawl to dry completely.
Making the Shawl Shorter
Reduce the number of motifs in every horizontal row.
For example:
16 motifs
15 motifs
16 motifs
15 motifs
16 motifs
15 motifs
16 motifs
This creates a shorter wrap while preserving the staggered design.
Making the Shawl Longer
Add equal numbers of motifs to every row.
For example:
22 motifs
21 motifs
22 motifs
21 motifs
22 motifs
21 motifs
22 motifs
This produces a longer stole without changing its depth.
Making a Narrower Shoulder Wrap
Use only:
5 motif rows
For example:
20 motifs
19 motifs
20 motifs
19 motifs
20 motifs
This creates a lighter shoulder wrap with approximately:
14–15 inches / 35–38 cm
of depth.
Making a Deeper Shawl
Add additional alternating rows.
For example:
9 total motif rows
Maintain the same:
20 / 19
alternation.
This creates more coverage over the upper arms and back.
Bridal Shawl Version
For a more delicate bridal finish, use:
- size 10 crochet cotton
- 1.75–2 mm hook
- bright white or ivory
The motifs will be smaller.
Add more motifs to reach the desired finished dimensions.
Use the same flower and joining construction.
Softer Everyday Version
For a softer wrap, use:
- fingering-weight bamboo blend
- fingering-weight cotton/acrylic blend
- 2.75–3 mm hook
The lace will drape more softly around the shoulders.
If the Petals Curl
Check your Round 3 tension.
The tall stitches must have enough height to spread comfortably inside the ch-7 loop.
Try:
- loosening your tr stitches
- using a hook 0.25–0.5 mm larger
- blocking the finished motif
Do not add extra stitches unless your yarn is dramatically different.
If the Flower Cups
Make sure Round 2 contains exactly:
6 ch-7 loops
Round 3 must contain exactly:
6 petals
If the stitch counts are correct, loosen the petal stitches slightly.
If the Flower Ruffles
Check that each petal contains exactly:
sc, hdc, dc, 3 tr, dc, hdc, sc
Do not accidentally add extra dc or tr stitches.
A little movement before blocking is normal.
If the Lace Looks Too Open
Move down one hook size.
You can also change the outer joining arches from:
ch 5
to:
ch 4
but use the same number consistently on every motif.
For the airy appearance shown here, keep:
ch 5
If the Lace Looks Too Dense
Use a slightly larger hook.
Make sure the ch-5 joining arches are loose enough to open during blocking.
Do not pull the joining stitches tightly.
If the Shawl Pulls at the Joins
The motif joins should act only as connection points.
They should not pull the ch-5 arches completely closed.
If a join puckers:
Remove it.
Bring the arches together again.
Rejoin with relaxed tension.
After blocking, the join should almost disappear into the lace.
Make a Matching Floral Scarf
Use:
3 motif rows
with alternating counts such as:
22 motifs
21 motifs
22 motifs
Join and block exactly the same way.
The result is a narrow floral lace scarf.
Final Pattern at a Glance
Flower Motif
Round 1
12 sc in MR.
Round 2
Repeat:
sc, ch 7, skip 1
around.
6 ch-7 loops
Round 3
In every ch-7 loop:
sc, hdc, dc, 3 tr, dc, hdc, sc
6 petals
Round 4
Sc in each petal tip with:
ch 5
between petal tips.
6 outer joining arches
Fasten off.
Shawl Layout
Make:
137 motifs
Arrange:
Row 1 — 20
Row 2 — 19
Row 3 — 20
Row 4 — 19
Row 5 — 20
Row 6 — 19
Row 7 — 20
Join horizontal neighboring motifs at their left/right outer arches.
Offset alternating rows so every motif nests between the two motifs above it.
Join upper diagonal arches to the corresponding lower arches of the previous row.
Block thoroughly.
The finished shawl measures approximately 60–62 × 20–21 inches / 152–157 × 51–53 cm and features an all-over field of raised six-petal white flowers connected by delicate open chain mesh.