Introduction
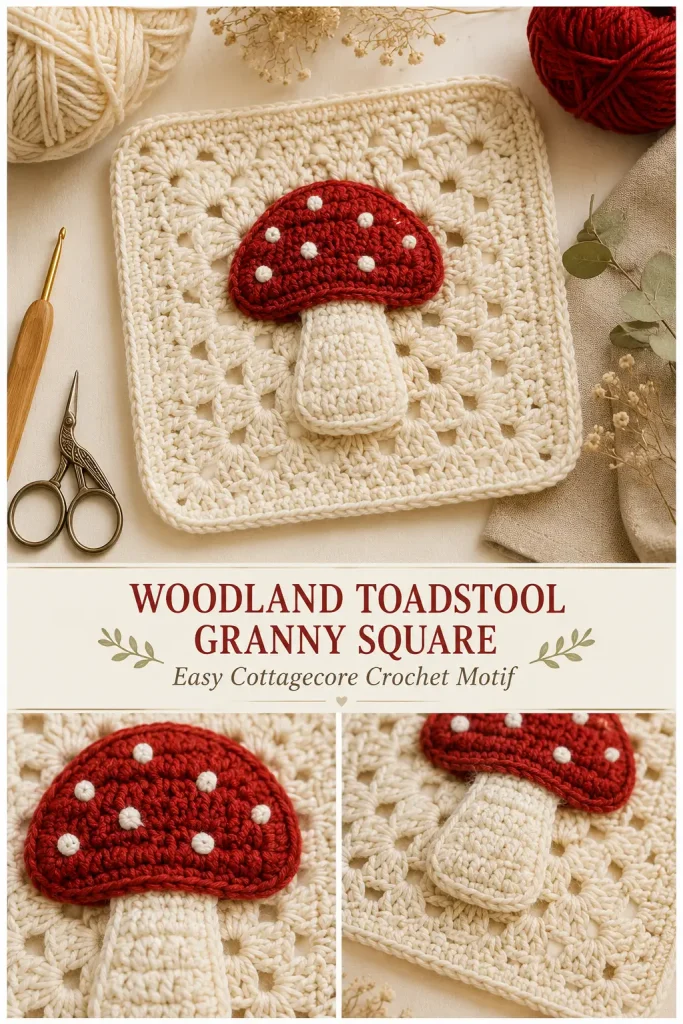
A mushroom granny square is such a sweet little crochet project for cozy blankets, cottagecore bags, fall pillows, nursery decor, and handmade patchwork pieces. The red mushroom cap, soft cream background, and tiny white spots give it that magical woodland feeling without making the square too complicated.
This Woodland Toadstool Granny Square is inspired by the visible idea of a mushroom appliqué sewn onto a granny square background. The linked pattern page also uses a mushroom appliqué attached to a solid granny square, but this version is written as a new original design with fresh stitch counts, shaping, appliqué construction, square base, edging, and finishing details.
The finished square has a warm cream base, a red rounded mushroom cap, a soft ivory stem, small embroidered white dots, and a neat border so the motif is ready to join into a larger crochet project.
Description
This crochet granny square is made in two parts: a simple cream square base and a separate mushroom appliqué. The mushroom is shaped with a rounded red cap and a slightly curved ivory stem, then sewn to the center of the square.
The design is beginner-friendly for crocheters who know basic stitches and are comfortable sewing appliqués. You can use one square as a coaster or patch, or make several for blankets, tote bags, cardigans, cushion covers, table runners, and fall crochet decor.
The color palette is classic woodland: warm cream for the square, deep red for the mushroom cap, ivory for the stem and spots, and optional brown or burgundy for outlining.
Materials
- DK or worsted weight yarn in warm cream for the square
- DK or worsted weight yarn in deep red for the mushroom cap
- DK or worsted weight yarn in ivory or white for the stem and spots
- Optional small amount of burgundy yarn for cap outline
- 3.5 mm hook for DK yarn or 4.5 mm hook for worsted yarn
- Yarn needle
- Scissors
- Stitch markers
- Pins for assembly
Finished Size
Approximate finished size:
- DK yarn: 4 to 4.5 inches square
- Worsted yarn: 5 to 5.5 inches square
Your size may change depending on yarn, hook size, and tension.
Gauge
Gauge is not strict, but the square should lie flat.
If the square curls, use a slightly larger hook.
If the appliqué looks loose or floppy, use a slightly smaller hook for the mushroom pieces.
Abbreviations
- MR: magic ring
- ch: chain
- sc: single crochet
- hdc: half double crochet
- dc: double crochet
- tr: treble crochet
- inc: increase, 2 stitches in same stitch
- sl st: slip stitch
- st: stitch
- sts: stitches
- sp: space
- ch-sp: chain space
- FO: fasten off
Pattern Notes
This pattern is written in US crochet terms.
The square base is made first.
The mushroom cap and stem are made separately.
The appliqué is sewn to the square after all pieces are complete.
The white spots are embroidered after sewing the mushroom in place.
Block the square before sewing the appliqué if you want a cleaner finish.
Step-by-Step Instructions
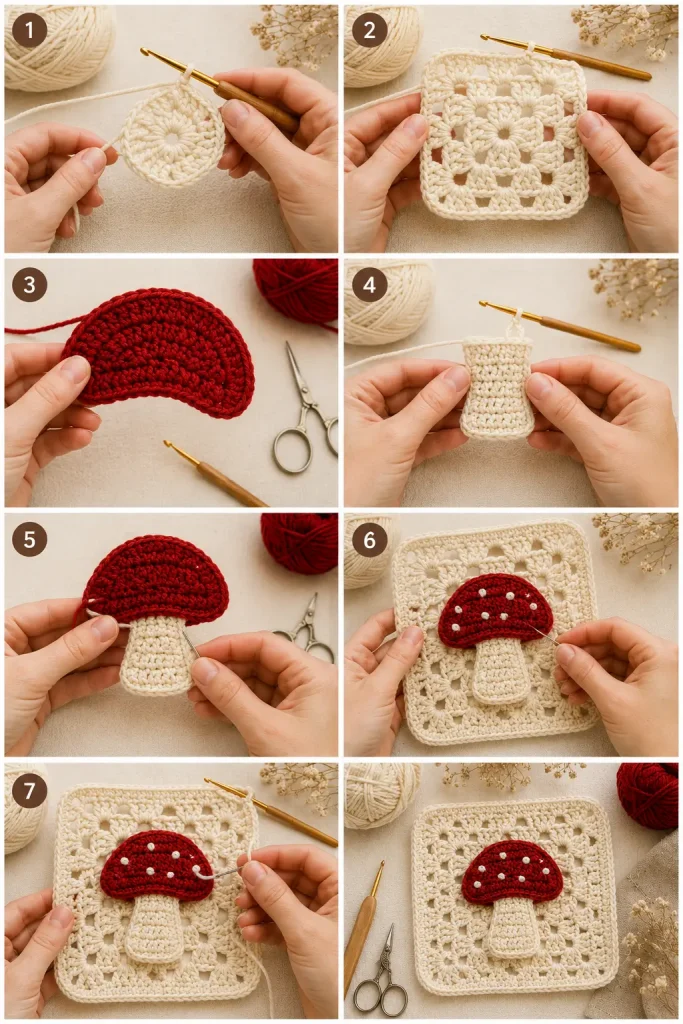
Cream Granny Square Base
Use warm cream yarn.
Round 1
Make a MR.
Ch 3. This counts as 1 dc.
Work 2 dc into the ring.
Ch 2.
Repeat 3 times: 3 dc into the ring, ch 2.
Join with sl st to top of beginning ch 3.
Pull the ring closed.
You should have 4 clusters and 4 corners.
Round 2
Sl st into the next corner ch-2 sp.
Ch 3.
Work 1 dc, ch 2, 2 dc in the same corner sp.
Dc in each stitch across the side.
In next corner, work: 2 dc, ch 2, 2 dc.
Repeat around.
Join with sl st to top of beginning ch 3.
Round 3
Sl st into the next corner ch-2 sp.
Ch 3.
Work 1 dc, ch 2, 2 dc in the same corner sp.
Dc in each stitch across the side.
In each corner, work: 2 dc, ch 2, 2 dc.
Join with sl st.
Round 4
Repeat Round 3.
Round 5
Ch 1.
Sc in each stitch around.
Work 3 sc in each corner ch-2 sp.
Join with sl st to first sc.
FO and weave in ends.
The base should be a neat cream square with softly rounded corners.
Mushroom Cap
Use deep red yarn.
This cap is worked flat in rows to create a rounded half-circle shape.
Row 1
Ch 9.
Dc in 4th ch from hook.
Dc in next 4 ch.
Work 5 dc in last ch.
Now work along the opposite side of the chain.
Dc in next 5 ch.
Ch 2, turn.
Row 2
Hdc in first 2 sts.
Dc in next 4 sts.
Work 2 dc in each of next 5 sts across the top curve.
Dc in next 4 sts.
Hdc in last 2 sts.
Ch 1, turn.
Row 3
Sc in first 3 sts.
Hdc in next 3 sts.
Dc in next 3 sts.
Work 2 dc in each of next 4 sts.
Dc in next 3 sts.
Hdc in next 3 sts.
Sc in last 3 sts.
FO, leaving a long tail for sewing.
The mushroom cap should look rounded on top and flatter along the bottom.
Cap Edge Outline
Optional, but it makes the mushroom look more polished.
Use burgundy or red yarn.
Join yarn at one lower corner of the cap.
Sl st evenly around the curved top edge only.
FO and weave in ends.
Do not pull too tightly, or the cap may curl.
Mushroom Stem
Use ivory or white yarn.
Row 1
Ch 6.
Sc in 2nd ch from hook and in each ch across. (5)
Ch 1, turn.
Row 2
Sc in each st across. (5)
Ch 1, turn.
Row 3
Sc2tog.
Sc in next st.
Sc2tog. (3)
Ch 1, turn.
Rows 4–6
Sc in each st across. (3)
Ch 1, turn after Rows 4 and 5.
Row 7
Work 2 sc in first st.
Sc in next st.
Work 2 sc in last st. (5)
FO, leaving a long tail for sewing.
The stem should be narrow in the middle and slightly wider at the top and bottom.
Stem Top Texture
This step creates the soft underside of the mushroom cap.
Use ivory yarn.
Join yarn to the top edge of the stem.
Ch 2.
Work 2 hdc in each stitch across the top edge of the stem.
FO and weave in end.
This gives the stem a soft flared top where it meets the cap.
Assemble the Mushroom
Place the red cap flat with the wrong side facing up.
Position the ivory stem behind the bottom center of the cap.
The flared top of the stem should tuck slightly under the red cap.
Sew the stem to the back of the cap first.
Turn the mushroom over and check the shape.
The stem should sit centered below the cap.
Attach Mushroom to Square
Place the cream square flat.
Center the mushroom appliqué on the square.
The mushroom cap should sit slightly above the middle of the square, and the stem should point toward the lower center.
Pin in place.
Using the long yarn tails, sew around the mushroom cap and stem.
Sew close to the outer edge of the appliqué.
Do not pull too tightly.
Weave ends into the back of the square.
White Mushroom Spots
Use ivory or white yarn and a yarn needle.
Add small embroidered spots to the red cap.
Make 7–9 spots in different sizes.
Suggested placement:
- 2 small spots near the top
- 3 spots across the middle
- 2–4 smaller spots near the sides
To make a spot, sew 3–4 short stitches in the same place until it looks like a small oval dot.
Keep the spots soft and rounded.
Optional Final Border
Use warm cream yarn.
Join yarn in any corner of the square.
Border Round
Ch 1.
Sc in each st around.
Work 3 sc in each corner.
Join with sl st.
FO and weave in ends.
This final round makes the square easier to join into blankets or bags.
Finishing
Weave in all yarn tails.
Gently shape the mushroom cap.
Smooth the square corners.
Lightly steam-block if your yarn allows it.
Do not press the mushroom appliqué completely flat if you want it to stay slightly raised.
Let the square dry fully before joining with other squares.
Tips & Variations
Use deep red for a classic toadstool look.
Use rust orange for a fall mushroom square.
Use tan or brown for a woodland mushroom.
Use cream for the square base so the mushroom stands out clearly.
Use green for the square base if you want a forest floor effect.
Make several squares with different mushroom colors for a cottagecore blanket.
Add tiny embroidered grass stitches under the mushroom stem for extra detail.
For a softer baby blanket version, embroider the spots instead of using buttons or beads.
For bags or garments, sew the mushroom appliqué firmly around all edges.
FAQ
Is this mushroom granny square beginner-friendly?
Yes. The square base is simple, and the mushroom appliqué uses basic stitches. The most careful part is sewing the mushroom neatly to the center.
Is this the exact pattern from the linked page?
No. The linked page has its own free pattern and video. This version is an original mushroom granny square with different stitch counts, cap shaping, stem construction, assembly, and finishing. (Granny Square)
Can I use this square for a blanket?
Yes. Make multiple squares in the same size and join them with single crochet, slip stitch, or whip stitch.
What yarn works best?
Cotton yarn gives the cleanest stitch definition. Acrylic yarn also works well for blankets and softer projects.
Can I make the mushroom bigger?
Yes. Use thicker yarn and a larger hook, or add one extra row to the cap before sewing it to the square.
Conclusion
The Woodland Toadstool Granny Square is a cozy, playful crochet motif that works beautifully for fall projects, cottagecore blankets, bags, pillows, and handmade gifts. The cream square, red mushroom cap, ivory stem, and embroidered white spots create a classic mushroom look while keeping the pattern simple and buildable.
Make one as a patch or coaster, or crochet a full stack for a magical woodland blanket.



