Blue Lagoon Whale Amigurumi Crochet Pattern
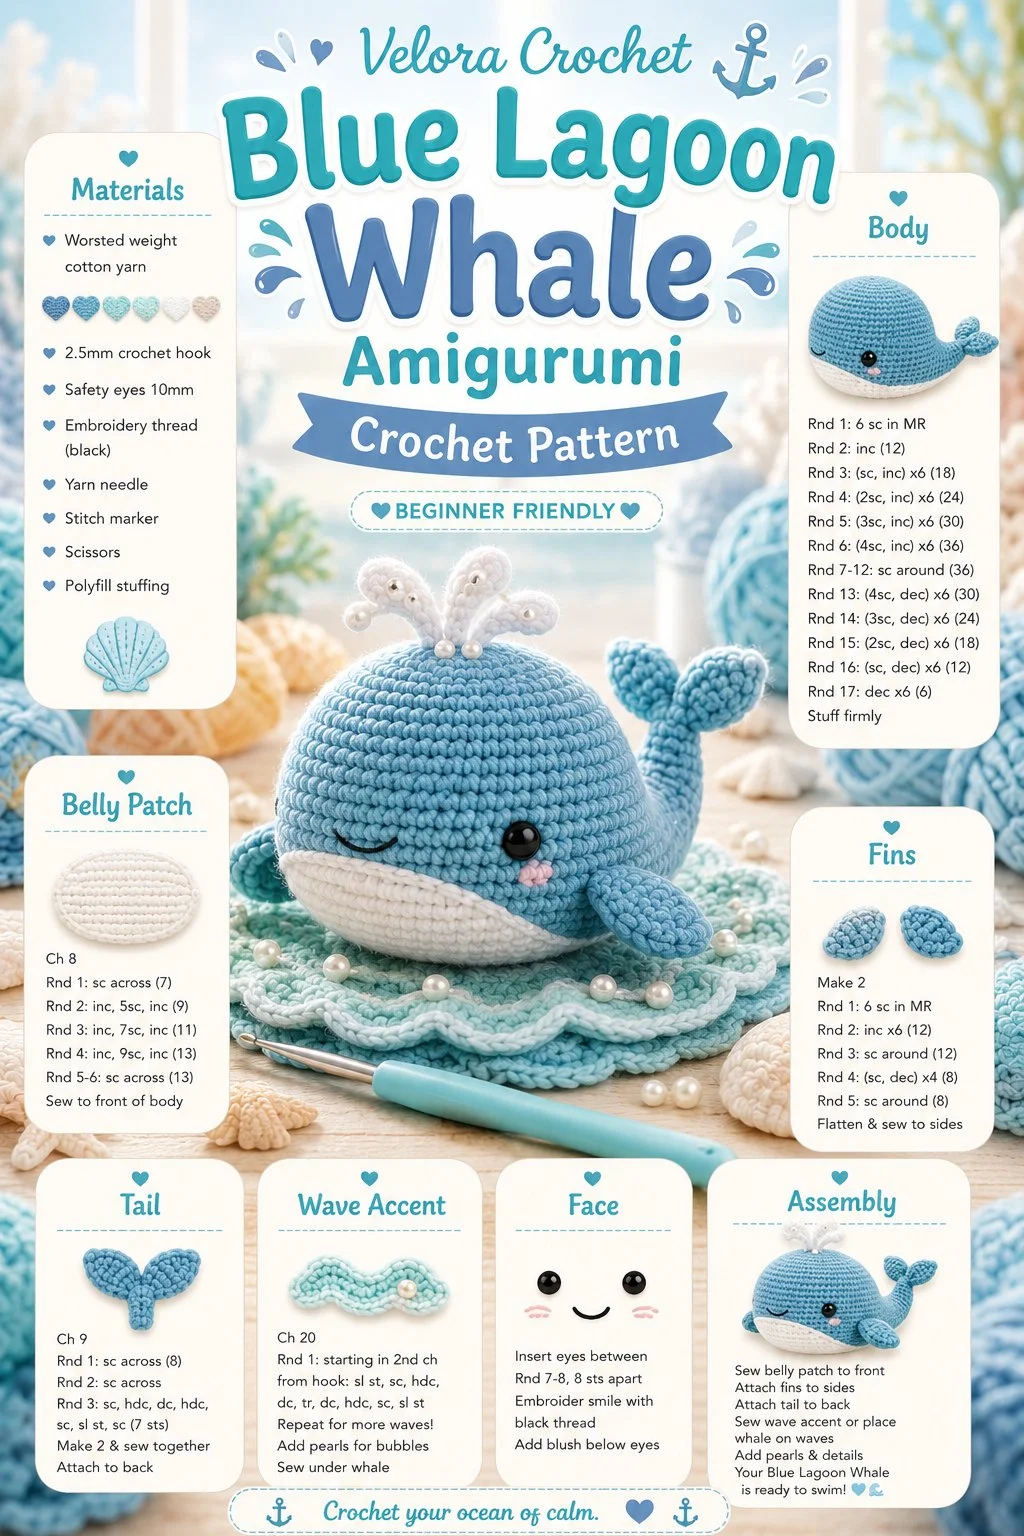
Creating adorable crochet projects is a delightful way to celebrate creativity and craftsmanship. One of the most charming creations you can make is a blue lagoon whale plush that brings a touch of the ocean into your home. Its serene design features a rounded body, side fins, a tail fin, a soft white belly, and a tiny smile—perfect for summer décor or as a thoughtful gift. Below, I’ll guide you through the materials you’ll need, detailed instructions, and some practical tips to achieve the best results.
Materials
- Blue yarn (medium weight)
- White yarn (for the belly)
- Black yarn (for the smile)
- Crochet hook (size G/4.0mm)
- Yarn needle
- Stuffing
- Stitch marker (optional)
Abbreviations
- MR: magic ring
- ch: chain
- sc: single crochet
- hdc: half double crochet
- dc: double crochet
- inc: increase
- dec: decrease
- sl st: slip stitch
Instructions
Body
- Start with the Body: Begin with a magic ring (MR) and work 6 sc into the ring. Pull the ring tight.
- Increase: Continue working in rounds, increasing until you have 24 stitches. This will give you a rounded whale body shape.
- Body Length: For approximately 10 rounds, work even in sc until you reach your desired body length, maintaining the 24 stitches throughout.
Belly Patch
- Creating the Belly: Using white yarn, make a separate piece by starting with 6 sc in a MR and increasing to 12 stitches, repeating the process until you achieve the desired shape for the belly.
- Attaching the Belly: Seam this patch securely onto the underbelly of the whale using a whip stitch.
Fins
- Side Fins: Using blue yarn, create 2 identical side fins by starting with a ch of 8, then working back to form a small triangle shape. Use sc and hdc for shaping.
- Attach the Fins: Sew the fins onto the body of the whale at desired positions.
Tail
- Crochet the Tail Fin: Begin with 4 ch and work 3 sc into the last chain for a small triangular tail shape.
- Attaching Tail: Securely sew onto the rear of the whale.
Wave Accent
- Creating Wave Details: Using white yarn, create small wave shapes or pearls by chaining and working sc back and forth to form delicate accents.
- Attach Waves: Place these accents randomly along the body to enhance the ocean-inspired look.
Face Details
- Adding the Face: Using black yarn, create a simple smile via embroidery or sc for the mouth.
- Optional Eyes: Add small stitches for eyes if desired.
Stuffing
Before closing the whale, stuff it firmly. Be careful not to overstuff, as this can distort the shape—it’s often best to check as you go.
Assembly
- Final Assembly: Ensure all pieces are attached securely. Use a needle and yarn to go over any seams necessary for additional reinforcement.
- Finishing Touches: Weave in all ends and give your whale a gentle press to even out the shape.
Tips for the Best Result
- Stuffing: Make sure you don’t overstuff to retain the soft appearance of the whale.
- Shaping: Use stitch markers in your rounds to keep your stitches organized, especially when working in continuous rounds.
- Facial Details: Take your time with the face; simple details can bring your whale to life.
Creating this blue lagoon whale adds a sweet, homemade touch to summer decor. And if you’re looking for more creative patterns, check out this blue crochet whale amigurumi pattern. It’s an ideal project that can be cherished for years to come, whether it’s for yourself or as a meaningful gift!